Yippee! You’ve finally found the theme of your dreams. To celebrate, you activate the theme on your French website, then start browsing it. But then, you’re in shock.
A good old-fashioned “Leave a comment ” appears in the comments area. From there, a nice “Search” appears in the search bar.

English on a French site? That’s a no-go for you. But don’t worry, I’ve got a solution for this problem: the Loco Translate plugin.
Thanks to this tool, you’ll be able to translate all the texts contained in your themes and plugins into the language of your choice. And the best part is that it won’t even make you loco.
Want to know more? Let’s get going on a detailed usage tutorial of this must-have plugin.
Overview
What is Loco Translate?
Loco Translate is a free WordPress plugin that allows you to edit the translation files of your themes and plugins directly on the WordPress administration interface, without coding.
Using this plugin, you’ll be able to translate the small texts in foreign languages that sometimes appear on your screen after activation.
Though the language of Shakespeare is still the most-used by developers, there are some plugins that are only available in a foreign language, or there may be situations in which you want to create a site that’s not in English.
How does Loco Translate work?
As you will see, Loco Translate is a very efficient plugin that has a unique way of working. As detailed in its documentation, it has multiple features, but it can’t do everything in terms of translation.
Loco Translate is a PO file editor
First of all, the plugin designed and developed by Tim Whitlock is primarily a PO file editor. These are the files that allow you to translate WordPress.
To understand this concept, let’s have a quick look at WordPress translation:
- The texts displayed in your theme and plugins are included in text files with the extensions
.poand.mo. However, an extension may not provide any.poor.pot. In this case, the strings (texts) contained in the source code are displayed (by default in English in 99% of the cases).
Often, plugins and themes do not provide translation files (.po) for English, because the strings in the source code are in English. - PO stands for Portable Object. This human-readable file contains the original texts and translations of the theme or plugin. This file contains only one locale (language, in WordPress jargon) because one
.potranslation file is needed per locale. - MO stands for Machine Object. The
.mofile has the same content as the.pofile. However, it is machine-readable, not human-readable. - Your WordPress site can also have a POT (Portable Object Template) file, rather than a PO file. As this site states, “
POandPOTfiles are essentially the same. The difference is in the intended use. This is why the two files have different extensions (.potand.po).”
Concretely, the POT file contains the list of strings extracted from the source code with a reference to the source code. The PO file contains the list of strings extracted from the source code with a reference to the source code AND the translation in a certain locale.
Translation files are usually located in a folder called
languages/, inside the folder where your theme is located. Sometimes they are also located directly in your theme folder, or inwp-content > languages > themes.
If the theme or plugin is premium, it will often embed its own translations in the theme or plugin folder, either in the root of your site, or in the languages/ folder, if the convention is respected.
If it came from the official WordPress directory, it will only embed a POT file. The PO and MO files will be downloaded directly from translate.wordpress.org, and placed in wp-content/languages/themes or /plugins.
As a name, they will carry the code corresponding to the language of the theme (WordPress calls this a “locale”). For example, en_US.po if your theme is in American English, or en_GB.po if it’s in British English:

Loco Translate does not translate dynamic content
Second, Loco Translate can only translate “static” content, i.e. content contained in your theme, plugins, and WordPress Core.
It cannot translate dynamic content, which is content that you have created yourself (e.g., text in your posts and pages) and stored in your database.
If you want to translate your site and make WordPress multilingual (offer different versions of its content in different languages), choose a multilingual plugin like Polylang, WPML, or Weglot instead. Loco Translate isn’t designed for that.
To learn more about the differences between Loco Translate and WPML, check out this comparison.
Although it offers integration with machine translation services like DeepL, Google Translate, Lecto AI, and Microsoft Translator, Loco Translate says that “this is a secondary feature designed to ease your workflow. If you need a plugin that magically translates your website then this is not the plugin you are looking for.”
If you want to take advantage of these services, here are the steps to follow to set up each of them.
If you are interested in automatic translation, there is a plugin on the official directory called Automatic Translate Addon for Loco Translate. Its advantage is that it doesn’t require you to subscribe to an API key and doesn’t impose any limits on the number of strings to translate. Its free version offers integration with the Yandex search engine translation widget.
If you want to access Google Translate or DeepL Doc, you will have to use the premium version (from $29 for use on one site). Whichever version of this addon you choose, you must first activate Loco Translate on your administration interface, of course.

Also note that the TranslateX for Loco Translate plugin allows you to connect Loco Translate to the TranslateX (GTranslate) automatic translation service API to translate your site automatically.
The plugin sends the original text strings you choose to translate each time a translation request is sent by Loco Translate.
The translation process is done directly in WordPress
Loco Translate is a super convenient WordPress translation plugin because it’s used directly in your admin interface. No code knowledge is required and you don’t have to get your hands dirty to use it.
This is a real plus in terms of getting started and a valuable advantage over one of its main competitors: Poedit. Poedit is a third-party tool, which means you have to leave WordPress to use it.
Moreover, it requires you to handle translation files, possibly an FTP client, and to navigate between folders in your WordPress installation, which can be laborious.
Loco Translate cannot translate all themes and plugins
Finally, Loco Translate doesn’t have all the answers! Unfortunately, it can’t translate all the themes and plugins in the ecosystem.
I reassure you, it’s not due to laziness. It’s just because your theme or plugin must have a translation capability implemented by its developer.
To do this, the developer must set up an “internationalization” process (abbreviated to i18n, in WordPress lingo).
This allows the theme or plugin to be translated into any language, and involves adding pieces of code and creating a POT file.
Technically, the developer must use GetText compatible functions to display the strings, and load the translations automatically if they exist.
Once internationalization has been implemented, “localization” (abbreviated as l10n) can be performed. This is “the process by which the text on the page and other settings are translated and adapted to another language and culture”, the WordPress documentation details.
However, localization (basically, translation) is not necessarily the developer’s responsibility. In fact, a theme or plugin can be translated by contributors.
Once the internationalization and localization have been done, you can translate your theme and plugin. Don’t worry: most of the popular themes and plugins in the official directory offer this option.
In principle, you shouldn’t have too much trouble with this. Now let’s find out how Loco Translate works.
Loco Translate installation and menus
How to install Loco Translate
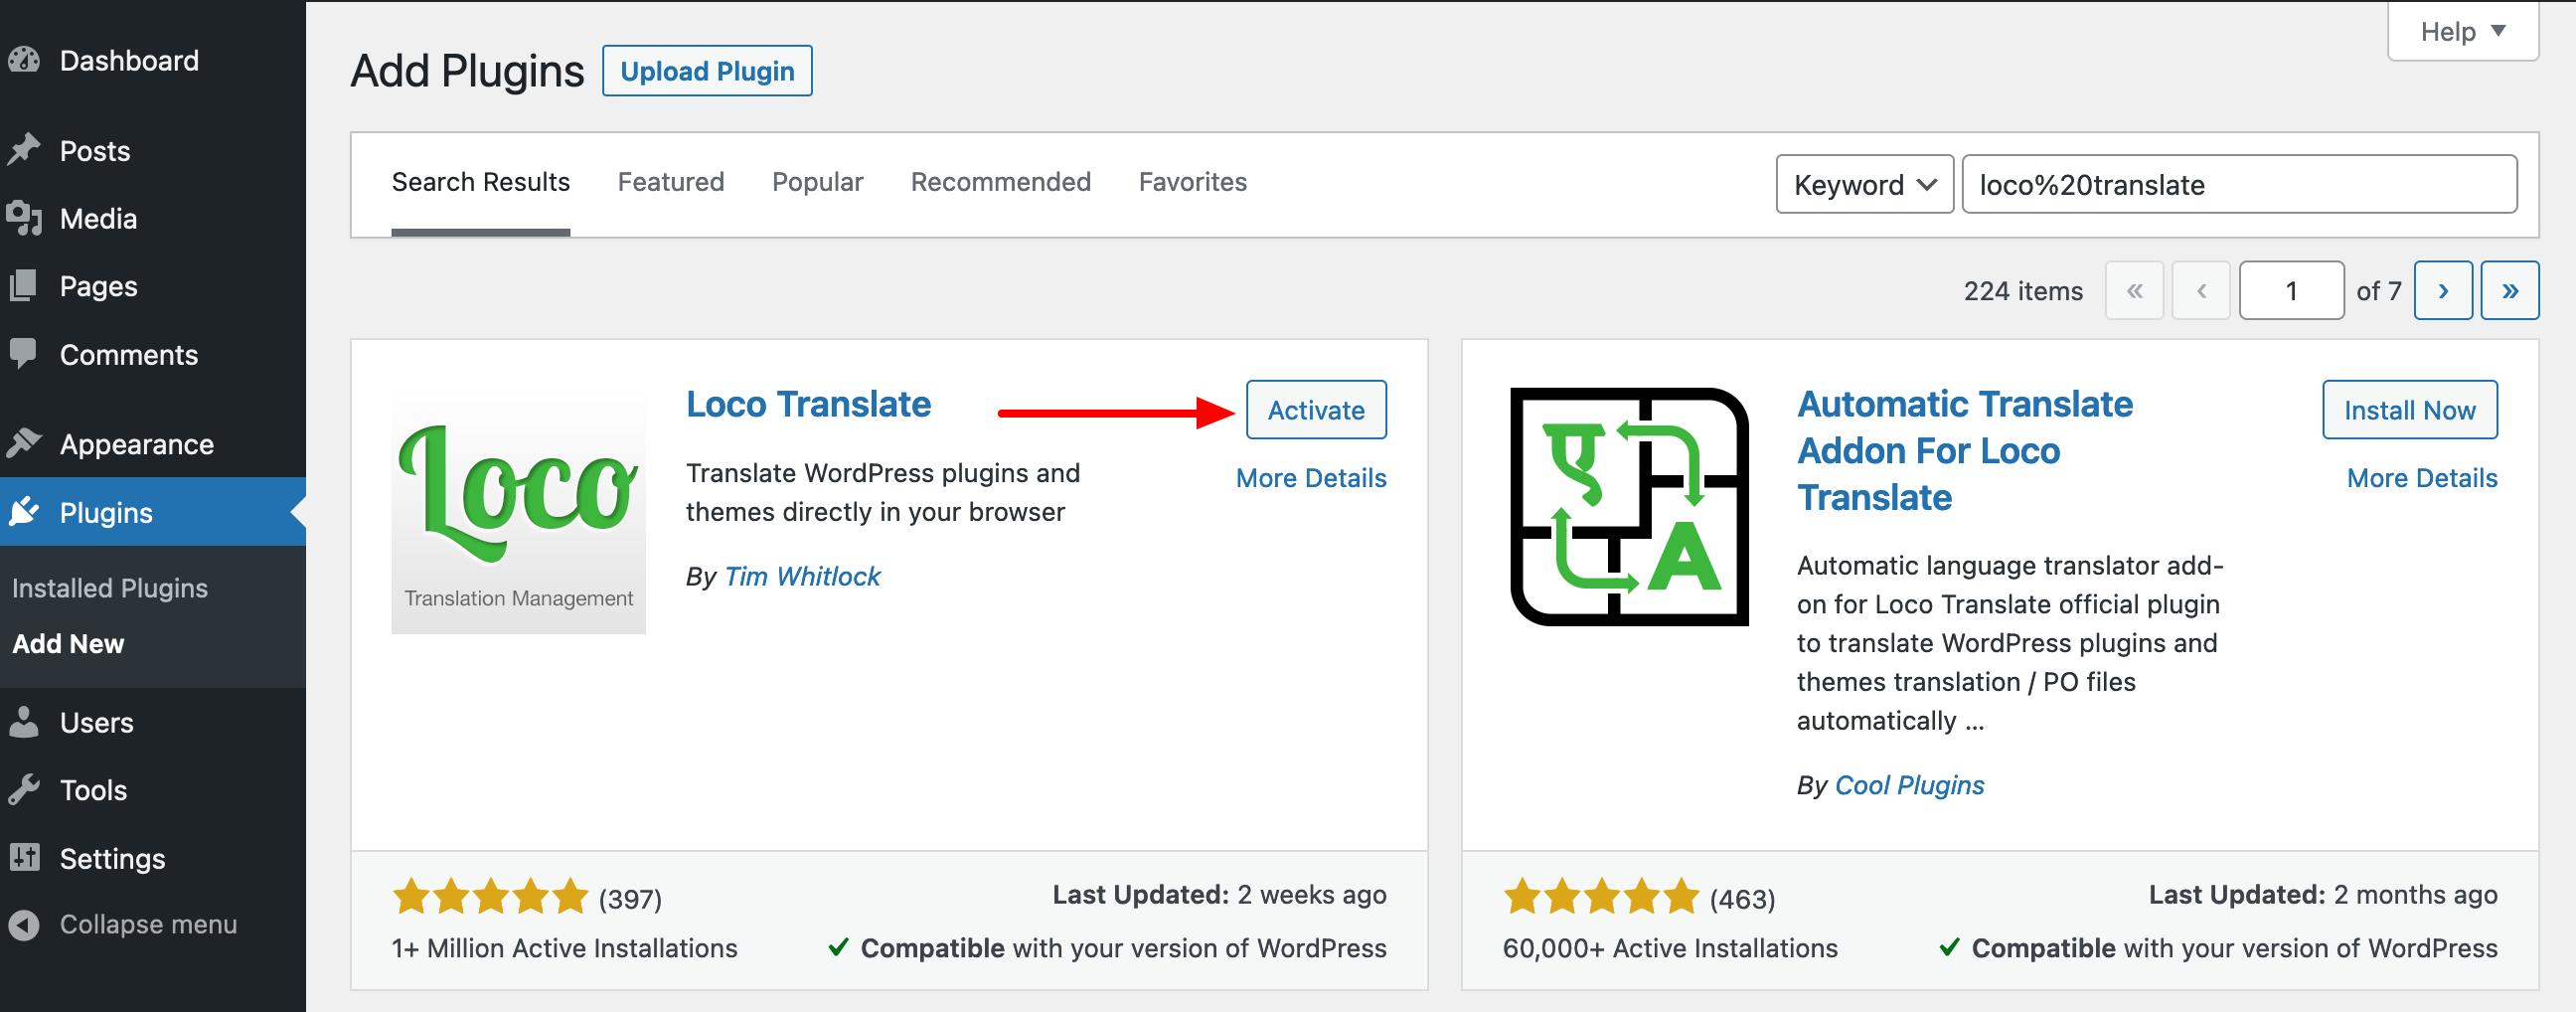
Installing the plugin is very simple: search “Loco Translate” in Plugins > Add New on your WordPress administration interface, and click “Add.”
Once that’s done, don’t forget to activate Loco Translate by clicking on the corresponding button:
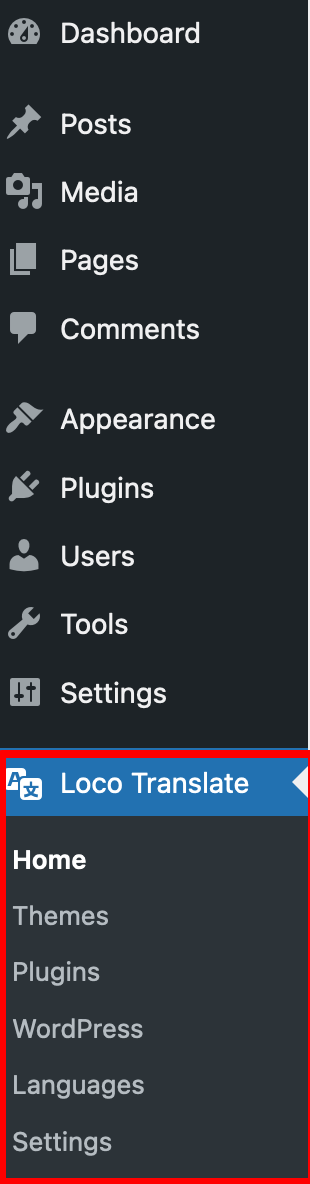
Immediately, you will notice a new menu called “Loco Translate” on the left sidebar:
What menus does the plugin offer?
The Loco Translate interface is clear and uncluttered. The plugin is very easy to use and you can quickly understand where and how to perform certain actions.
To summarize, here are the options available to you:
- “Home” details the language of your site and lists your active theme and plugins.
- “Themes” lists the themes installed on your WordPress site. This is where you can translate them (same for plugins).
- “Plugins” lists all the plugins installed on your site.
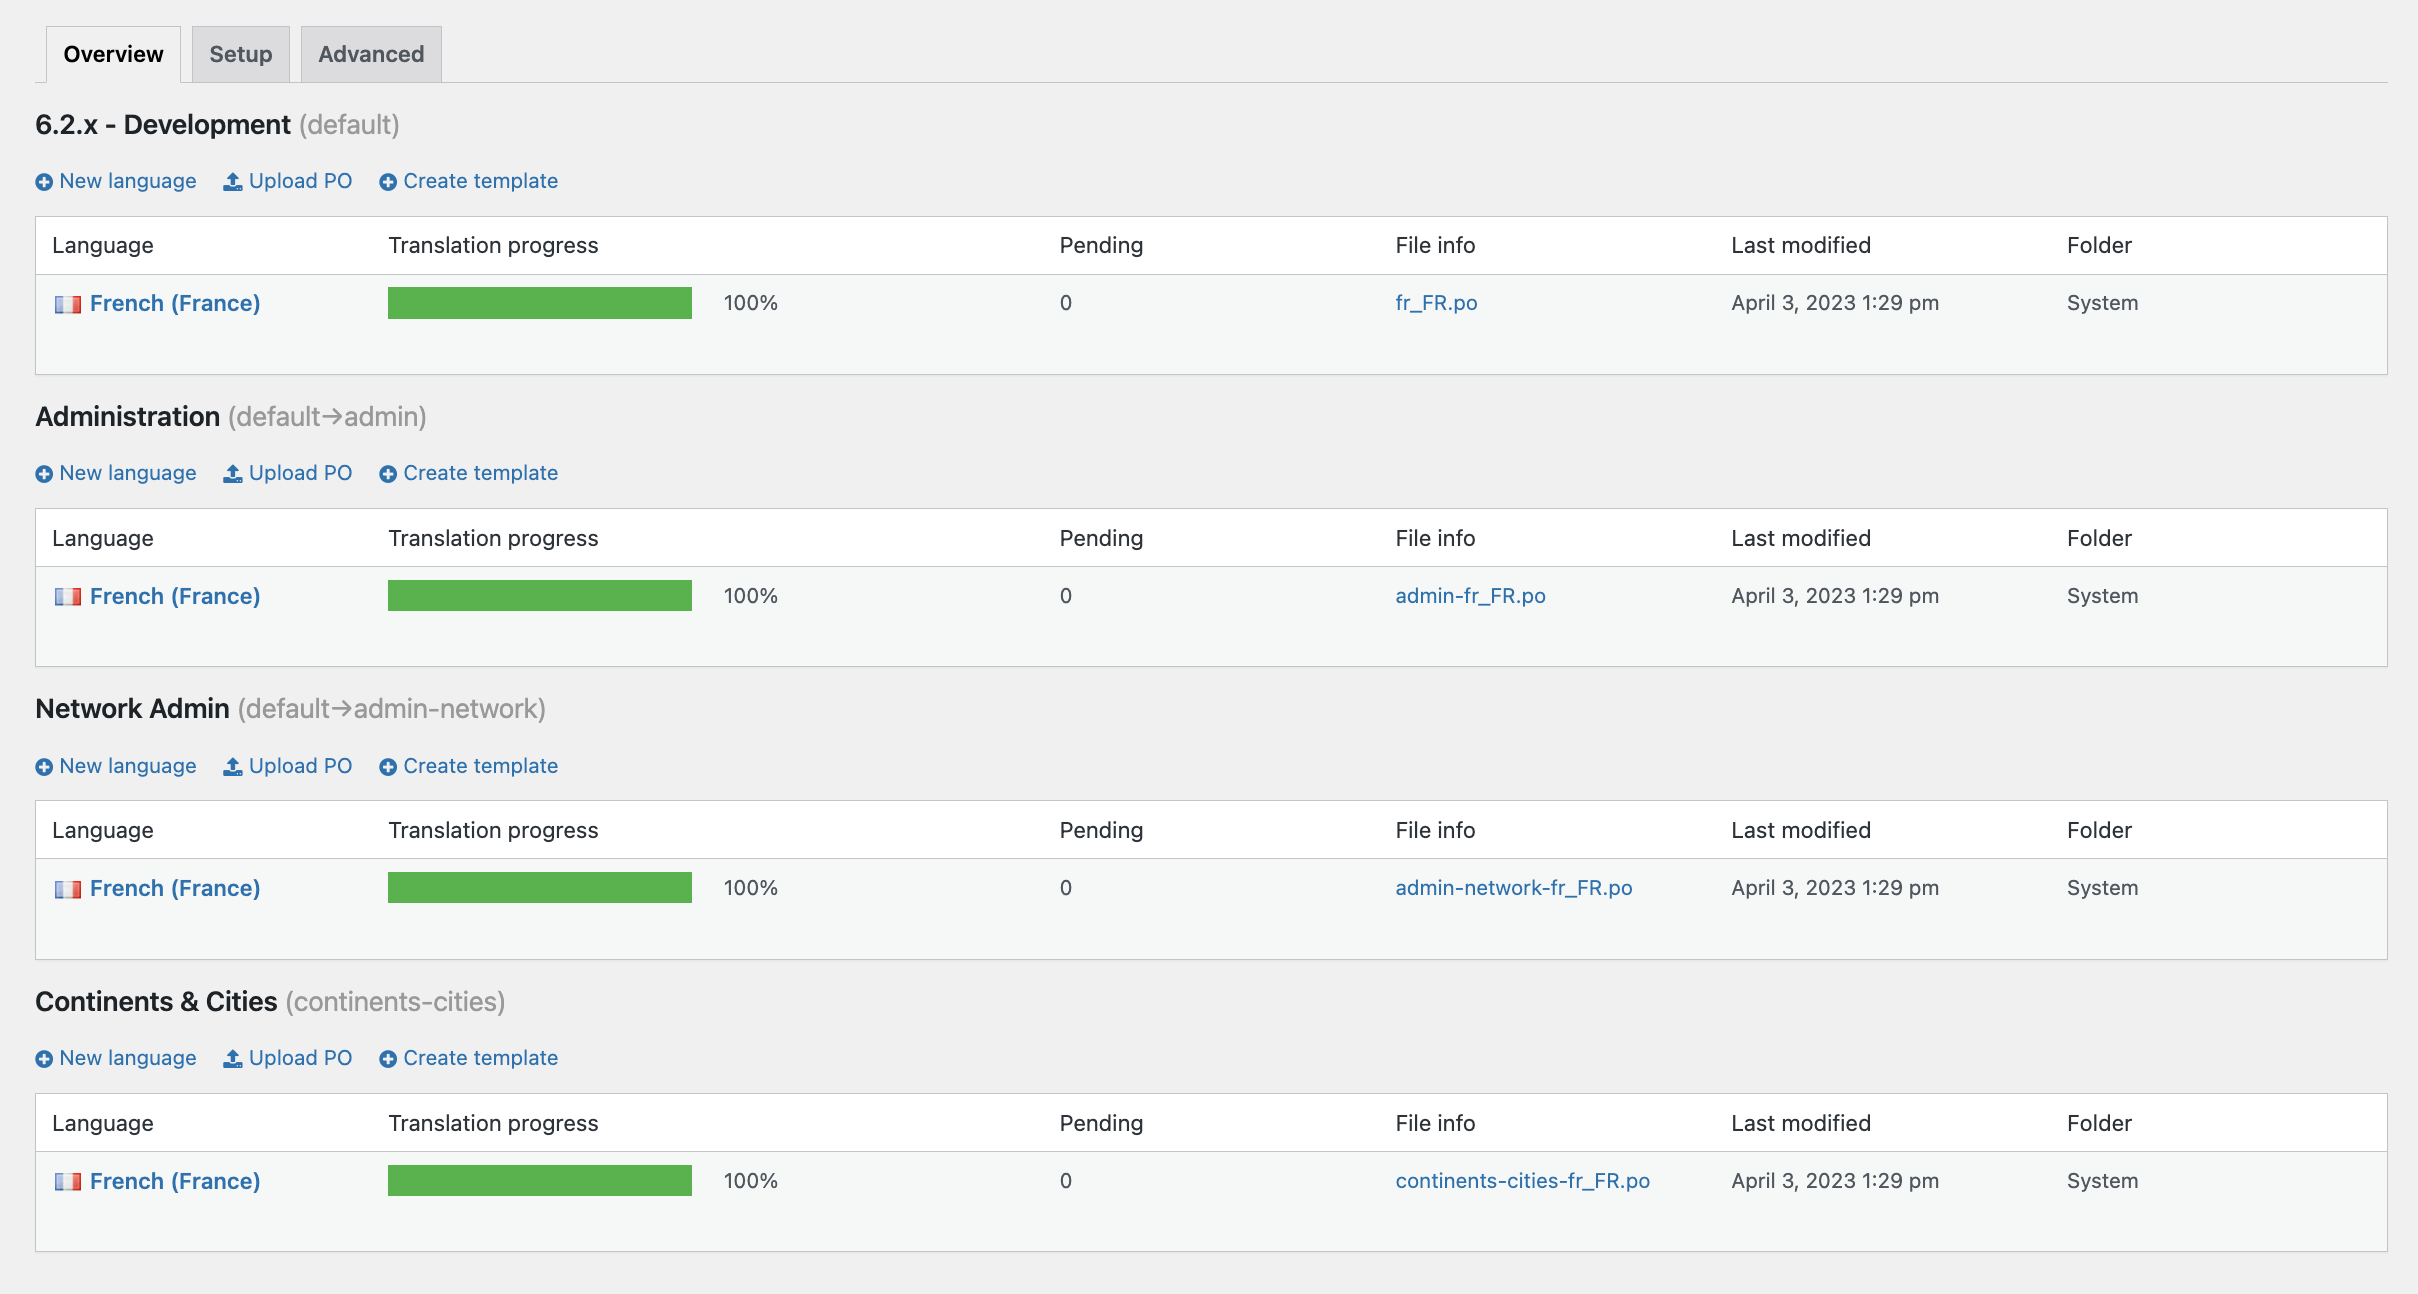
- “WordPress” shows the status of the translation of the WordPress Core. On a fresh installation, you can see below that the French translation is impeccable: there is nothing to do (the bar is green and at 100%):
- “Languages” details the languages installed on your site.
- “Settings” provides additional customization options. For example, this is where you can add API keys for third-party machine translation services. By default, the settings are effective, but you can always take a look at them to best suit your needs.
Without further ado, let’s move on to how the Loco Translate editor works. You will learn step by step how to translate a theme.
How to translate a theme step by step with Loco Translate
By default, the default themes that WordPress includes in every new installation are 100% translated. So you won’t have to do any work on Twenty Twenty-Two or Twenty Twenty-Three themes, for example, unless you want to modify some of the proposed translations.
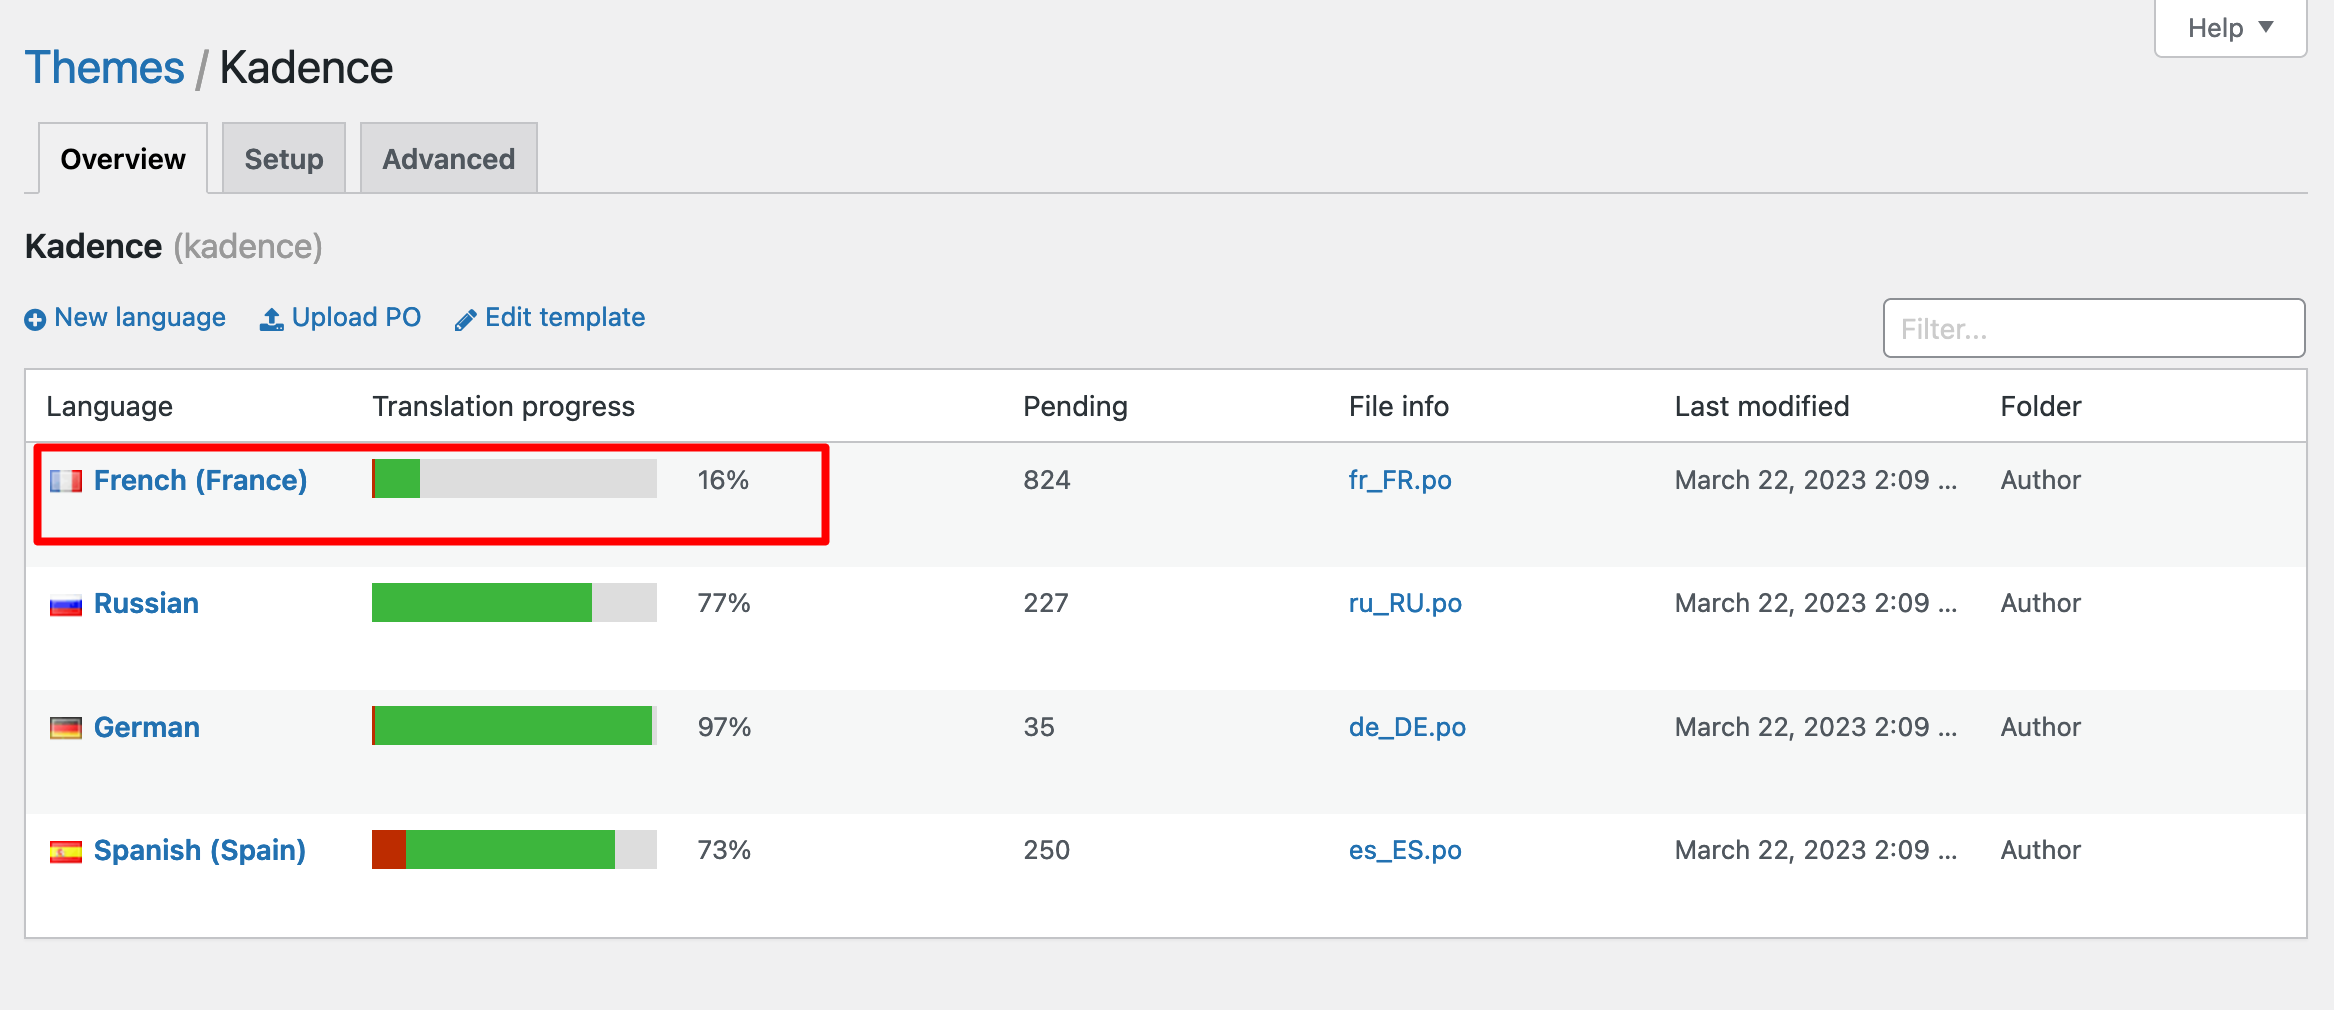
For the purpose of this test, we will focus on a free theme whose translation in French is incomplete: Kadence. When I installed it, I was told that the translation was “only” 16% complete:
Step 1: Choose your theme from the list proposed by Loco Translate
To start, select the theme you want to translate from the list of themes provided by Loco Translate. To do so, click on Loco Translate > Themes, and then choose the theme of your choice (Kadence, for this test).

By default, Loco Translate displays both the active theme on your site, as well as those that are only installed.
However, you can still translate themes that are not active, and then activate them when you are done. All your changes will also be automatically applied to the front-end of your site.
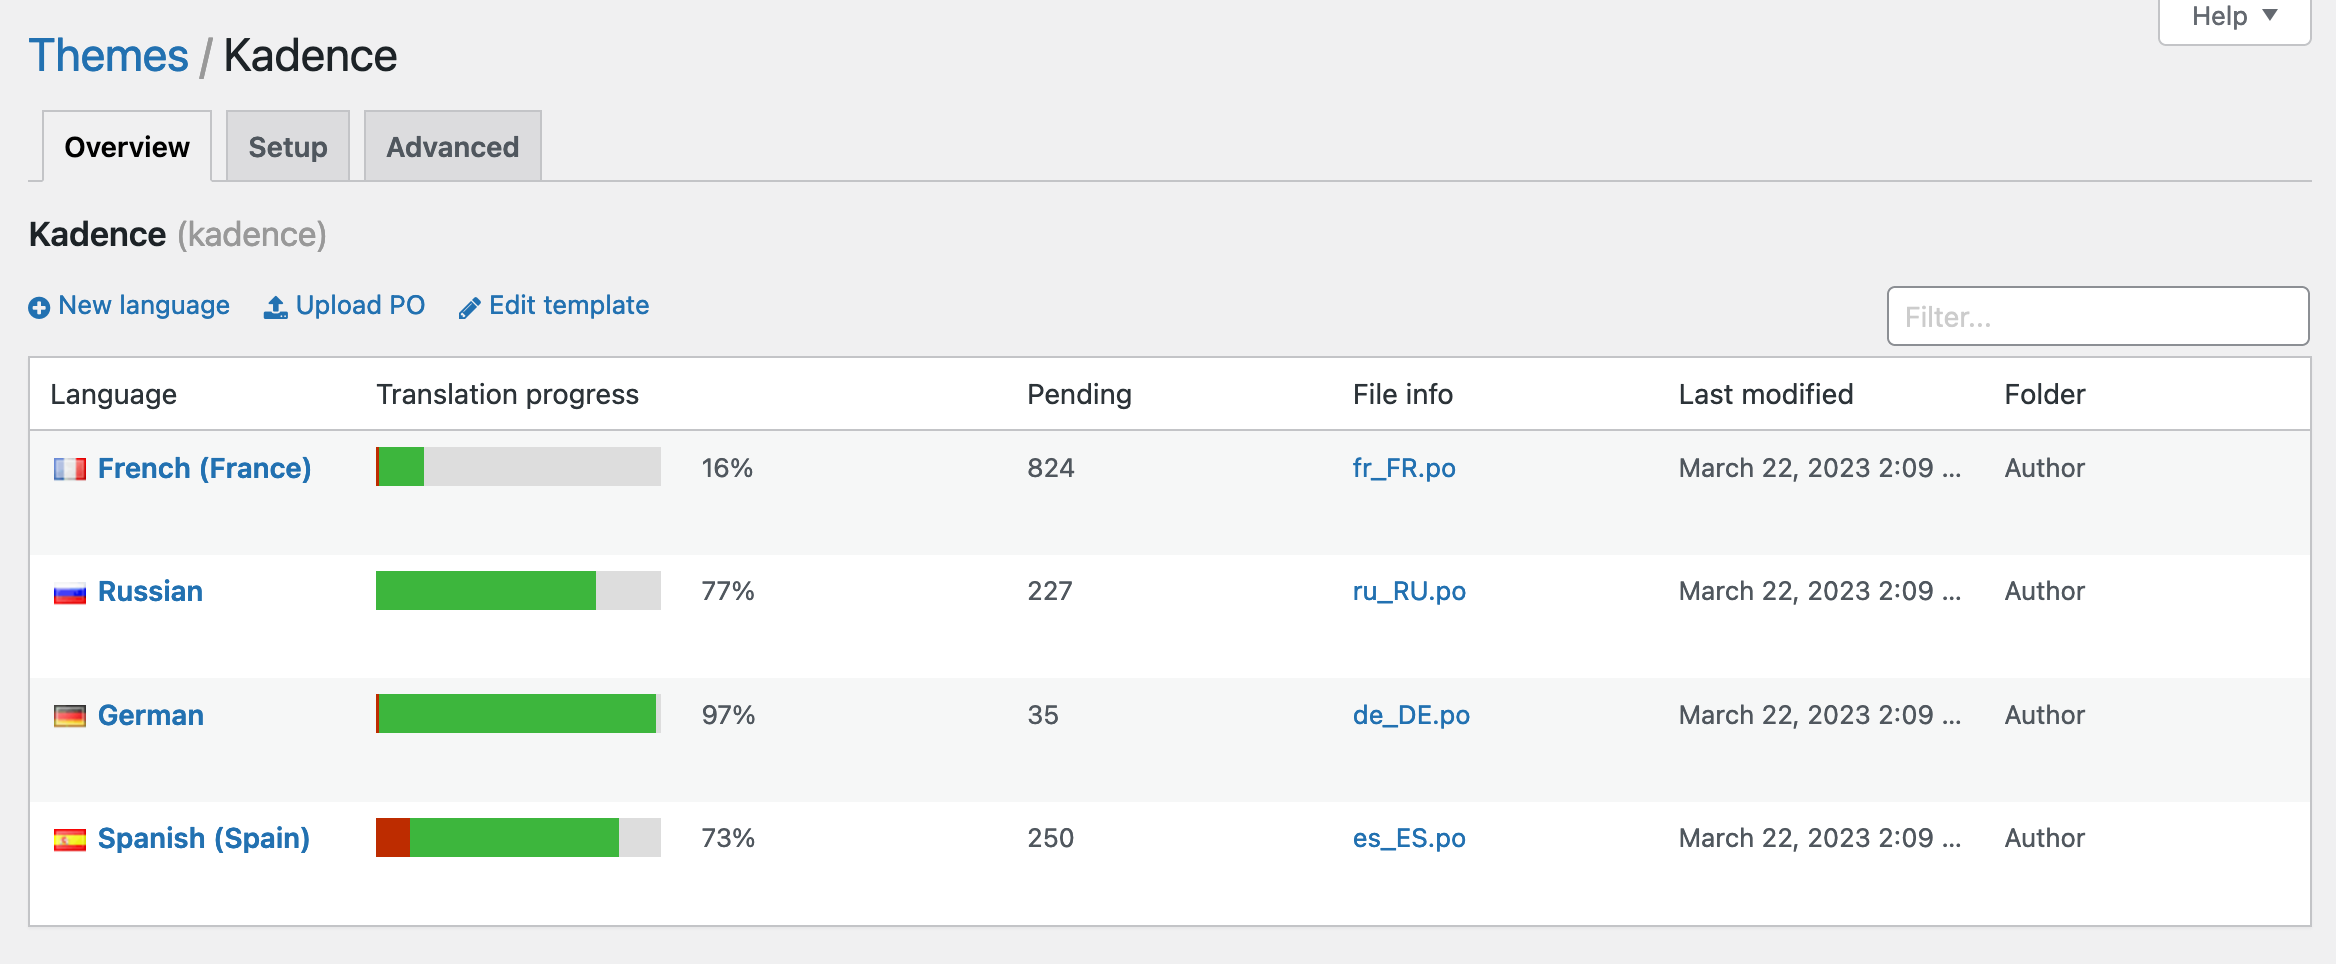
Below, you can see that the theme already offers incomplete translations in four languages:
- French
- Russian
- German
- Spanish
This means that the Kadence theme does contain .po files. It is therefore editable and translatable.
For your information, you can find these files in the following directory of your site (accessible from an FTP or an interface like cPanel): wp-content/themes/kadence/languages:
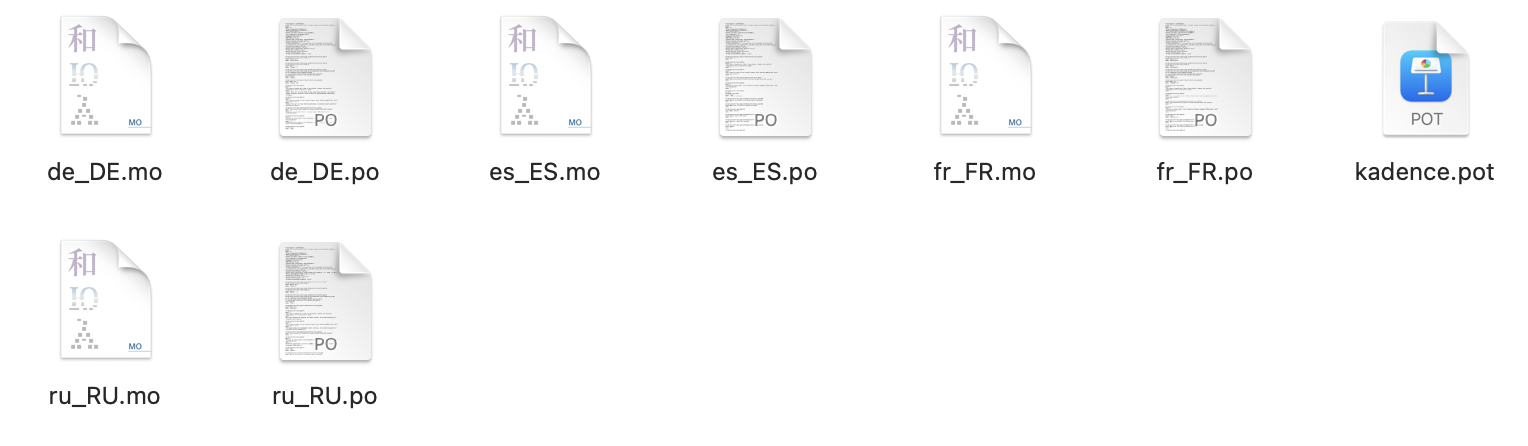
Each language has its own .po and .mo file. For example, fr_FR.po is the French translation of the theme, while es_ES.po is the Spanish translation.
Are you using a child theme? In this case, you may wonder whether it’s better to translate the child theme (Loco Translate is able to do this), rather than its parent theme.
On this topic, Loco Translate says the following: “If you need to replace some existing strings in the parent theme, you should translate the parent theme and leave the child theme alone”.
Step 2: Add or choose a new language
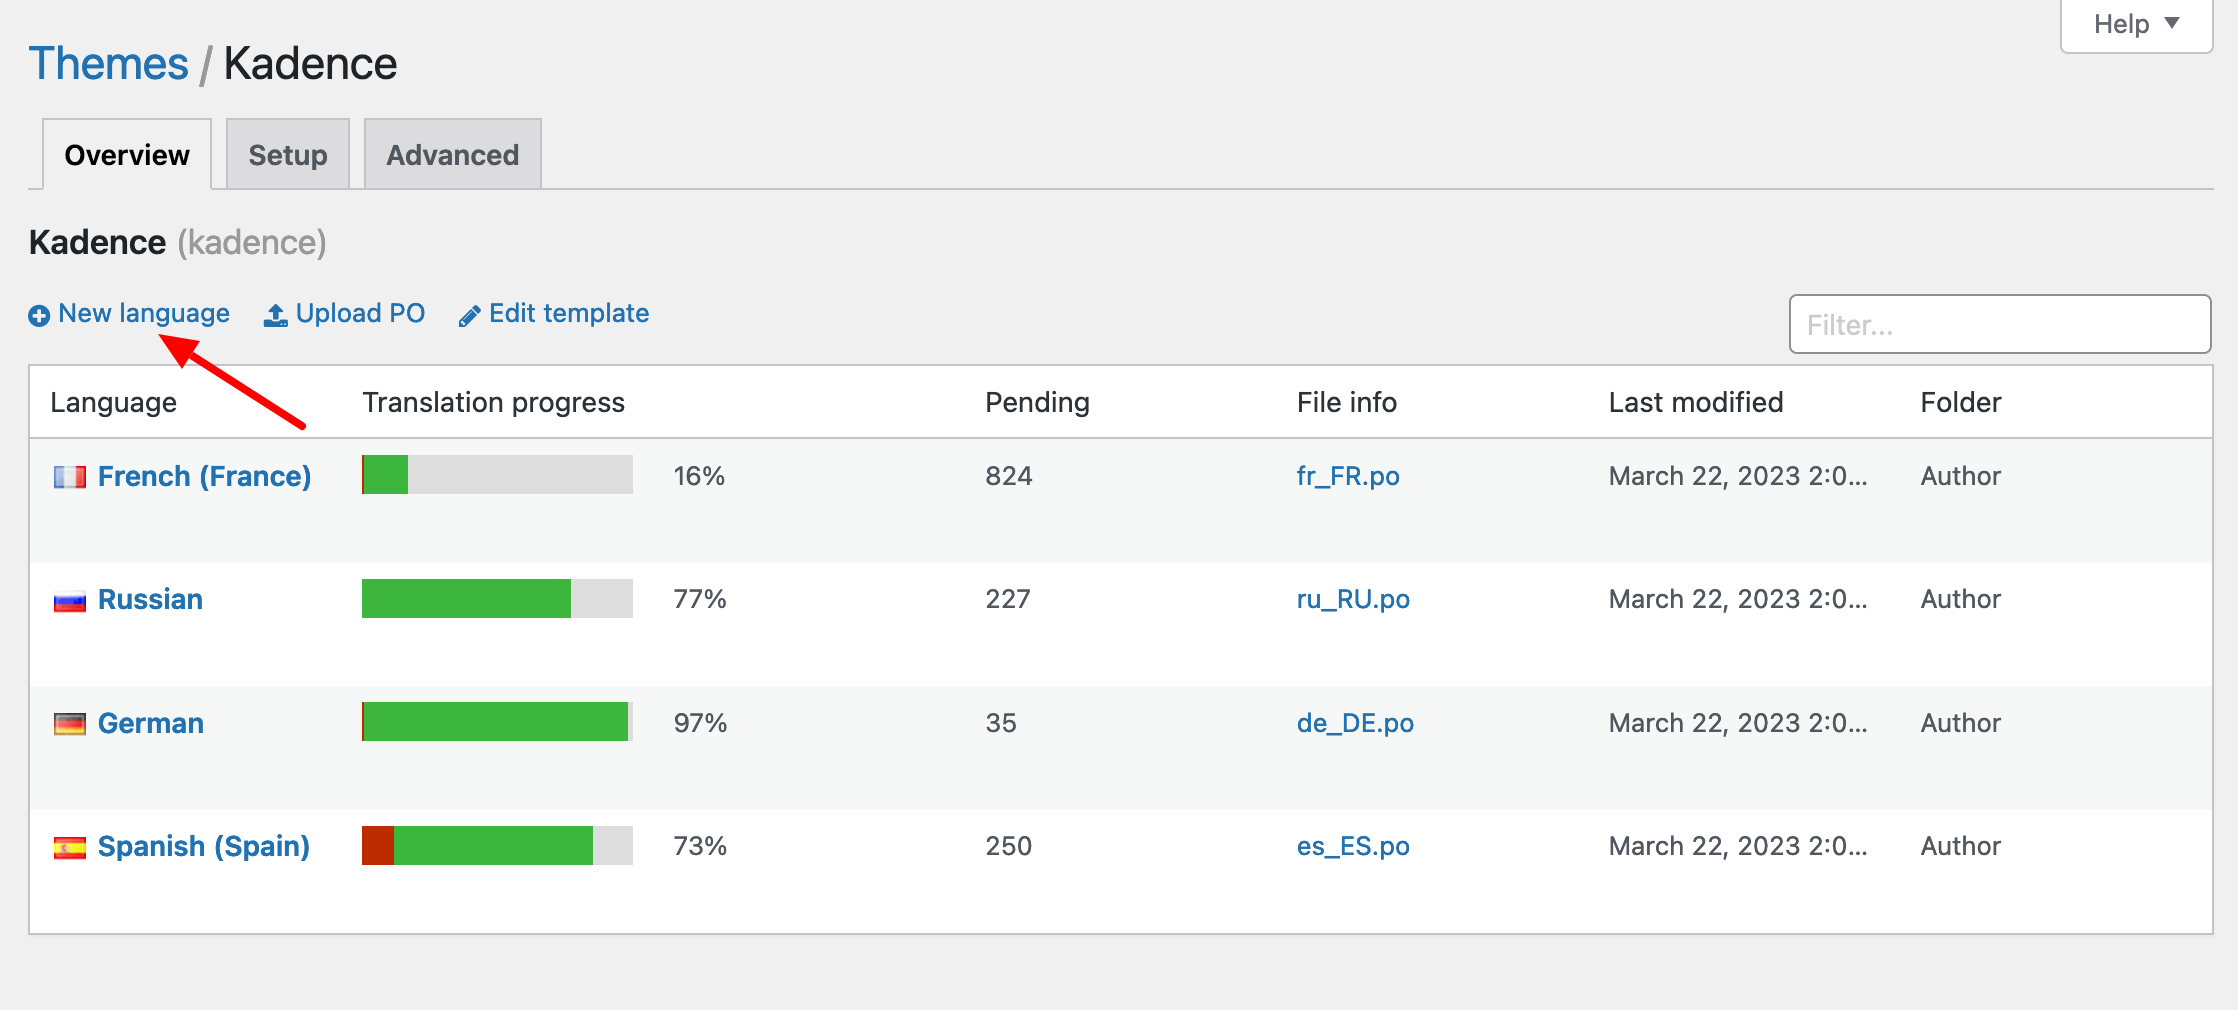
Case 1: No language is detected
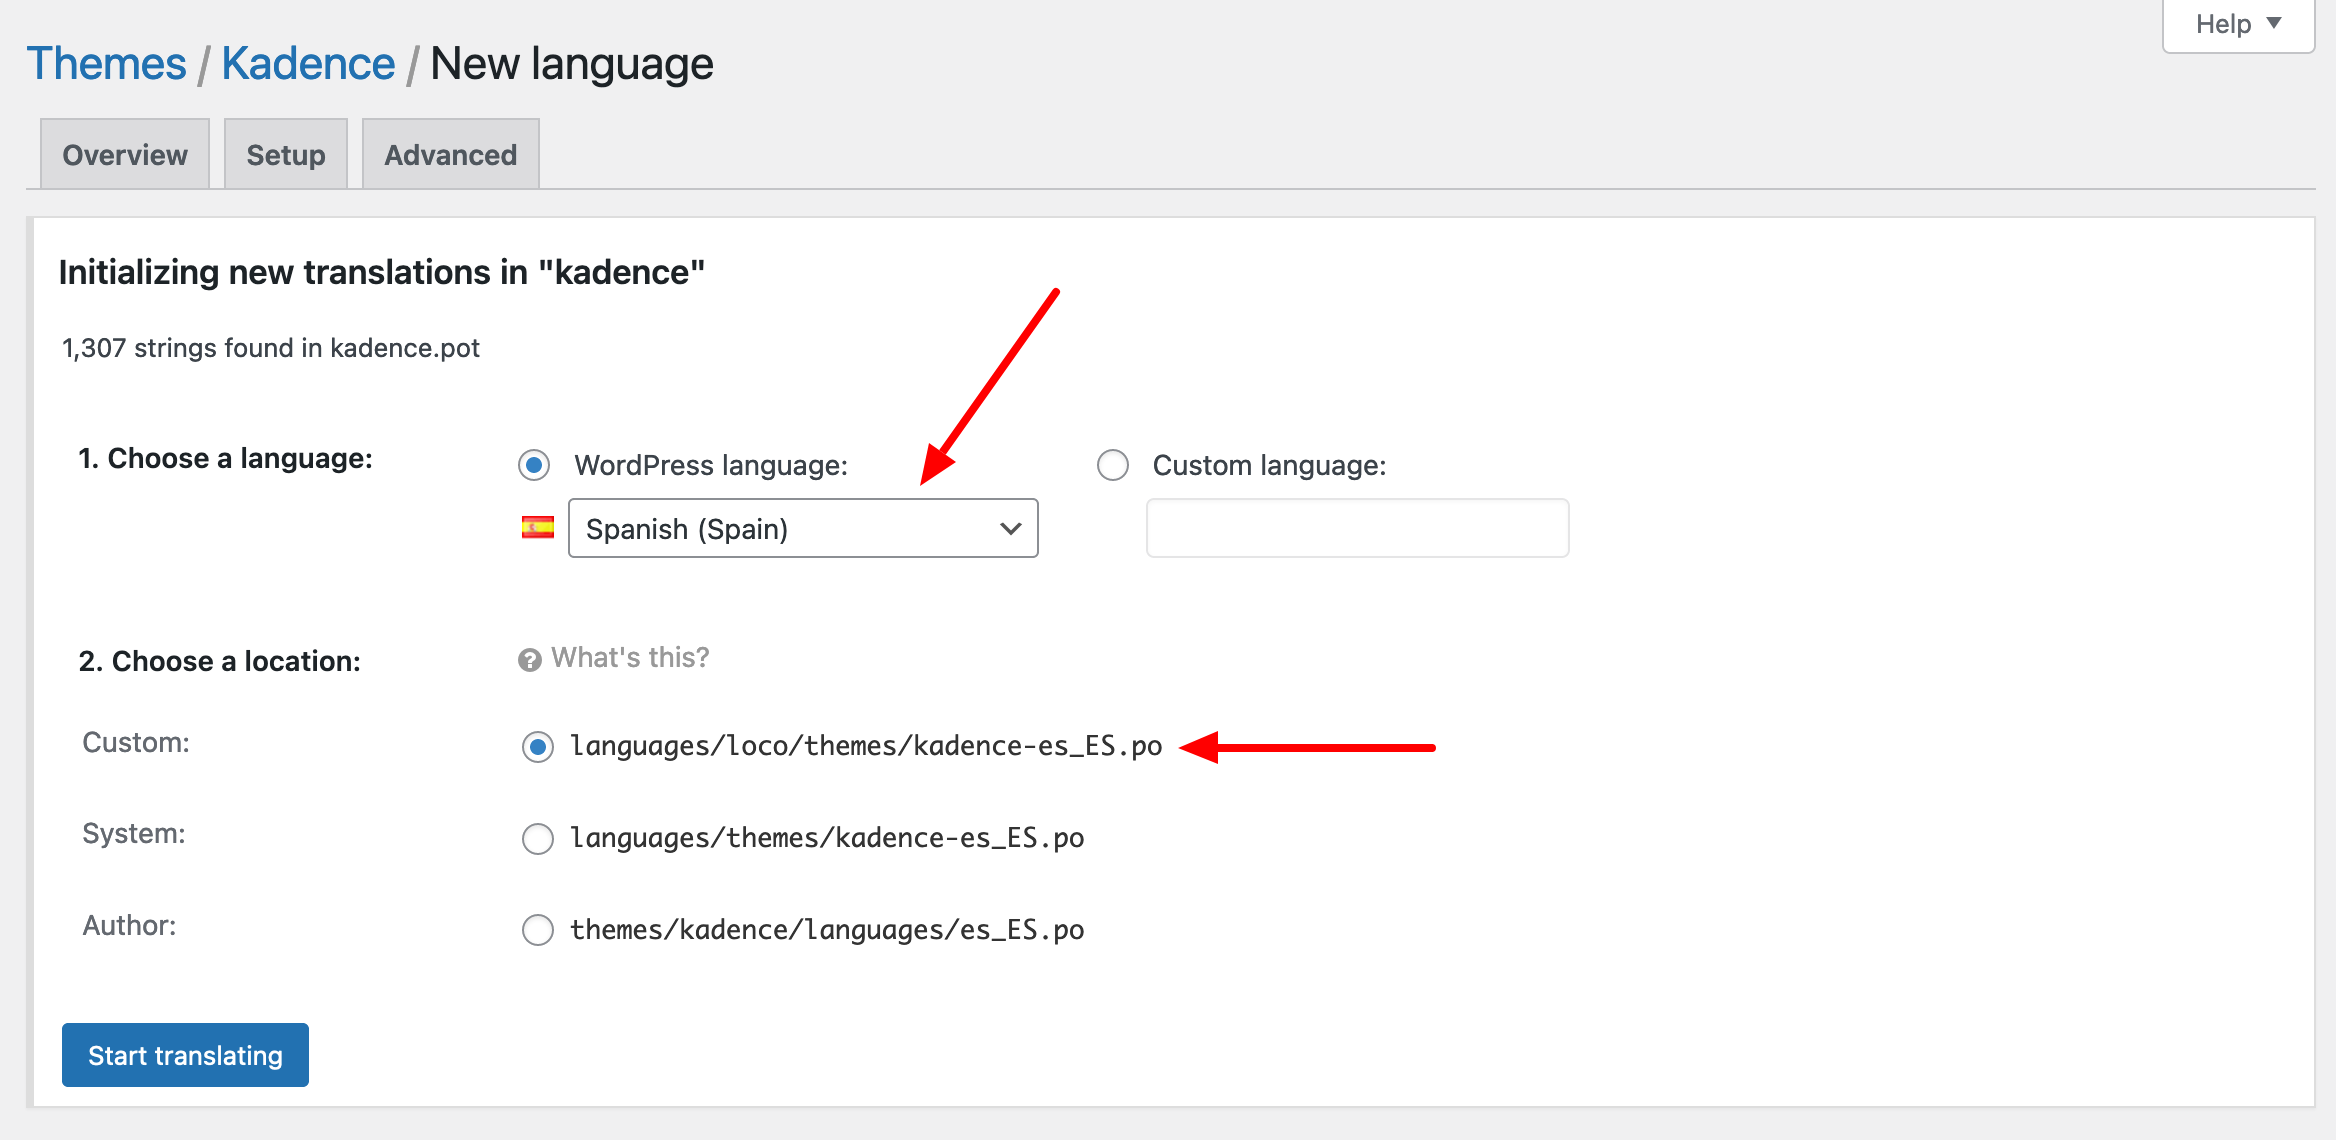
The second step is to choose your translation language. If no language is proposed in the list in the “Overview” tab, you have to add one by clicking the “New language” button:
To show you, I chose Spanish because French was already installed on my test site.
Then you have to choose a location where your translation file will be saved.
If you click on the “What is this?” link in gray, you will come across explanations from Loco Translate.
The developer recommends using the location called “Custom”, which corresponds to the following path, in my example: wp-content/languages/loco/themes/kadence-es_ES.po.
Why? Well, because in case of an automatic theme update, your files will not be overwritten (which is not the case with the “Author” and “System” locations). Continue by clicking on the blue button “Start translating”:

Case 2: A language is already installed
Let’s move on to case #2: a language is already installed on your WordPress site. In our example, this is the case for French, remember: 16% of the translation has already been done.
To continue, just click on the “Edit” link. It will appear when you place the mouse over the language of your choice:
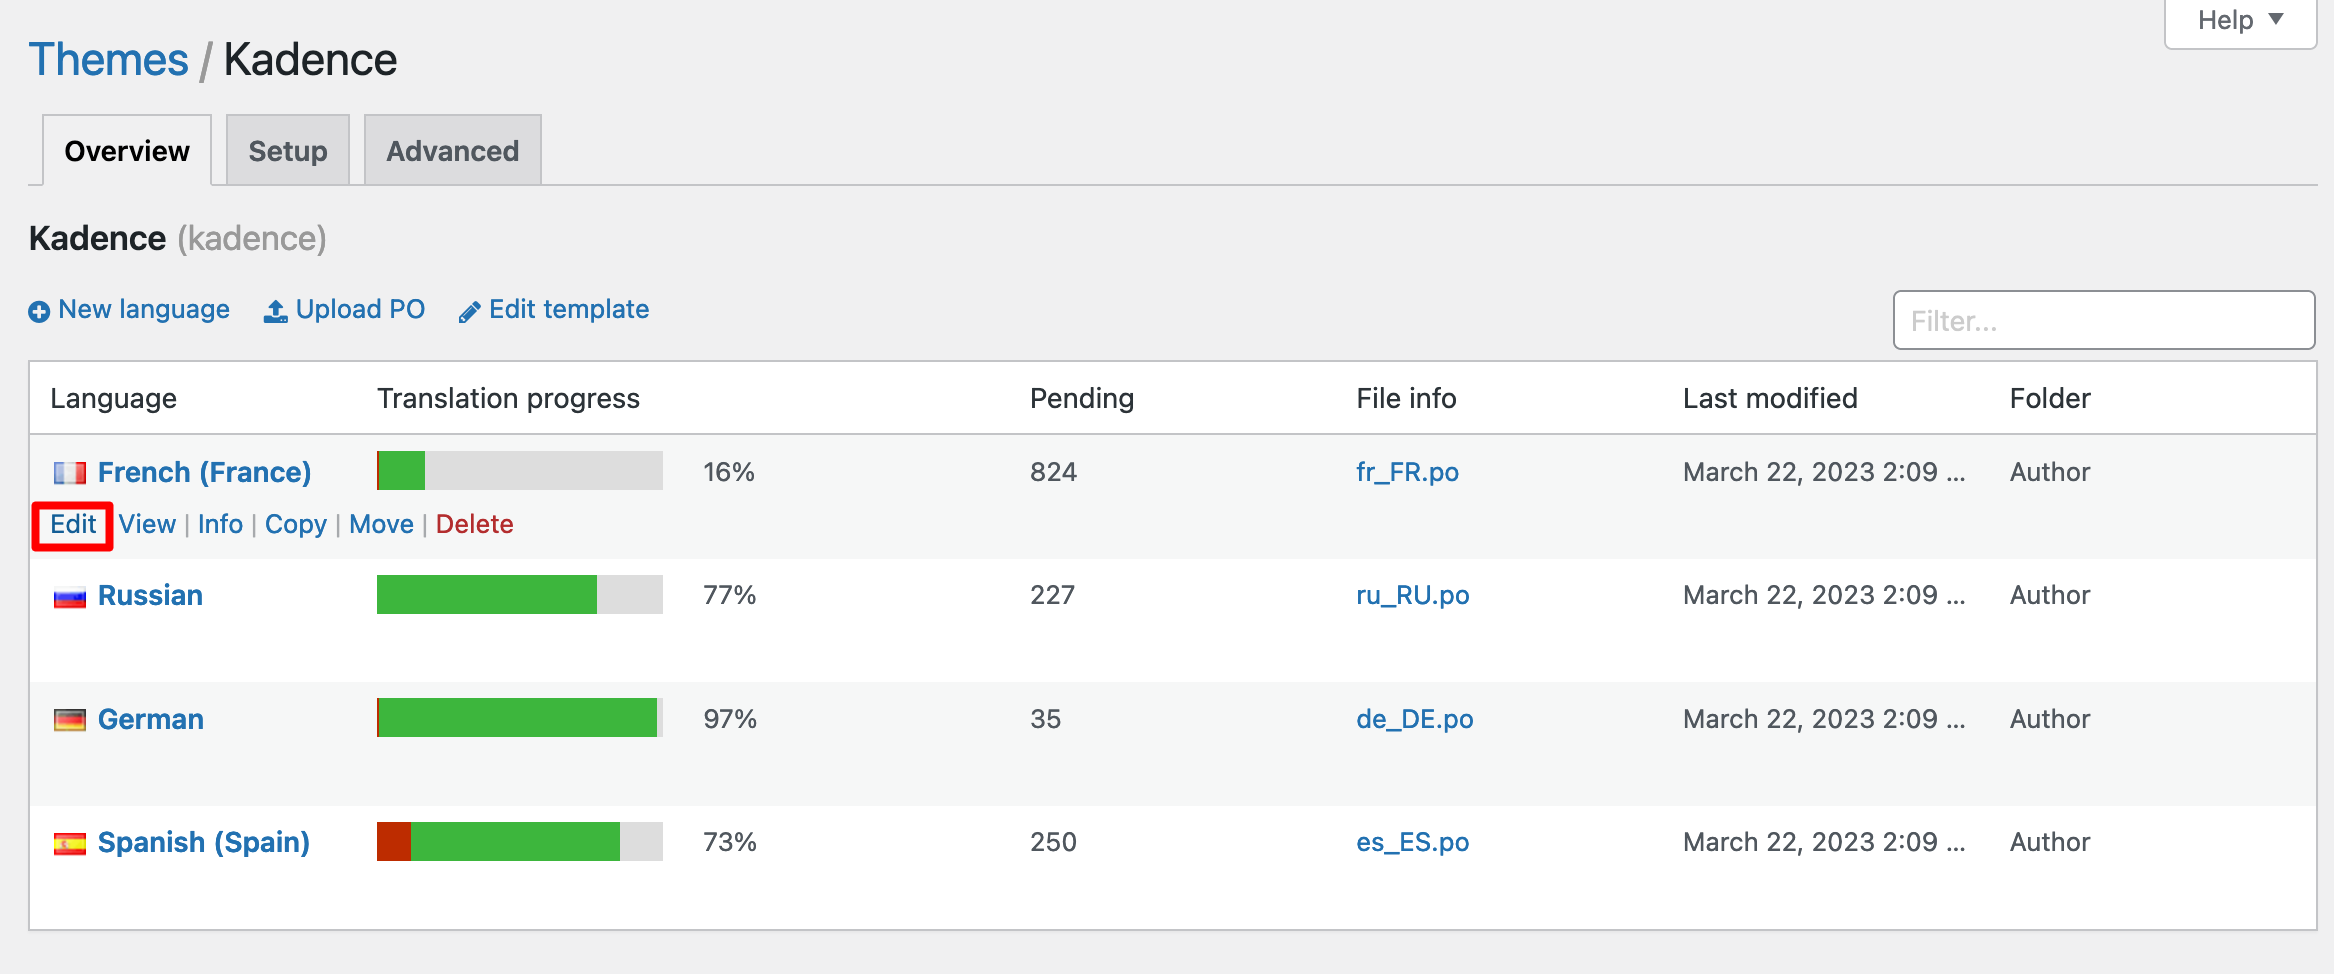
You will then be redirected to the plugin’s editor, which you will learn to handle in the next part.
Step 3: Translate the theme
Now let’s introduce the Loco Translate editor. It looks like this:
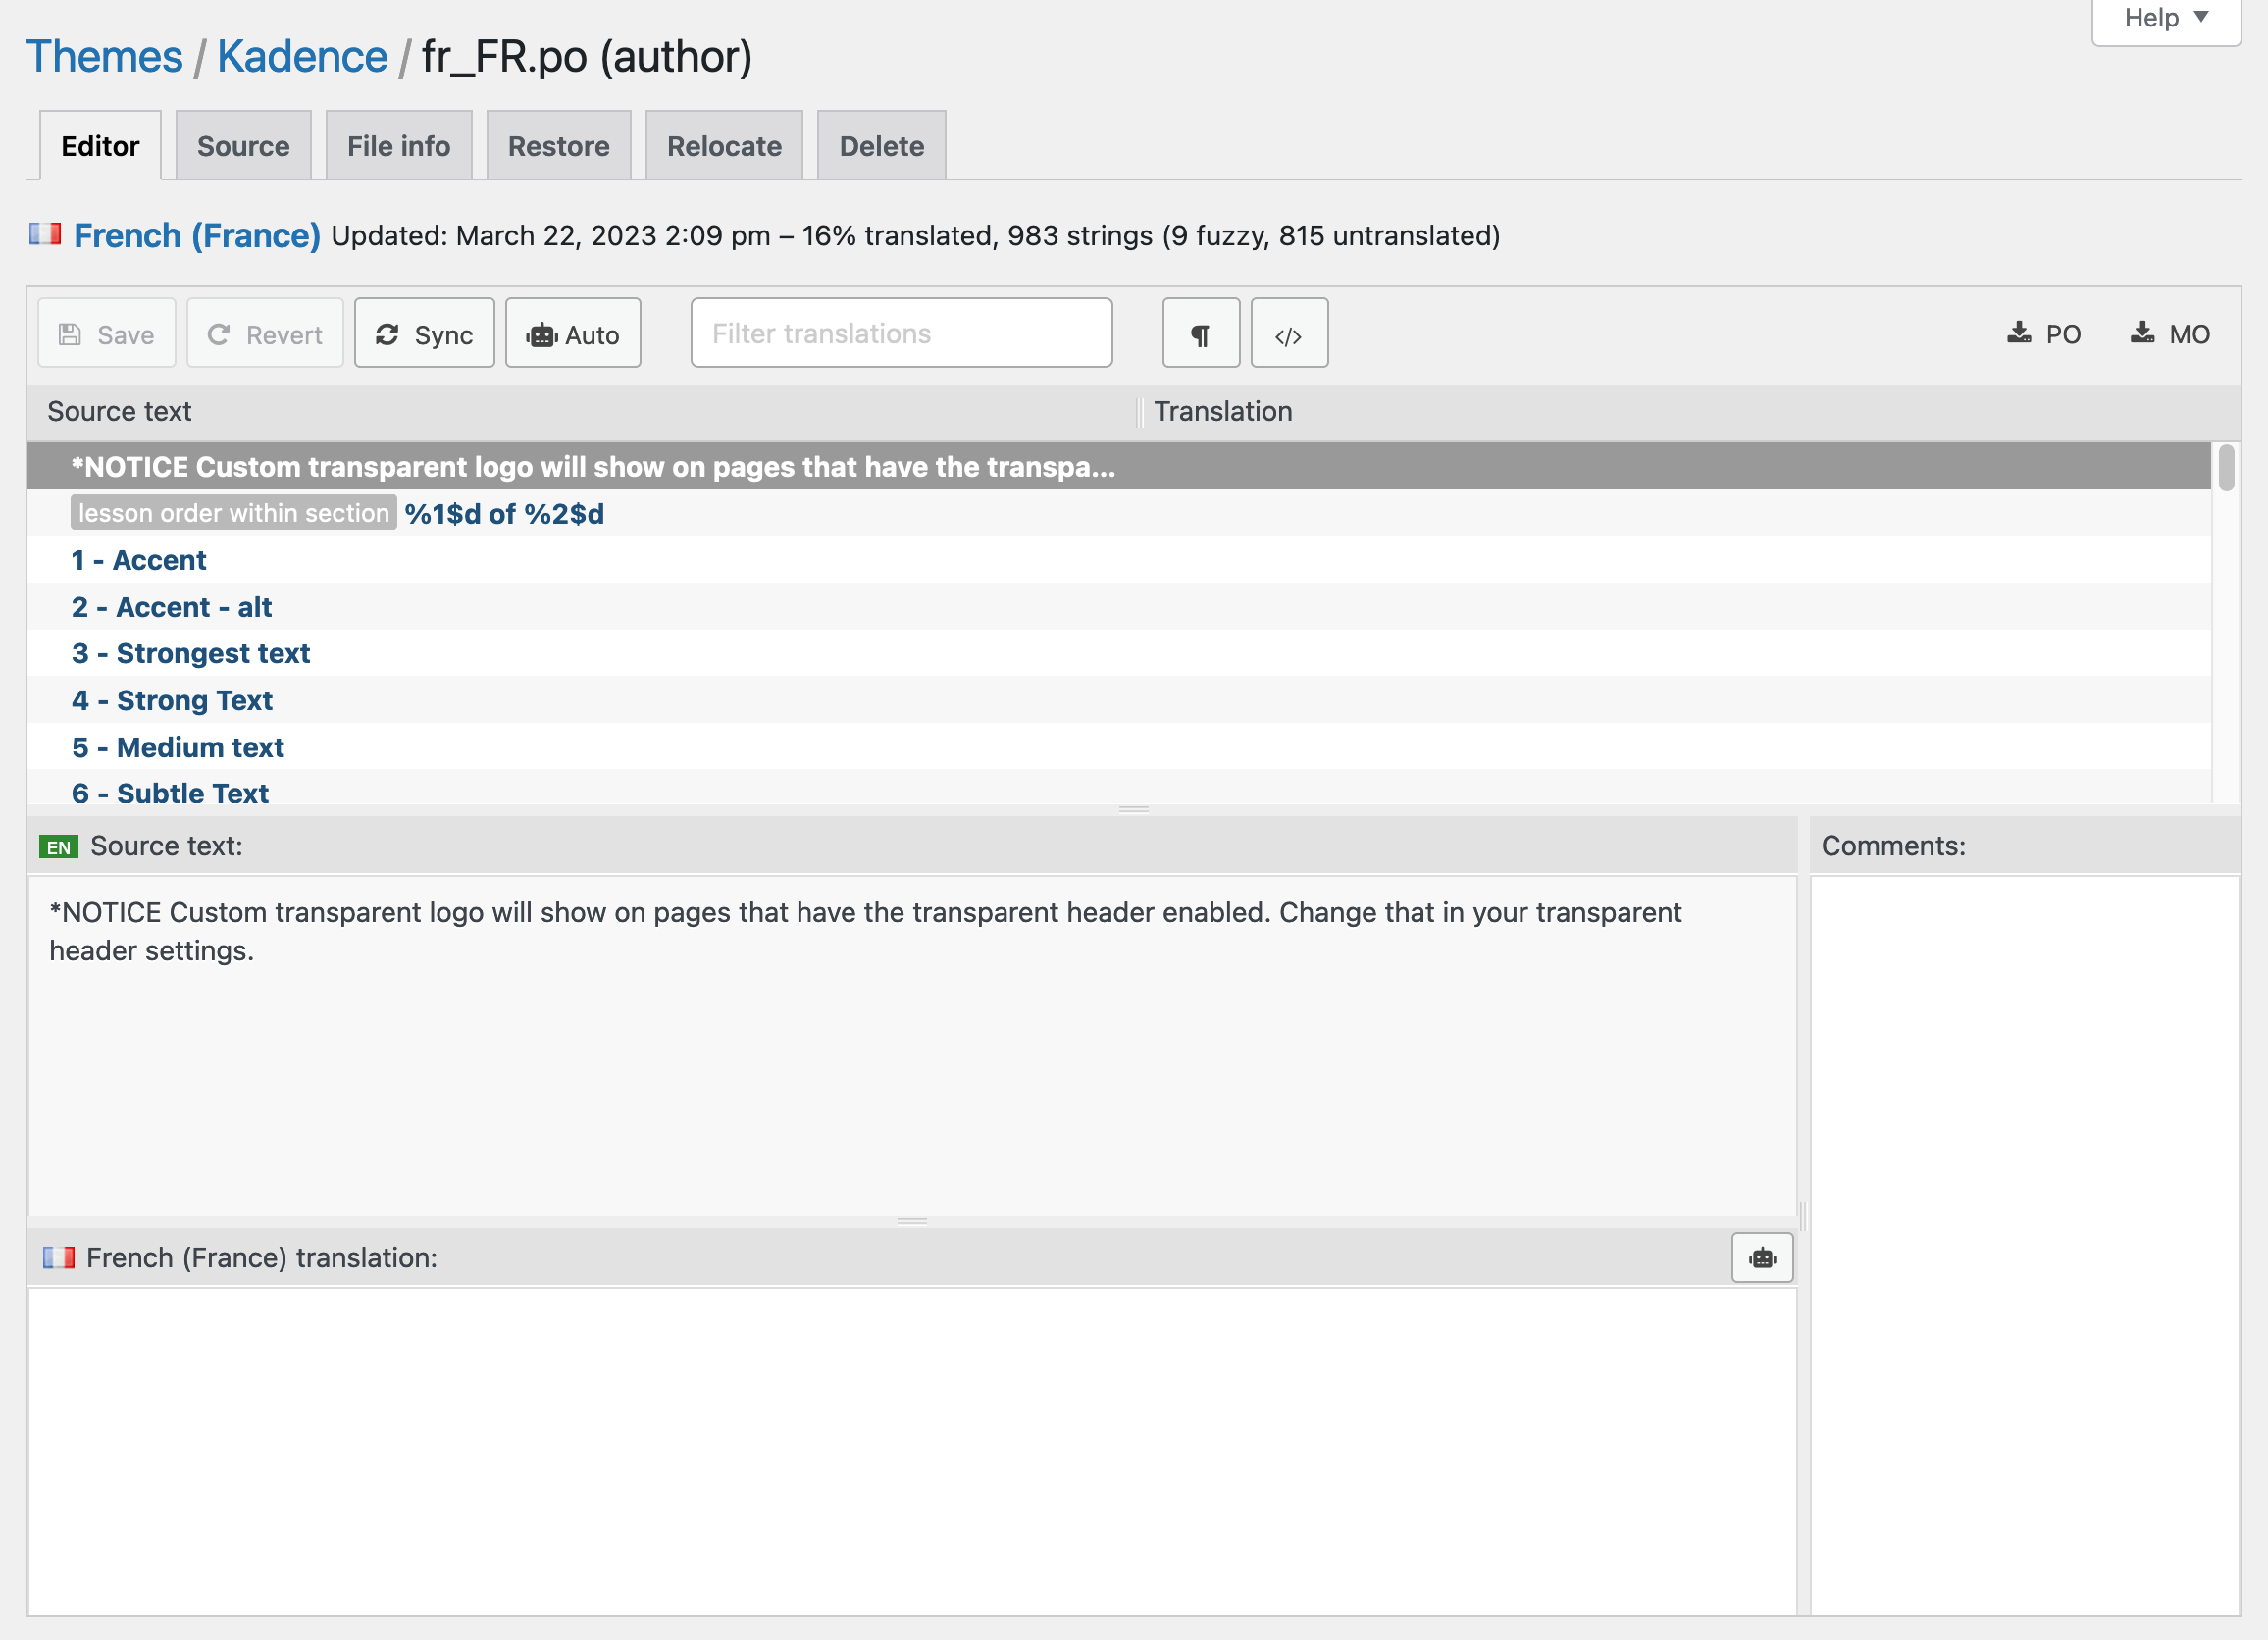
It may look a bit busy at the beginning, but as you’ll see, it’s very easy to use.
So far, I can see that out of a total of 983 strings, 815 are untranslated. So we have a lot of work to do!
To start the translation, proceed as follows:
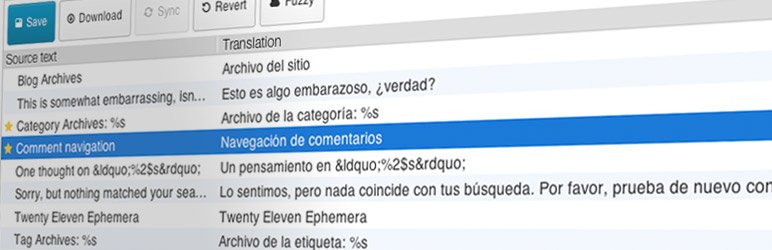
- Select the text of your choice in the “Source text” box by clicking on it (zone 1 on the screenshot below). It will be displayed in gray. For your information, untranslated strings (texts, to simplify) are displayed in dark blue.
- Write its translation in the “French translation” box (zone 2). As soon as you enter the beginning of the translation, you will be able to save it:

If you wish, you can also enter the comment of your choice in the box provided for this purpose (zone 3).
To go further, let’s take a look at the toolbar offered by the Loco Translate editor:
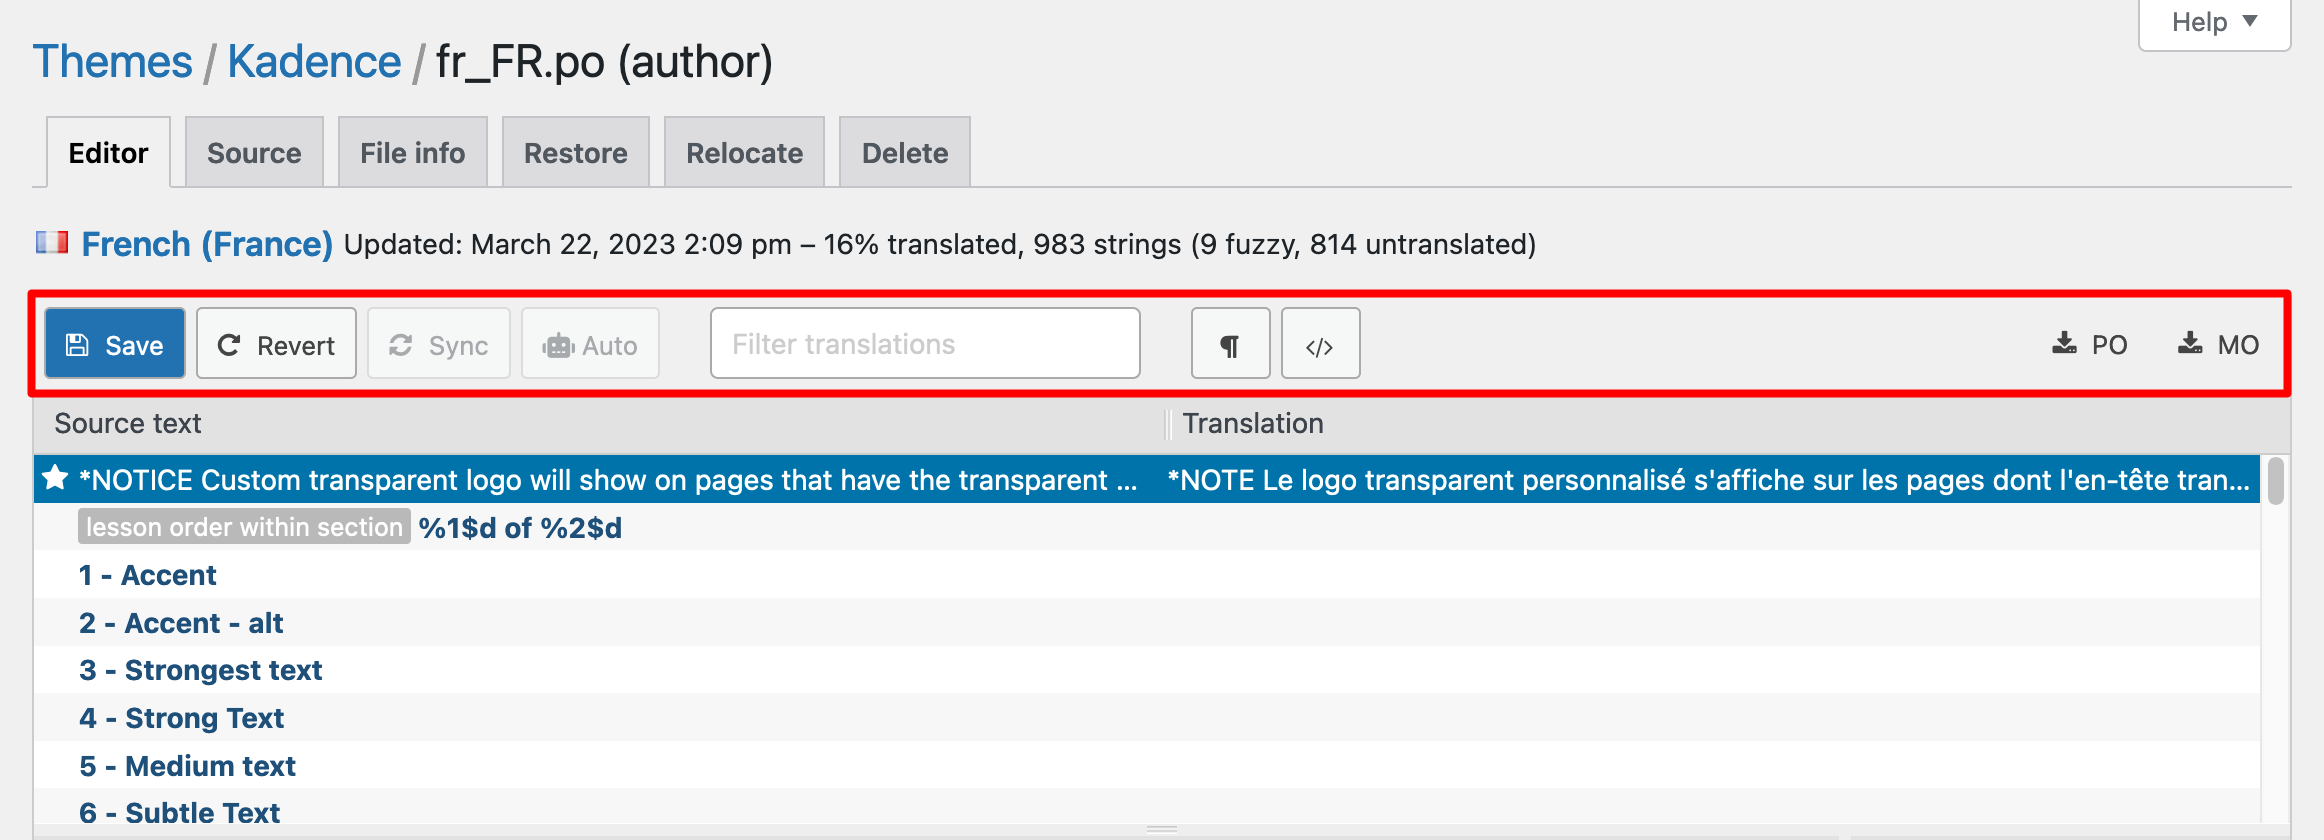
Here are the actions you can perform:
- “Save” allows you to save your translations, as there are no automatic saves. Remember to do this regularly. A star icon will appear next to each string as soon as you can save it.
- “Revert” refreshes the page, like when you press F5 on your web browser, for example.
- “Sync” updates your translations from the available strings. Loco Translate says that “if any of them have changed since you last saved your file, new translations will be added and obsolete ones will be removed”.
- “Auto” displays a highlighted window to add an automatic translation service for your strings. This service will be able to translate your entire
.pofile. You must save your translation for the “Auto” option to be available. - The search bar allows you to quickly search for a string. This can be useful if you come across untranslated text while browsing your site and want to change it quickly.

- “Show/Hide Invisible Characters” displays the non-breaking spaces in your text to see where you have too many.
- “Show/Hide Code View” (icon </>) displays the translated text in code format. This is handy if you want to add a hyperlink in your footer text, for example.
- The “PO” and “MO” download buttons allow you to download your translation in one of these two file formats.
When translating your theme, you’ll come across both strings that correspond to the settings menus offered by your theme, and texts that will be displayed on your visitor’s screen.
For example, in our Kadence theme, we can notice that the missing translations are mostly settings menus. When you’ve finished entering your translations, remember to save.
Sometimes, you will find special characters like $, %, etc. Do not delete them when translating! These are variables that will be automatically replaced by information.
Step 4: Verify the translation of your strings
So, are our translations in place? To find out, let’s do a before-and-after comparison of what we’ve just translated.
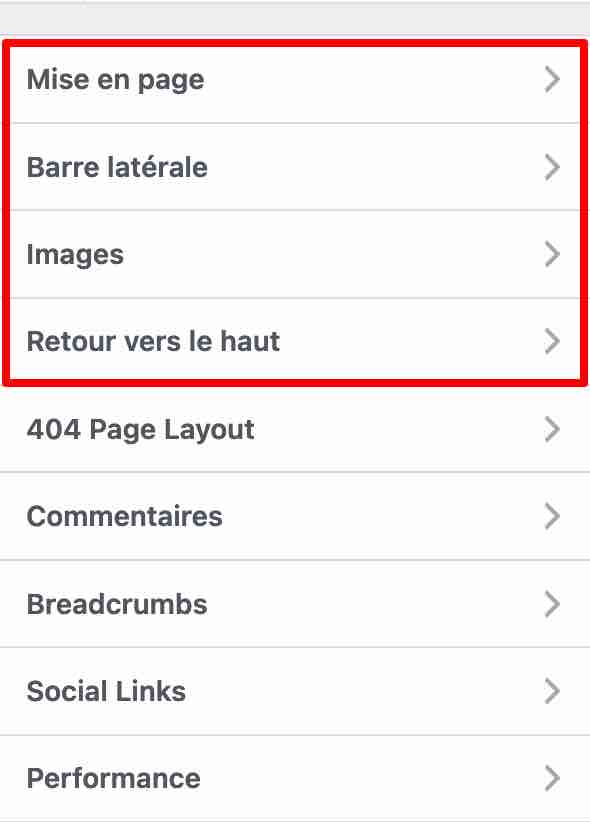
In the WordPress Customizer, all the menus in Kadence were in English. Look at the “General” menu, for example:

To show you the effectiveness of the plugin, I had fun translating some submenus:
- “Layout” has become “Mise en page”
- “Sidebar” has become “Barre latérale”
- “Scroll To Top” is now called “Retour vers le haut”
And you know what? It worked!
If the translations you just made affect the visible interface of your site (what your visitors see), your changes may not be visible immediately because your page has been cached.
This may be the case if you are using a caching plugin like WP Rocket (affiliate link). In this case, purge the cache (read our WP Rocket tutorial to find out how).
You can also try clearing the browsing data of your web browser. We explain how to do this in our dedicated tutorial.
How to translate a plugin with Loco Translate
You now know all about how to translate a theme. But how do you translate plugins?
Actually, you follow almost the same process! This time, go to Loco Translate > Plugins. Click on the plugin of your choice to translate.
For the example, I choose to edit the strings of the Smush plugin, which allows you to compress the weight of your images:

After clicking on its name, I just have to add the language of my choice, then translate the texts I’m interested in.
It works exactly the same way as a theme:


How much does Loco Translate cost?
Loco Translate is a free WordPress translation plugin. You can use it without limit and translate any number of themes and plugins you want.
If you browse its official website, you may come across a page with prices. The prices shown are for the Loco translation tool itself: it’s the tool that powers the WordPress plugin that is the subject of this tutorial.
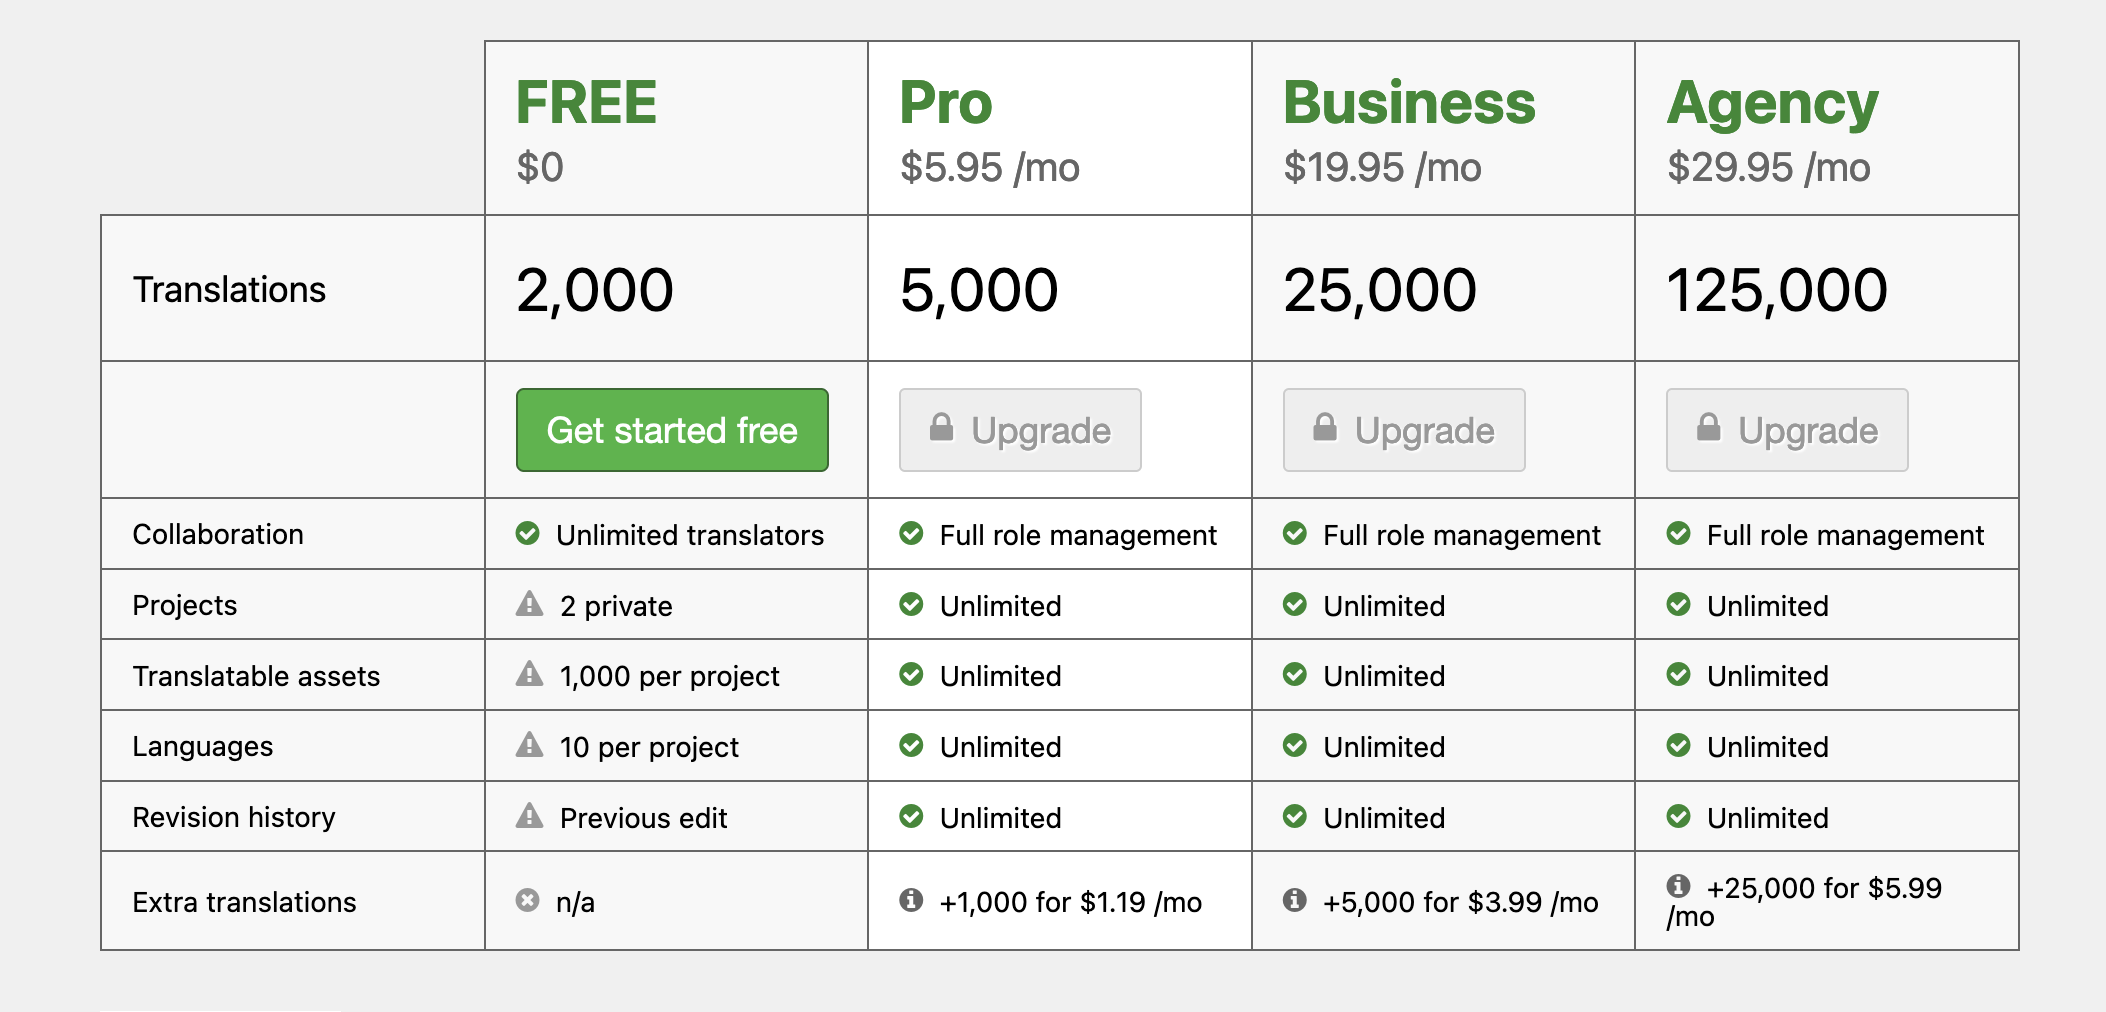
In concrete terms, you won’t have to pay anything if you only use the Loco Translate plugin on WordPress.
You will have to pay if you plan to use the Loco tool on another platform or CMS than WordPress, as soon as you need to translate more than 2,000 strings.
Our final opinion on Loco Translate
Loco Translate is a great plugin to translate your themes and plugins. Its ease of use makes it suitable for any kind of user, from beginner to advanced.
With this plugin, translating your strings becomes child’s play, since you don’t have to manipulate any code. The fact that you can make all your changes in real time, without leaving the WordPress interface, is also a real plus.
On the other hand, you won’t have access to a priority support (that’s normal, since the plugin is free). To find answers to any problems, you’ll have to go through the forum or the documentation of the plugin.
But with this tutorial, I’m not too worried about you: you should be able to get by like a champ.
Do you use Loco Translate? If so, tell me what you think by posting a quick comment!

Receive the next posts for free and access exclusive resources. More than 20,000 people have done it, why not you?
Continue reading
Articles posted in WordPress PluginsOur review of B2BKing: A WooCommerce plugin built for B2B commerce
“Hi, I need 200 units of this product with fast shipping please”. As an online store owner, receiving this kind of message puts a smile on your face. Answering it, on the other hand, becomes a lot less fun… Basically,…
GTranslate on WordPress: our full review of this tool for creating a multilingual site
“Hello, how are you?” “What do you think of this computer mouse?” For you, everything is easy to understand in these two sentences. For someone living deep in the Shetland Islands or Yucatán, it’s probably a bit more complicated… If…
Air WP Sync: Test and review of this plugin for integrating Airtable into WordPress
Do you use Airtable and WordPress? Then some of your days probably look something like this. In the morning, you update your Airtable database as soon as something changes. In the afternoon, you copy and paste the same data into…