For the general public, his name is associated with the invention of the printing press in the mid-15th century.
Almost 600 years later, the name is still very much in the news. But this time, it’s fueling the buzz in the WordPress ecosystem.
As an aficionado of the world’s most popular CMS, do you know who I’m talking about? The WordPress Gutenberg editor, of course!

You use it to write and format your posts and pages. But are you sure you’re making the most of its potential?
In this guide, I’m going to show you how to make the most of the content editor, while revealing some of its best-kept secrets.
In the end, you’ll be able to use it more effectively and increase your productivity when you team up with it.
Overview
- What is Gutenberg on WordPress?
- Site editor, page builder: What are the differences with the WordPress content editor?
- What are the advantages and disadvantages of Gutenberg?
- How do I use the Gutenberg editor on WordPress?
- 12 little-known features to take you further with the WordPress content editor
- How do I disable Gutenberg on WordPress?
- Conclusion
What is Gutenberg on WordPress?
An editor behind a revolution
Gutenberg is the name given to the WordPress content editor. Integrated into the heart of the CMS when version 5.0 of WordPress was launched in December 2018, it allows you to write and format the visual appearance of your posts and pages.
More broadly, Gutenberg is the name of a project whose purpose is to shape a new publishing experience on WordPress.
Contributors started bringing it to life back in January 2017, before it appeared in the WordPress Core at the end of 2018.
At the time, its appearance was a revolution and is still considered to be “one of the most significant changes to WordPress in many years.”
The entire user experience has been simplified and made more intuitive than with the old editor, known as TinyMCE.
With Gutenberg, users have a better view of how their content will look before publication.
And its blocks — we’ll come back to this concept in detail — make it easier to add features (rather than using shortcodes or custom HTML, as was the case with the classic editor).
While Gutenberg is present by default on every new major version of WordPress, there is also a Gutenberg plugin on the official directory. You don’t need to activate it on your site to take advantage of the content editor. This plugin incorporates all the latest features of the editor. You can use it to discover upcoming features before they are officially integrated into the WordPress Core. But be careful: don’t do this on a site in production!

Blocks, the beating heart of Gutenberg on WordPress
The WordPress Gutenberg editor is based on a central concept, mentioned above: the famous blocks. These are content elements — containers of sorts — that you can move and add to your post/page with a couple of clicks.
Using blocks, you can create advanced, customized page layouts without any knowledge of code.
There are 6 categories of blocks:
- Text
- Media
- Design
- Widgets
- Theme
- Embedded content

As WordPress points out in its Gutenberg FAQ, “the idea with blocks is to create a new common language across WordPress, a new way to connect users to plugins, and replace a number of older content types — things like shortcodes and widgets”.
An editor dedicated to building “entire sites”
But it doesn’t stop there. WordPress adds that blocks should be seen as a “way to design not just posts and pages, but entire sites.”
All this has been meticulously planned in advance. Project Gutenberg has 4 phases:
- Facilitating editing, with the appearance of the content editor.
- Customization, with the introduction of a Site Editor, block patterns, and block-based themes.
- Collaboration, to facilitate real-time collaboration between several authors on the content editor.
- Multilingualism, with the aim of integrating this functionality into the WordPress Core.
At the time of writing (July 2023), Project Gutenberg has entered phase 3.
This means that it is now possible to design entire sites (and not just posts and pages).
In concrete terms, Gutenberg allows you to modify every part of your site, from the header to the footer, including the body of your content.
To fully understand what this means, go to the next section.
Site editor, page builder: What are the differences with the WordPress content editor?
What is the WordPress Site Editor?
Gutenberg was originally launched with one aim in mind: to make editing easier for webmasters and writers.
As you have just seen, this was the purpose of phase 1 of its project. The editor only worked for posts and pages.
But that was before. Then we entered phase 2 of the project, which saw the birth of a Site Editor (initially called Full Site Editing — FSE — before being renamed Site Editor).
This appeared in the WordPress core with the launch of version 5.9 in January 2022.
With this Site Editor, you can now create and edit all the parts of your site (header, footer, 404 page, post archives, widget zones, etc.) using blocks.
You can access it by going to Appearance > Editor.

However, there are some prerequisites to take advantage of it:
- Your site must be running on a WordPress version greater than or equal to 5.9. If this is not the case, I encourage you to update your site as soon as possible, especially for security reasons.
- You must have activated a block-based theme. This is the case with the latest default native WordPress themes, such as Twenty Twenty-Three. If you’re not using this type of theme, you won’t have access to this Editor. For example, the Astra theme is not block-based, and the “Appearance” menu will look like this if you activate Astra:

In summary, then, you have two ways of using Gutenberg on WordPress:
- First, you rely on it when creating or modifying an article or page.
- Second, Gutenberg can be used to create an entire site, thanks to its Site Editor (menu Appearance > Editor).
The Site Editor is a tool that is still being fully developed and fine-tuned. If you want to achieve professional layouts, it requires solid technical knowledge, both in terms of templating and web design. That’s why we don’t recommend it for WordPress beginners. If your aim is to create pages and an entire site without coding, turn to a page builder instead.
Gutenberg on WordPress vs. page builder
A page builder is a tool that lets you create rich, complex layouts for your content without touching a single line of code, thanks in particular to the use of ready-to-use templates.
Editing is often drag-and-drop and in real time. Gutenberg’s Site Editor is very similar to a page builder in that both allow you to customize all areas of your site.
On the other hand, your creative options will be much more limited with the Site Editor. A page builder, for example, offers many more ready-to-use page templates than the Site Editor.
There are many page builders on the market, and they are increasingly becoming site builders. I’m thinking, for example, of Divi Builder (affiliate link) and Elementor (affiliate link), which WPMarmite has been recommending and using since 2017.
So, to summarize, here’s a little summary for the user:
- If you want to create posts and pages, use the WordPress content editor.
- If you want to create an entire site, you have two options. If you’re a developer or a seasoned WordPress user, you can use the Site Editor. If you’re just starting out, a page builder is often more appropriate than the Site Editor.
Can’t decide between Gutenberg and a page builder? Clear up your doubts by consulting our detailed Gutenberg vs. page builder comparison.
What are the advantages and disadvantages of Gutenberg?
Before moving on to a practical guide to using Gutenberg on WordPress, I wanted to review the strengths and weaknesses of the Site Editor.
That way, you’ll have as complete an overview as possible before getting down to business. 😉
Advantages of Gutenberg on WordPress
- A flexible, easy-to-use tool for editing your pages and posts.
- All your changes are visible in real time, thanks to a WYSIWYG (What You See Is What You Get) interface similar to that offered by tools like Wix or Squarespace.
- You don’t need any coding skills to use the block editor.
- With blocks, you no longer need to use shortcodes to integrate content.
- There’s no risk of incompatibility or bugs, as the project is integrated into the WordPress core.
- Project Gutenberg is scalable and continues to improve over time.
- Gutenberg has been designed with users AND developers in mind. For example, it uses the REST API, JavaScript, and React.
- The tool is focused on accessibility. As WordPress explains, Gutenberg was designed “with and for everyone.”
Disadvantages of the content editor
- To create advanced layouts without coding, the content editor will have fewer options than a page builder.
- Even if it improves in this respect, the Content Editor can still experience minor performance problems (slightly slower loading speed) when you’re writing long-form content.
All set? I’d now like to show you how to make the most of this very attractive editor.

How do I use the Gutenberg editor on WordPress?
This guide focuses on the interface and functionalities of the WordPress content editor, i.e. the one you use to create/edit your posts and pages. We won’t cover the Site Editor aspect of Gutenberg.
Introducing the interface
Landing on the Gutenberg interface on WordPress and seeing what’s under the hood is very simple.
If you wish to create an article, go to Posts > Add New. If you prefer to create a page, go to Pages > Add New.
Are you hesitating between a post and a page for your next piece of content? Discover the differences between the two on the WPMarmite blog.
Have you made your choice? Then you’ll be faced with an interface like this:

If you look closely, there are 3 clearly identifiable zones:
- At the top of your window is a horizontal bar (top bar, 1). Here you can add blocks and preview and publish your content.
- The central area (2) contains all your content (text, images, media, etc.) in the form of independent blocks (most of the time).
- The right-hand area (3), contained in a sidebar, consists of two tabs: “Post” or “Page” (to modify certain general aspects of your content) and “Block” (to customize each block individually, including its style).
How do I add a new block?
Speaking of blocks, let’s take a look at how to add one. As you now know, there are 6 block families (Text, Media, Design, Widgets, Theme, Embedded Content), for a total of 96 native blocks at the time of writing.
All your blocks are accessible via the block inserter. This is represented by the “+” icon at the top left of your page.
You’ll then have a list of all your blocks with their names and an icon representing them.
To add a block, first click where you wish to insert it in your content. You can then either:
- Click on the small black “+” icon and select the block of your choice
- Open the block inserter and click on the block of your choice (you can also drag and drop it into your text).

As the block headings are clear, the procedure is simple:
- Want to incorporate a title? Add a “Title” block.
- Want to illustrate your text with an image? Add a “Media” block.
- Need to integrate a button? Add a “Buttons” block.
Note that if you want to write a paragraph, you don’t necessarily need to add the block of the same name. Writing in the body of your content is enough: Gutenberg will automatically create a “Paragraph” block for you.
You can also create a “Paragraph” block just by pressing the “Enter” key on your keyboard to skip a line.
How do I format a block?
Once your block has been added, it’s raw. You can start to customize it by clicking on the block in question, which opens a toolbar at the top of the screen.
The options it offers vary according to the type of block. For example, you can add a filter to the “Image” block, which is logically not possible on the “Title” block. However, you can add bold or italics to the “Title” block.
Take a look at what you can do with the “Title” block, for example:
- Manage block and text alignment
- Choose the title level (hn tags like h2, h3, h4, etc.)
- Control formatting with bold, italics, strikethrough, superscript, etc.
- Add a link
- Etc.

How do I customize the style of a block?
Formatting is just the tip of the iceberg when it comes to customizing a block’s appearance.
You can go much further by relying on the advanced settings offered by each block.
You’ll find them in the sidebar, on the right, under the “Block” tab.
Once again, the range of options available depends on the block you wish to customize.
For a “Paragraph” block, you can modify:
- The color of the text, background, and links
- Typography options: size, font family, appearance, line height, spacing, case, etc.
- Block internal and external margins
- HTML anchor and additional CSS class

With the “Button” block, you can also modify the width and border of the button in question.

How do you change the position of your blocks?
Once you’ve modified the visual appearance of your block, are you happy with its placement on your page? No problem, nothing is set in stone with WordPress’ Gutenberg editor.
To move and/or reorganize a block, you have several options:
- Copy and paste. To do this, select the entire block you’re interested in by clicking on it. Then press Ctrl C (PC) or Cmd C (Mac) and Ctrl V (PC) or Cmd V (Mac) to copy and paste it to the location of your choice.
- Click on the two little arrows on the toolbar to move a block up or down, as required.

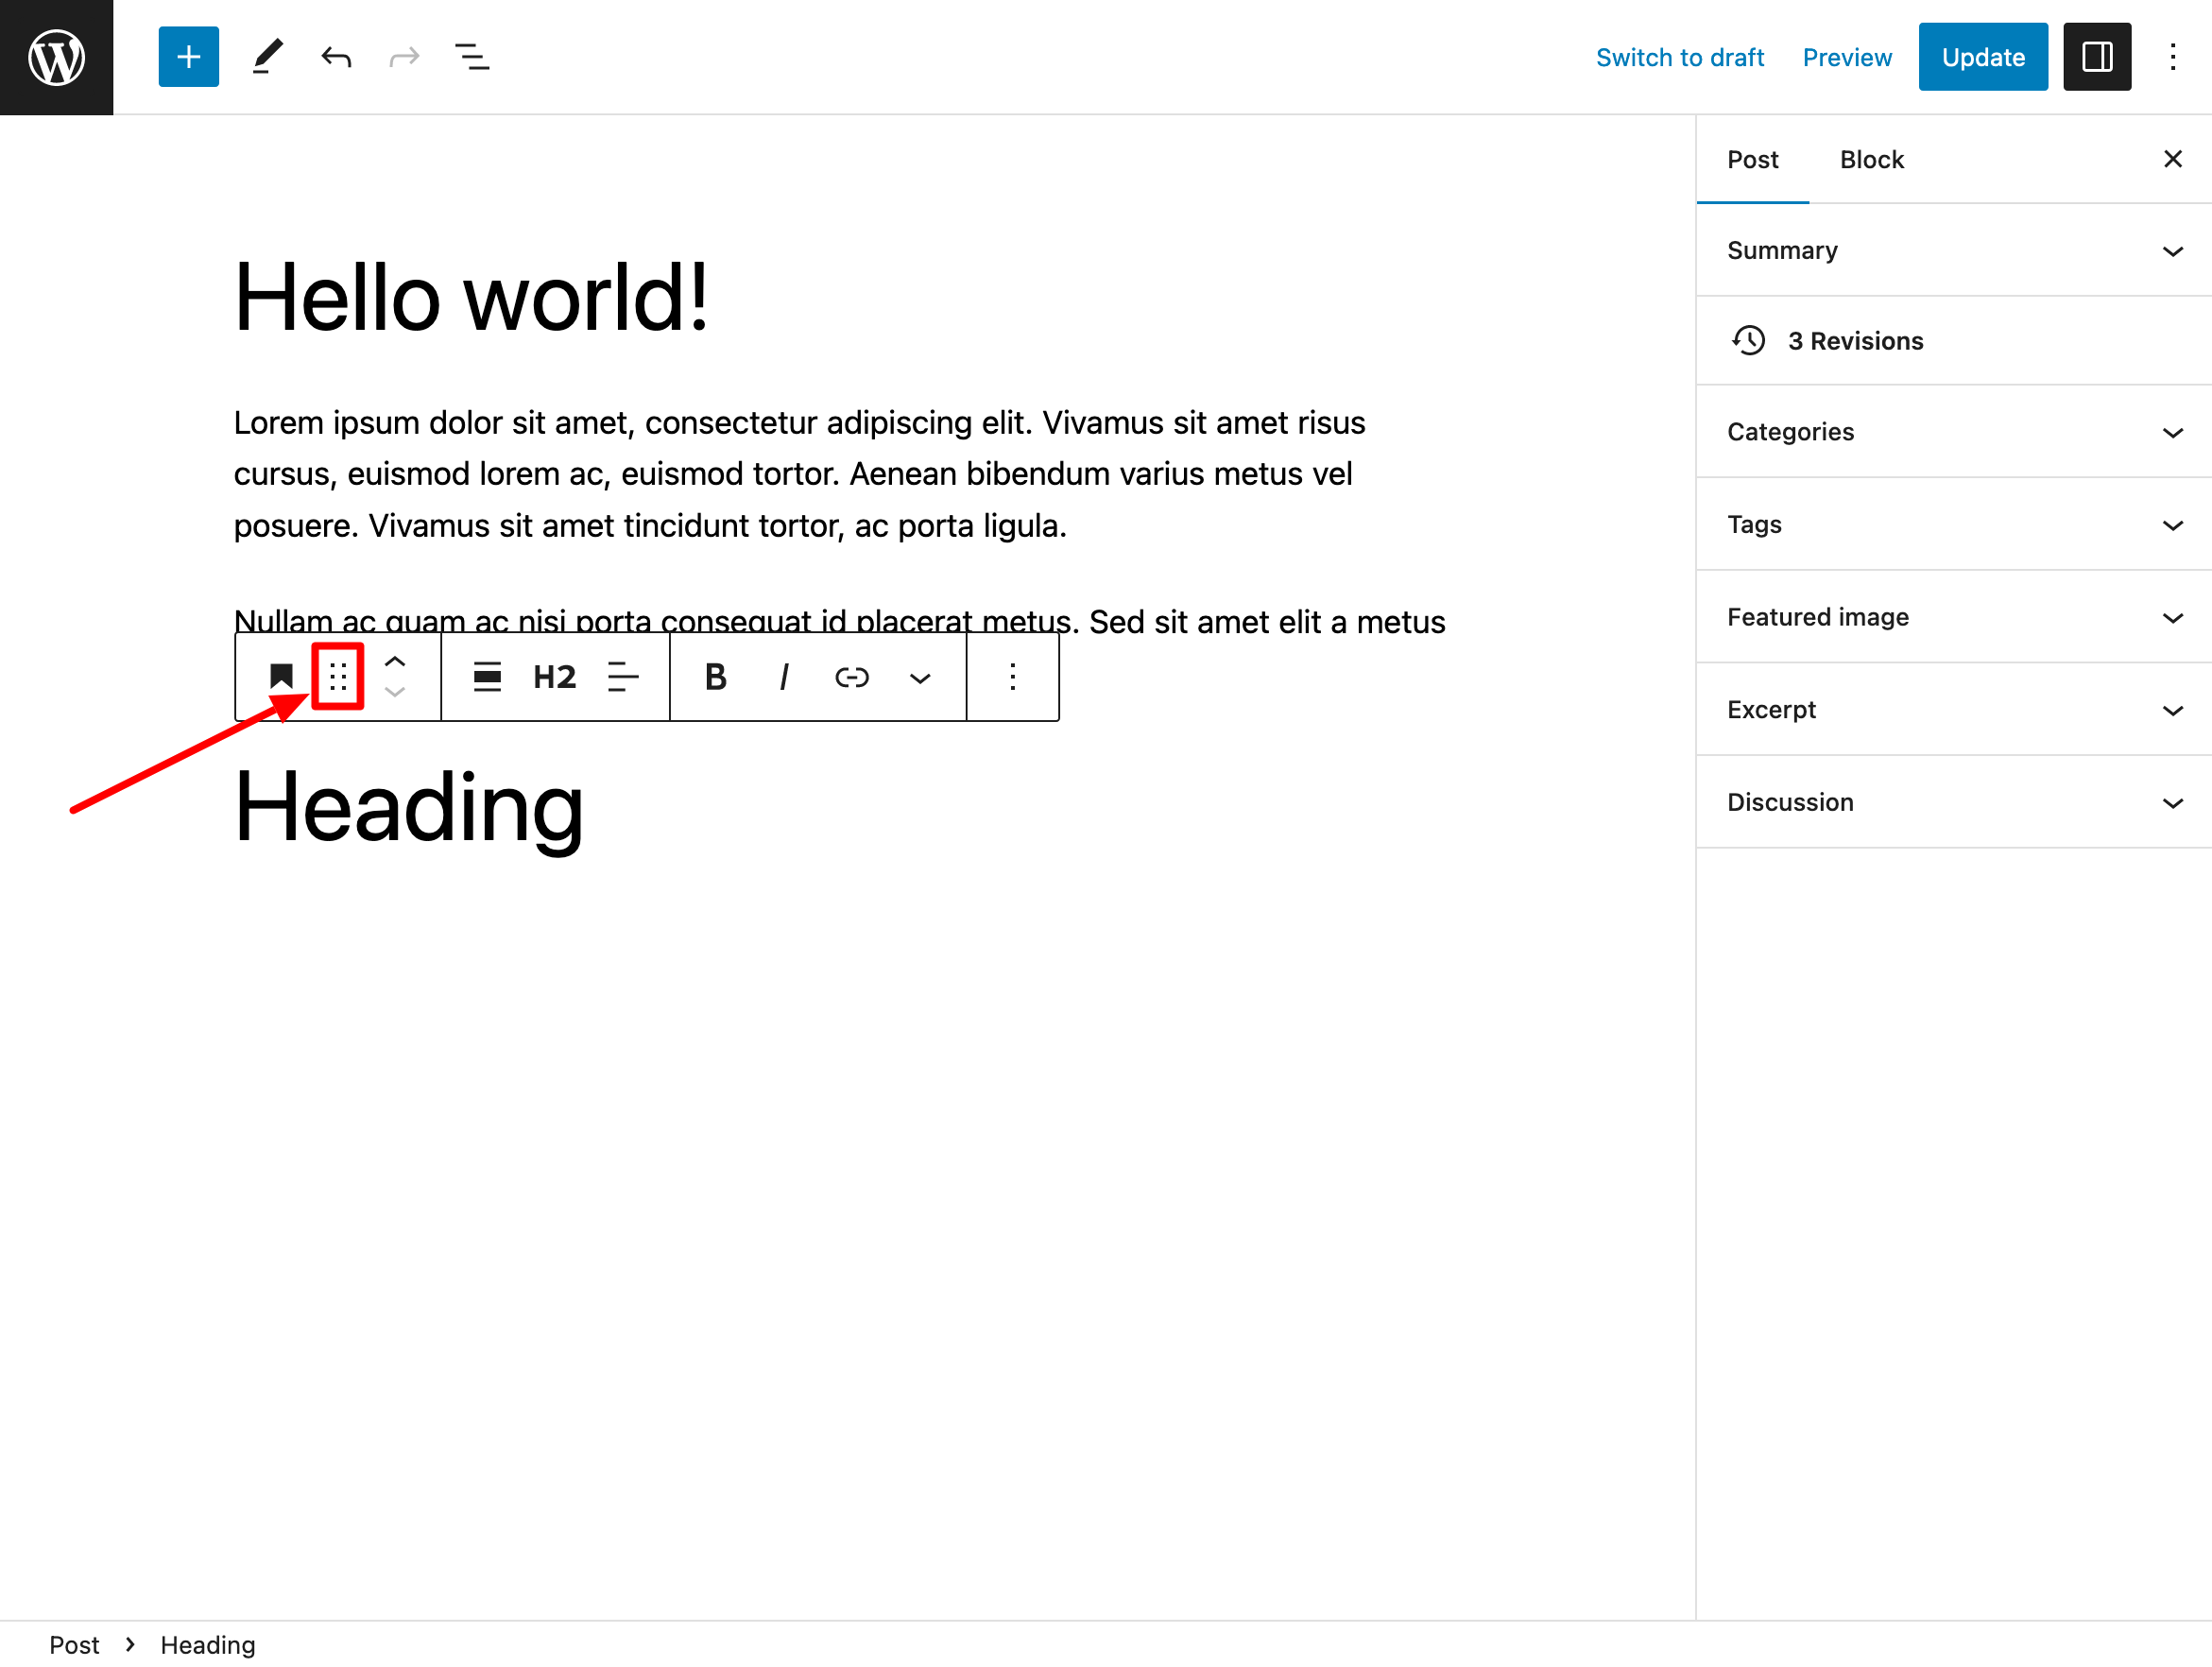
- Use drag & drop to swap the position of different blocks. To do this, click on the 6-dot icon in the upper toolbar (hold down the click), then move the block.
How do I group several blocks together?
Even if the content editor doesn’t have all the layout options offered by a page builder like Elementor, you can still modify the display of your posts and pages.
You can do this thanks to the blocks in the “Design” family of the WordPress Gutenberg editor.
With the “Columns” block, for example, you can create a multi-column layout.
In fact, Gutenberg creates a parent block that acts as a main container for 2 or more additional blocks (your columns).
So, for example, if you adopt a two-column layout, you can display an image on the left, and a paragraph of text on the right:

When you add columns, they will stack horizontally next to each other.
If you need to group blocks vertically, you may be interested in using the “Group” block. The latter lets you stack blocks from top to bottom (like the “Stacking” block), and there’s a lot you can do here.
For example, you can use the “Group” block to group a title and its paragraph.
The advantage of grouping two or more blocks together is that you can then apply the same layout and style to them:

How do I add Gutenberg block patterns to WordPress?
While we’re on the subject of grouped blocks, this new section, dedicated to the use of block patterns, is a perfect segue.
Block patterns are a set of blocks grouped together in a single container.
They’re a kind of ready-to-use template that you can use to create one or more sections in your content.
By default, the WordPress Gutenberg editor provides access to block patterns via the block inserter, in the “Patterns” tab. Their number varies according to the theme you’re using.
These block patterns are grouped into 9 categories, whose titles speak for themselves:
- Featured
- Posts
- Text
- Gallery
- Call to Action
- Banners
- Headers
- Footers
- Testimonials

To add a block pattern to your content, simply click on the one that interests you.
You can then modify it as you see fit, customizing each block individually in terms of content and style.
If you’d like a larger preview, click on the “Explore all patterns” button:

Finally, you should know that WordPress offers its own directory of block patterns (as with themes and plugins). You can even copy a pattern you’re interested in from the directory, and paste it directly into your Gutenberg post/page!
Take advantage of synced patterns
Have you ever heard of synced patterns? If you answered “no”, you may know them by their old name: reusable blocks.
In August 2023, with the release of WordPress 6.3, reusable blocks were renamed synced patterns.
A synced pattern is a block or set of blocks created with WordPress’ Gutenberg editor is intended to be reused on the publications of your choice. Once designed and saved, it retains its content and formatting, and can be identically duplicated.
Its content is synchronized throughout your site, so if you modify a synced pattern in one place on your site (e.g. on a blog post), the modification will be reflected on all other publications containing your block pattern.
This is a very practical concept if you’re used to using the same content on several pages or posts on your WordPress website.
It saves you precious time (no need to create an identical block for each piece of content) and can be used in a wide range of situations.
I’m thinking, for example, of adding calls to action to subscribe to your newsletter scattered throughout your site.
The question is how to create a block pattern, and how to synchronize it (or not). We explain it all in this tutorial.
How can I benefit from additional Gutenberg blocks?
Are the default blocks offered by WordPress not enough for you in terms of quantity? Or perhaps you feel that their customization options aren’t extensive enough?
This doesn’t have to be the case, because the official plugin directory is full of plugins that let you add extra blocks.
Some even go so far as to offer block patterns, or even ready-made page templates, that can be integrated into your content with just one click.
Depending on the plugins you use, the customization options will vary for each block in terms of typography, colors, margins, and so on.
Among the most famous Gutenberg block plugins, I should highlight:
- Spectra and Spectra Pro (affiliate link)
- CoBlocks
- Kadence Blocks
- Otter

But they’re not the only ones, as you’ll discover in our test of the best Gutenberg plugins.
That’s it for this first tour of the WordPress Gutenberg editor.
Now you know how it works, and you’ll be able to use it to perform classic operations such as adding and customizing blocks.
In the next section, I’m going to show you how to get even more out of the WordPress editor, with some handy and sometimes quite well-hidden tricks. 😉
Thanks to these features, you’ll become more productive and efficient when writing your next articles or other pages.
12 little-known features to take you further with the WordPress content editor
Keyboard shortcuts in the WordPress Gutenberg editor
For starters, you can speed up your work flow by using keyboard shortcuts. To be clear, Gutenberg doesn’t offer a ton of them, so don’t get too excited, but there are still about thirty or so that are very satisfying.
They’re all listed in the “Tools” section of the WordPress content editor options.
Simply click on “Keyboard Shortcuts” to display them in a highlighted window (or use the following keyboard shortcut: “Cmd Option H” on Mac or “Ctrl Option H” on PC:

You’ll see that they are divided into 4 categories:
- General shortcuts
- Selection shortcuts
- Block shortcuts
- Text formatting
Here you have a practical guide to start practicing and acquiring some automatisms.
The slash command
In the same vein, are you familiar with the slash command in WordPress’ Gutenberg editor? Personally, I haven’t been able to do without it since I discovered it.
Thanks to it, you can add a new block very quickly, without having to go through the block inserter, which limits your number of clicks.
To take advantage of it, simply place your mouse cursor where you want to add a new block, then add a slash (/). Gutenberg will show you a list of the most frequently used blocks, and you can search for a block by typing its name.
When you’ve found it, press the “Enter” key on your keyboard to integrate it into your content:

Customizing the editor interface…
Let’s continue with the editor’s “Preferences” menu, which you’ll find in the options.
This is where you can customize options related to the block editor interface and editing flow.
In the “Blocks” tab, for example, you can deactivate the blocks you don’t want to appear in the block inserter, for a less crowded list:

… and the working window
As we’ve already mentioned, Gutenberg was designed to facilitate and simplify the user’s experience when writing content.
The idea is to make you feel as comfortable as possible, a bit like on a word processor, but with a much more advanced visual experience.
To make you feel as comfortable as if you were on a soft sofa, the WordPress Gutenberg editor offers 4 features in its “View” mode options:
- A fixed top scroll toolbar
- “Highlight” mode for highlighting one block at a time, so you can concentrate solely on that one
- “Full Screen” mode to show or hide the administration interface
- “Distraction-free” mode, which erases all Gutenberg settings menus
Note that you can activate/deactivate any of these 4 modes by simply clicking on it.

Copy and paste from Google Docs
With a working window customized to your tastes and needs, you’ll likely have a better experience working in the content editor.
Personally, I still prefer to write my articles on one of my favorite tools, Google Docs, before adding them to the WordPress editor.
And for this, I take advantage of a handy option: copy-paste from Google Docs to Gutenberg.
You can literally copy and paste everything from one tool to the other, including text and images. Formatting is preserved, which is a real time-saver.
Note that this also works for other platforms such as Apple’s Pages, Microsoft Word, and Evernote.
However, I would advise you not to paste your images directly from Google Docs, but rather to add them manually using an “Image” block, for example. Otherwise, they won’t be added to your Media Library and will continue to be hosted on Google’s servers. So if you delete your Google Doc, your images will disappear! In addition, for the SEO of your images, it’s best to add them one by one — even if it’s more tedious — in order to fill in their alt attribute.
Adding images with drag & drop
Speaking of images, here’s a handy new trick. With a little drag and drop, you can add an image from your computer, from your desktop for example.
This image will then be added directly to your Media Library.
Integration of royalty-free images
Images — we keep coming back to those! There’s another new option lurking in the shadows. Since the release of WordPress 6.2 in March 2023, you’ve been able to add royalty-free images directly from the content editor’s block inserter.
In the “Media” tab, click on “Openverse,” and type the keyword of your choice in the search bar:

Openverse (formerly CC Search) is a royalty-free image search engine (also accessible at this address) that has been part of the WordPress project since May 2021.
It provides access to over 700 million photos, images, and audio documents without leaving the WordPress interface. In many cases, you’ll no longer need to visit a royalty-free image bank from your web browser.

The skeleton of your content
As you move forward with the writing of your content, you’ll probably want to make things a little clearer, especially if the words are piling up.
How is your post or page structured? What block did you add here or there?
You can get a quick answer to these questions by clicking on the document overview icon in the top toolbar of the WordPress Gutenberg editor.
First of all, Gutenberg offers you a list of all the blocks present in your content, in the “List View” tab.
You can directly access any block by clicking on it, while viewing its options by clicking on the 3 little dots.
Then, in the “Outline” tab, you can view the skeleton of your content, with its number of characters, words, and estimated reading time:

Adding link anchors
If you’ve been a WordPress fan for many years, you’ll surely remember its former editor, the famous TinyMCE.
And perhaps you remember how difficult it was to create a link anchor… You had to add a bit of HTML code, and it was annoying and tedious.
With the Gutenberg editor, the pain is over. Gutenberg makes it very easy, thanks to a dedicated option.
Here’s how it’s done. First, add an anchor to the title of your choice, for example. Click on the title you want, then go to the “Advanced” tab in the editor options.
Enter a link anchor, i.e. a word without spaces and in lower case. For example, “wordpress”:

Next, create a link to this link anchor. Select the piece of text of your choice, then create a link containing the name of your anchor with the hash sign (e.g. #wordpress):

From now on, when you click on the text containing the link, you’ll be redirected to the title containing the link anchor. Well done.
Adding hypertext links with a simple copy-and-paste operation
Without further ado, let’s stay on the subject of links. As you saw just above, you can integrate a hypertext link by selecting the text of your choice, then clicking on the link icon.
But did you know? It’s possible to add a link even faster. Simply copy the URL of your choice, choose the word or group of words to add the link to, and paste.
And that’s all there is to it: no need to go through the little “Link” menu in the WordPress Gutenberg editor:

Editing your slug
In the link family, I’d like to mention the slug, i.e. the end of your permalink (or URL). Gutenberg lets you customize it by going to the “Summary” tab in the editor options.
A good practice for on-page SEO on WordPress is to create a slug consisting of your main keyword. If the keyword consists of several words, separate them with hyphens (e.g. gutenberg-wordpress).
Write in lower case and don’t include accents or special characters, since the idea is also to make the URL as legible as possible for your visitors.

How do I disable Gutenberg on WordPress?
Before concluding, I’d like to tell you about a final option that goes against the grain of what we’ve been talking about all along these lines.
Let’s say you can’t stand WordPress’ Gutenberg editor. To the point where you don’t want to hear any more about it and want to get rid of it right away.
If you’re ready to cross the Rubicon, you have two options:
- Use the Classic Editor plugin, which will “reactivate” the classic WordPress editor and replace Gutenberg. But be warned: this plugin may one day disappear. As the WordPress team that develops and maintains it points out, this plugin “will be fully supported and maintained until 2024, or as long as necessary.”

- Activate the Disable Gutenberg plugin. This, too, restores the TinyMCE editor to WordPress. At the same time, it allows you to disable Gutenberg only for certain types of content (posts, pages, roles, etc.).
Conclusion
WordPress’ Gutenberg editor is a must-have tool for editors, webmasters, and other site creators.
Present in the WordPress Core since December 2018, it’s constantly evolving and continuing to improve, thanks in particular to the release of new features when major WordPress versions are launched.
It’s also an under-exploited tool, partly because it contains options that are often well hidden in its settings menus.
Thanks to this guide, you’ll now know how best to use Gutenberg, as well as many tips and tricks for working more productively with it.