
Generally, when you feel good about a place, you don’t want to leave it or go elsewhere. This works for a resort: we drag our feet when we have to return the keys to the reception after a really good time.
It also works for a restaurant. When you have your habits somewhere, you don’t risk going elsewhere to see if the food is even better. The risk is too high. What if it was less good at the restaurant next door?

And this also applies to WordPress, you know. Once you got used to this tool, you won’t want to do without it.
Good news: it’s even possible to manage all your email marketing activities from WordPress, without using a third-party solution. Yes, you read that right.
With the MailPoet plugin, you can create and send your newsletters directly from your Dashboard. But also design subscription forms to capture emails, or customize your WooCommerce emails.
Now that’s a complete tool! Is it fun to use? Should you adopt it right away?
It’s time to make up your mind by reading this detailed test.
Overview
- MailPoet, what is it?
- Why is this plugin interesting?
- Ergonomics and usability
- How to create a subscriber list on MailPoet?
- How to create an email capture form with MailPoet?
- How to create a welcome email with MailPoet?
- How to create a newsletter with MailPoet?
- MailPoet and WooCommerce: advanced ecommerce features
- How to manage your subscribers and follow up on your actions?
- The plugin and GDPR regulation
- How much does MailPoet cost?
- Our final review on MailPoet
Initially published in January 2015, this post has been updated in April 2022 to take into account the most recent evolutions of MailPoet (and in particular its version 3, MailPoet v3).

MailPoet, what is it?
MailPoet is a freemium email marketing plugin. Without leaving your WordPress admin dashboard, it allows you to create and send several types of emails: newsletters, welcome emails, etc.
It is also possible to design subscription forms for your email list, or to customize WooCommerce emails, especially by automating them.
MailPoet is an “old-timer” in the WordPress ecosystem. For those who have some experience with our favorite CMS, you may know the plugin under its former name: Wysija.
The latter was born already a decade ago, in 2011. With this mission in mind, as stated on the official website of the tool: “build a simple, intuitive, and rock-solid solution for WordPress”.
Over time, it has expanded its range of features. From a “simple” plugin to send a newsletter, it has now become a complete Swiss army knife that allows you to perform many actions found in most email marketing tools.
And this, without ever abandoning one of its initial goals: to remain easy to use. That’s part of the reason why it has managed to build a solid user base.
According to the figures it communicates, the MailPoet plugin is used by 500,000 users worldwide, including 8,000 premium customers, and not the least (TripAdvisor, DHL, Decathlon etc.).
What are the reasons for this success? The answer is in the next part.
Why is this plugin interesting?
If MailPoet seduces (overall rating of 4.5/5 on the official WordPress directory), it’s because it has several unique advantages that make it stand out from the competition:
- It is used directly on your site’s dashboard, without having to leave WordPress, unlike many third-party emailing solutions like Mailchimp, for example. The user who is familiar with WordPress will not have any additional learning curve to expect, for a significant time saving.
- It can be customized from the content editor (Gutenberg), which is all too rare at the time of writing.
- MailPoet allows you to send emails, to capture them thanks to opt-in forms while offering a very advanced integration to WooCommerce.
- As mentioned before, it is very easy to use and intuitive. We will of course develop this point in the following parts.
- It has a free version that can accommodate up to 1,000 subscribers.
- It works with many plugins related to emailing (e.g. famous email capture forms such as Thrive Leads, Bloom, OptinMonster).
- It offers an excellent deliverability rate (98.5% according to its figures), especially because since 2017, it has offered its own email sending service, to avoid your emails ending up in your readers’ spam folder.
After this presentation phase, let’s get to know MailPoet better. We will first review the first selection criterion when we are about to choose a tool for email marketing: its usability.
Ergonomics and usability
A clear and concise dashboard
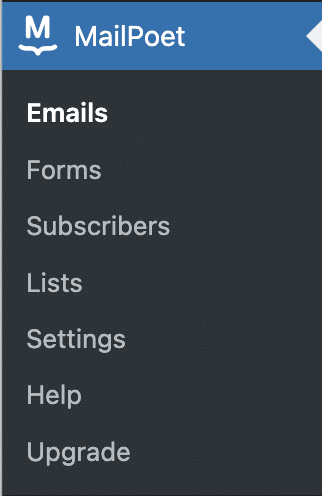
When you enable MailPoet, you will be pleasantly surprised to discover a simple and clear settings menu. You can see at a glance the actions you can perform:
- Create emails
- Design forms
- Manage your subscribers and lists
- Adjust settings
- Access the documentation, which is very exhaustive and precise.
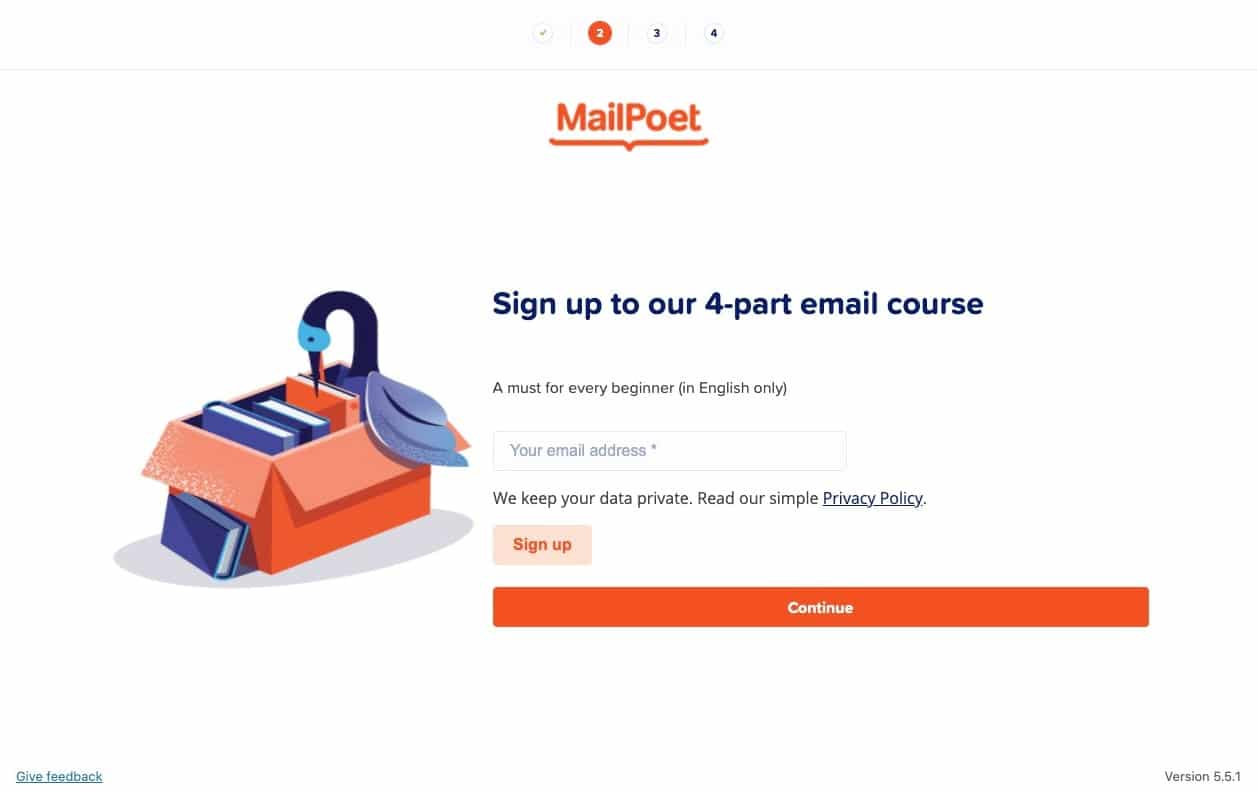
To make the user feel comfortable, the designers of MailPoet have also thought of supporting him when he discovers their tool. For example, a configuration wizard offers to sign up for an email course to get started with the plugin.
After this warm first contact, you will surely want to dive into MailPoet’s options.
You will then find a clean and colorful interface, with a precise visualization of the actions to perform, thanks to clearly visible buttons:
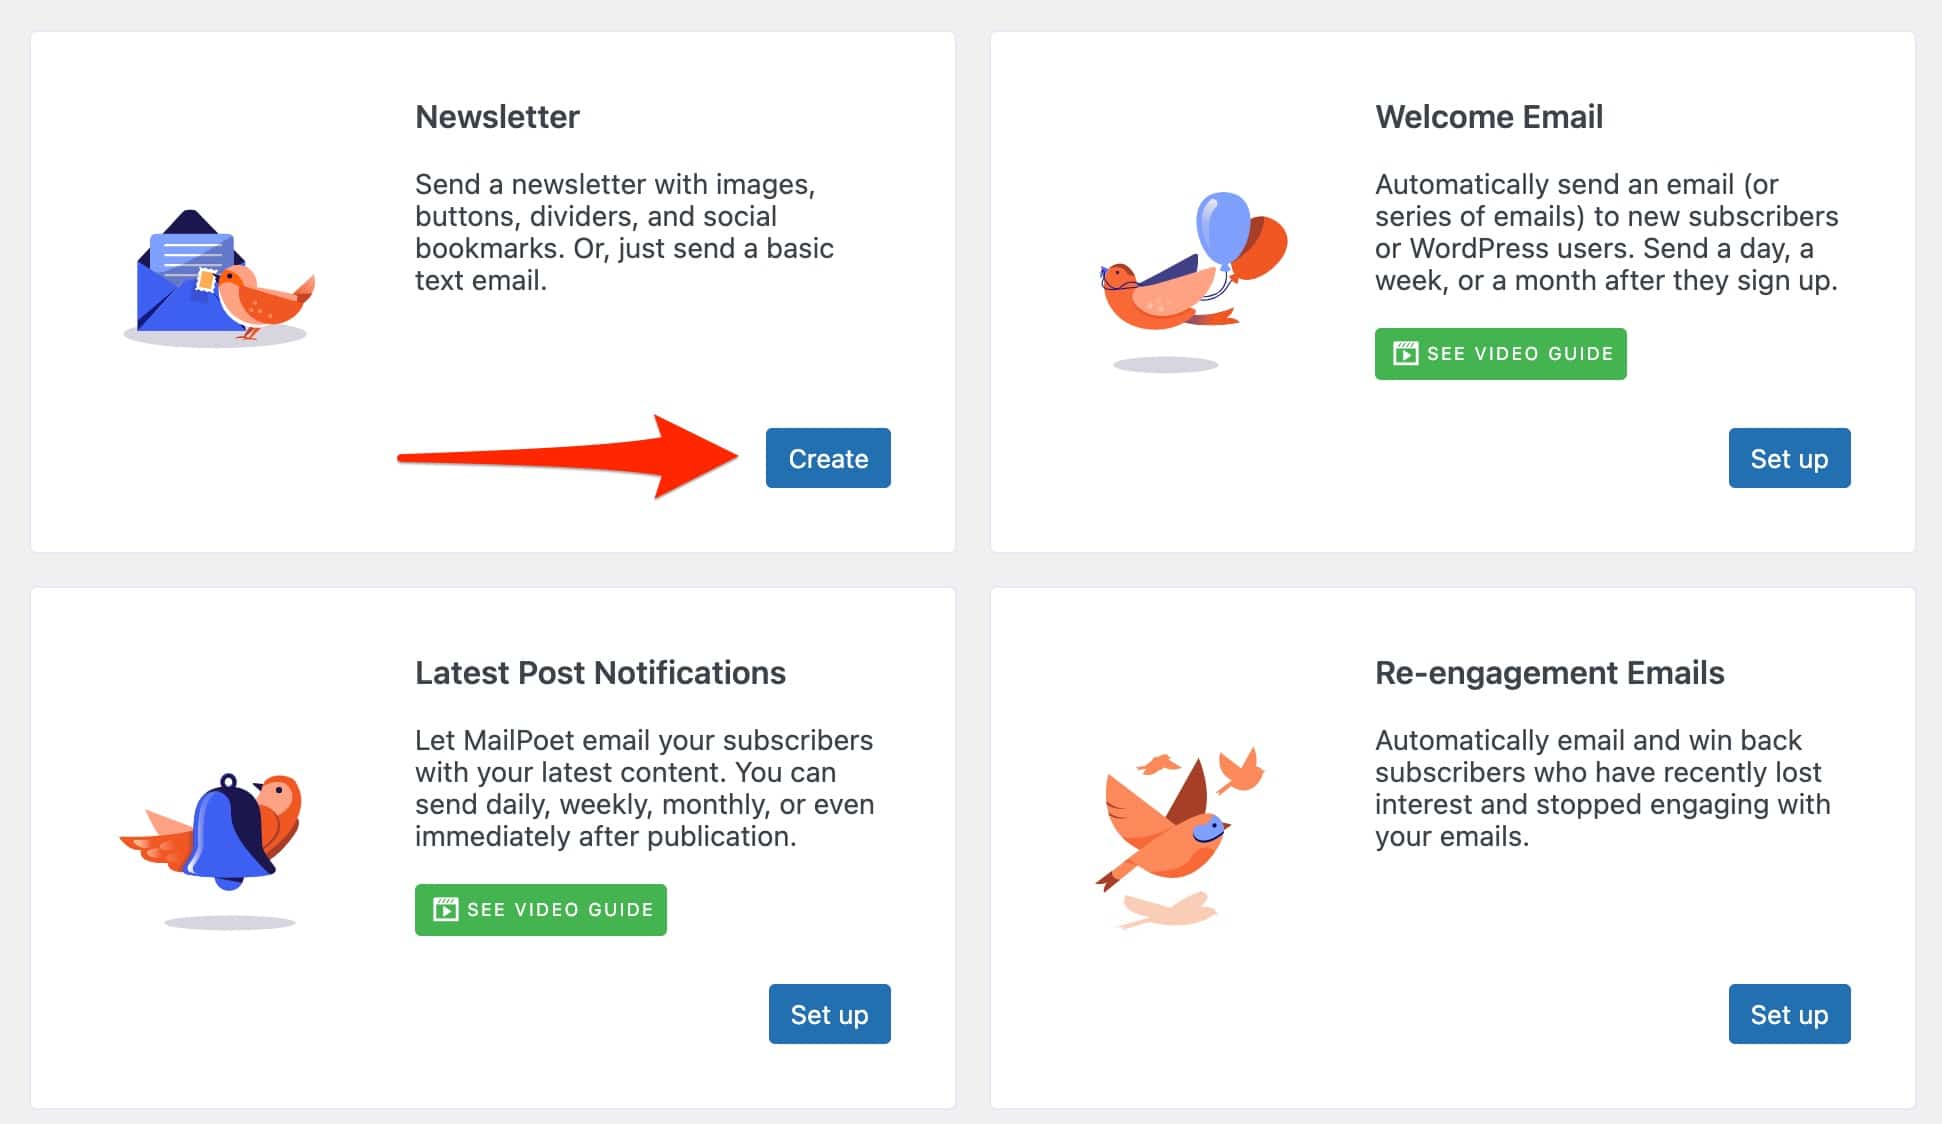
Even if you only want to use MailPoet in the free version to start with, I strongly advise you to create a premium account as soon as possible. It’s free for up to 1,000 subscribers and allows you to have access to more advanced statistics on your emails, to MailPoet’s email sending service and to priority support.
A nice and intuitive drag-and-drop interface
Now let’s get your hands dirty a bit more and discover the plugin’s drag-and-drop interface.
As with the settings, the emphasis is on simplicity. The designers of MailPoet have decided not to overwhelm the user with unnecessary options.
Here’s what they say: “We designed our drag-and-drop builder to be intuitive enough for anyone to use, no matter how experienced you are. With fewer and more focused design options, you’ll quickly master MailPoet and get emails into your subscribers’ inboxes faster.”
In fact, it’s hard to argue with them. Everything is easily understood at a glance: your editable content is placed on the left, customization options (content, columns, style) on the right.
Don’t expect advanced effects: here, we focus on the essentials to help you send an effective and functional newsletter quickly.
To achieve this, you can add on the fly the elements of your choice with a simple mouse movement, and modify directly on your page the elements already integrated on the template you have chosen.
Changes are visible in real time, thanks to a functional WYSIWYG (What You See Is What You Get) structure:
Each template is separated into different blocks (e.g. text, image, buttons) on which it is possible to perform several basic actions (edit, duplicate, delete, move etc.).
A simple click on the area to be modified opens a more extensive contextual menu, see below:

In the end, the usability is really intuitive, that’s the word. We like it!
Now you know how MailPoet works. Later on, let’s remain on the practical aspect. To do this, we will follow the path that a user would take if he started from scratch, by taking 4 essential steps, namely:
- Create a list.
- Set up a subscription form for this list on your site.
- Prepare a welcome email.
- Design and send the newsletter.
Is it all good? Then follow the guide.
How to create a subscriber list on MailPoet?
A subscriber list contains all the people who have given you their email address to receive your future newsletters. It is an essential element, on which to focus first: no subscribers, no newsletter. 😉
By default, MailPoet already offers several lists when you enable its plugin. For example, the “Newsletter mailing list”. You can use it to “store” the email addresses you will collect. This will work without any problem.
For the sake of personalization, it can also be interesting to create your own list, with the name you want.
To do this, go to MailPoet > Lists, then click on the “New List” button at the top of the page.

Give it a name, possibly a description, and that’s it.
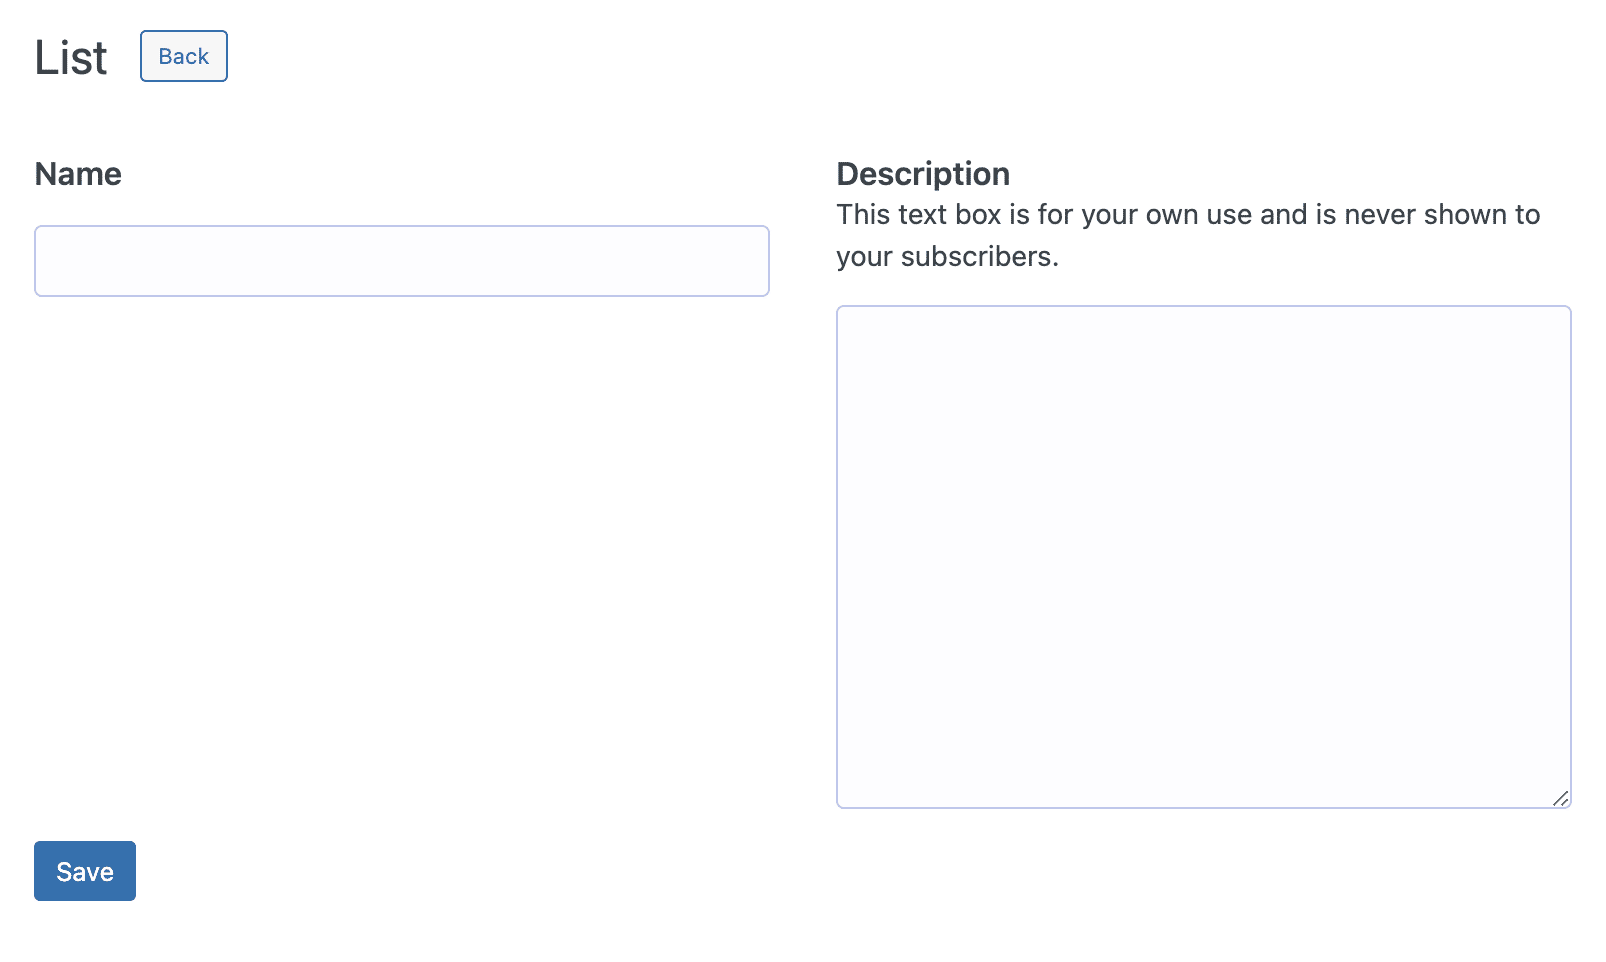
Under “Lists”, you can manage your lists (create, delete, edit, duplicate) and your segments.
By segmenting your list, you will group certain subscribers based on one or more criteria, in order to communicate with them in a more personalized way.
This is not necessarily useful when you are starting out and have few subscribers, but it is good to know this for the future when your list grows.
With MailPoet, you can create segments based on:
- A user’s role.
- An action performed by a subscriber on an email (e.g. a segment for those who opened an email. Another segment for those who clicked on a link).
- WooCommerce actions performed by your subscribers: product purchase, product purchase in a given category, number of orders placed, amount spent, etc.
These segments are dynamic, which means that as soon as a subscriber or a customer performs the required action (e.g. purchases a product), it is automatically added to the relevant segment.
In addition, several segments can be combined to create conditions (for example, if a new subscriber has clicked on a link AND placed an order for a total of X dollars on your WooCommerce store, he will be integrated to this or that list).
Now let’s move on to phase 2: adding a subscription form to your WordPress site.
How to create an email capture form with MailPoet?
In order to send your beautiful newsletters created with MailPoet, you will need the email addresses of your recipients. But who are those recipients? The subscribers to your email list, of course!
That’s easy enough to understand. But let’s complicate now: how to get these email addresses, which are not going to fall out from the sky, as you can imagine?
Answer: by using an opt-in form. As you can see, this subscription form is essential to the success of your email marketing strategy.
As fine connoisseurs of this world as they are, MailPoet’s designers have offered their users this essential feature.
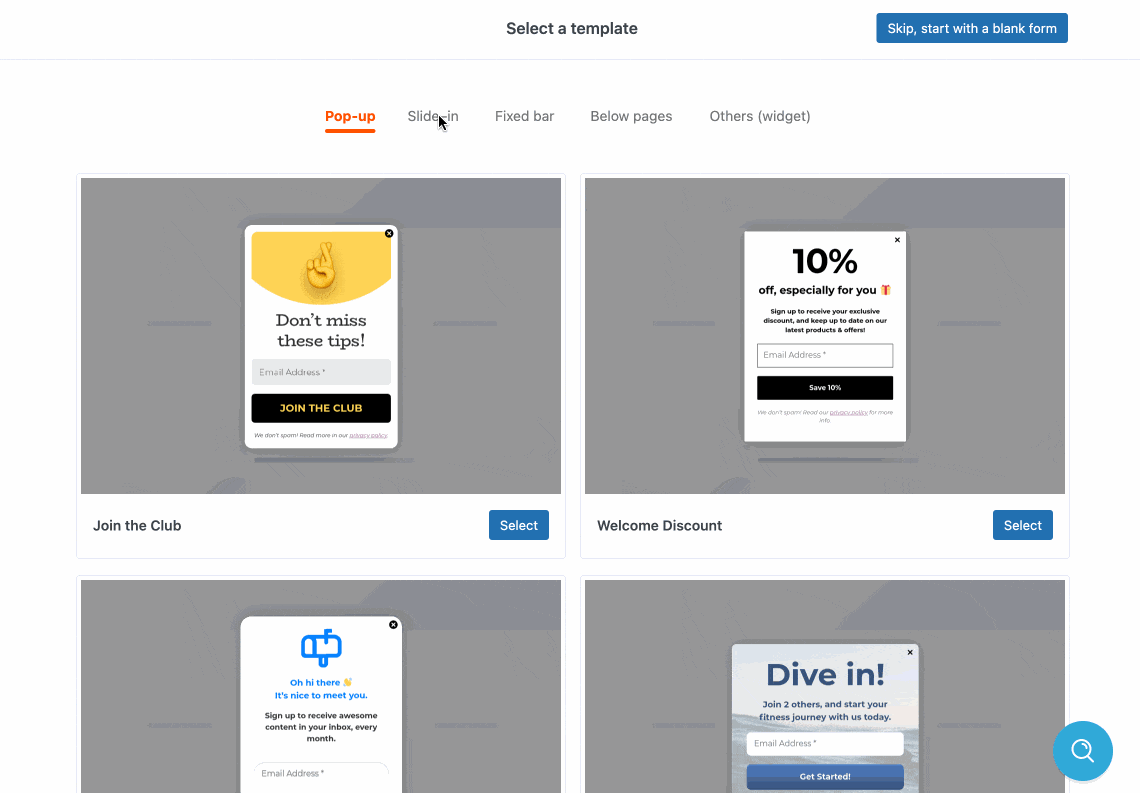
To take advantage of it on your site, go to MailPoet > Forms.
What types of forms can you create?
You will see, you will find easily your way. Designing this type of form follows the same logic as creating a newsletter.
You select a pre-designed template (or a blank form), edit it, then integrate it into your site. Three steps only. That’s it.
MailPoet offers 12 forms that you can position in different areas and in different ways:
- Pop-up: in this case, a pop-up window will be highlighted on your visitor’s screen to propose to sign-up.
- Slide-in: the form is revealed in a corner of the screen.
- Fixed bar: the form is displayed and sticks horizontally to the top or bottom of your page.
- Below pages, which speaks for itself.
- Others (widget) to display your form in a widget area provided by your theme (e.g. in a sidebar).
Take advantage of the power of the content editor to customize your capture form
You’ve chosen your template? Great. The next step is to use your content editor, Gutenberg.
This is one of the differences with the newsletter creation, which was done on a dedicated page, but not in your content editor.
Well, frankly, it’s a very good idea. If you’re writing blog posts, you’ll find exactly the same interface and will be able to add your own personal touch.
Change the overall look
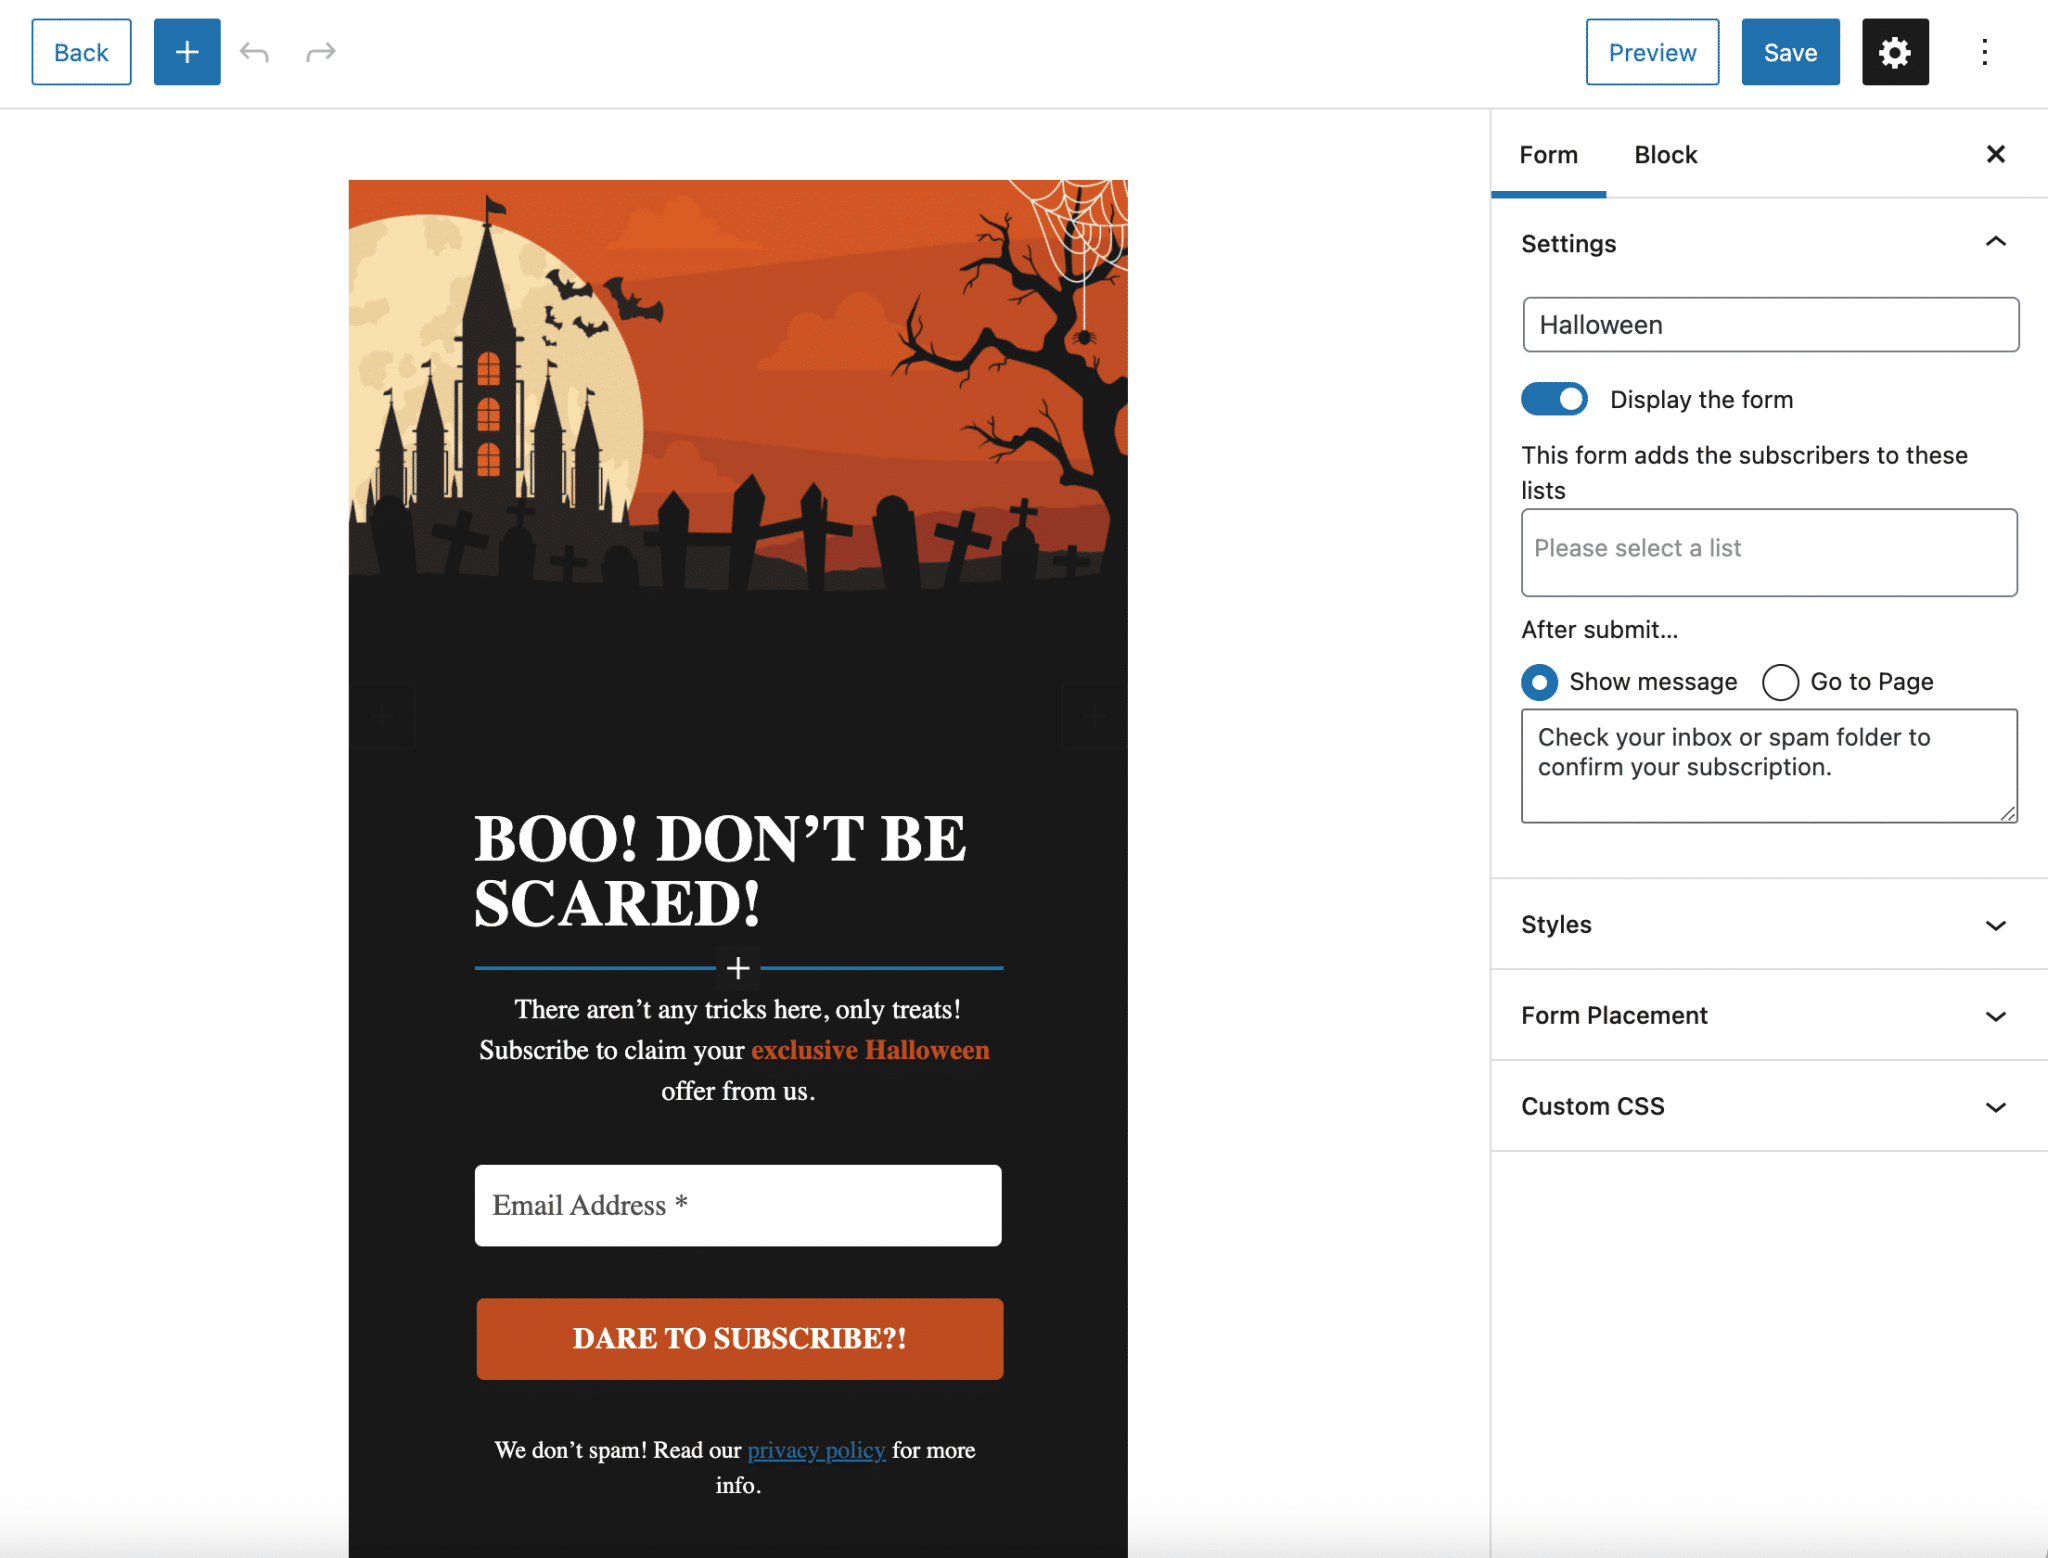
Of course, it is possible to get rid of the chosen template and modify it as you wish. You can actually change the general appearance using the “Form” tab, by doing the following:
- Choose the list which the people who fill in their email will be assigned to.
- Display a customized message or redirect to a specific page to confirm the subscription.
- Change the background color and image, the font color, style and font family.
- Choose the style of the close button.
- Add custom CSS code.
Work block by block
To go more into detail, each form is composed of blocks, the principle on which the WordPress content editor is based.
A block is a sort of ready-to-use container that includes material you can customize (e.g. text or image).
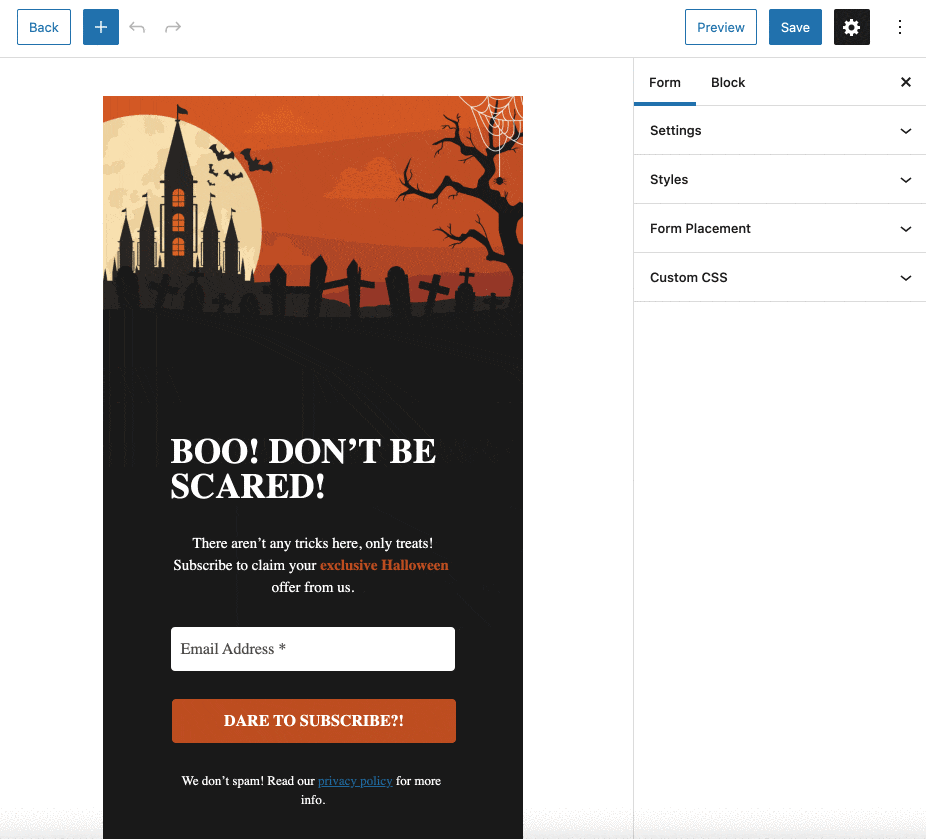
You can fine-tune each block by clicking on it. For example, I can modify my “Image” block below by playing with its style, or its dimensions.
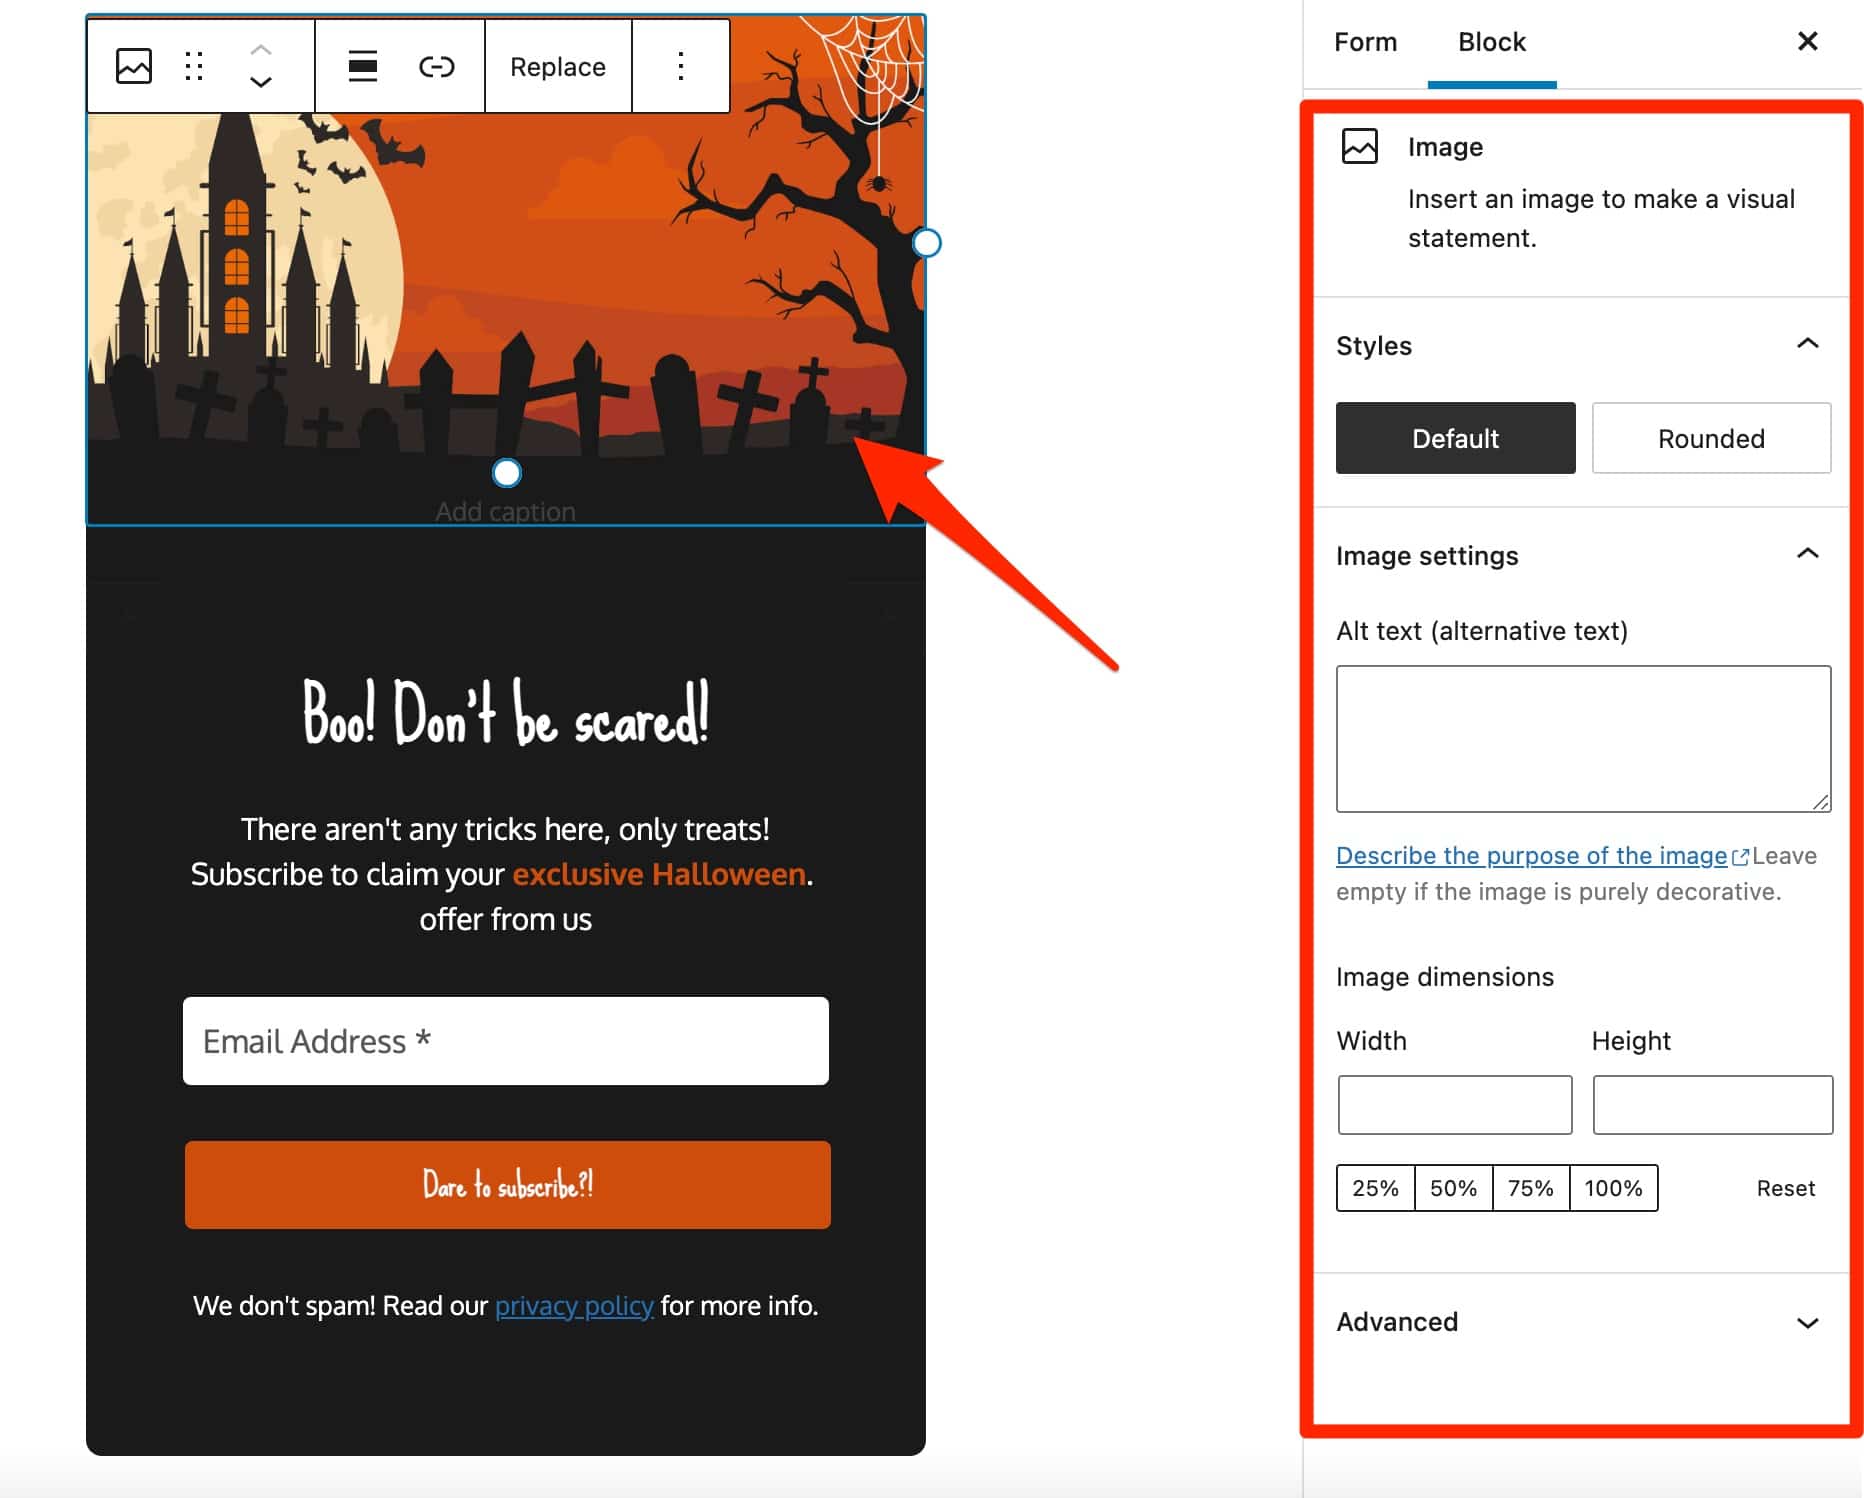
Regarding the fields of your form, which are very important, the default choice is quite small. You can add the fields “Name”, “First name”, “List selection” and “Custom HTML”.
Note that the fields “Name”, “First name” and “Email” (available by default on each form) will often be enough to create this kind of form.
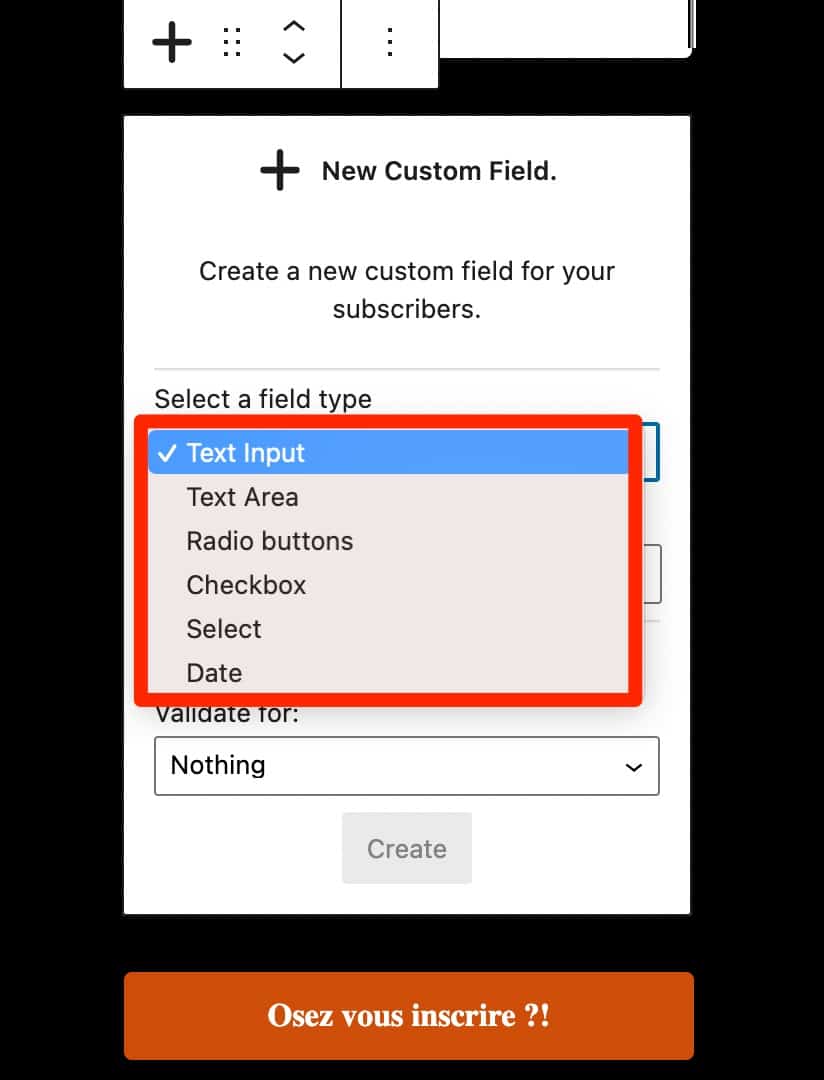
However, you may be stuck if you need a very specific field. Fortunately, MailPoet has also thought about this and allows you to create a new custom field thanks to a dedicated block (called “New Custom Field”), which offers the following additional fields:
- Text Input
- Text Area
- Radio buttons
- Checkbox
- Select
- Date
Once your form is complete, save it and add it wherever you want in your content.
To do this, simply go to the post or page of your choice, then add the dedicated MailPoet Gutenberg block to the area of your choice:
Now you’re ready to grow your list of subscribers.
Simplicity, efficiency: I don’t have much else to say about creating a subscription form with MailPoet. Or maybe for those who are a bit more into marketing and would like to know more.
MailPoet is richer in options than the famous Thrive Leads, Bloom or OptinMonster, specifically dedicated to email capture. Meanwhile, this is logical. It is not intended to compete with them and MailPoet has decided not to overdo it.
Let’s just say that with it, you have all the basics to start capturing emails without any trouble, and that’s not bad. And if you have your own habits with an email capture tool, you should know that MailPoet works very well with the most famous ones.
On that note, let’s move on without delay to the third phase of the process of creating a newsletter: the preparation of a welcome email.
How to create a welcome email with MailPoet?
A strategic email that shouldn’t be neglected
The welcome email is the email that your users will receive when they give their consent to subscribe to your newsletter and to join your list.
It is very important because it is expected by your readers: its average opening rate is about 50%. It is therefore important to take good care of it. Take the opportunity to thank people for subscribing, and explain what they should expect in your next emails (frequency, topics, etc.).
To write your first lines, go to MailPoet > Emails > Welcome Emails.
I won’t dwell on the design process, which remains the same as for the creation of a newsletter: you choose a template, you customize it and you send it (more detailed information in the next part, don’t worry). However, it is good to note some interesting details.
You can for example choose when this strategic email will be sent (immediately, after a few hours, days or weeks), but also after a specific action of the user (when he subscribes to your mailing list, or when he is added to your site).
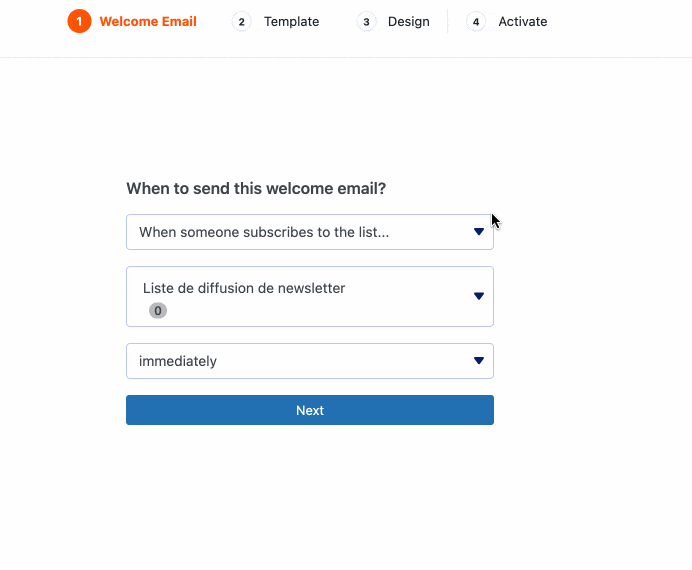
It is indeed thanks to this option that you will be able to send a series of automated emails, at regular intervals. For example:
- A first email immediately after a subscriber has signed-up to your list.
- A second email 24 hours later.
- A third email 48 hours later.
- A fourth email one week later.
You could for example use it to promote a small free training that you will send by email.
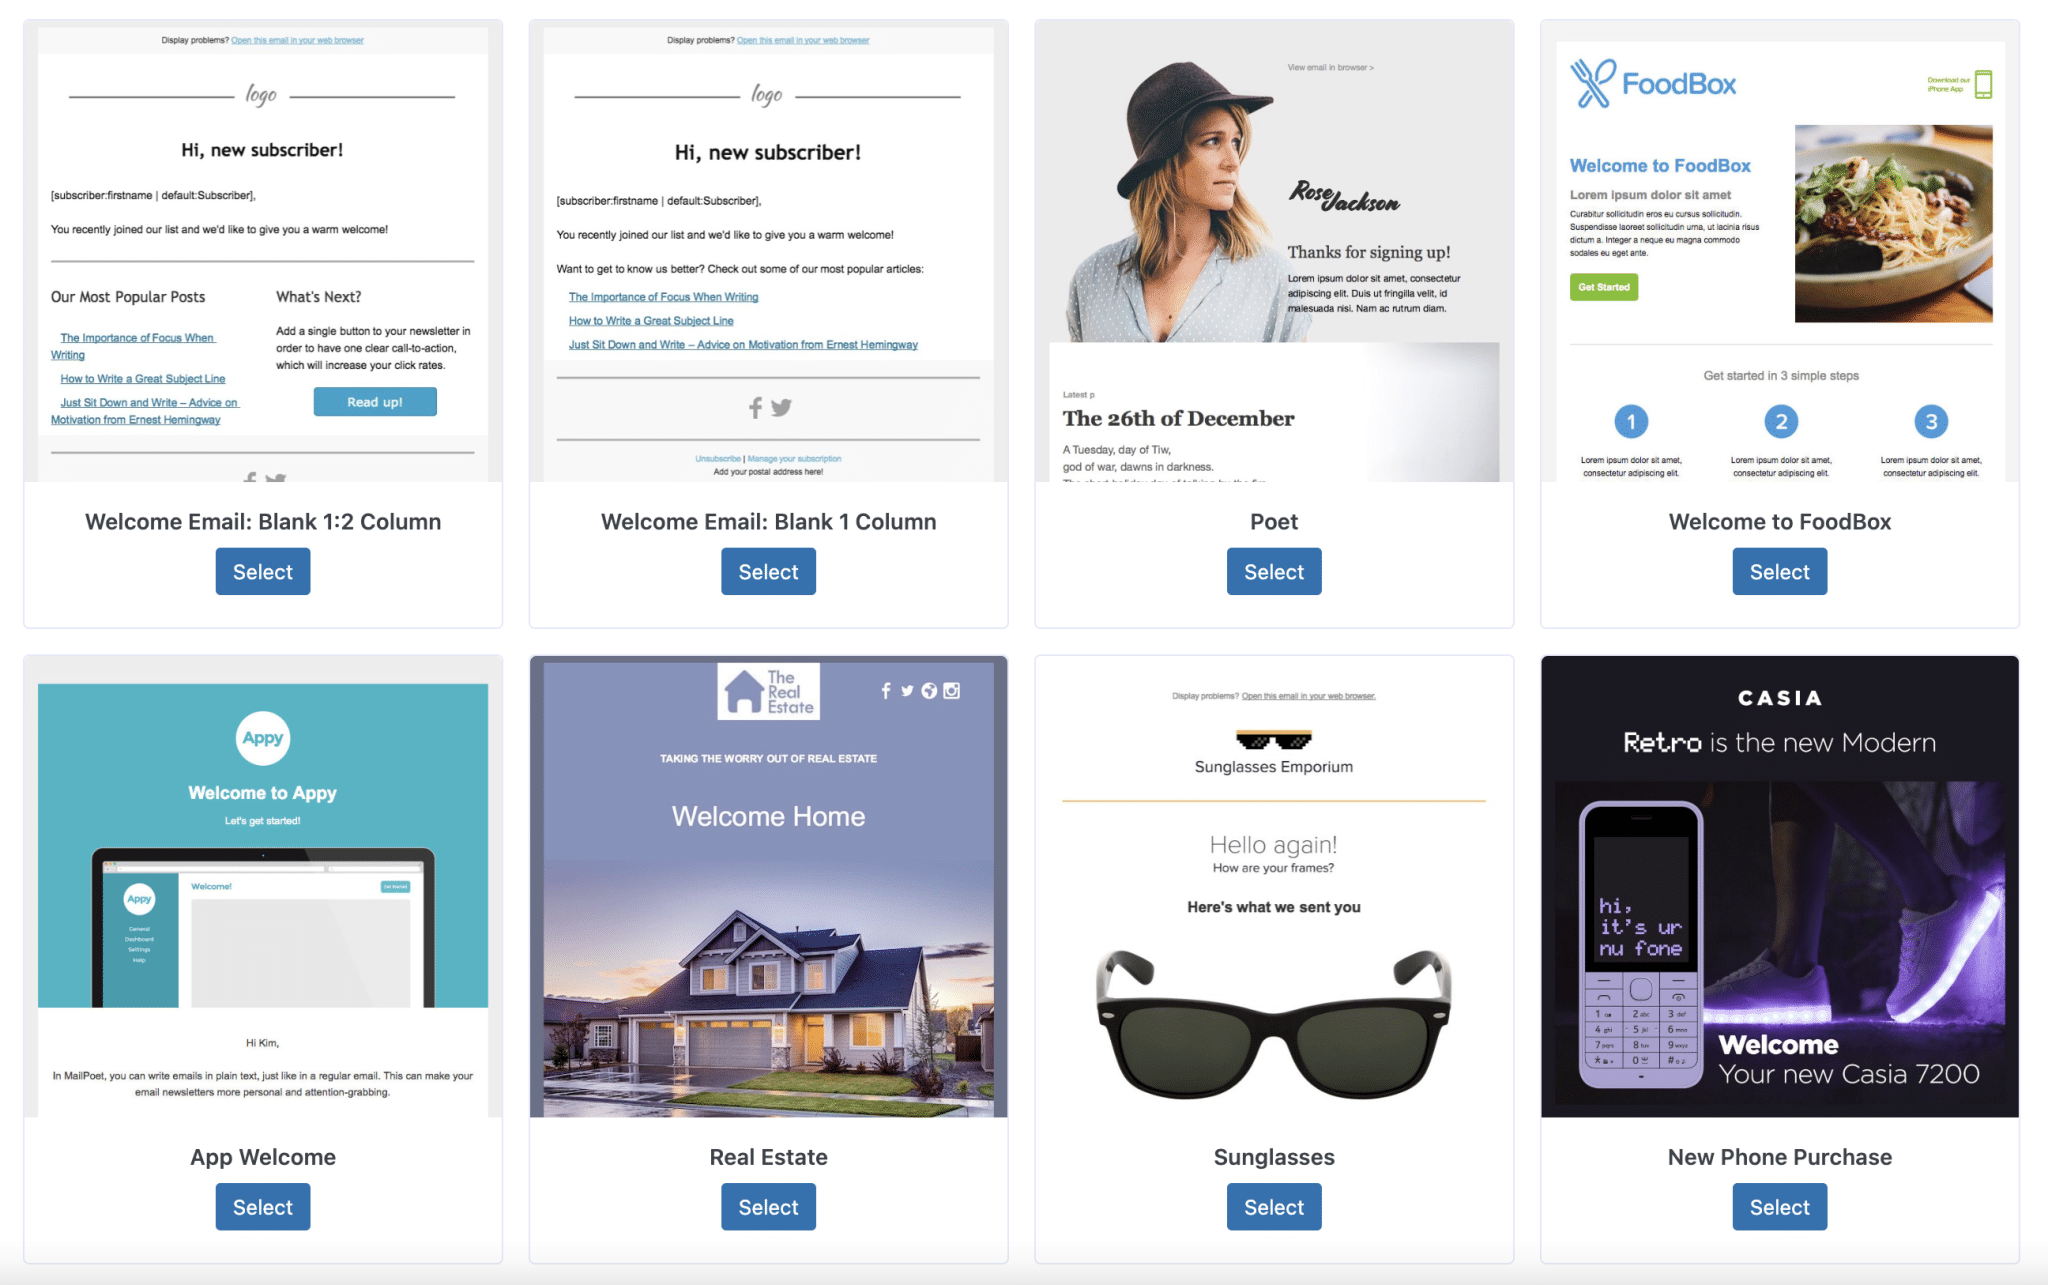
As for the design, at the time of writing, MailPoet offers a total of 10 templates to customize your welcome emails.
To learn more about the configuration of a welcome email, you can check this video guide proposed by MailPoet:
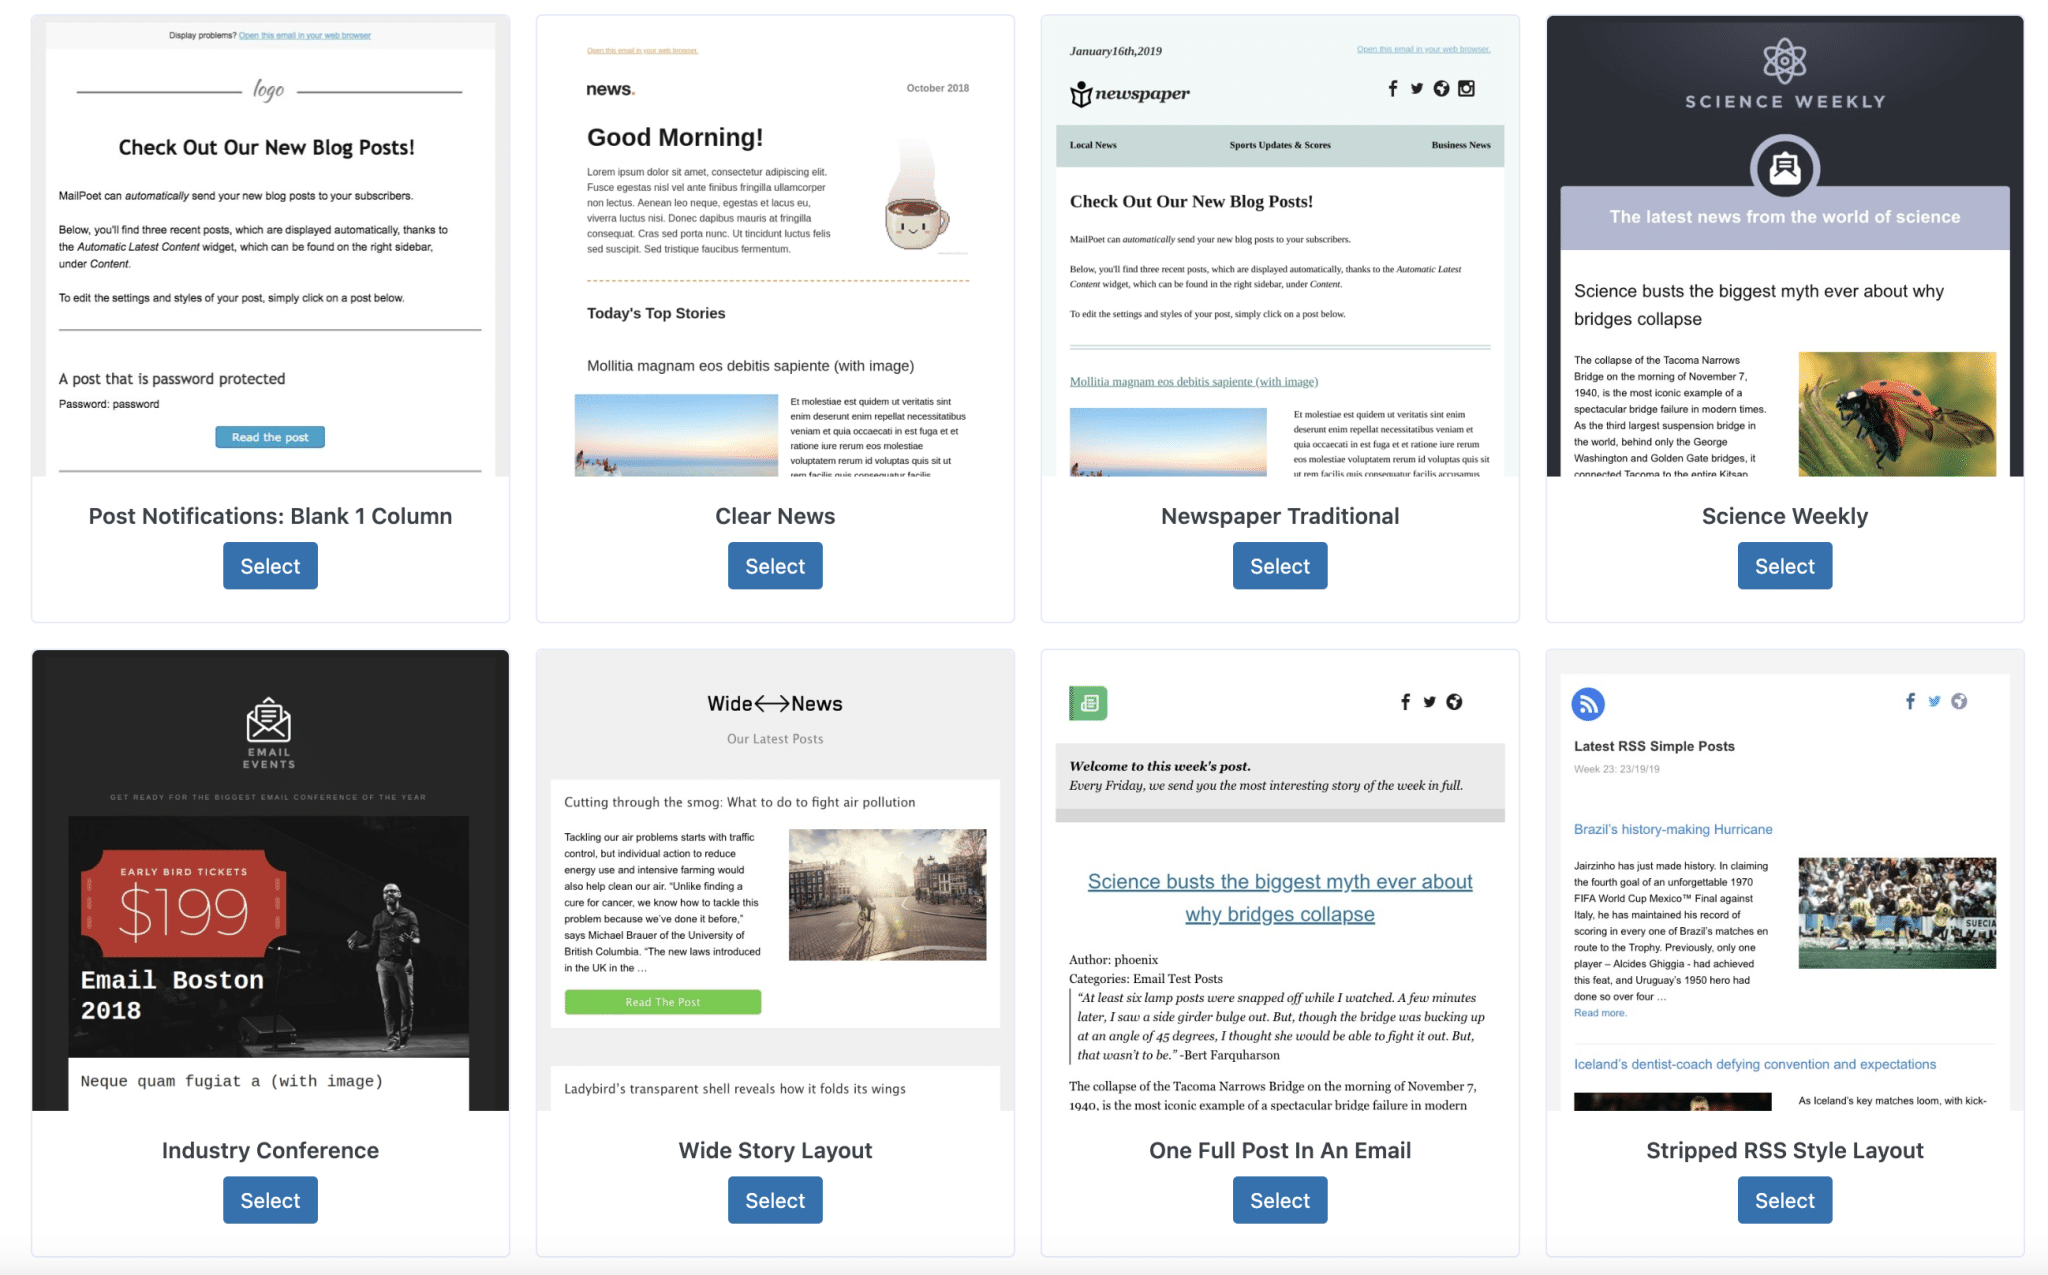
In addition to your newsletters and welcome emails, MailPoet also offers the possibility to send emails to automatically notify your subscribers of the release of a new post (under: MailPoet > Emails > Post Notifications).
Post notifications
The notifications of recent posts will be used to send “an email to your subscribers with your latest content, one day, one week or one month after its publication”, as detailed in MailPoet.
Here again, you can select a frequency (immediate, daily, weekly, monthly) and, if necessary, a sending schedule.

9 specific templates are proposed to get you started.
This feature can be interesting to keep a privileged and direct contact with your subscribers, while ensuring that you redirect traffic to your WordPress site.
However, be careful not to send too generic emails. If you want to retain and satisfy your readers in the long run, it’s a good idea to personalize your emails.
Need to know more about creating latest post notifications with MailPoet? Take a look at their in-house video guide:
After creating a list, a subscription form and a welcome email, let’s move on to the last step, the one you’re probably most looking forward to: creating a newsletter.

How to create a newsletter with MailPoet?
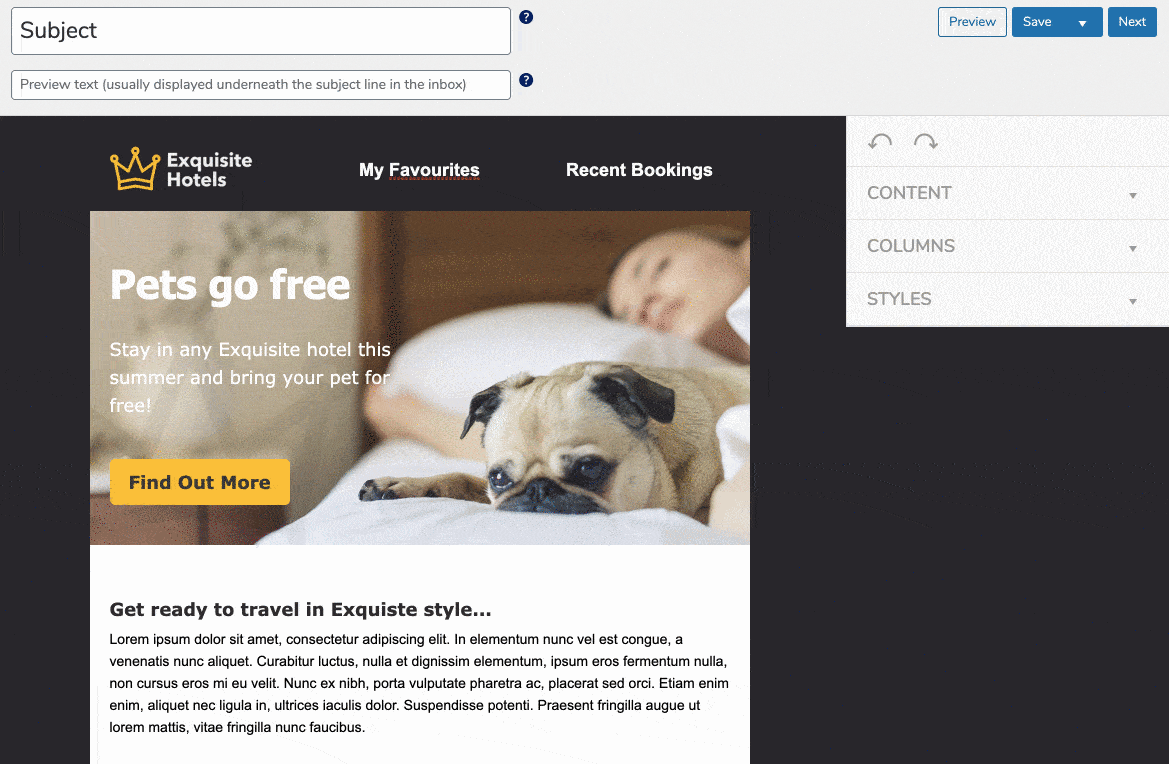
To do so, click on MailPoet > Emails, then select Newsletter.
Step 1: Choose an email template
To make the editing process easier, MailPoet provides you with 46 ready-to-use templates that must be divided into two parts:
- Templates with simple text (without formatting or images). There are 5 in total.
- Templates with formatted text, colors and images. 41 templates in total are available.
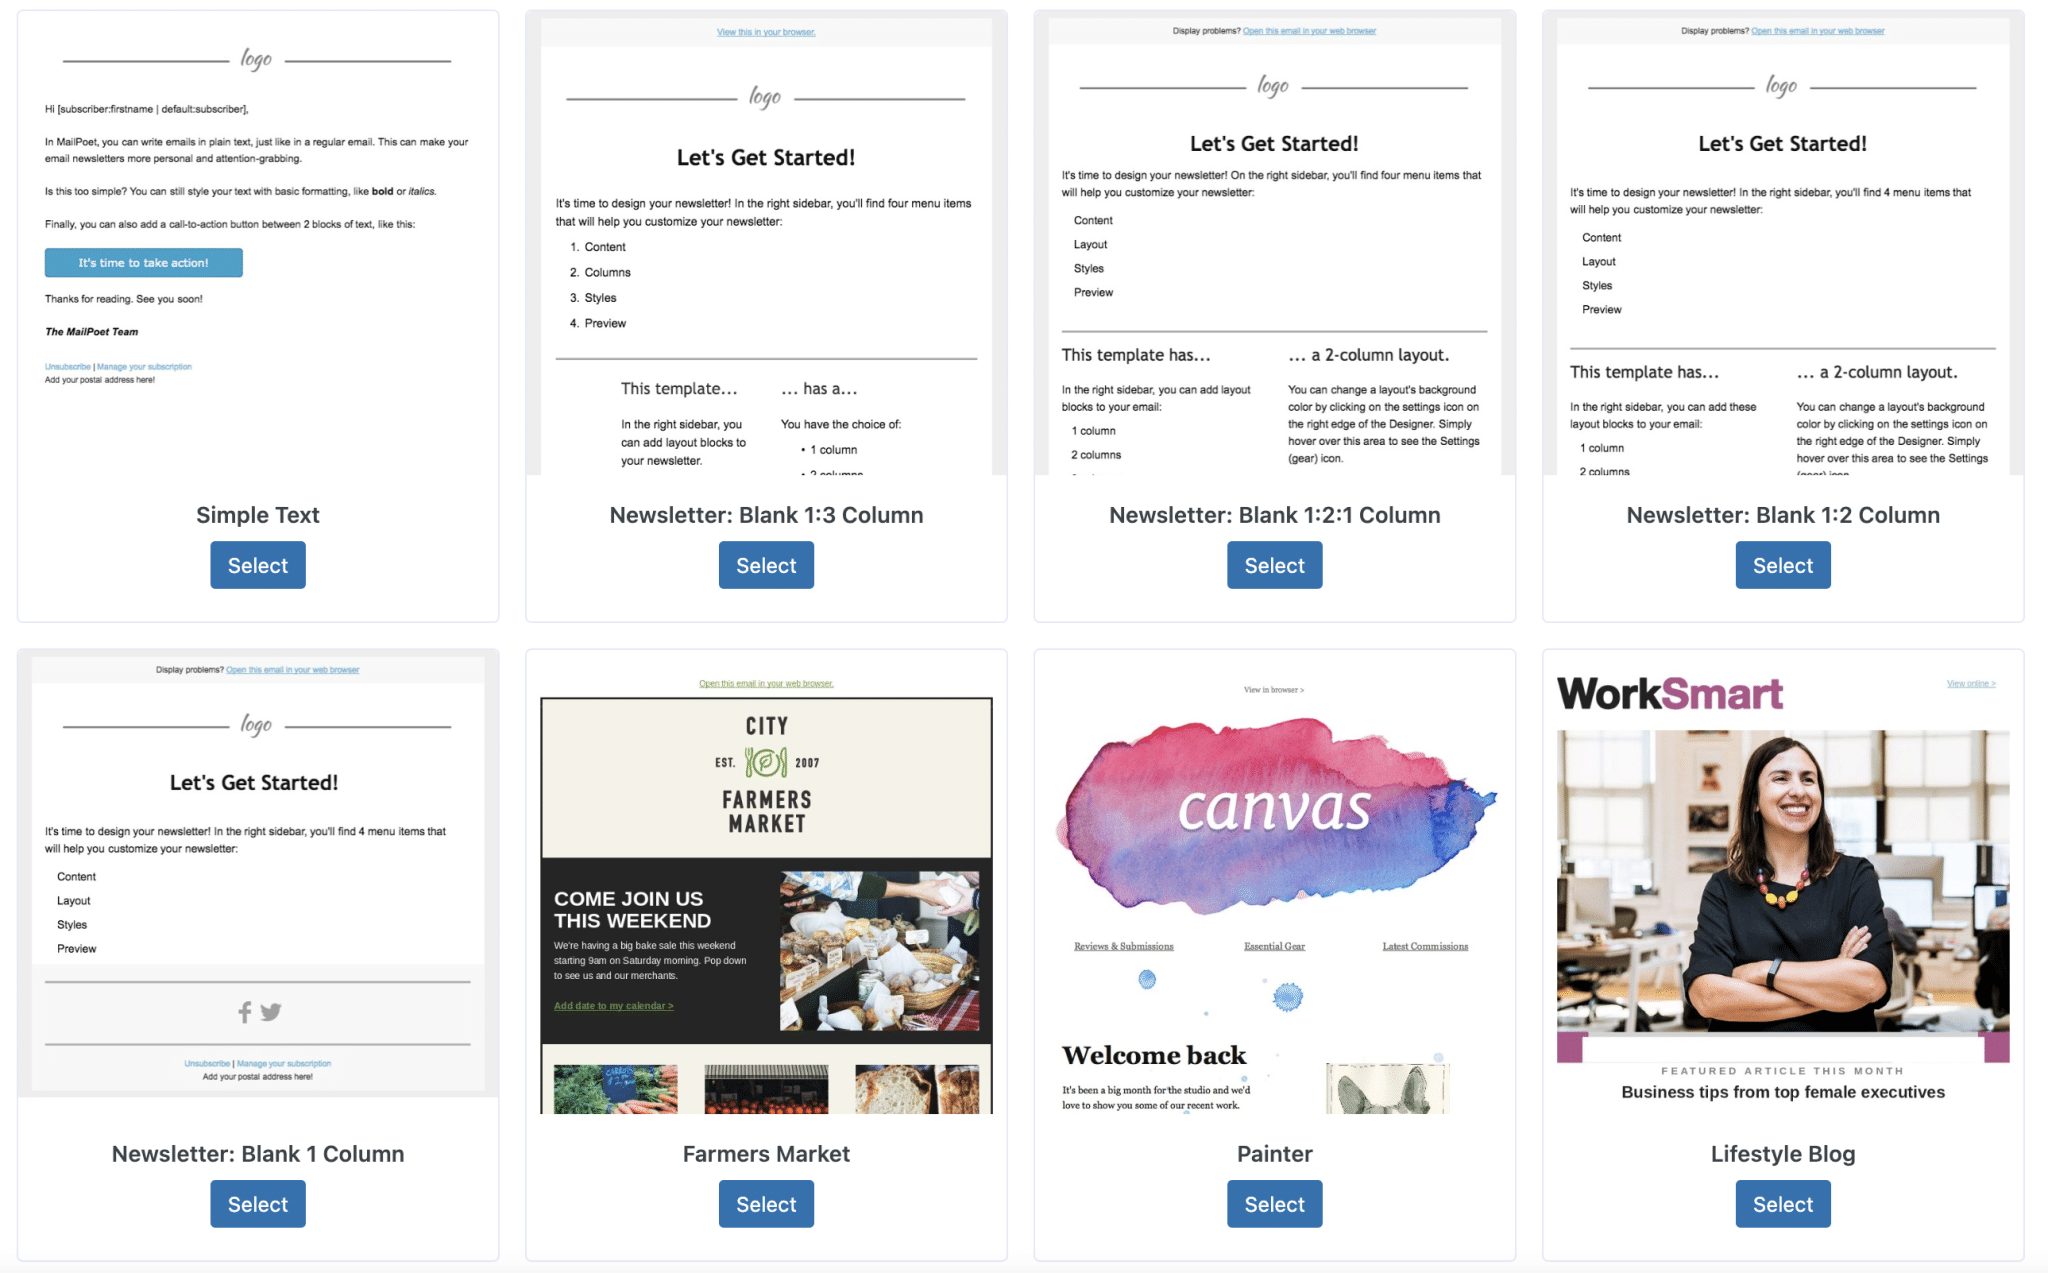
The templates cover a wide range of fields, in an attempt to meet the needs of as many users as possible, regardless of the niche in which their business is.
That’s why you’ll find email templates adapted to different fields: hotels, restaurants, religion, fashion, sports, news etc.
If the design of the templates is quite classic, the idea is to propose a functional base to be remodelled. You are free to customize it according to your wishes, and your style guide. 😉
This is precisely the purpose of the next step.
Step 2: Customize your MailPoet template
When you select a template, MailPoet sends you to an editing page, always on your WordPress admin interface. The customization process happens without leaving WordPress, don’t forget.
At this point, you are able to:
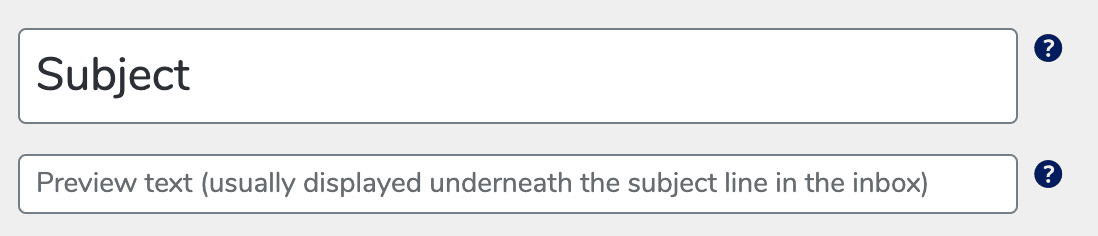
- Define your email subject and preview your text.
- Customize the body of your email (text + design) using the drag-and-drop editor I introduced earlier in this post. It is possible to add specific content blocks (e.g. text, image, button, social network icons), while playing with the visual aspect (choice of font, size, text and background colors etc.).
- Edit the footer of the email. For example, MailPoet had the good idea to automatically include a link to unsubscribe from the newsletter (mandatory).
Also note, a very useful feature to save the changes you applied to your template. If you are going to use it frequently, it can be useful.
Step 3: Adjust the sending settings
You are now in the final stage of creating your newsletter with MailPoet. In order to send it correctly, you need to make some final adjustments:
- Check your subject and preview text. It is still possible to modify them before the email is sent.
- Select a mailing list (your email address base collected beforehand). By default, MailPoet offers a list that it has already created, called “Newsletter mailing list”. If you have created your own list, you can choose it from the drop-down menu.
- Verify the sender’s name and email (you, in principle), as well as the address for possible answers from your subscribers.
- Schedule the sending, if you don’t want to send your newsletter right away.
- Take advantage of advanced statistics related to the click rate of your newsletter, thanks to the integration of Google Analytics (for the premium offer only).
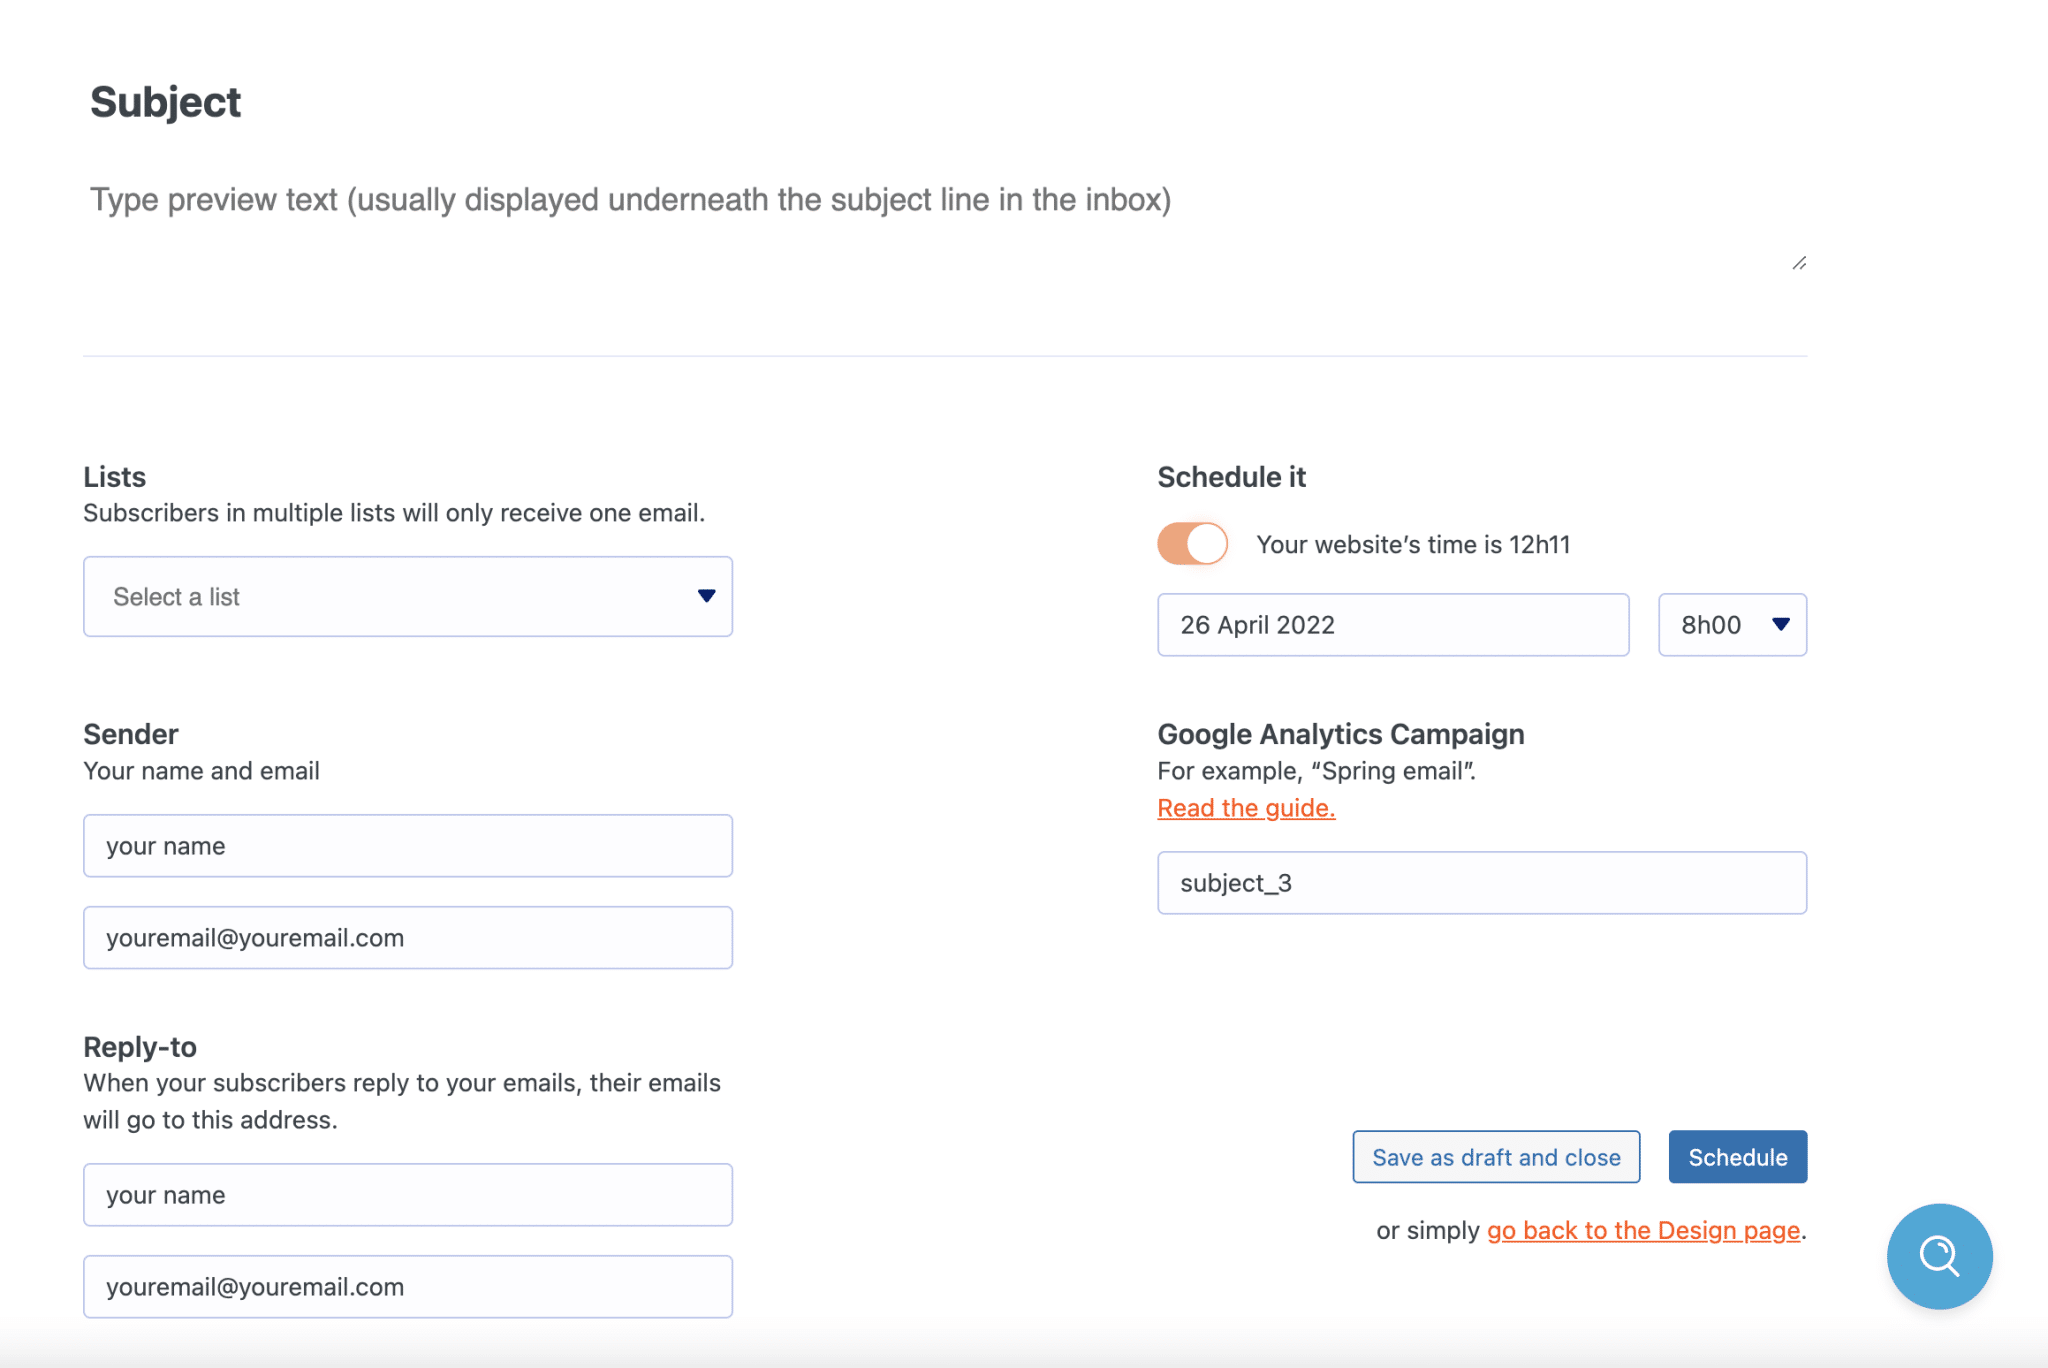
If everything is good for you, you can send your newsletter or schedule it.
There you go, it was a piece of cake, wasn’t it? Come on, since you’re well on your way, let’s continue with WooCommerce.
MailPoet and WooCommerce: advanced ecommerce features
You will see that MailPoet has several very interesting features specific to WooCommerce. And this specificity could get even stronger in the coming months and years for a simple reason.
Since December 2020, the MailPoet team has now joined WooCommerce, which is owned by Automattic, the company that contributes the most to WordPress.org.
So we can imagine that the email integration of WooCommerce and WordPress will go even further in the future.
In any case, if you have an online store and want to do email marketing, you’ll be particularly happy.
Currently, MailPoet allows you to do the following:
- Send an email to your visitors who abandon their cart before purchase.
- Send an automatic email after the first purchase made by a customer, based on a product type or category.
- Add a newsletter signup form on the checkout page.
- Customize WooCommerce default emails using the MailPoet editor.
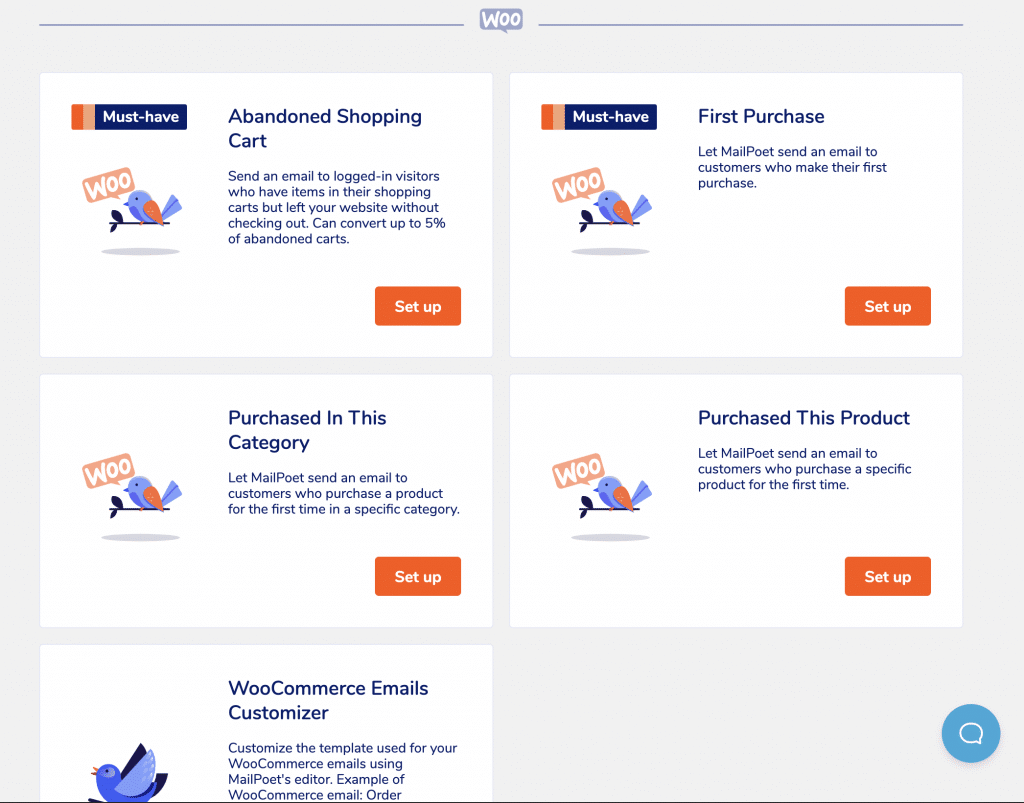
For abandoned shopping cart and first purchase emails, the mechanics are the same as for newsletters and email capture forms: you choose a template, customize it and send it. So I won’t dwell on it.
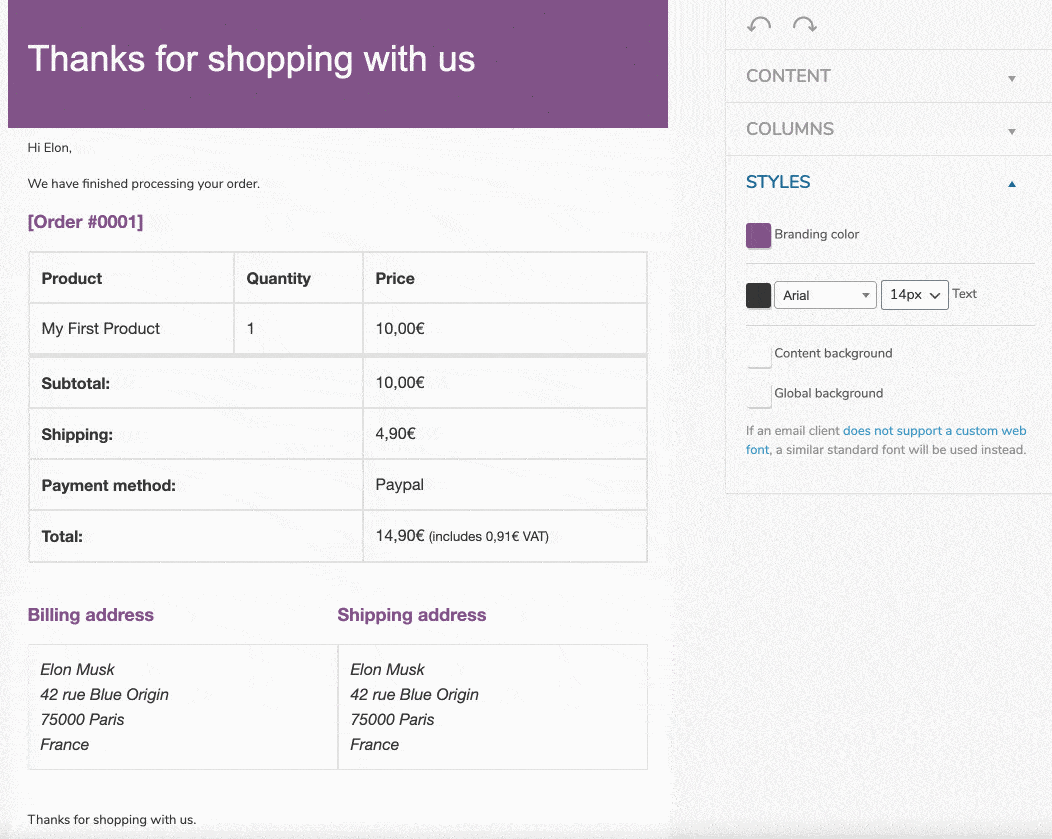
On the other hand, the WooCommerce email customization tool deserves a few lines of introduction. You can find it under MailPoet > Emails > WooCommerce > WooCommerce Email Customization.
How does the WooCommerce email customization tool work?
Through the MailPoet editor, it is possible to customize some transactional emails sent by WooCommerce:
- New account
- Order in progress
- Completed order
- Customer rating
But be careful, you don’t have control over everything! You can’t modify the content automatically generated by WooCommerce.
Apart from that, you can still add your personal touch by first changing the overall style of the email:
- Brand color
- Text color, size and font choice
- Background color
- Logo change
Then, you are able to add multiple content blocks (text, image, social media icons, button, divider, spacer) in areas where content is not automatically generated by WooCommerce.
Finally, you can add up to 3 columns containing the blocks of your choice. In action, it looks like this:
Once your emails are sent, the MailPoet dashboard gives you access to the statistics generated by your emails, including the click-through rate and revenue generated by each email.
Congratulations, you’re now able to manage the whole creation-customization-sending aspect of your online store. You now know how to manage all the creation-personalization-sending of emails. Without any transition, let’s move on to the management of your email marketing actions.
How to manage your subscribers and follow up on your actions?
Subscribers on MailPoet
To take care of your subscribers and pamper them while respecting the email marketing good practices, MailPoet offers several interesting options.
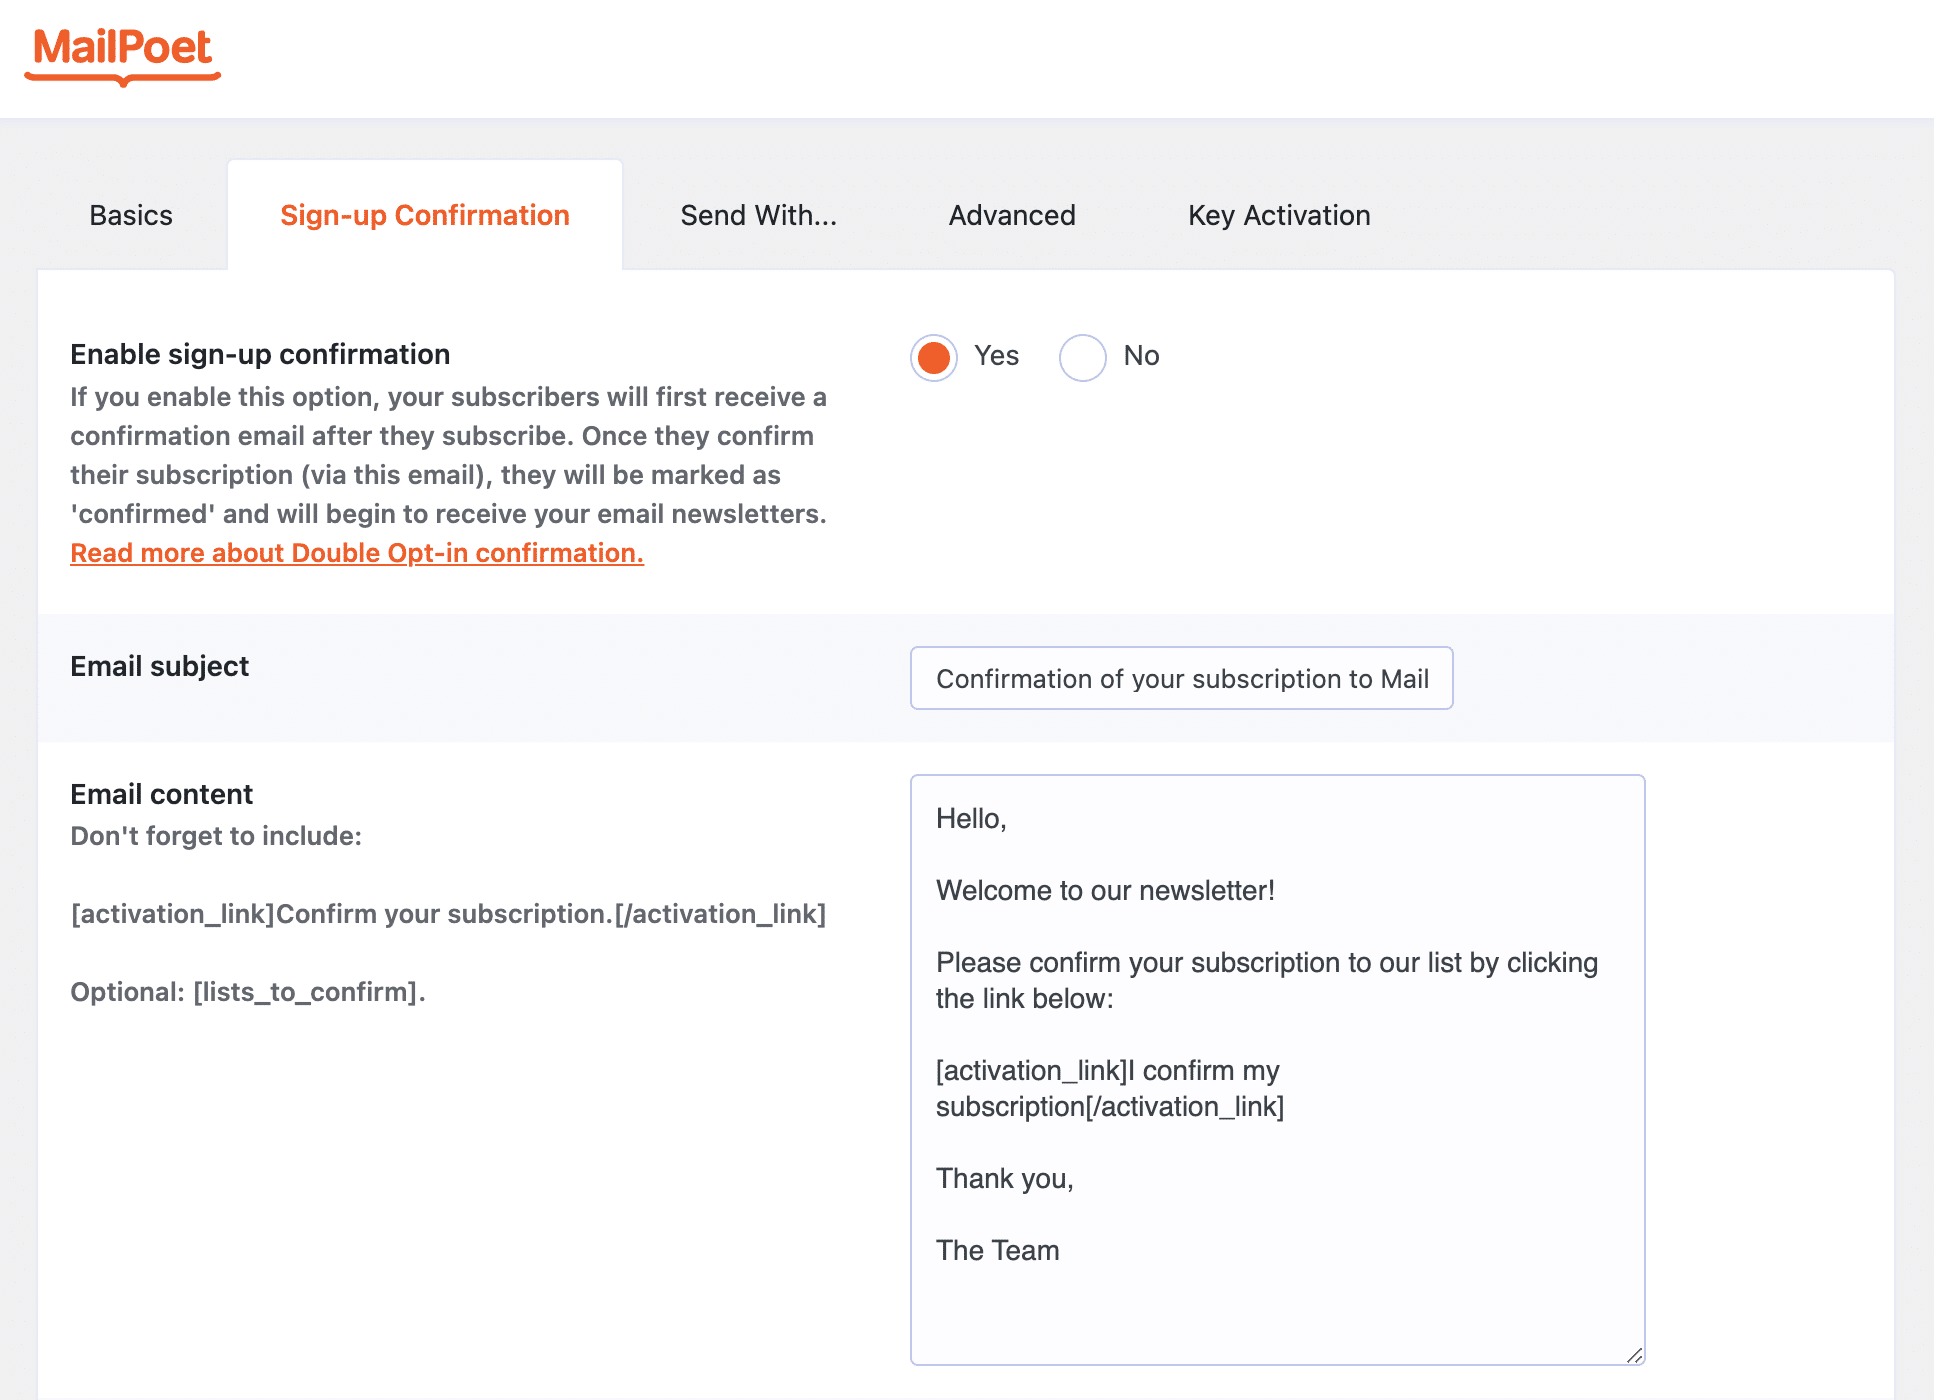
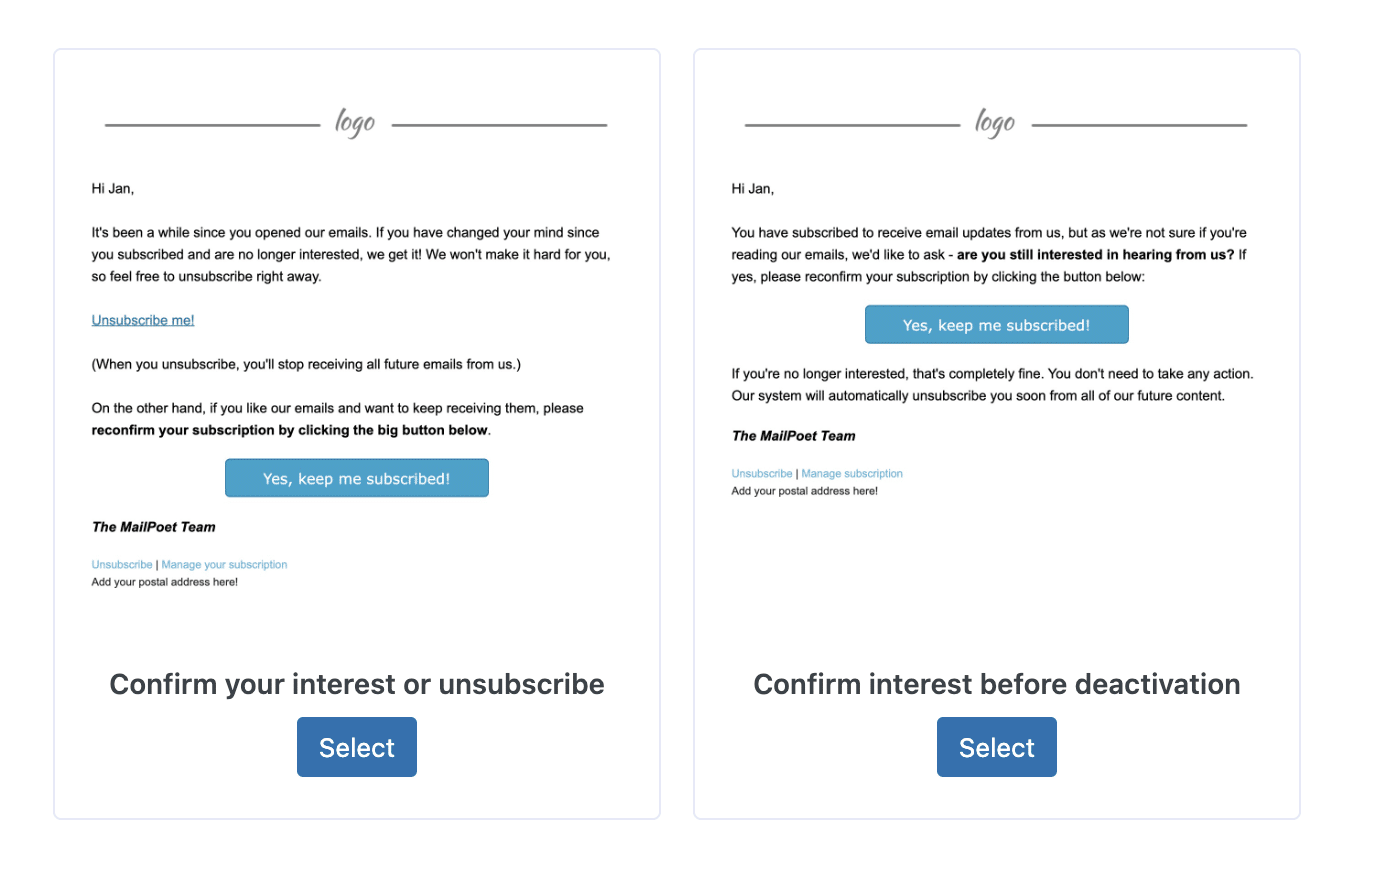
Via Settings > Sign-up Confirmation, you can first enable a sign-up confirmation for each new subscriber to your list. This is called double opt-in.
As soon as someone joins your list via a sign-up form, for example, they will receive a confirmation email that you can customize:
Another interesting option: the possibility to stop sending emails to inactive subscribers (via Settings > Advanced), for those who do not open your emails anymore.
Thus, you will penalize less your email opening rate (which will be higher), and improve your deliverability (unopened emails tend to land in the spam folder after a while).

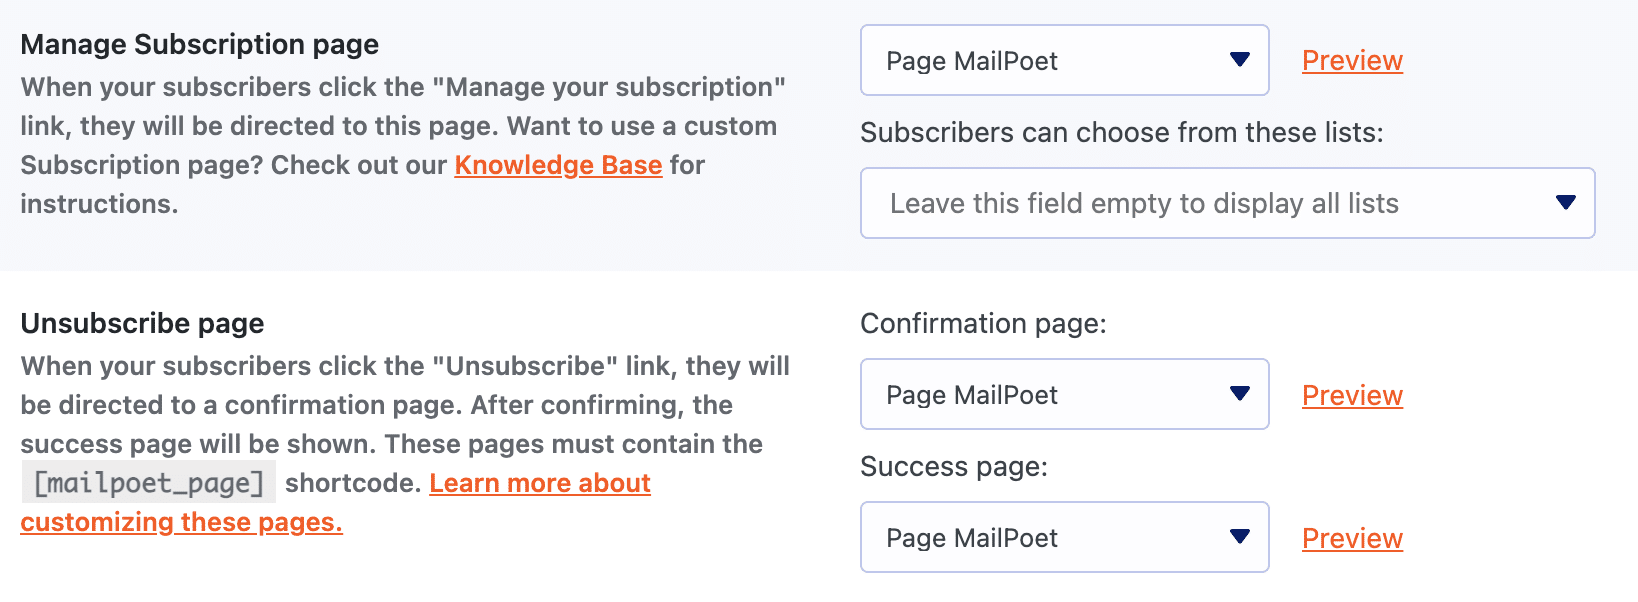
Regarding subscription management, you can easily redirect your subscribers to the page of your choice so that they can manage their subscription (e.g. modify their surname, first name, status, email address), but also send them to a dedicated confirmation page if they wish to unsubscribe (under Settings > Basics).
Finally, to make your subscribers benefit from an even higher deliverability rate, MailPoet offers you to use its in-house sending service (Settings > Send With).
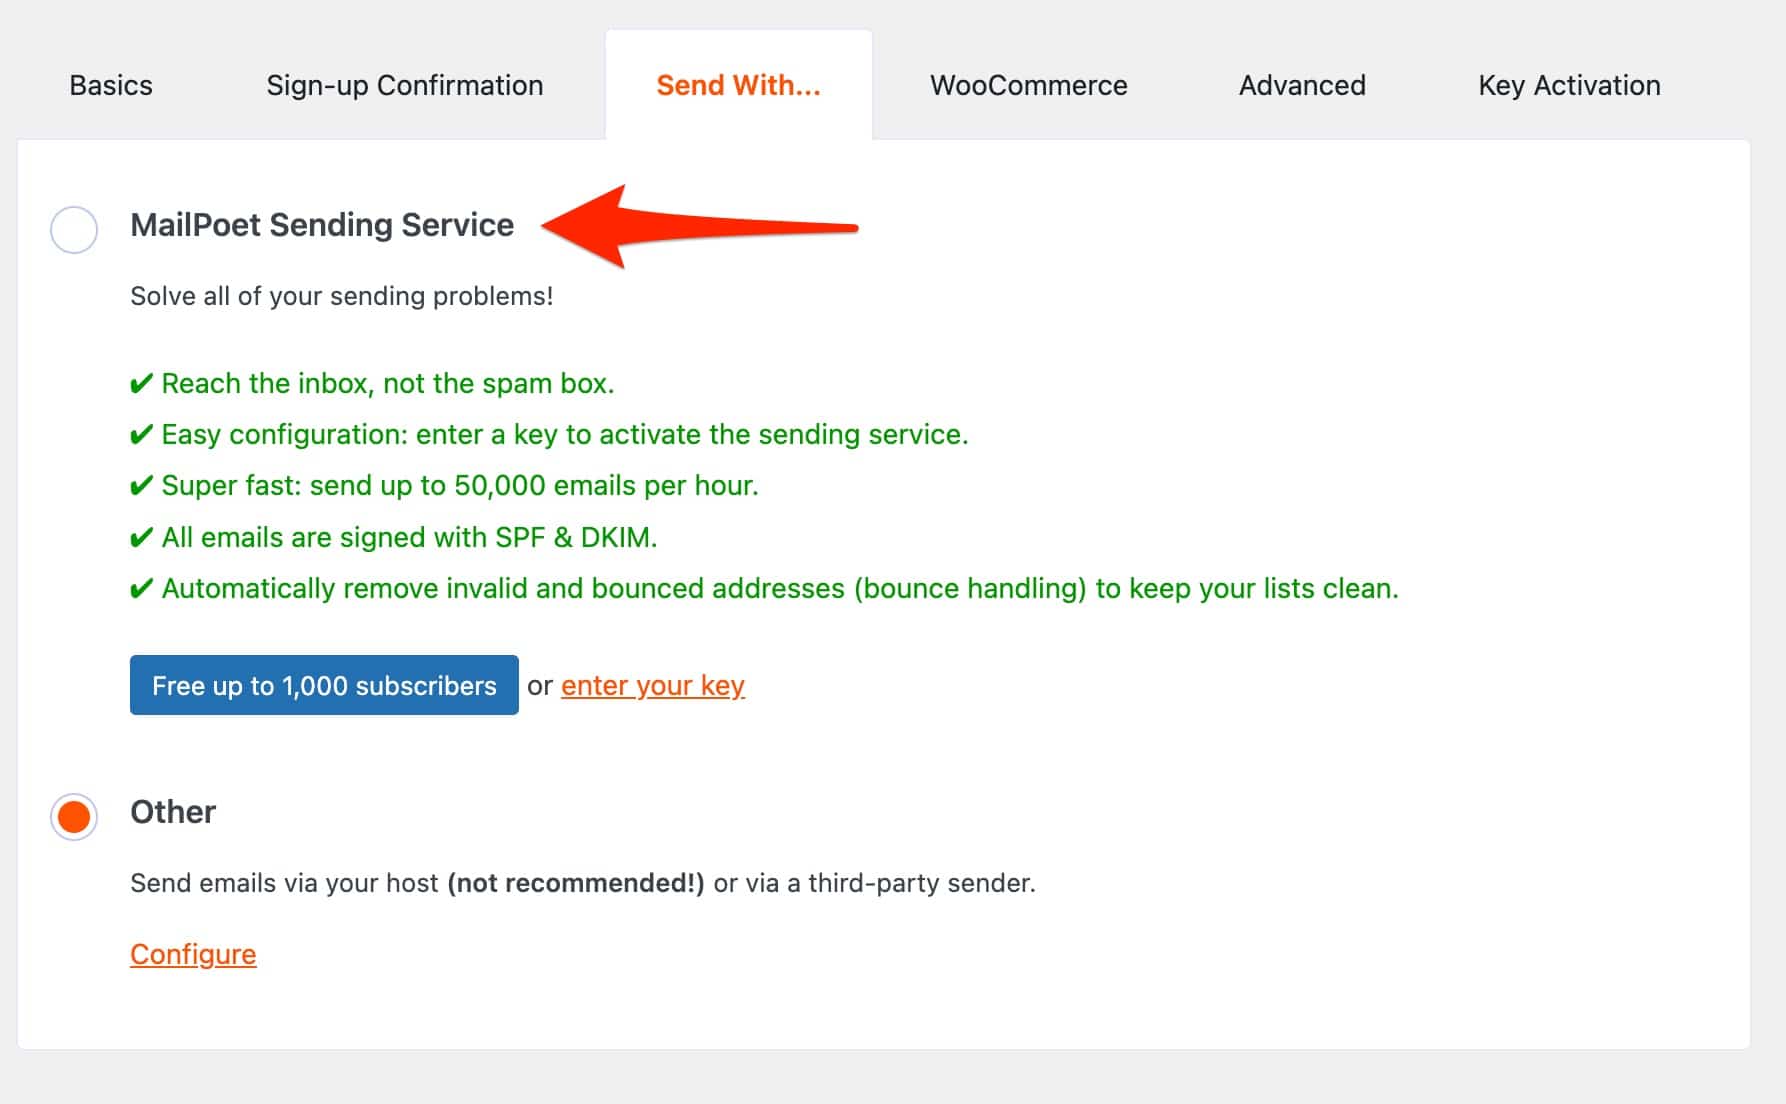
To take advantage of this service, you must create a free account (up to 1,000 subscribers) on the MailPoet website, then enter your validation key.
Thanks to this sending service, MailPoet claims that its deliverability rate is 99%. It is impossible for me to confirm the accuracy of these figures.
However, one thing is certain: by activating this service, your emails will no longer be sent by your host. You should know that a hosting server is not an email server, so the deliverability can vary.
In the vast majority of cases, your subscribers will automatically be added to your mailing list by subscribing to it. However, you can also add them manually on a case by case basis. And it is also possible to import contacts via a file, or from Mailchimp (Subscribers > Import).
Statistics
What is the performance of your emails sent with MailPoet ? You can find out by checking the statistics provided by MailPoet. For each newsletter, you can find for example the opening rate and click rate.
With the Premium package, you can also benefit from advanced statistics per user, such as:
- The opening rate of your emails
- The click rate
- The unsubscribe rate
- And if you use WooCommerce, the number of orders generated by your emails, as well as the total and average amount of sales.
Re-engagement emails
Another interesting option to keep in touch with your subscribers: the possibility to send automatic re-engagement emails to subscribers who no longer open your emails, and no longer read them.
Everything happens under Emails > Re-engagement Emails. You can choose when to send this type of email, for example after X weeks or X months of disengagement.
As for the rest, you know how to do. You just have to choose one of the two templates and then customize it to your liking.
The plugin and GDPR regulation
The General Data Protection Regulation (GDPR) that came into force in 2018, and constitutes a set of regulations allowing the control and protection of personal data disseminated during browsing on the web.
Obviously, this has repercussions on your email marketing actions and the sending of your newsletters
Here are some of the main rules to respect in order to send newsletters to individuals:
- A subscriber must always be able to freely give his consent when he wants to subscribe to an email distribution list. This consent must be expressed in advance by a clear positive act. Therefore, we’ll exclude consents by “opt-out”, i.e. pre-ticked boxes or formulas such as “To refuse to receive our newsletter, please check the box”. An exception to this principle exists if the recipient of the emails is a customer and the emails are intended to promote products similar to those he has purchased from the same vendor. In this case, it will be possible to use an “opt-out” formula.
- In order to be able to give informed consent, the individual must be informed about the processing of his personal data.
This information must be easily accessible (e.g. a hypertext link near the consent button) and take the form of a document commonly called “privacy policy”. The GDPR regulates the content of this document. - Any newsletter email must include the identity of the advertiser and a process to unsubscribe from the mailing list. It will generally be integrated at the bottom of the email.
- The personal data used for sending newsletters (emails, name, first name in particular) must be deleted at the latest at the end of a 3-year period starting from the termination of the contractual relationship, if the recipient is a customer, or from the last contact with the recipient when it is not a customer.
It is understood that “last contact” means a positive step by the recipient, such as a request for information or a click on a hyperlink in the email.
At the end of this period, the data must be deleted or irreversibly anonymized.
In its guide to comply with the GDPR, MailPoet states that “If your subscribers have joined your list, you can consider this as sufficient consent”.
However, there are other adjustments you need to make to comply with the GDPR, as MailPoet explains in the resource I mentioned above.
One example I have in mind is the double opt-in, a non-mandatory option but enabled by default on MailPoet (under Settings > Sign-up Confirmation).
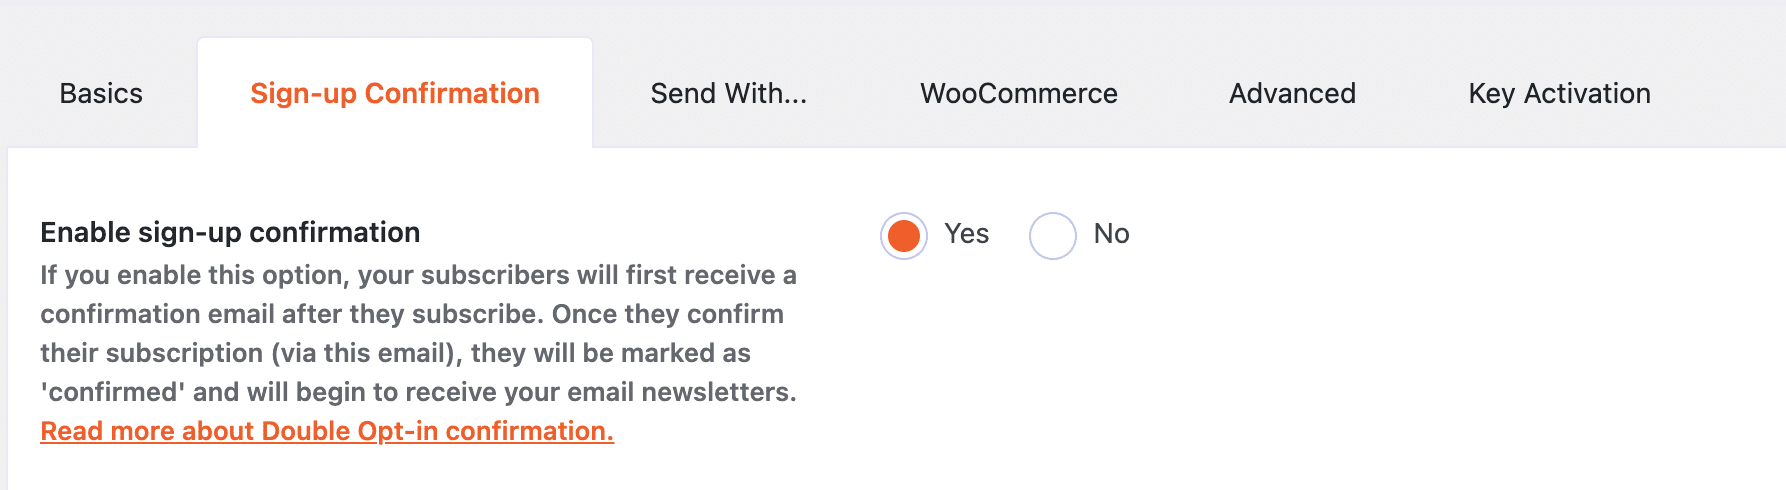
This allows you to send a confirmation email to your subscribers, after their registration. They will then have to confirm their subscription to receive your newsletters.
Regarding the GDPR regulation, do not hesitate to check our dedicated resource on the WPMarmite blog.
Finally, the best thing to do is to contact a GDPR specialist if you have any doubt.
How much does MailPoet cost?
Well, that’s all well and good, but how much does MailPoet cost? Since March 2022, the plugin offers a new pricing plan. Previously, you could choose between 3 licenses if you didn’t want to use the MailPoet sending service.
Or pay according to the number of subscribers to your list (using their sending service). This used to be a bit confusing, but now everything has been simplified.
Now, to use MailPoet, you can choose between 4 different plans:

- The free plan (Starter) is limited to 1,000 subscribers, with a limit of 5,000 emails/month. It can be used on one site and includes MailPoet’s in-house sending site (you must enable it to use it).
- The Creator plan starts at $8/month for 500 subscribers. As the number of subscribers increases, the price goes up (e.g. $16/month for 1,000 subscribers). It can be used on a maximum of one site and allows you to use the host of your choice to send your emails.
- The Business plan is charged from $10/month. It allows you to send an unlimited number of emails and is used on a maximum of one site.
- The Agency plan starts at $30/month and can be used on up to 50 sites with an unlimited number of emails.
Now, here are some tips to choose the most appropriate plan for your needs:
- Do you want to discover MailPoet to make your decision before you take it to the next level? Don’t take any risk and choose the Starter plan.
- You don’t want to use MailPoet’s sending service and prefer to rely on your host? The Creator license should suit you.
- Do you manage dozens of sites and want to install MailPoet on each of them? The Agency license will be the only appropriate one, since all the others can be used on one site only.
- Do you want to remove any mention of MailPoet from your emails? Choose any license except the free one, which does not allow you to remove the mention of MailPoet in your communications.
- Do you want to have access to all MailPoet options on one site only? The Business license represents the best value for money.
MailPoet offers a 30% discount for the first year on all its licenses thanks to a coupon.
Finally, please note that in its Business and Agency plans, MailPoet does not limit the number of emails and contacts.
Even if the goal here is not to compare MailPoet and Mailchimp, one of the leaders on the email marketing software market, we can still note that Mailchimp imposes a daily sending limit even for its premium plans.
Our final review on MailPoet
Well, your discovery of MailPoet ends here. Easy to use and to set up, this plugin made a very good impression on me.
The fact that you can customize everything from your WordPress dashboard is a real plus. However, it’s not for everyone.
In my opinion, it is mainly for two types of users:
- Beginners in the world of email marketing, who will appreciate its ergonomics, intuitiveness and usability. If you want to start sending newsletters without the need for complex features, MailPoet is undoubtedly an excellent choice.
- WooCommerce store creators, who will benefit from an advanced integration with the famous ecommerce plugin.
However, more experienced profiles and web marketers may regret the lack of more advanced options.
MailPoet remains basic on segmentation options, statistics, or email automation for example. And you can’t do A/B testing (testing of two versions of the same email to see which one works better).
Download the MailPoet Plugin:
Do you already use MailPoet, or do you plan to start using it? Your feedback would be much appreciated in the comments below!

Receive the next posts for free and access exclusive resources. More than 20,000 people have done it, why not you?


Continue reading
Articles posted in WordPress PluginsSpectra: Dive into this page builder that’s integrated into the WordPress editor
Leaving the native WordPress interface? Never. Drowning you in a slew of widgets? He wouldn’t dream of it. With this guy, blocks are the guiding light. Create your next WordPress site without leaving the default editor (Gutenberg), without coding, and…
WP Rocket: We went over this plugin with a fine-tooth comb [2024 Review]
It took me a while, but I finally found it. Yes, I found someone who dared to criticize the WP Rocket plugin sharply. What a nerve! This reader of an American site specializing in WordPress, says that this plugin has…
Yoast SEO: a guide to set up the best SEO plugin for WordPress
With more than 620 million downloads at the time of writing, Yoast SEO is one of the 10 most downloaded plugins of all time. Officially, it’s installed on websites in order to optimize their SEO (Search Engine Optimization). Put another…