“Take a picture, it’ll last longer!” You’ve probably heard this famous line many times over the years, or even said it yourself.

But let’s get back to the present. Today, you might be hoping to make your Instagram pictures last longer by saving them to a very special album: your WordPress site.
And if possible, without headaches, without coding, and without wasting too much time. Good news: all that is possible with the Spotlight Social Feeds plugin!
Keep reading below as we develop a picture of this attractive plugin, with a full test and detailed instructions.
Overview
- What is Spotlight Social Feeds?
- What are the strengths of this Instagram plugin?
- How to add your Instagram feed to WordPress?
- What additional settings does Spotlight Social Feeds offer?
- How much does the Pro version cost (and what can you do with it)?
- Who are Spotlight Social Feeds’ competitors?
- Our final review of Spotlight Social Feeds
What is Spotlight Social Feeds?
Spotlight Social Feeds is a freemium WordPress plugin that lets you add your Instagram feed to your WordPress site.
The plugin requires no coding and offers ready-to-use templates for displaying your feed.
It can be integrated into your content using a Gutenberg block or shortcode.
Spotlight Social Feeds, also known as Spotlight Social Media Feeds, Spotlight Instagram Feeds, or SpotlightWP, is one of the most popular Instagram plugins for WordPress in the official directory.
It’s among those with the most active installations (60K+ for its part), alongside competitors such as:
- Smash Balloon Social Photo Feed (1M+)
- Social Feed Gallery (80K+)
- WPZOOM Social Feed Widget & Block (60K+)
Designed and maintained by RebelCode, the company behind the WP Mayor blog and the WP RSS Agregator plugin, Spotlight Social Feeds also boasts an excellent rating of stars.
And let’s face it: the plugin is a big hit with its users, who are particularly impressed by its ease of use.
This is far from being its only positive quality, as you’ll discover in greater detail below.
What are the strengths of this Instagram plugin?
The free version of SpotlightWP — I’ll cover the options of the Pro version in a separate section — boasts a number of assets (non-exhaustive list):
- Adding a feed is quick and easy, thanks to an interface based on a series of steps. The user is guided and taken by the hand.
- The options are clear and well presented.
- No technical knowledge is required. You don’t need to know how to code to add your photo feed.
- Spotlight Social Feeds supports photos from your Instagram account, as well as videos and reels.
- Ready-to-use templates let you take advantage of an already efficient display of your photo feed (e.g., presenting your photos in the form of a gallery). You can then further customize certain aspects, such as the number of posts displayed, their order, the number of columns, etc.
- There’s no limit to the number of accounts you can connect or the number of photo feeds you can add.
- The plugin is responsive by default. Your feed will display correctly no matter what device your visitors are using (computer, smartphone, or tablet).
- You can add a “Follow” button to encourage your visitors to follow your account and improve engagement.
- You can embed a single Instagram post in the content of your choice, thanks to oEmbed support. This format makes it possible to embed content by copying a link to an Instagram post.
- If you maintain sites for your customers, Spotlight Social Feeds can generate a token to connect any Instagram account without having to use your customer’s login details.
- Support (customer assistance) is included in the free version, which is very rare.
As you can see, the free features are already quite extensive. If you’re over here, it’s perhaps because you’re keen to find out how to link your Instagram account to WordPress with the Spotlight Social Feeds plugin.
So let’s get started. In the next section, I’ll take you through 6 step-by-step instructions.
How to add your Instagram feed to WordPress?
Step 1: Install and activate the Spotlight Social Feeds plugin
First, install the plugin from your WordPress dashboard. To do this, go to the Plugins > Add New menu.
In the search bar, type “Spotlight Social Feeds.” Locate the plugin offered by RebelCode, then click on the “Install Now” button:

Remember to activate the plugin to finish. If all goes well, you’ll see a new custom post type called “Instagram Feeds” in the left sidebar of the WordPress CMS back office:

From this menu, you’ll be able to add your first photo feed from your Instagram account. Let’s take a look at that just below.
Step 2: Select a publication type
By default, the plugin offers 6 options for creating a feed of publications. With the free version, you’ll have just one option: adding Instagram posts (photos, videos, and reels).
Click on “My Instagram posts” to choose this option (it will already be pre-selected), then on the “Next step” button to start the configuration process:

Spotlight Social Feeds also offers a free 14-day trial version, so you can test out the other types of publication feeds offered in the premium version of the plugin. As long as you cancel at the end of the trial, you won’t be charged.
The plugin’s creators also provide a 14-day money-back guarantee for all of their licenses. If the premium version doesn’t suit you, you have 14 days to request a full refund.
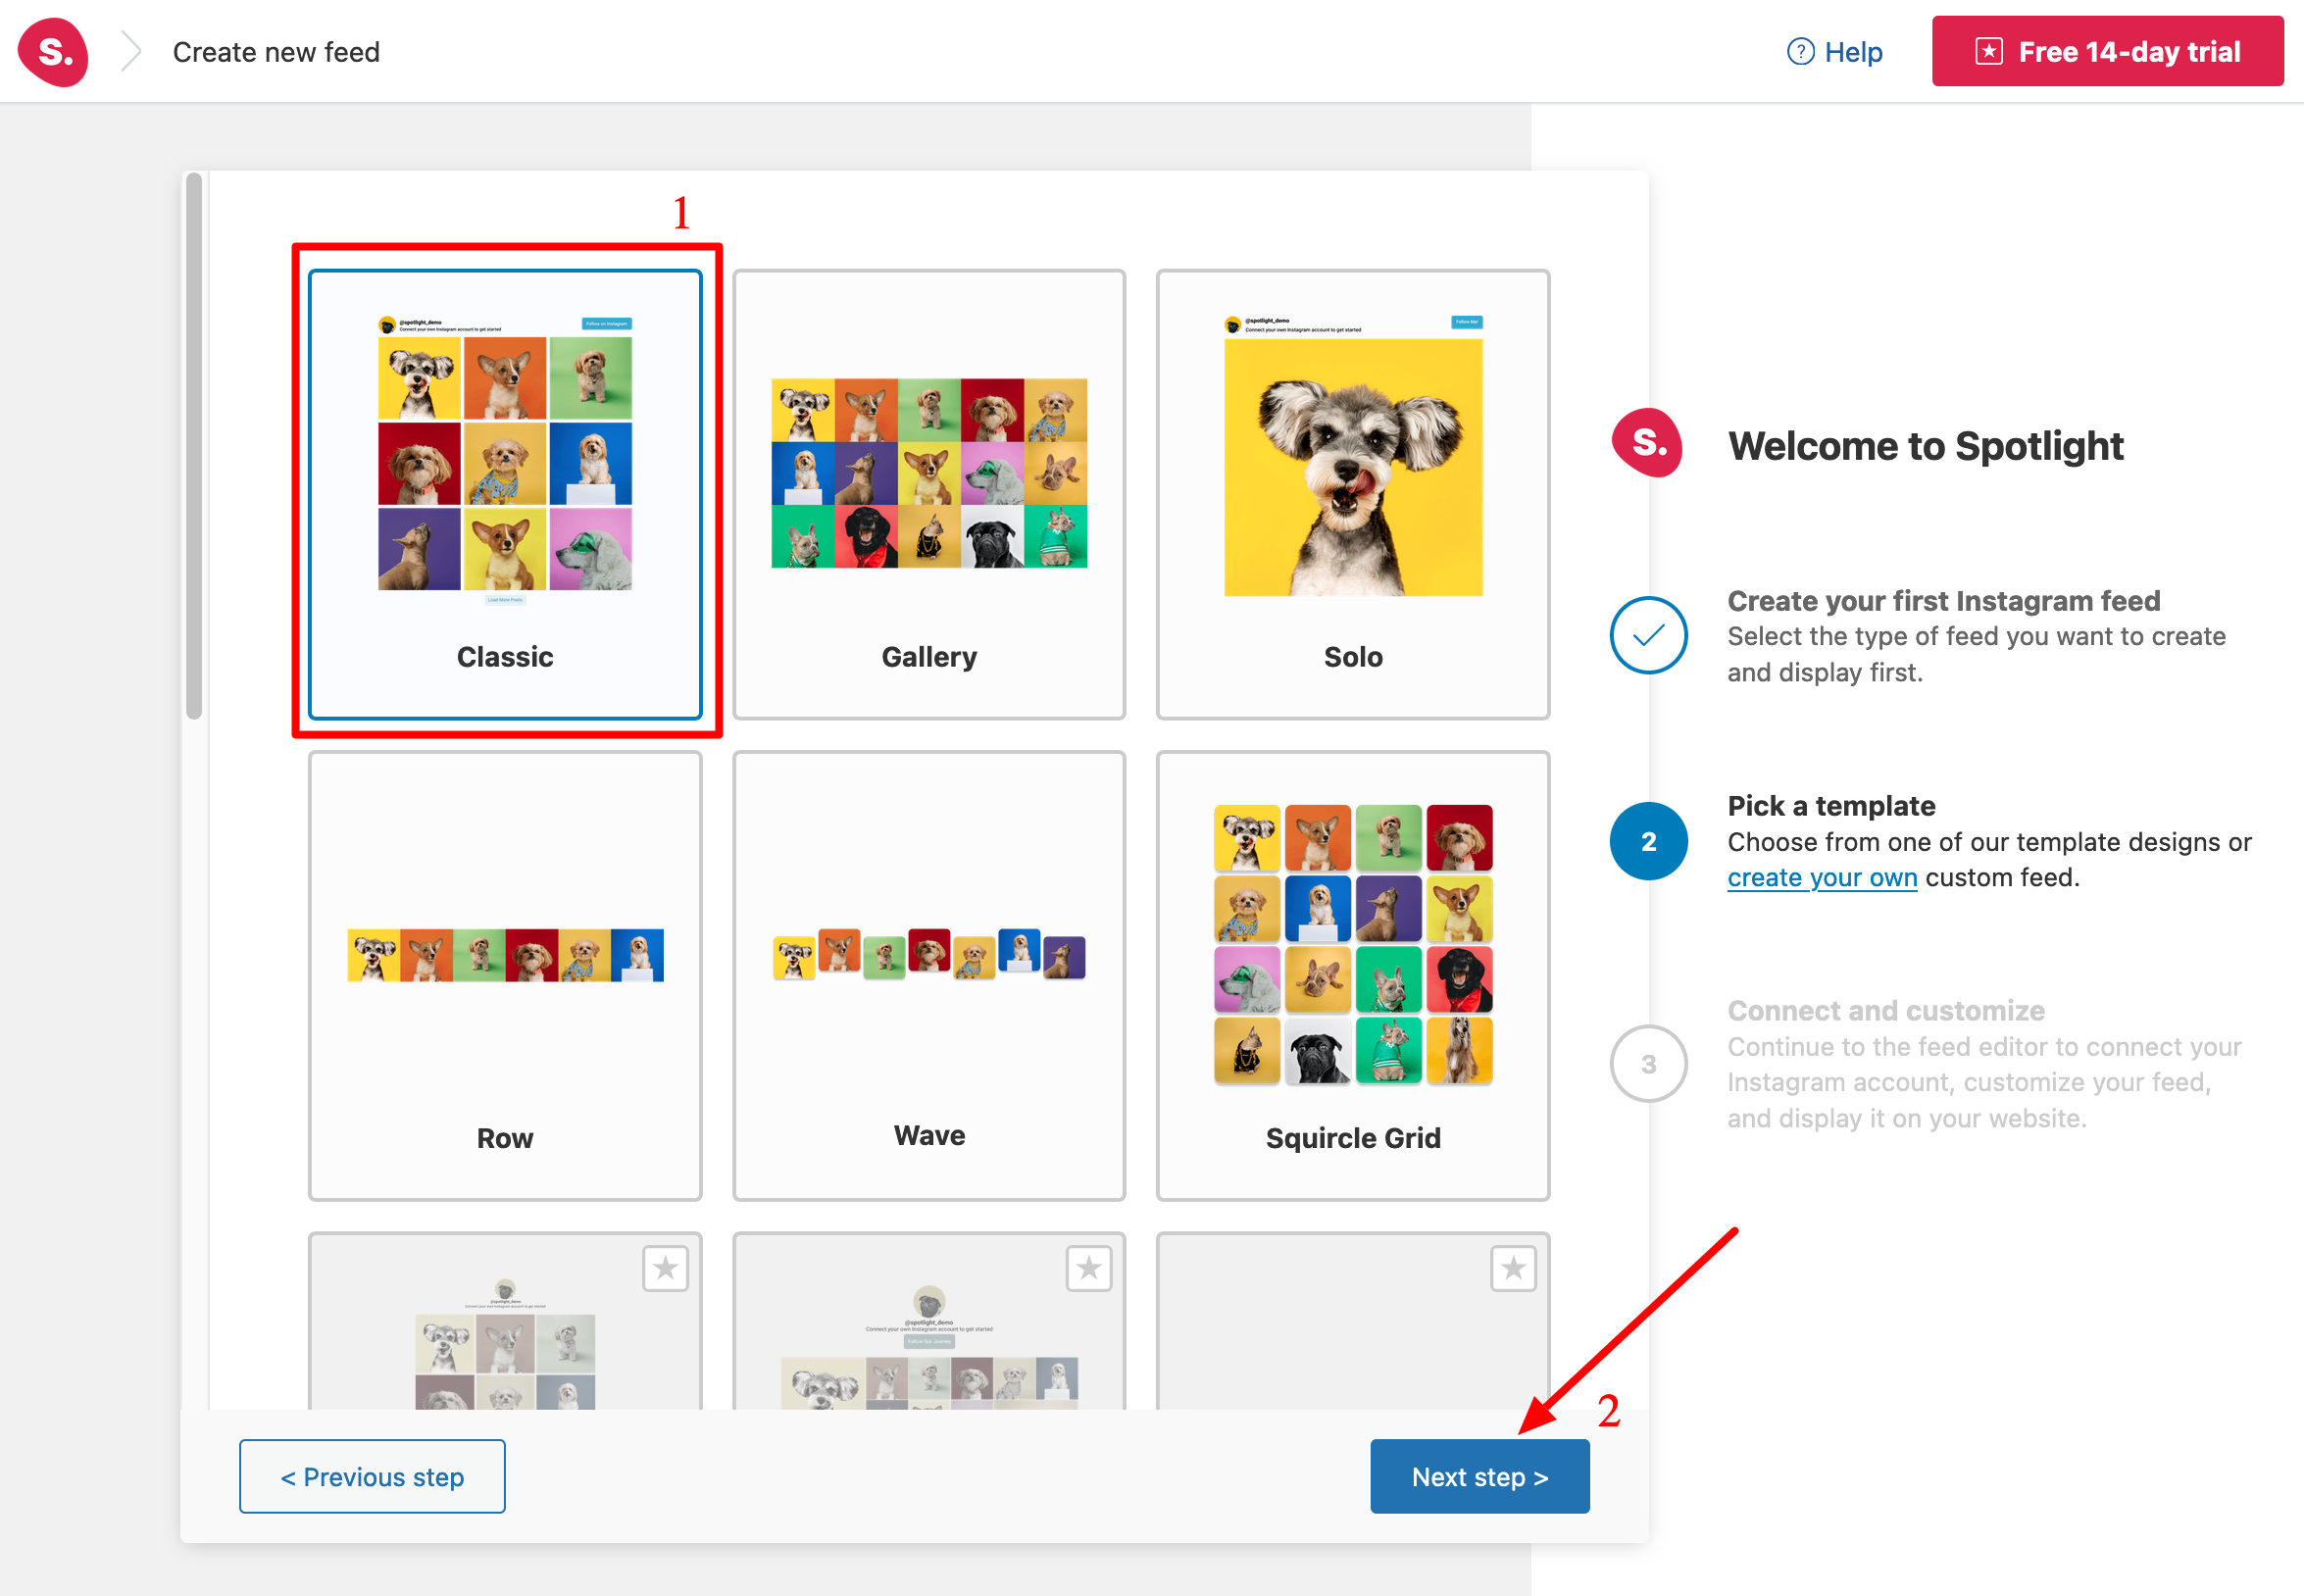
Step 3: Choose a template
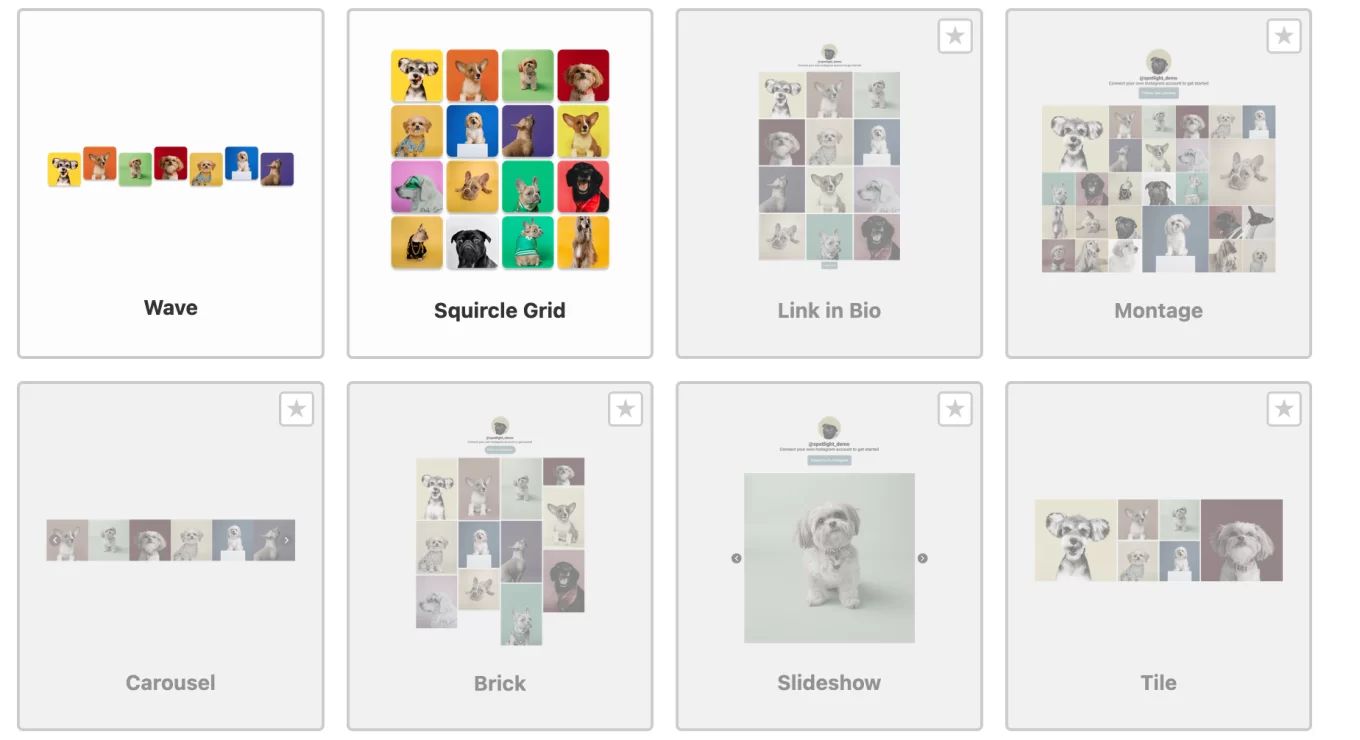
Next, the plugin lets you select one of 6 templates:
- Classic: Display your publications as a grid.
- Gallery: Display your posts in a gallery.
- Solo: Display one photo.
- Row: Display your posts horizontally.
- Wave: Posts are displayed horizontally, but with an undulating, wave-like effect.
- Squircle Grid: Display your posts in a grid, but with rounded edges on each post.
Select the template of your choice, then click on the “Next step” button:
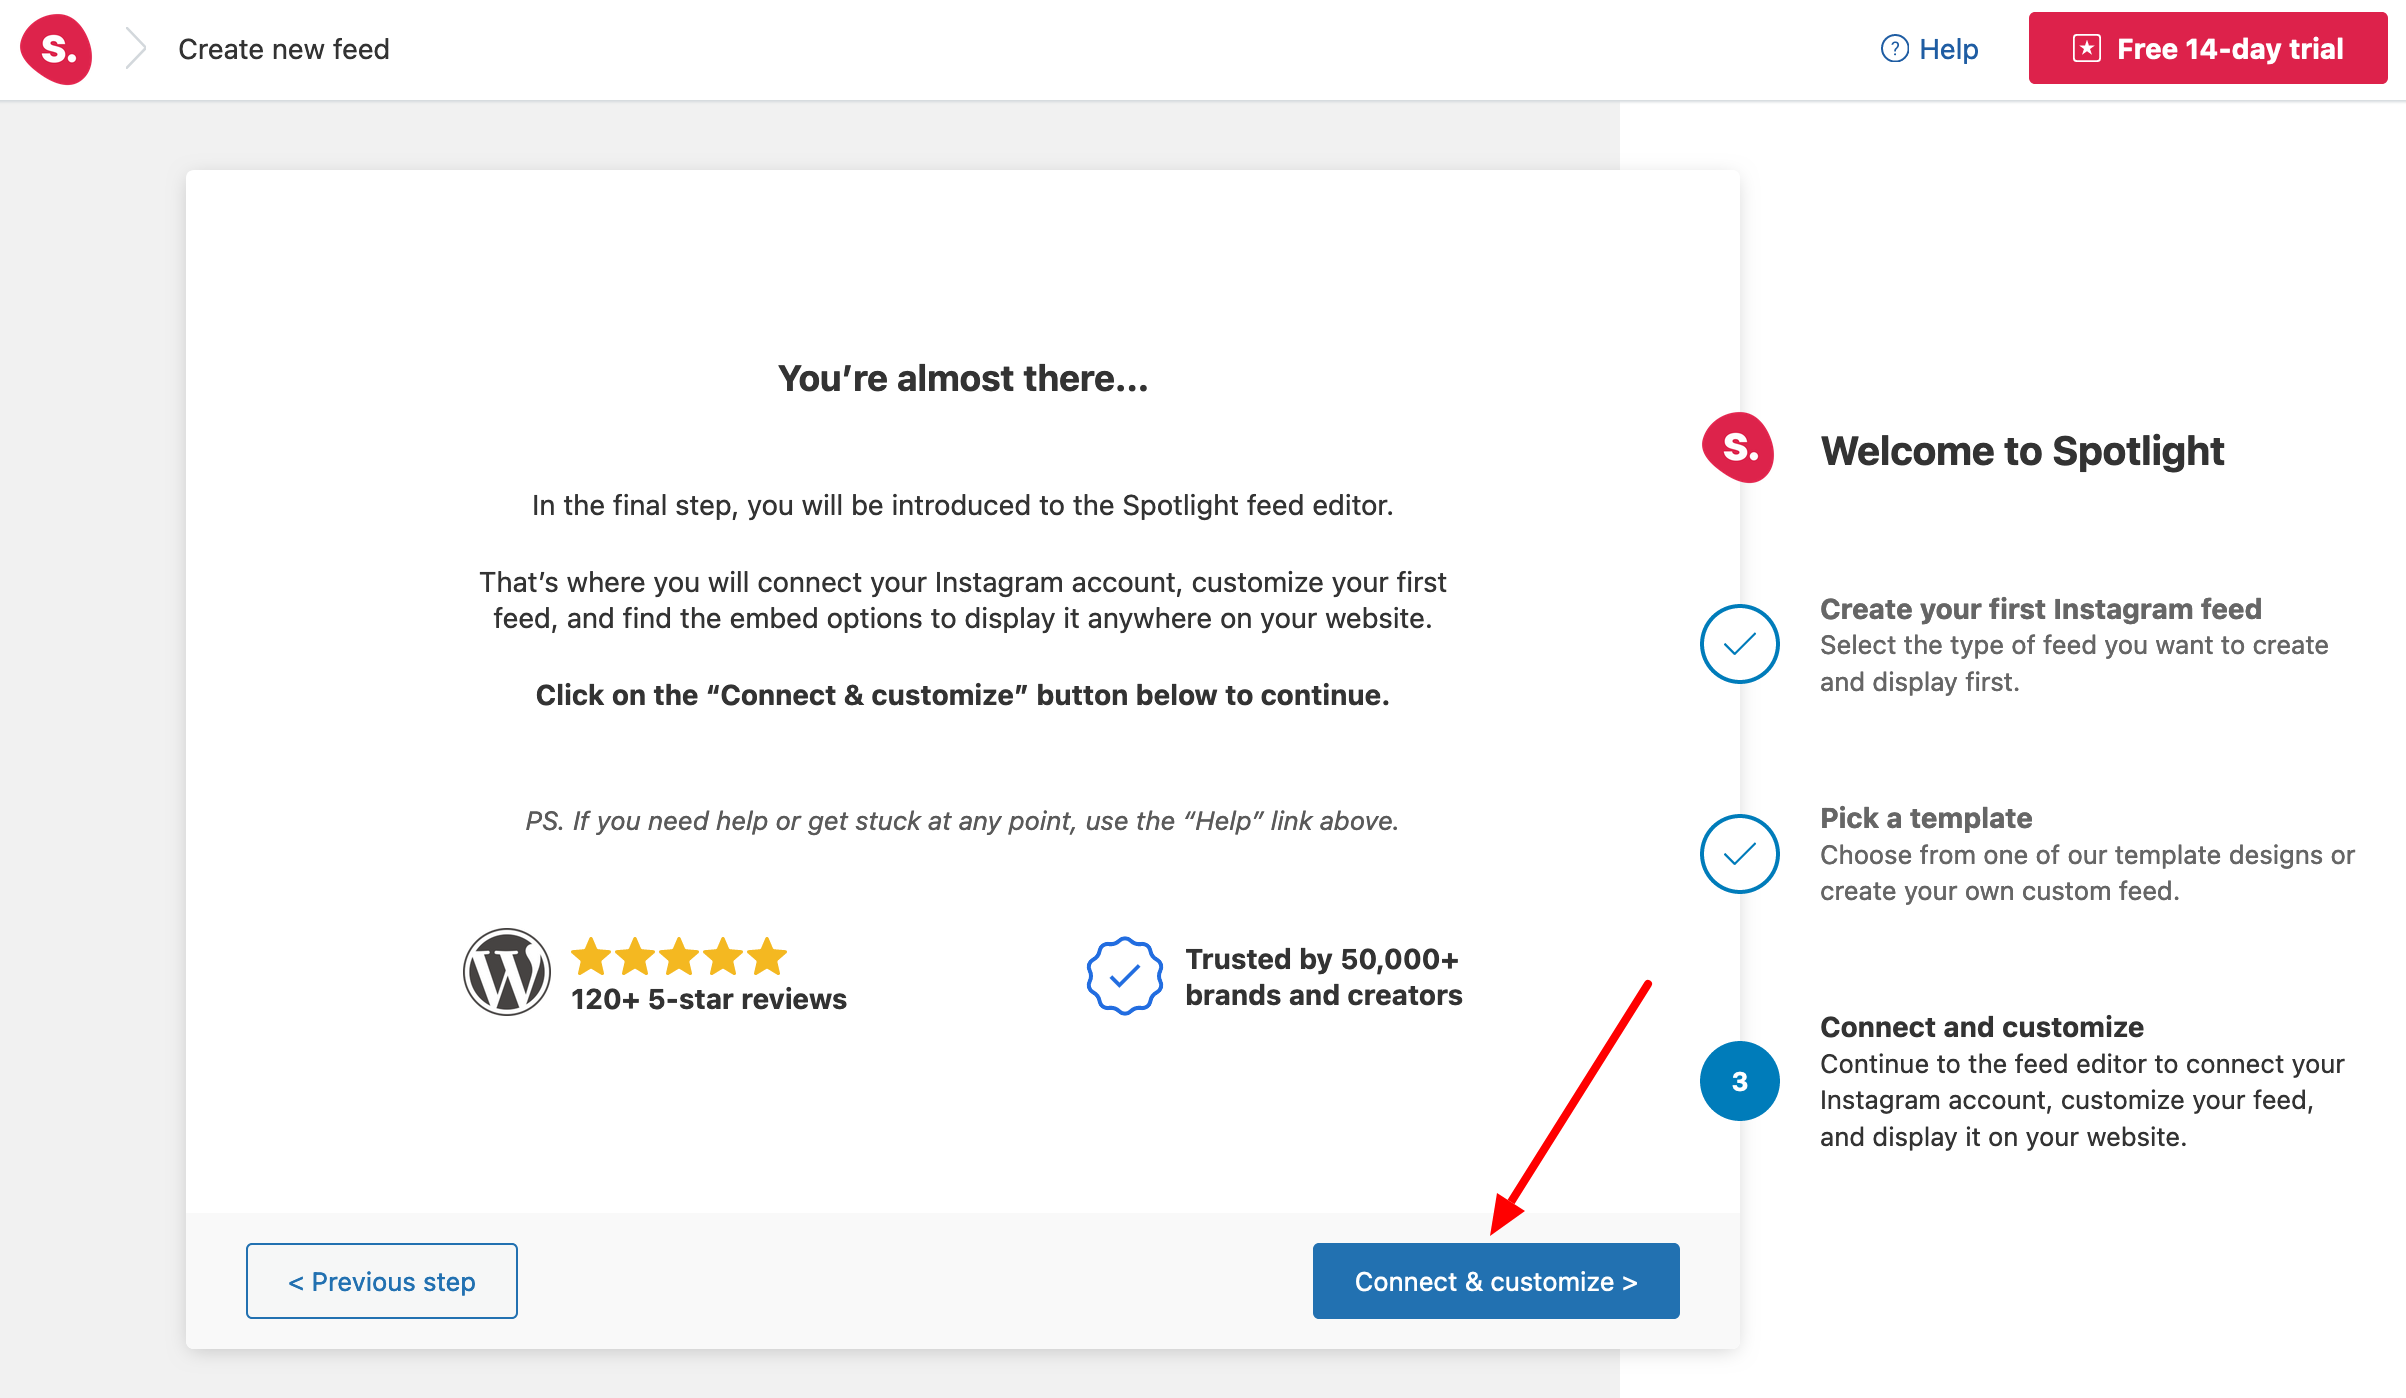
Step 4: Connect your Instagram account
The fourth step is to connect your Instagram account, a prerequisite for linking the social network to your WordPress site.
Without this step, your posts won’t be displayed. To connect your account, click on the “Connect & customize” button:
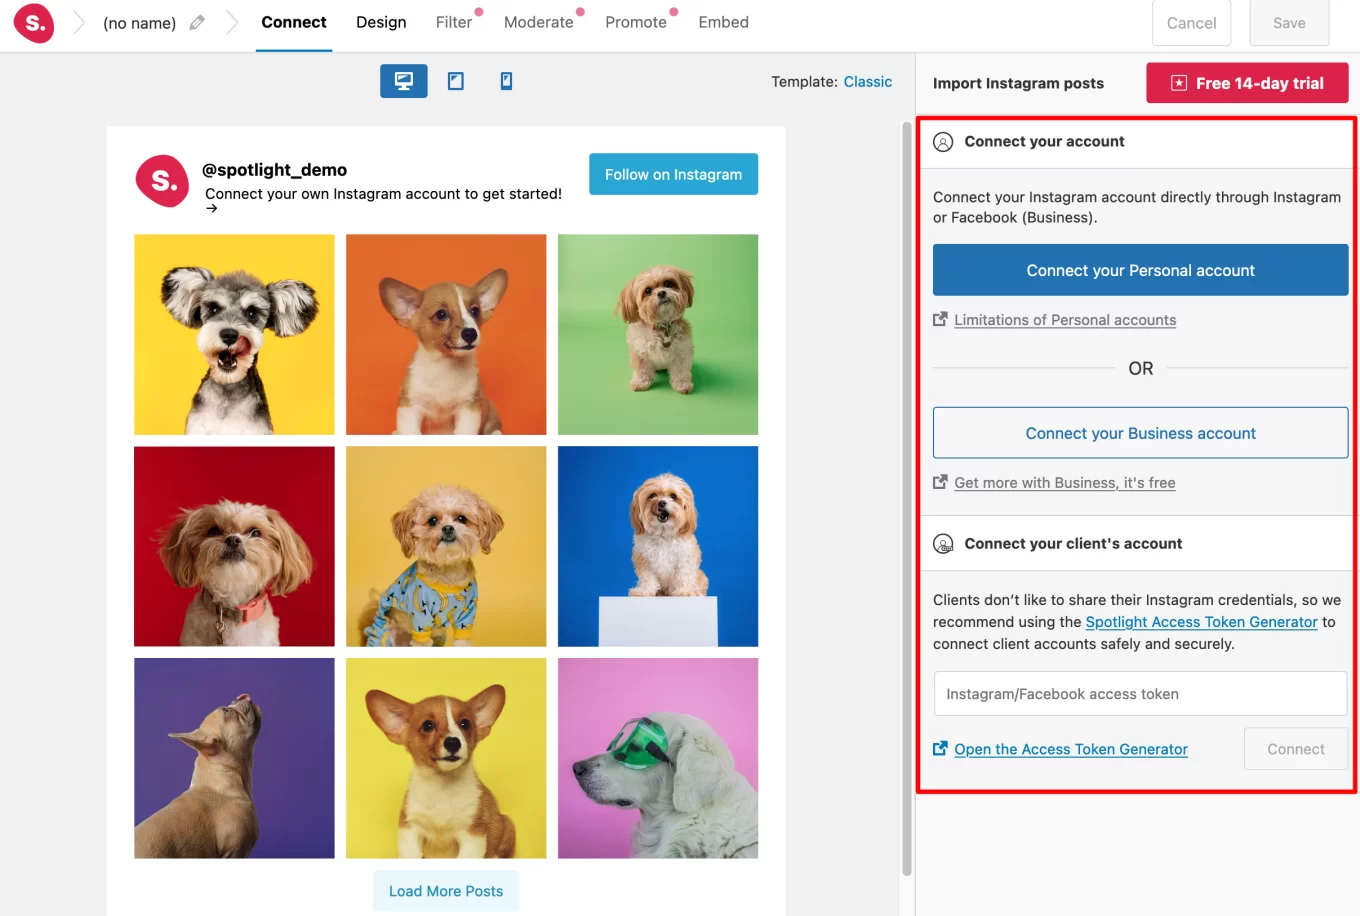
To connect your Instagram account, you have two options:
- Connect a Personal account or a Business account. Instagram Business is free and is mainly intended for company accounts. It gives you access to additional features compared with a Personal account. For example, you can sell products directly on the social network owned by Meta, or advertise.
- Connect one of your customers’ accounts via a Token key. As mentioned above, this method means your customers don’t have to share their login details with you.
Choose the option that best suits your situation:
When your account is added, it appears in the “Show posts from these accounts” section.
In the screenshot below, you can see that the WPMarmite account has been successfully synchronized. To display your posts, click on the account name. A blue check mark indicates that the connection has been successful.
After a few seconds, your publications will appear. Finish by clicking on the “Save” button in the top right-hand corner of the page. And here’s the result:

If you wish, you can connect other Instagram accounts by clicking on the “Connect more Instagram accounts” button.
Step 5: Customize the Spotlight Social Feeds feed
Spotlight Social Feeds then invites you to customize the visual appearance of your feed.
To do so, click on the “Design” tab at the top of the interface:

With the free version (the little red dots indicate features included in the premium version only), you can modify 7 aspects:
Layout
Here you can manually select the number of publications and columns to be displayed.
For each family of options, you can enter different settings depending on the type of screen (computer, smartphone, or tablet). To do this, click on the icon at the top of your feed corresponding to the screen of your choice, customize as you wish and finish by saving (“Save” button).
Feed Options
The “Feed Options” menu lets you choose the order in which your posts appear. You can choose from:
- Most recent first
- Oldest first
- Most popular first
- Least popular first
- Random
You can also choose to open a publication in a new tab or in a popup box.
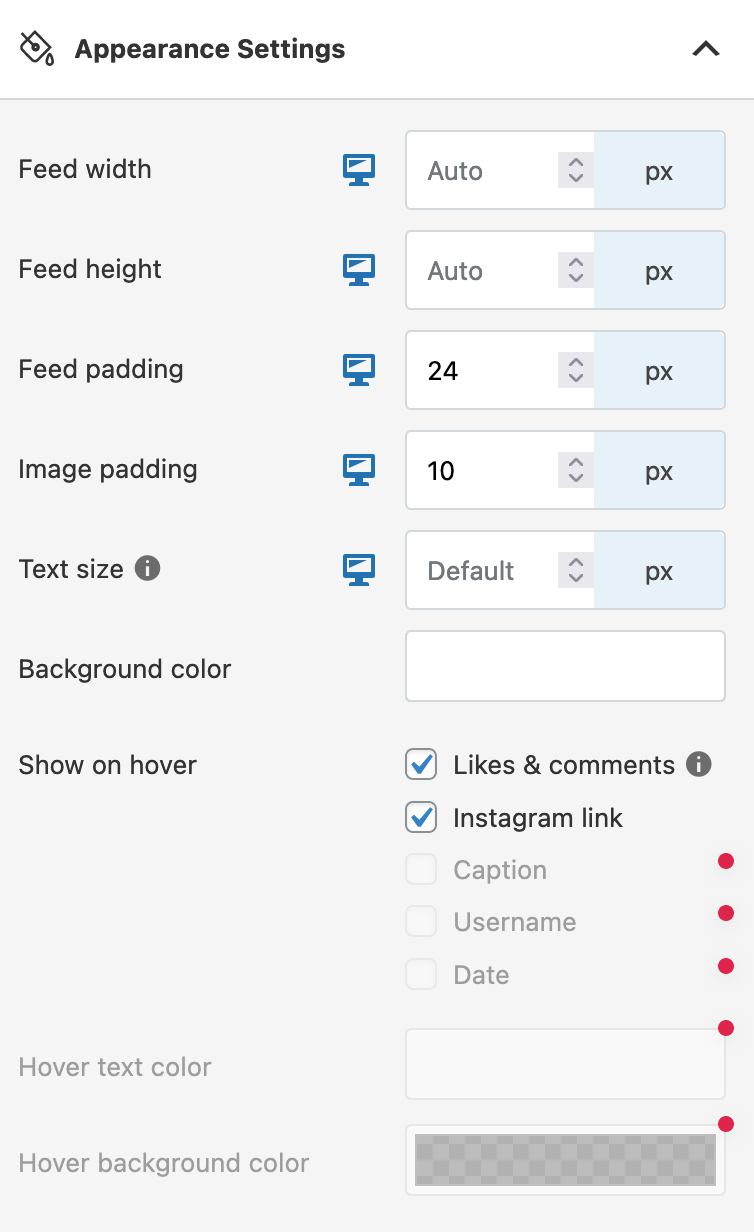
Appearance Settings
In the “Appearance Settings” section, you can control the width and height of your feed, as well as its margins (and those of your images).
You also have control over text size, background color, and the display of your Instagram link, likes, and comments on mouseover (“Show on hover”).
Spotlight Social Feeds header
Here you can adjust the appearance of your feed header. For example, you can add a profile photo or write a short introductory text.
You can also control the background color, margins, and text color.
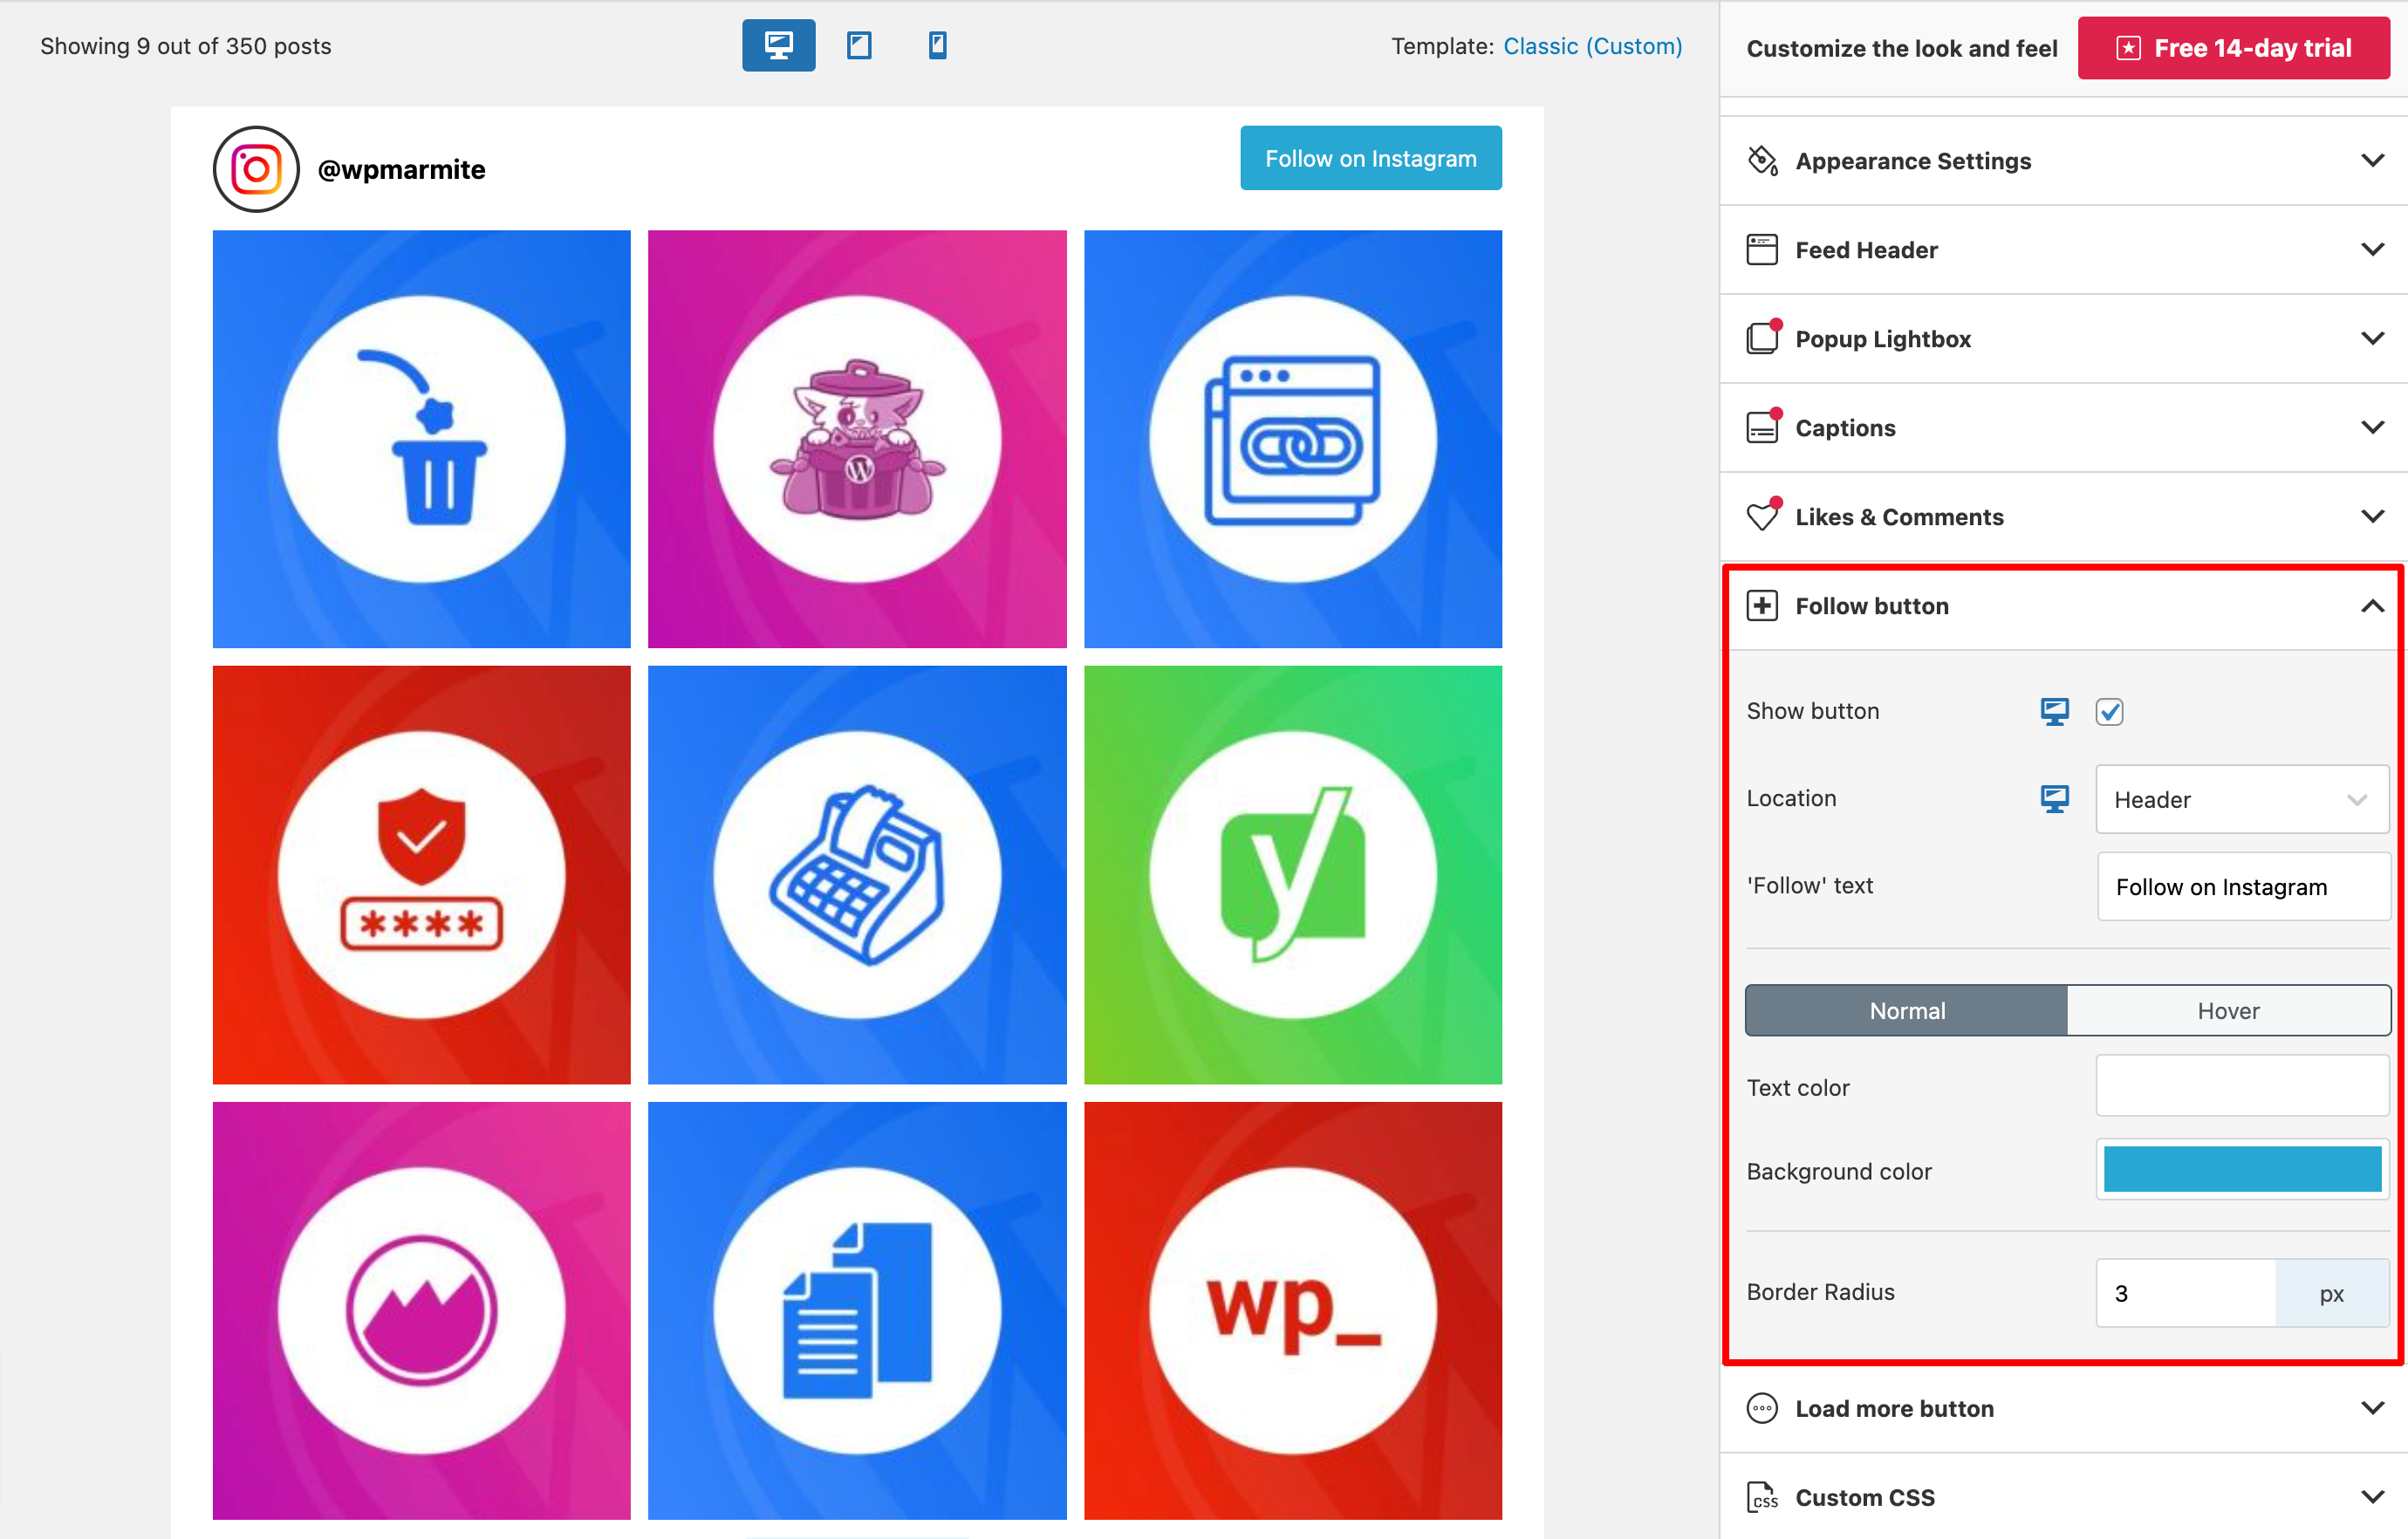
Follow button
With this submenu, you can customize the button to encourage people to follow you on Instagram.
For example, you can change the background and text color (also for mouseover), as well as the location of the button (in the header, at the bottom of the feed, or both):
Load More button
Same idea and settings for the “Load More” button as for the “Follow” button.
Consider customizing it, especially if you have a large number of publications.
Custom CSS
Finally, the “Custom CSS” submenu lets you add custom CSS code. Spotlight Social Feeds even takes you by the hand by suggesting the names of some twenty CSS classes.
Remember to save your feed by clicking on the “Save” button, then move on to the last tab, called “Embed.”
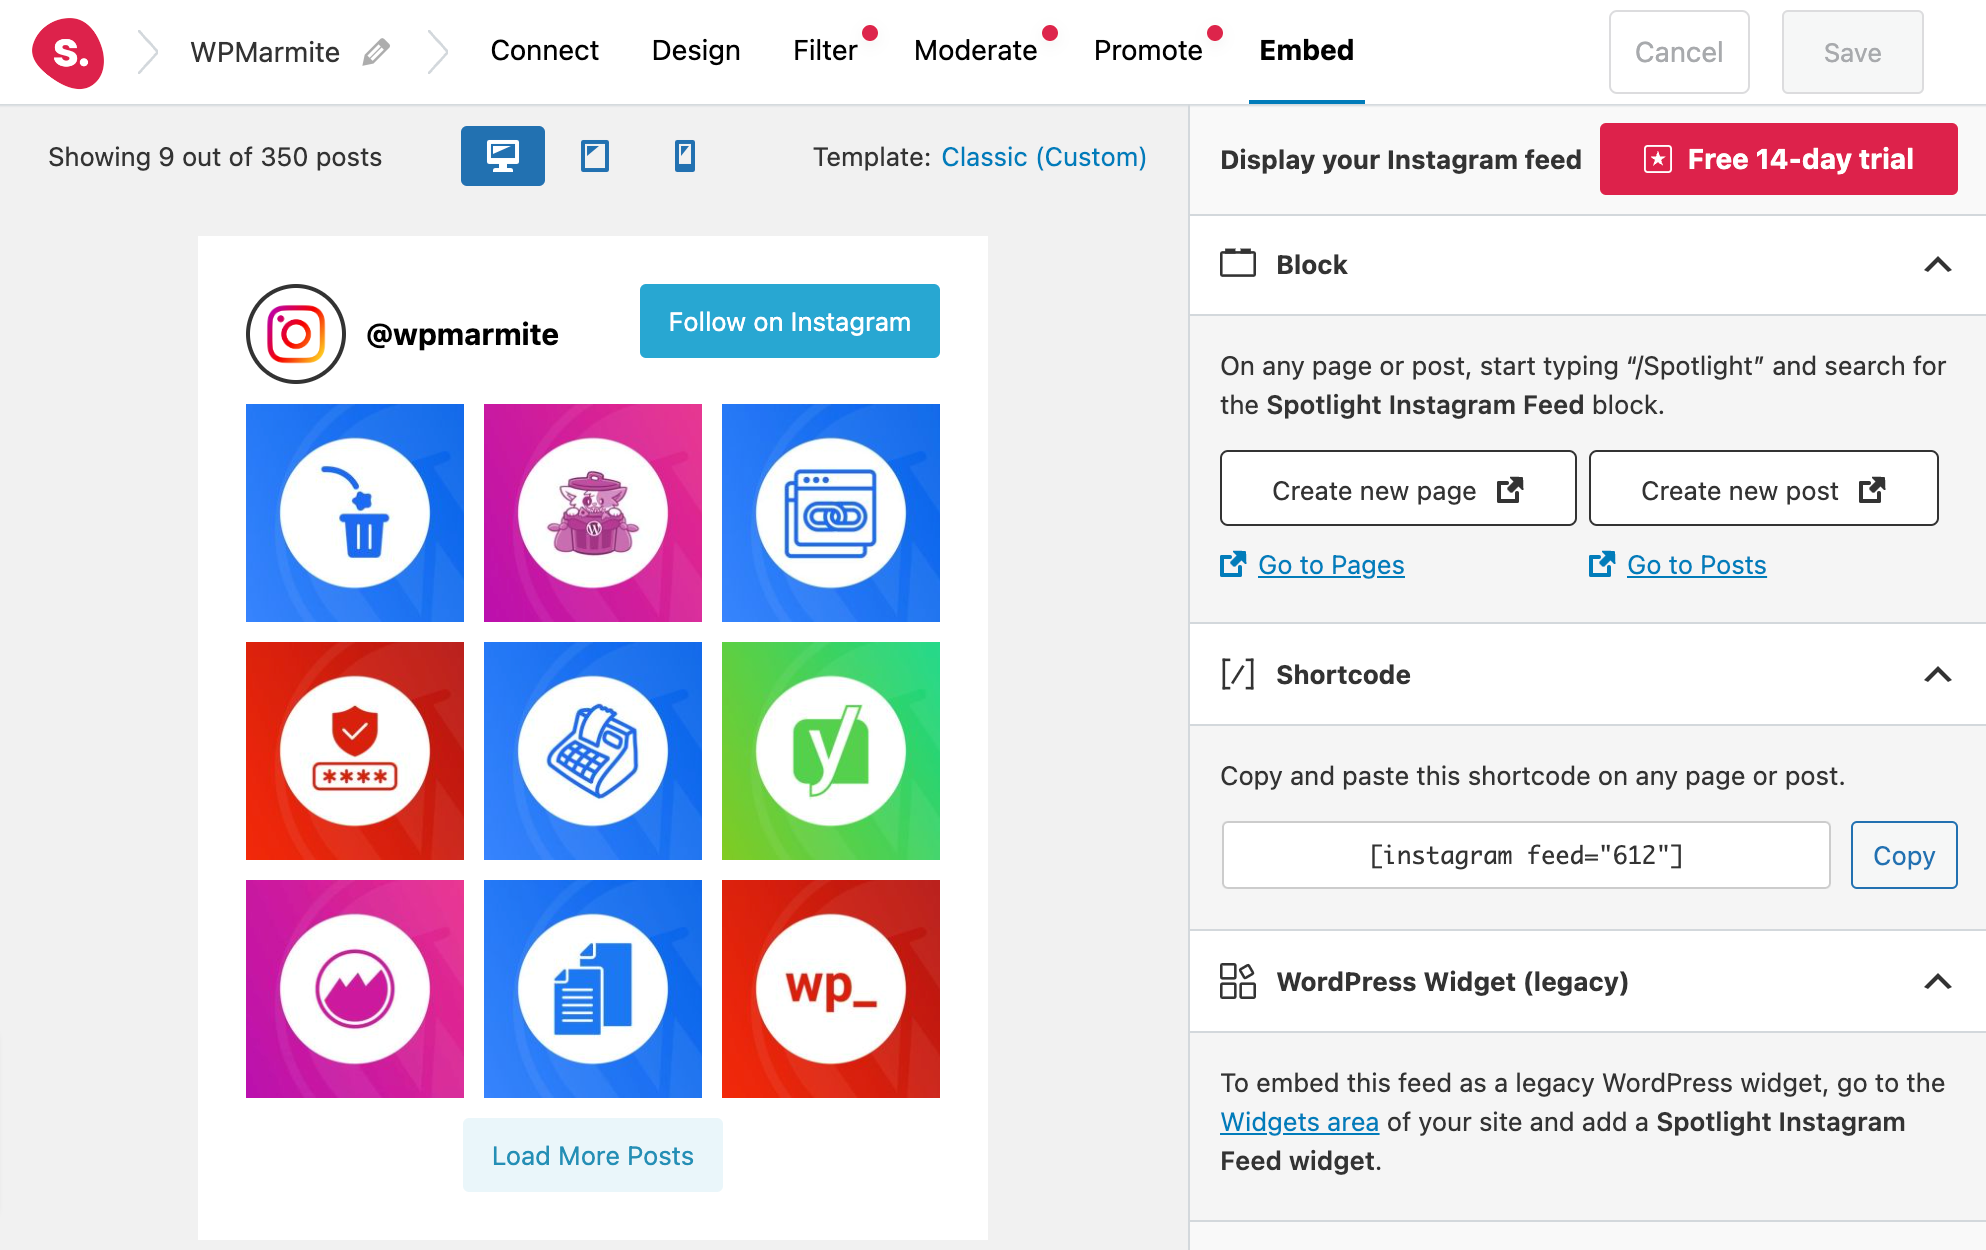
Step 6: Embed your feed in your content
All that’s left to do is embed your feed in the content of your choice (post or page). Spotlight Social Feeds offers 3 options:
- With a Gutenberg block, the solution I recommend first and foremost.
- With a shortcode that you simply copy and paste into the location of your choice.
- With a widget (a solution that’s not recommended). Whether you’re using a block-based theme or a classic theme, simply add a Gutenberg block in one of the widget zones offered by your WordPress theme.
For this example, I’m going to use a Gutenberg block. To do this, go to the WordPress content editor after opening the page or post of your choice.
In the block insertion tool, type “spotlight” in the search bar. Click on “Spotlight Instagram Feed”, and your feed will appear:

That’s it: your Instagram feed is integrated into your WordPress site. You see, it wasn’t that complicated. 😉

What additional settings does Spotlight Social Feeds offer?
In addition to the interface for customizing your feed, Spotlight Social Feeds offers additional settings, which can be found in the “Instagram Feeds” menu.
However, most of these settings can only be activated with a premium license.
Here’s what’s on offer:
- “Feeds” lists all the publication feeds you’ve created. You can design a new feed from here, or even import one from another WordPress site, for example.
- “Promotions” (premium) allows you to automatically link your Instagram posts to blog posts, pages, or products based on the hashtags used in the caption of a publication.
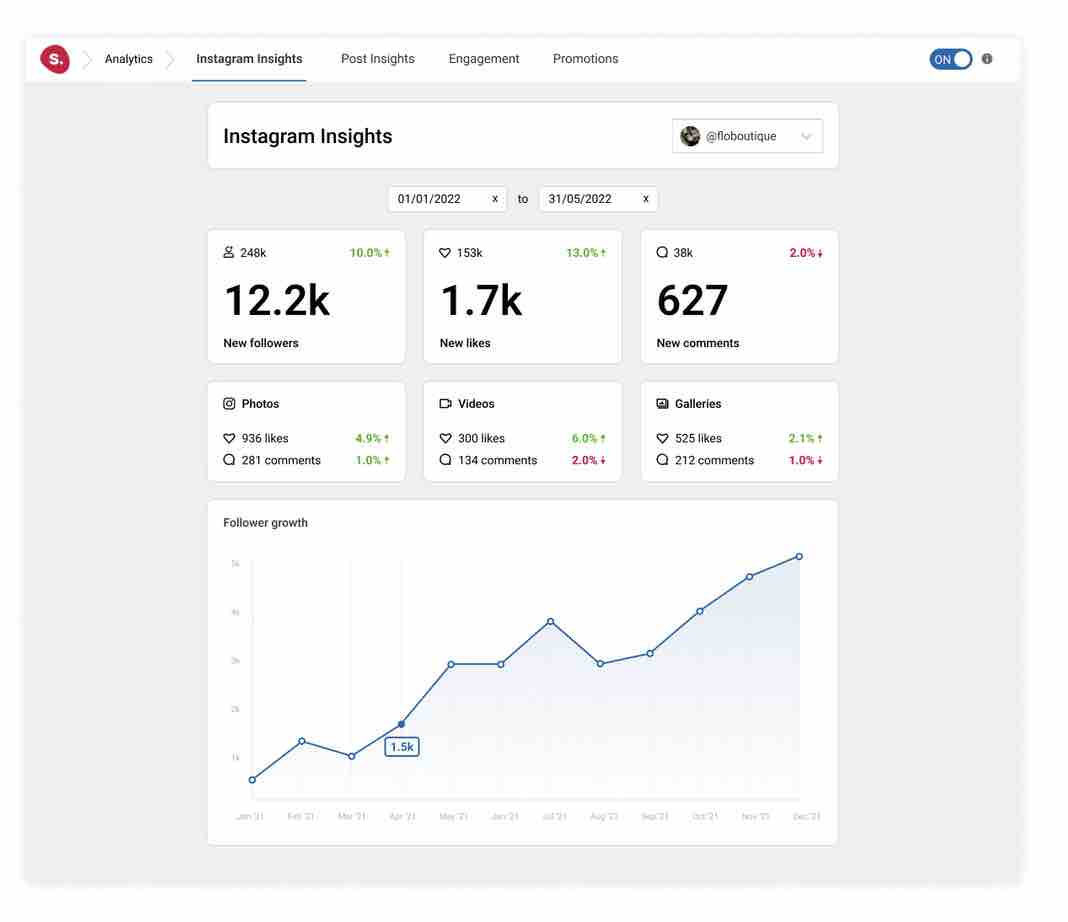
- “Analytics” (premium) gives you access to statistics related to your Instagram account and publication feed (likes, comments, new followers, etc.).
- “Guides” suggests links to resources from the Spotlight Social Feeds blog.
- “Settings” lets you manage your various connected Instagram accounts. You can add a new account, or reconnect and/or delete an existing one. In addition, the “Configuration” and “Tools” tabs offer options for optimizing the loading of your publications. For example, you can choose the loading method for your publications (e.g. lazy loading).

- “License” gives you access to your license key, provided you have a premium license.
- “Help” provides a form for contacting plugin support. With the free offer, you can, for example, ask a question about a bug or a customization issue. Technical support, on the other hand, is reserved for premium customers.
- “Pricing” presents the plugin’s 3 premium licenses. A seamless transition: let’s move on to the premium offer and pricing of the Spotlight Social Media Feeds plugin.
How much does the Pro version cost (and what can you do with it)?
What are the premium options?
The additional options you’ll find in the premium version of the plugin fall into 4 main categories:
- Design.
- Filters.
- Moderation.
- Promoting and monitoring your Instagram account.
Most of the premium options are available in the plugin’s Customization Tool.
When using the free version, a small red dot indicates options that are premium only:

Design
Compared with the free version, the design section features 8 additional templates:
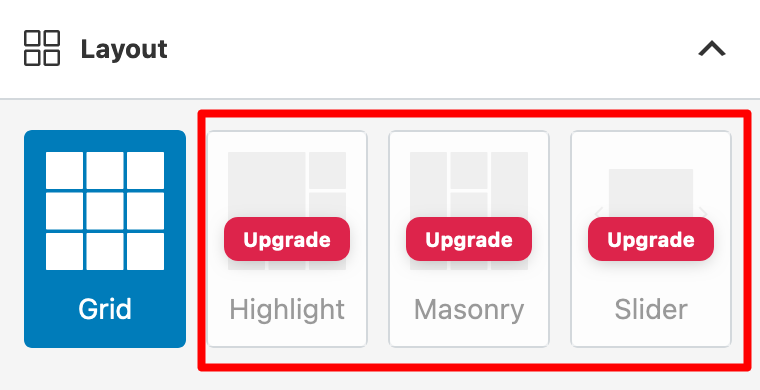
Additional layouts are also available (Highlight, Masonry, and Slider):
Additionally, you have the option of displaying your posts in a popup lightbox, or showing the total likes and comments (and their content).
Finally, the plugin features its own Elementor widget to help you create and customize your Instagram post feed directly from the interface of the famous page builder.
Filters
When it comes to filters, you can:
- Show/hide posts containing specific words in their captions
- Show/hide posts containing specific hashtags
- Manually choose which posts to show or hide
Moderation
On the moderation side, Spotlight Social Feeds Pro lets you select the Instagram posts you want to display in each post feed.
You can also hide photos, videos, and reels from your feed.
Promotion and monitoring with Spotlight Social Media Feeds Pro
Finally, SpotlightWP Pro offers a number of handy options for promoting your account and generating more engagement.
First of all, you can design a “Link in bio“ page to redirect traffic from your Instagram account to pages on your WordPress site.
In terms of conversion, this can be very useful if you have a WooCommerce store, for example. You can then redirect your Instagram visitors to your product pages.
To boost your sales, you can also create a “shoppable” feed by linking your Instagram publications directly to products or services sold on your eCommerce store.
Finally, the premium offer gives you access to detailed statistics on your publications and Instagram feed, directly on your administration interface.
While the range of premium options is very extensive and interesting, it’s primarily aimed at people (freelancers, agencies, companies, etc.) who use Instagram on a regular basis and for professional purposes.
If you use the social network to communicate with your friends and post publications for purely personal purposes, the plugin’s free offering should be more than sufficient.
Pricing
Spotlight Social Feeds offers 3 licenses:
- Essentials ($39/year for use on one site).
- Pro ($59/year for use on one site).
- Performance ($99/year use on one site).
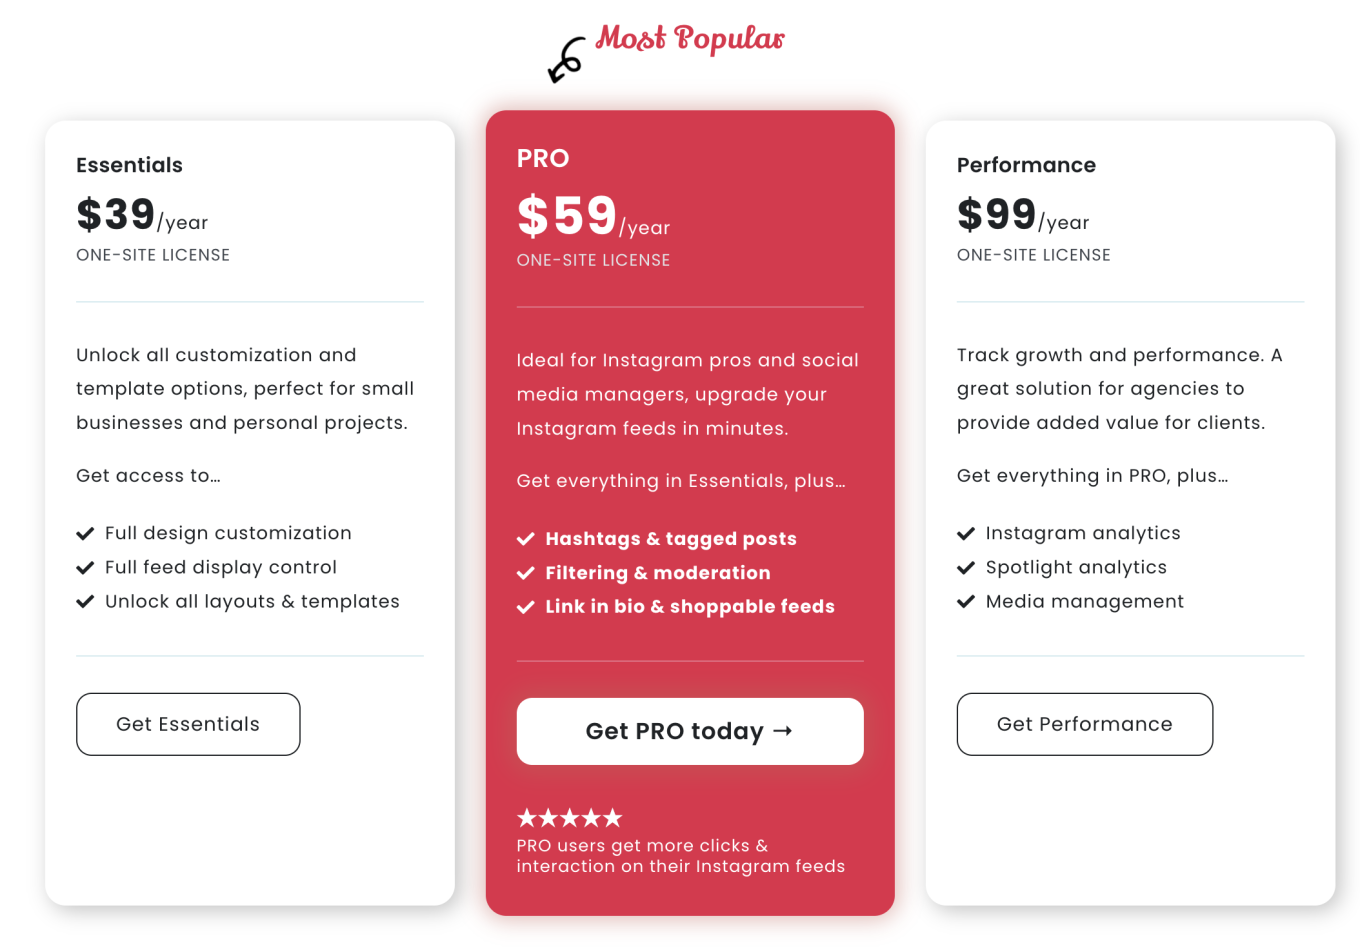
The more expensive the license, the more options you’ll have. For example, the Essentials license does not allow you to filter and moderate your publications.
Feel free to compare the 3 licenses on this page before making your choice.
Who are Spotlight Social Feeds’ competitors?
Before giving you my final opinion of this plugin, I’d like to give you a quick overview of Spotlight Social Media Feeds’ competitors.
There’s nothing to stop you activating them on a test site, locally for example, to see what they’ve got up their sleeve and compare them with SpotlightWP.
All the plugins I’m about to mention have a free version:
- Smash Balloon Social Photo Feed
- 10Web Social Photo Feed
- Social Feed Gallery
- Meks Easy Photo Feed Widget
- WPZOOM Social Feed Widget
- Etc.
Are you in a hurry and want to know right away what these plugins are worth? Check out our review of the best Instagram plugins for WordPress, in which we discuss these plugins in detail (along with other competitors).
Our final review of Spotlight Social Feeds
Alright, it’s time to give you my opinion of this Instagram plugin. Very easy to use and already effective in its free version, Spotlight Social Feeds is a plugin that convinced me.
Simple to use, intuitive, and easy to handle, it’s suitable for all types of profiles, from beginners to advanced users.
If you want to add your Instagram feed to WordPress, you can bet on this plugin with your eyes closed. In its genre, it has very few equivalents, apart from the equally effective Smash Balloon Social Photo Feed.
Its free version is enough to get you started if you have a personal account and publish a few photos or videos from time to time.
On the other hand, if you have a professional Instagram account, the premium version may quickly become indispensable. It’s up to you to decide whether the options offered suit your needs.
On the downside, the interface is only available in English, which may be a hassle if you need another language (you can get around that with Loco Translate). Also, the three premium licenses can only be activated on a maximum of one site.
Do you use Spotlight Social Feeds? If so, tell us what you think!

Receive the next posts for free and access exclusive resources. More than 20,000 people have done it, why not you?

Continue reading
Articles posted in WordPress PluginsOur review of B2BKing: A WooCommerce plugin built for B2B commerce
“Hi, I need 200 units of this product with fast shipping please”. As an online store owner, receiving this kind of message puts a smile on your face. Answering it, on the other hand, becomes a lot less fun… Basically,…
GTranslate on WordPress: our full review of this tool for creating a multilingual site
“Hello, how are you?” “What do you think of this computer mouse?” For you, everything is easy to understand in these two sentences. For someone living deep in the Shetland Islands or Yucatán, it’s probably a bit more complicated… If…
Air WP Sync: Test and review of this plugin for integrating Airtable into WordPress
Do you use Airtable and WordPress? Then some of your days probably look something like this. In the morning, you update your Airtable database as soon as something changes. In the afternoon, you copy and paste the same data into…