


Dear WPMarmite readers, I know something about you.
Something personal. Your heart is beating. It’s racing.
Revelation in 3, 2, 1: you have a Facebook account, right?
What a scoop! If you do, you’re one of the 2.89 billion monthly active users of the social network worldwide.
And even if the reach of Facebook publications tends to decrease, it is still a first choice channel to build and communicate with an audience.
Apart from that, if you’ve come across this post, you’re probably wondering how to link WordPress and Facebook.
I suggest you to see it together.
To help you and save you time, I have tested 10 plugins for Facebook.
I will also offer you some bonuses and show you how to proceed to a manual integration of Facebook on your website. So stay tuned!
Overview
Originally written in January 2022, this post was updated in December 2022.


Foreword: how to create a Facebook app?
Before you dive into reading this post, a technical refresher is in order.
To use some of the plugins in this test, you’ll need a Facebook application (app).
We are talking about a tool that allows you to transfer data to and from Facebook.
So, we’ll stop here on the details to create it. That way, it will be done.
Step 1: Access the Meta for Developers page
First, you need to have a Facebook developer account (more info here).
Then go to the platform dedicated to developers of the social network (Meta for Developers), and click on “My apps”, in the top right corner of your screen.

The Facebook group changed its name at the end of October 2021. It is now called Meta and encompasses several tools: Facebook, Instagram, WhatsApp, Oculus, etc.
Step 2: Choose an application type
On this new interface, click on the green “Create App” button, then choose an app type.
You have 7 options:
- Business
- Consumer
- Instant Games
- Gaming
- Workplace
- Academic research
- None
For the purposes of this test, I choose the “Business” box. However, Facebook says the following, “If you are creating an application for the first time and just want to explore the creation process, choose “None”.”
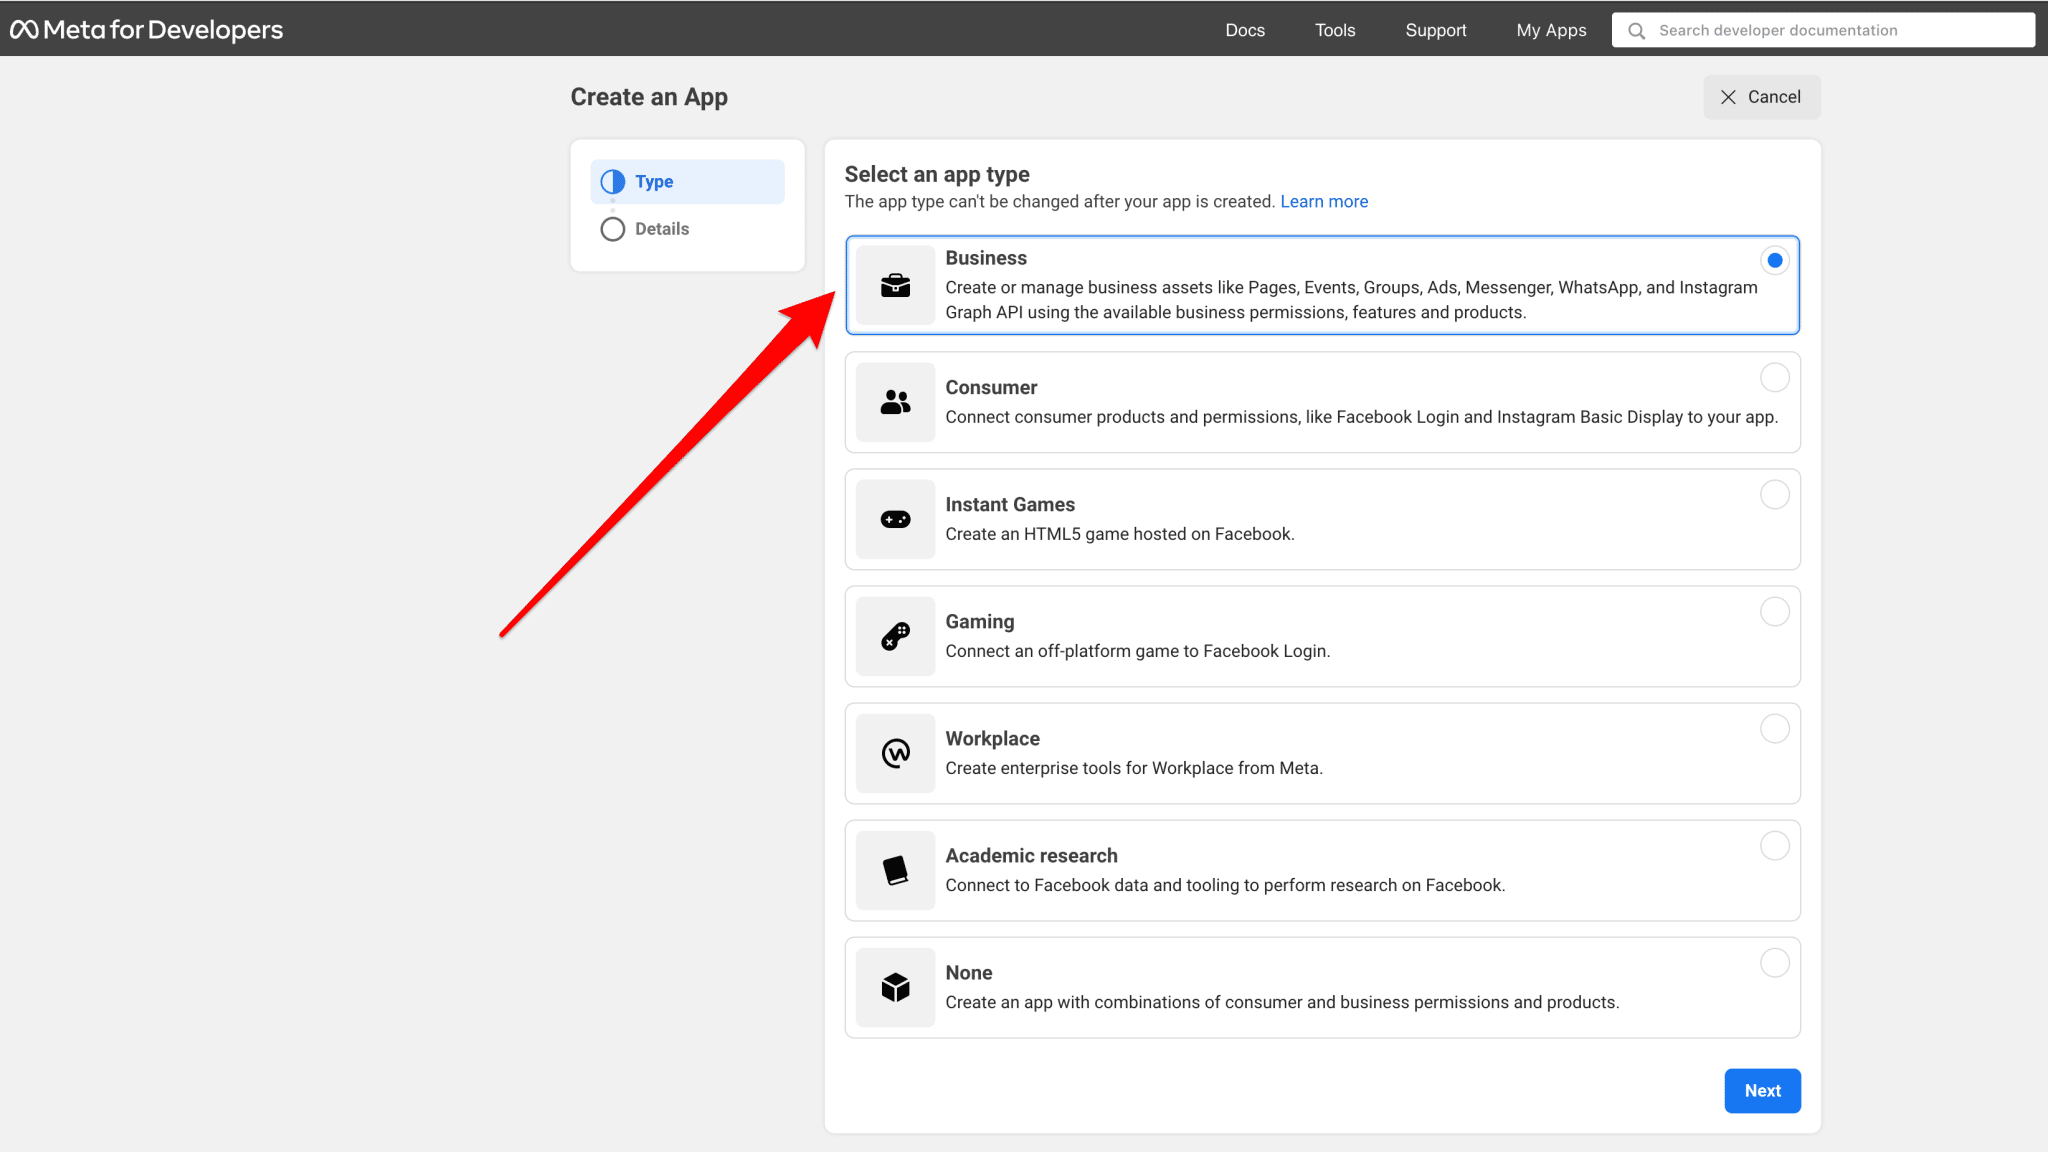
Click the blue “Next” button to proceed.
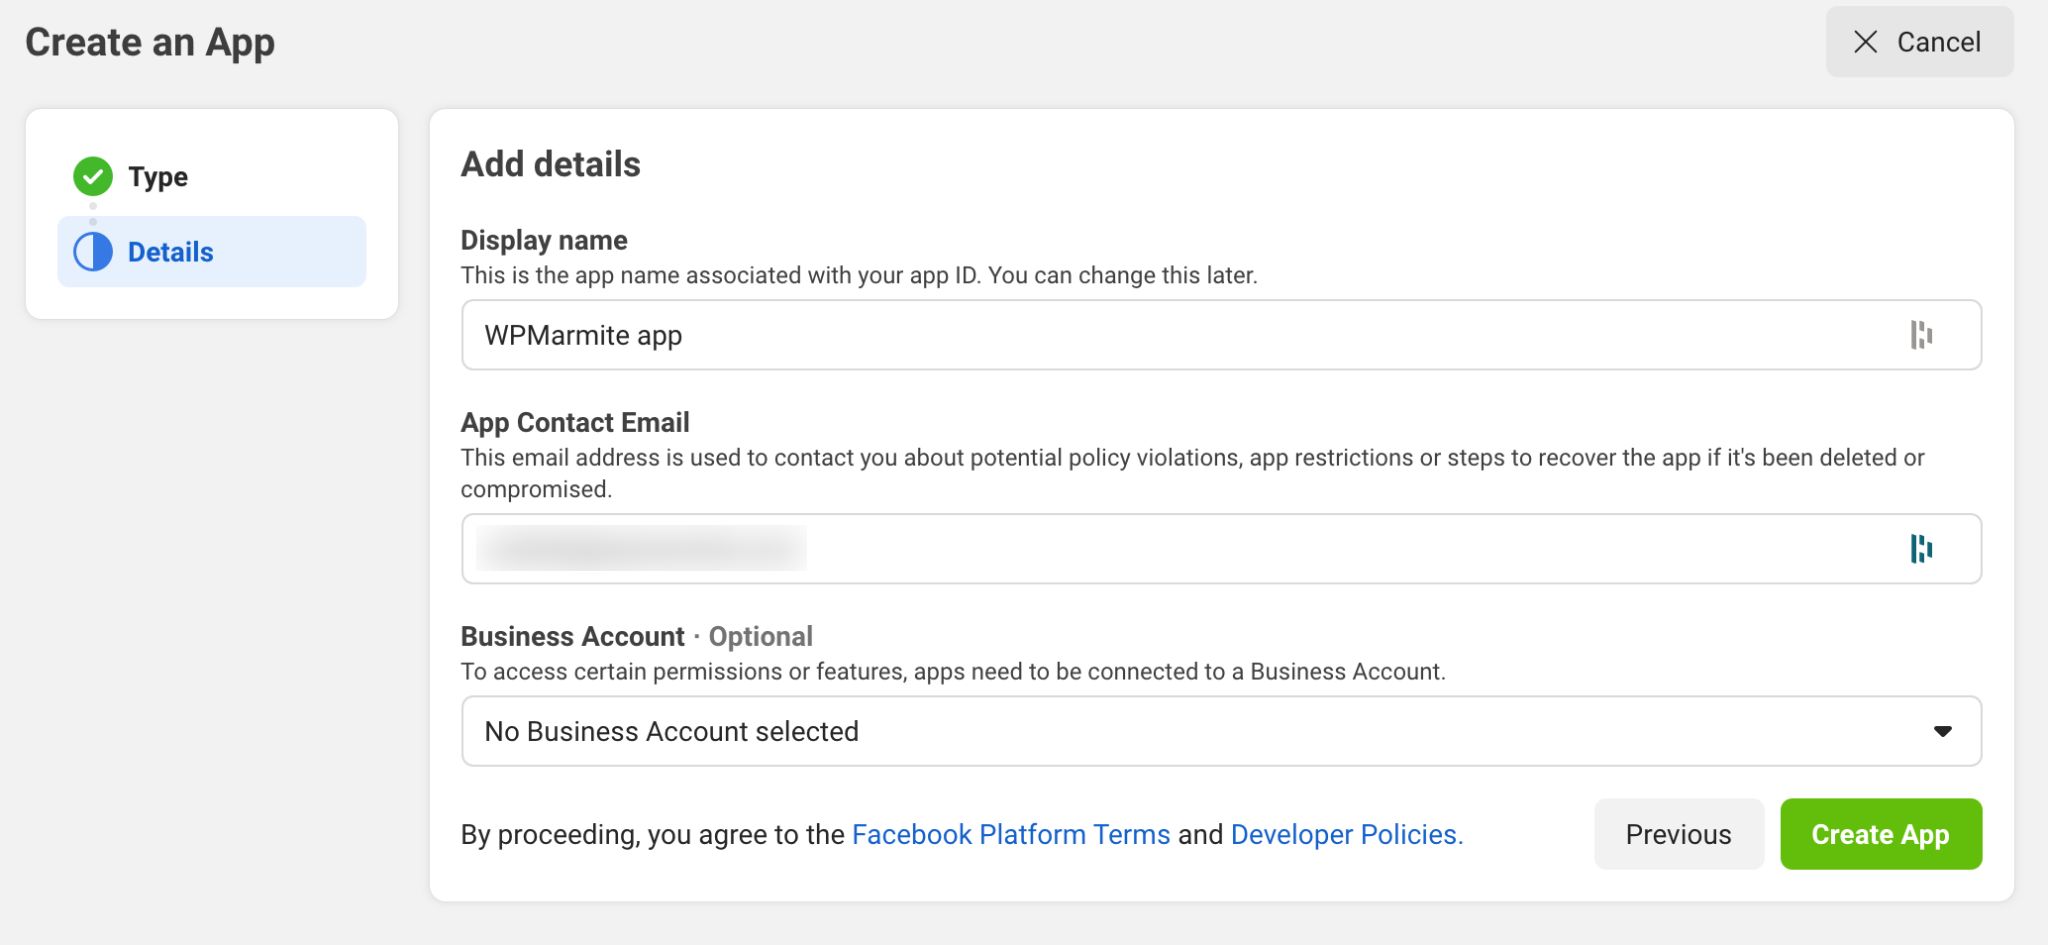
Step 3: Add details about your application
At this point, you need to:
- Give your application a name.
- Provide an email address that will be associated with it.
Finally, you have the choice to link your Business Manager account (to advertise on Facebook, for example), if you have one.
Finish by clicking on the green “Create App” button.
Congratulations, your application is now created. It is available on your dashboard:
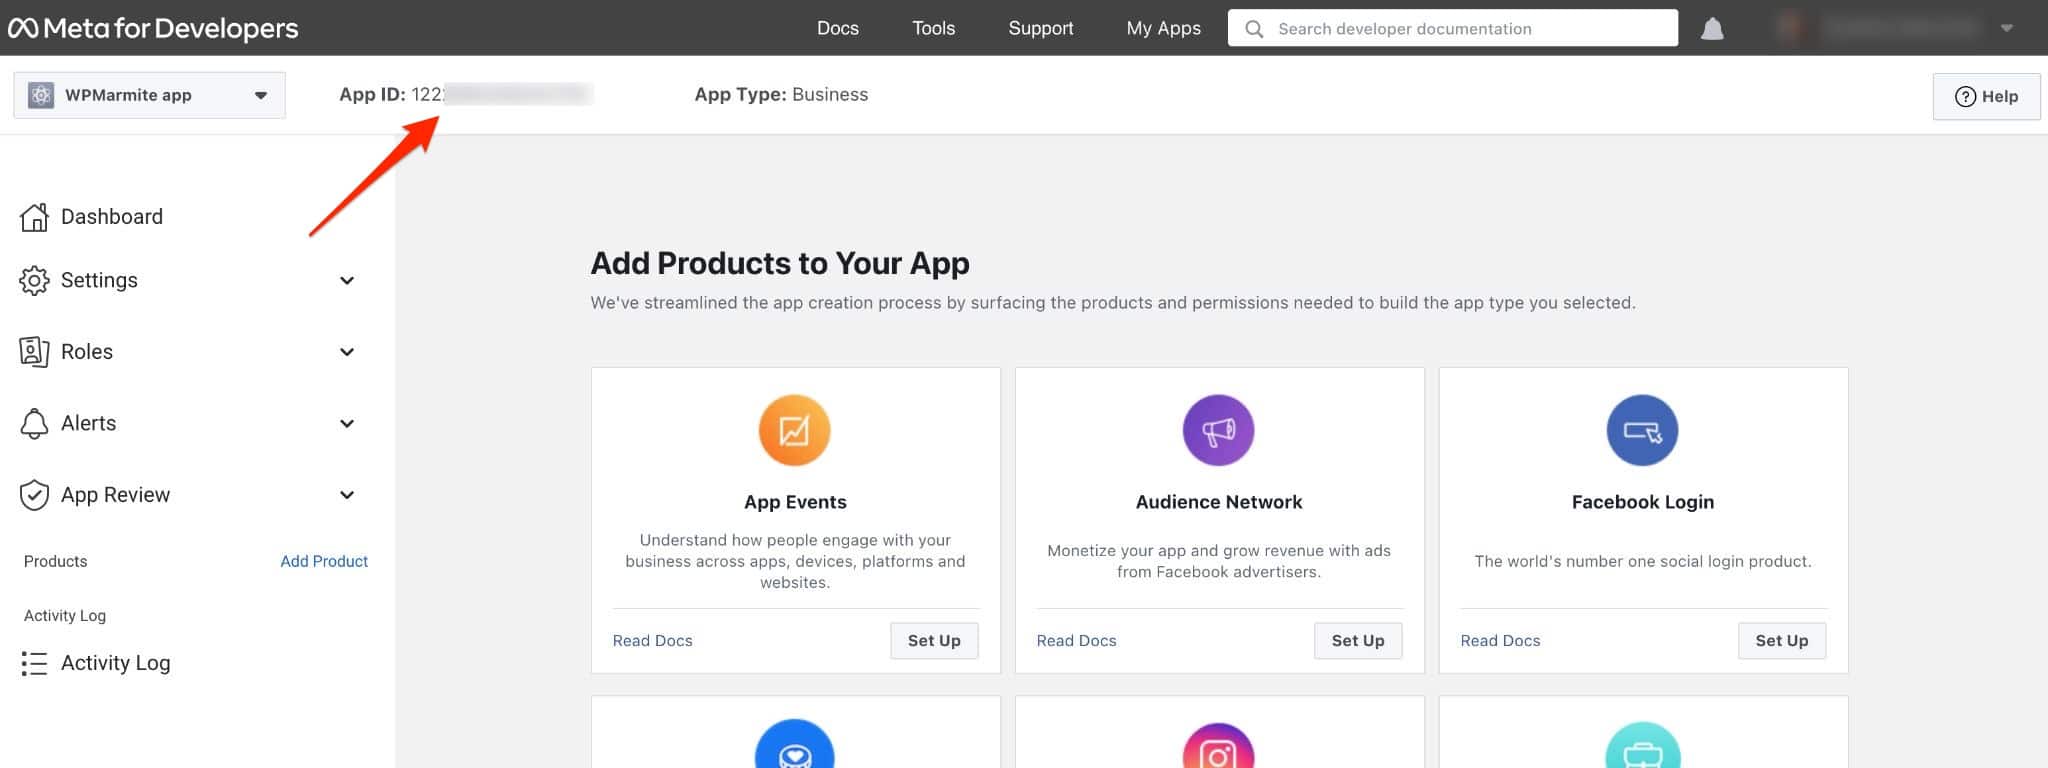
When some plugins ask for it, you will just have to copy and paste it in the requested area. In any case, congratulations: you are now ready to move on.
Speaking of plugins, now it’s their turn to be presented!
WordPress and Facebook: 10 plugins under the microscope
Want to integrate your Facebook page into WordPress? And even your news feed?
Before discovering how to do it, here are some details about the content of the next lines.
I have chosen to present you 10 plugins. That is a drop in the ocean of Facebook plugins for WordPress.
There are several hundreds, just on the official directory. The plugins that come up the most and seemed the most relevant are in this post.
But if you use a gem not mentioned here, don’t hesitate to mention it in the comments.
Selection criteria and types of plugins
For your information, the post focuses on 7 “families” of plugins designed to:
- Display a Facebook page/news feed.
- Integrate Facebook buttons.
- Publish Facebook comments on WordPress.
- Automatically share posts.
- Add a Messenger chat on WordPress.
- Automatically connect to WordPress using Facebook.
- Display customer reviews from your Facebook page.
Among the selection criteria I took into account, I based myself on:
- Compatibility with the latest versions of WordPress.
- Ease and simplicity of use. Even if, sometimes, you will have to create a Facebook app. I’ll come back to that. Don’t run away!
- The presence on the repository, the official WordPress directory.
Now, the basics are set. Now I’ll show you what’s inside each plugin.
Smash Balloon Social Post Feed

Active installations: 200K+
Let’s open the selection with a must-have WordPress Facebook plugin, on paper. Drum roll, I call on stage Smash Balloon Social Post Feed (formerly called The Custom Facebook Feed).
And I warn you: it can’t disappointment. Otherwise, I contact the developers for fake customer testimonials.
I must say that with all the positive comments it generates, one expects the best. Examples: “Great plugin!”, “Best Support Service I have ever had from plugin supplier”, “Great Customer Support! Excellent product”.
Let’s add that the plugin, which allows you to display your page and your news feed, accumulates excellent ratings at the time of writing (4.8/5).
After this appetizer, all that’s left to do is to enjoy it. Let’s go!
First observation: the plugin is very easy to use. You don’t get lost in incomprehensible and cluttered menus. The navigation remains clear and pleasant.
Once you have installed and activated it, you will find three options in the left bar of your WordPress admin.
To create your first news feed, click on All Feeds > Add New.

Then, everything happens in 4 steps, where you are guided step by step:
- You select the type of news feed. With the free version, you only have one choice(Timeline). You can only display posts from your Facebook page (which is enough to start with).
- You connect the plugin to your Facebook page or group.
- You customize your news feed. Here, the options are numerous and varied. You can change the appearance of your news feed (displaying publications as a list or as a masonry), its height, its colors, the number of ads to display (the number can be different depending on the screen used by your visitors), but also the visual appearance of the header and posts (colors, size). Any change applied is displayed in real time, which is very practical.
- You integrate your Facebook feed wherever you want on your website. For this, 2 possibilities. You want to display your feed on a page, a post, or in a widget area? Use the Gutenberg block called “Custom Facebook Feed”. Another option, less intuitive: copy and paste the shortcode generated at the end of the customization of your news feed.
And that’s it, finito. With this plugin, everything is simple. We also note that having so many options is very rare – or even non-existent – in competing plugins.
Other positive points to note:
- You can translate all the texts of your news feed through the Translation tab of the Settings submenu.
- The responsive part of the plugin. This means that the display is optimal on all types of devices, such as smartphones and tablets.
- The possibility to use the plugin to activate the oEmbed. Due to a change in API (a programming interface) in October 2020, Facebook and Instagram no longer support oEmbed, a format that allows, for example, to integrate content from these social networks on WordPress by copying the simple link of a publication. As a result, if oEmbed is not activated (it will be if you have a Facebook app, for example), the Facebook and Instagram posts you want to copy and paste will not be displayed on the visible interface of your website.
For your information, Facebook’s privacy policy prevents personal profile posts from being displayed to the world. That’s why you only have the choice to display posts from a page or a group.
Want more? For the greedy among you, you should know that Smash Balloon Social Post Feed also offers a pro version. It will cost you $49 to use on one site.
It allows you to display your photos, videos, comments and other shares on your news feed, which is of course impossible with the free version.
This is a major limitation, because it gives the impression that your site has display problems by not showing the photos and videos associated with your Facebook posts.
It’s a pity because apart from that, this plugin is still very efficient.
Also note that Smash Balloon Social Post Feed is part of a suite of plugins that also allows you to display on your site the news feeds from the following social networks: Instagram, Twitter and YouTube.
Download the Smash Balloon Social Post Feed plugin:
Easy Social Feed
Active installations: 50K+
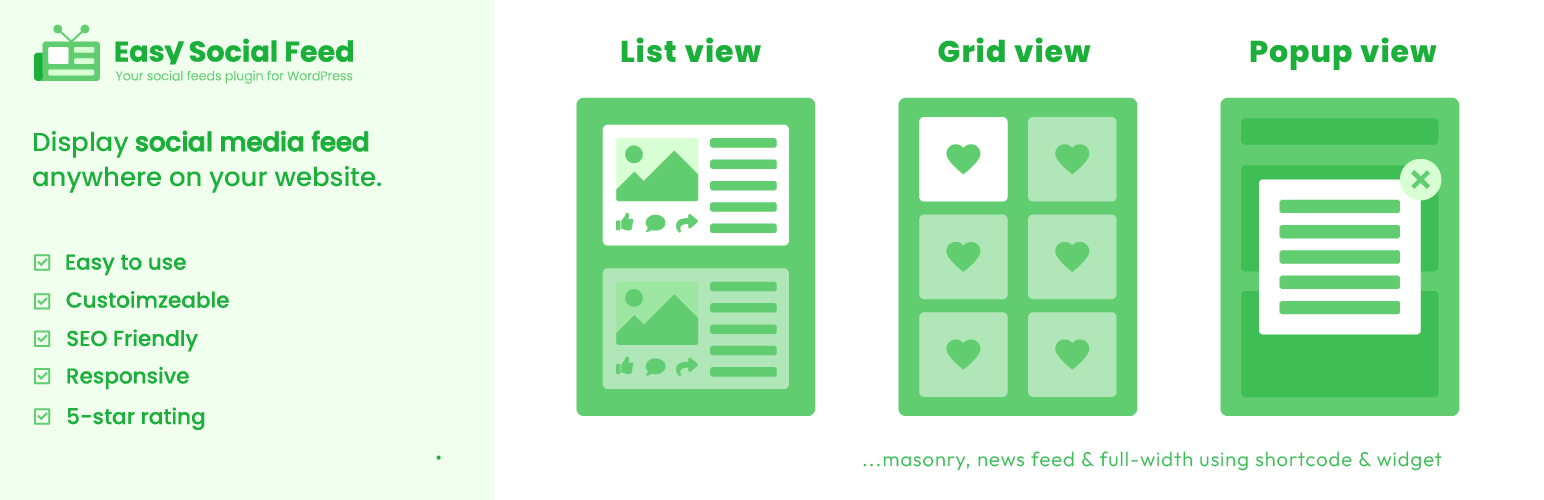
Do you know the 3-in-1 effect? Hint: nothing to do with shampoo or beauty products. Don’t know? Check out Easy Social Feed (formerly Easy Facebook Like Box).
Created by Sajid Javed, an engineer at Automattic – the company that mostly contributes to WordPress.org -, this plugin allows you to display either your news feed or your Facebook Like Box, or both. All this in 3 ways using:
- One of your widgets
- A shortcode
- A popup window
After a redesign, the plugin also offers to integrate your Instagram feed, which is part of Facebook, remember.
So it seems complex. Don’t worry, it’s very accessible. Everything is explained in the settings. Don’t worry, I’ll help you step by step.
To start, you have to connect your Facebook page to the plugin if you want to display your news feed (only the Pro version allows you to display the feed of any page).

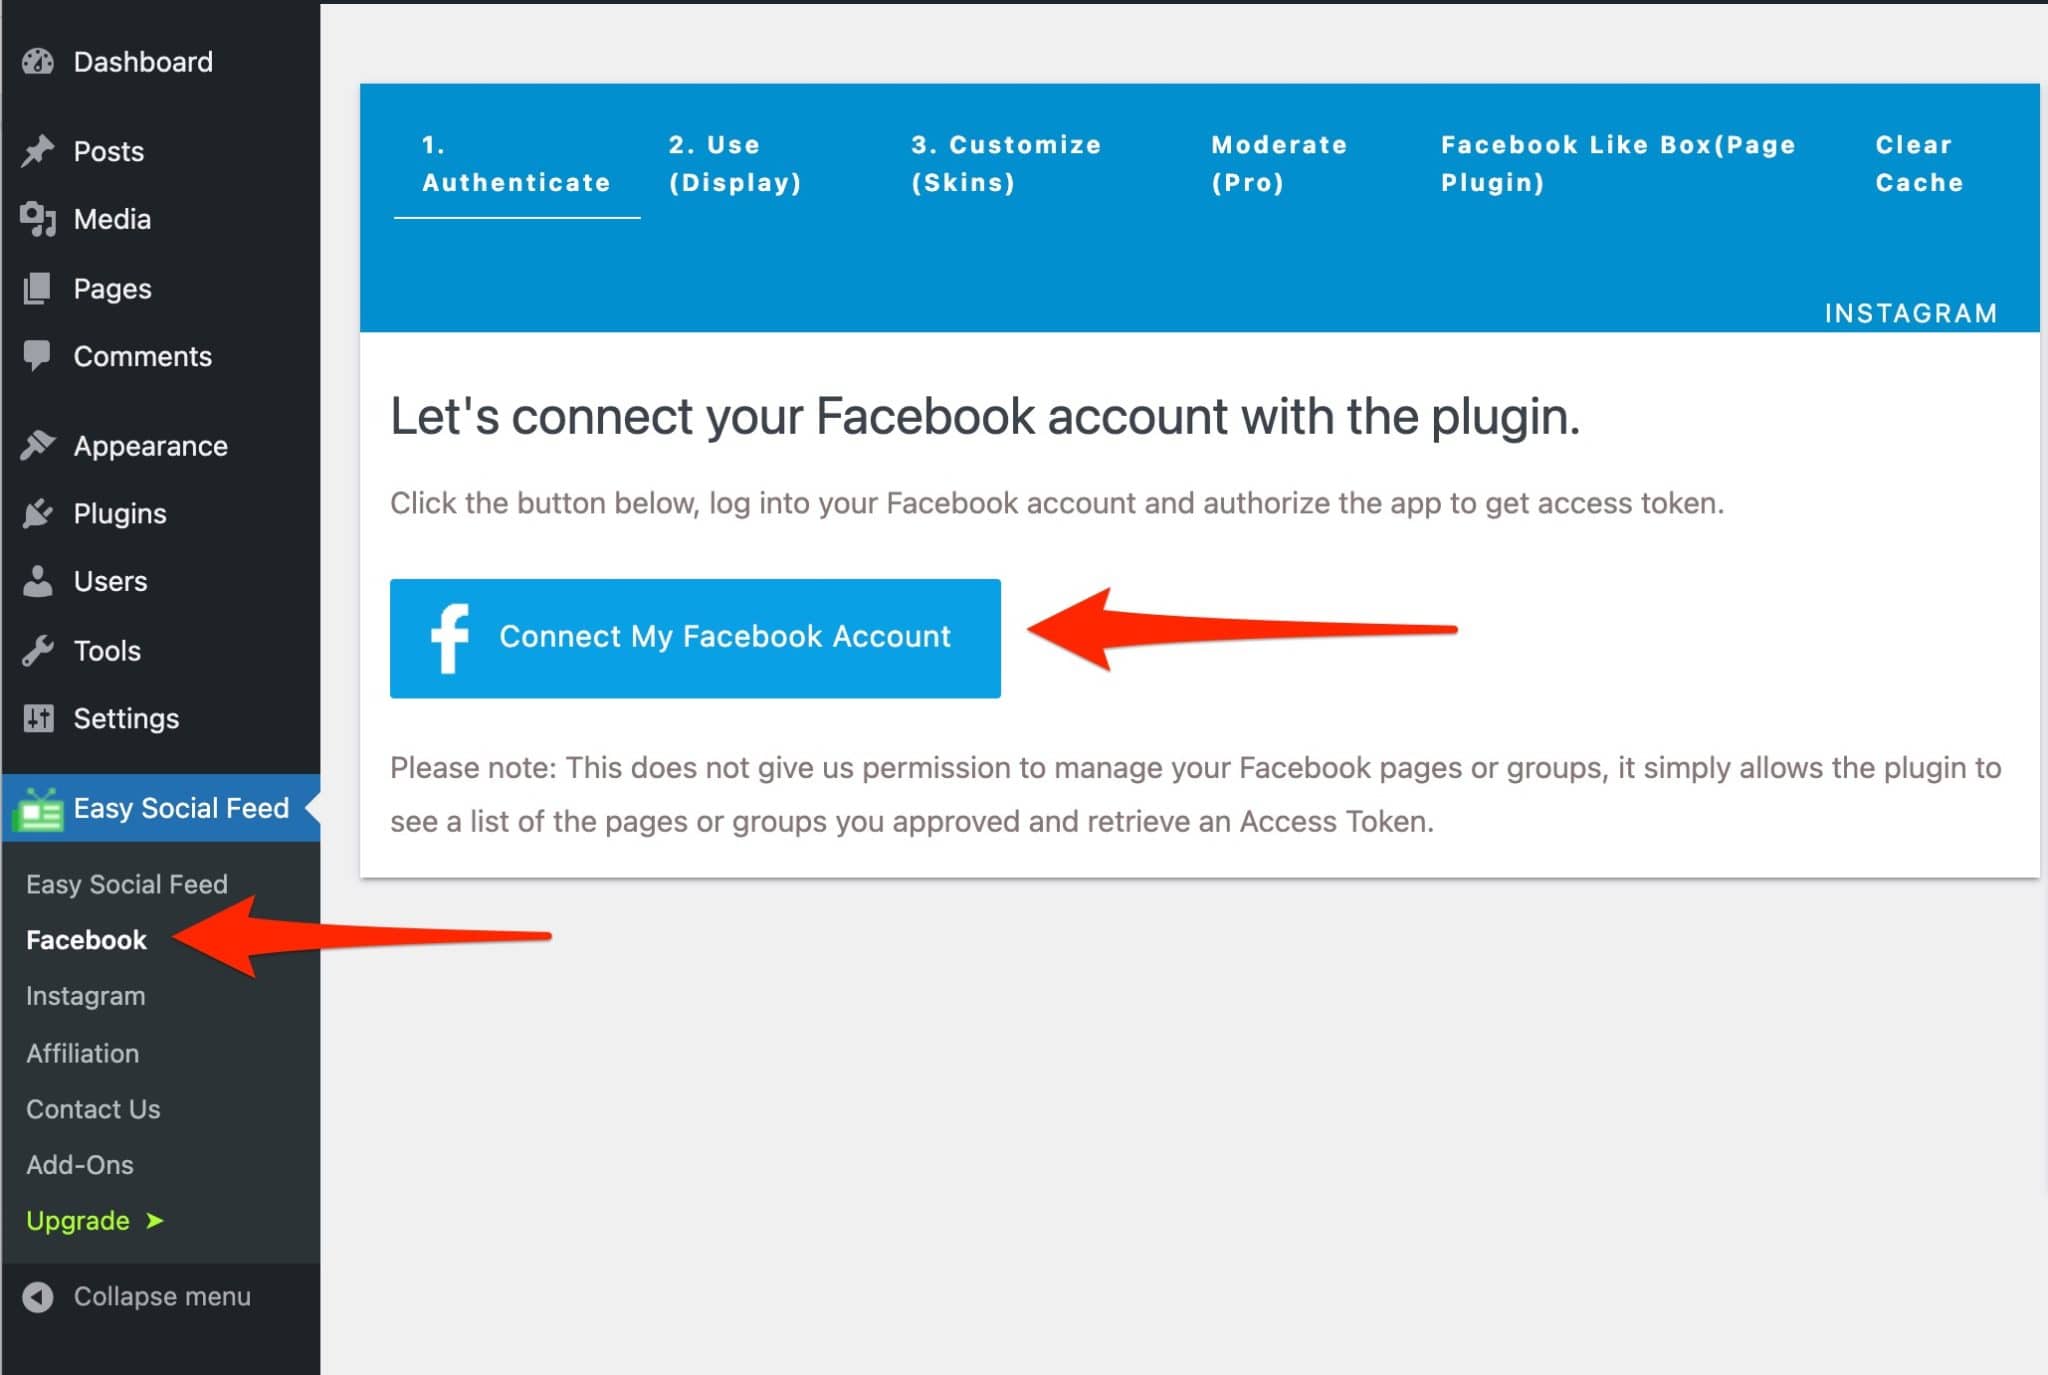
All good? So let’s go through the different scenarios.
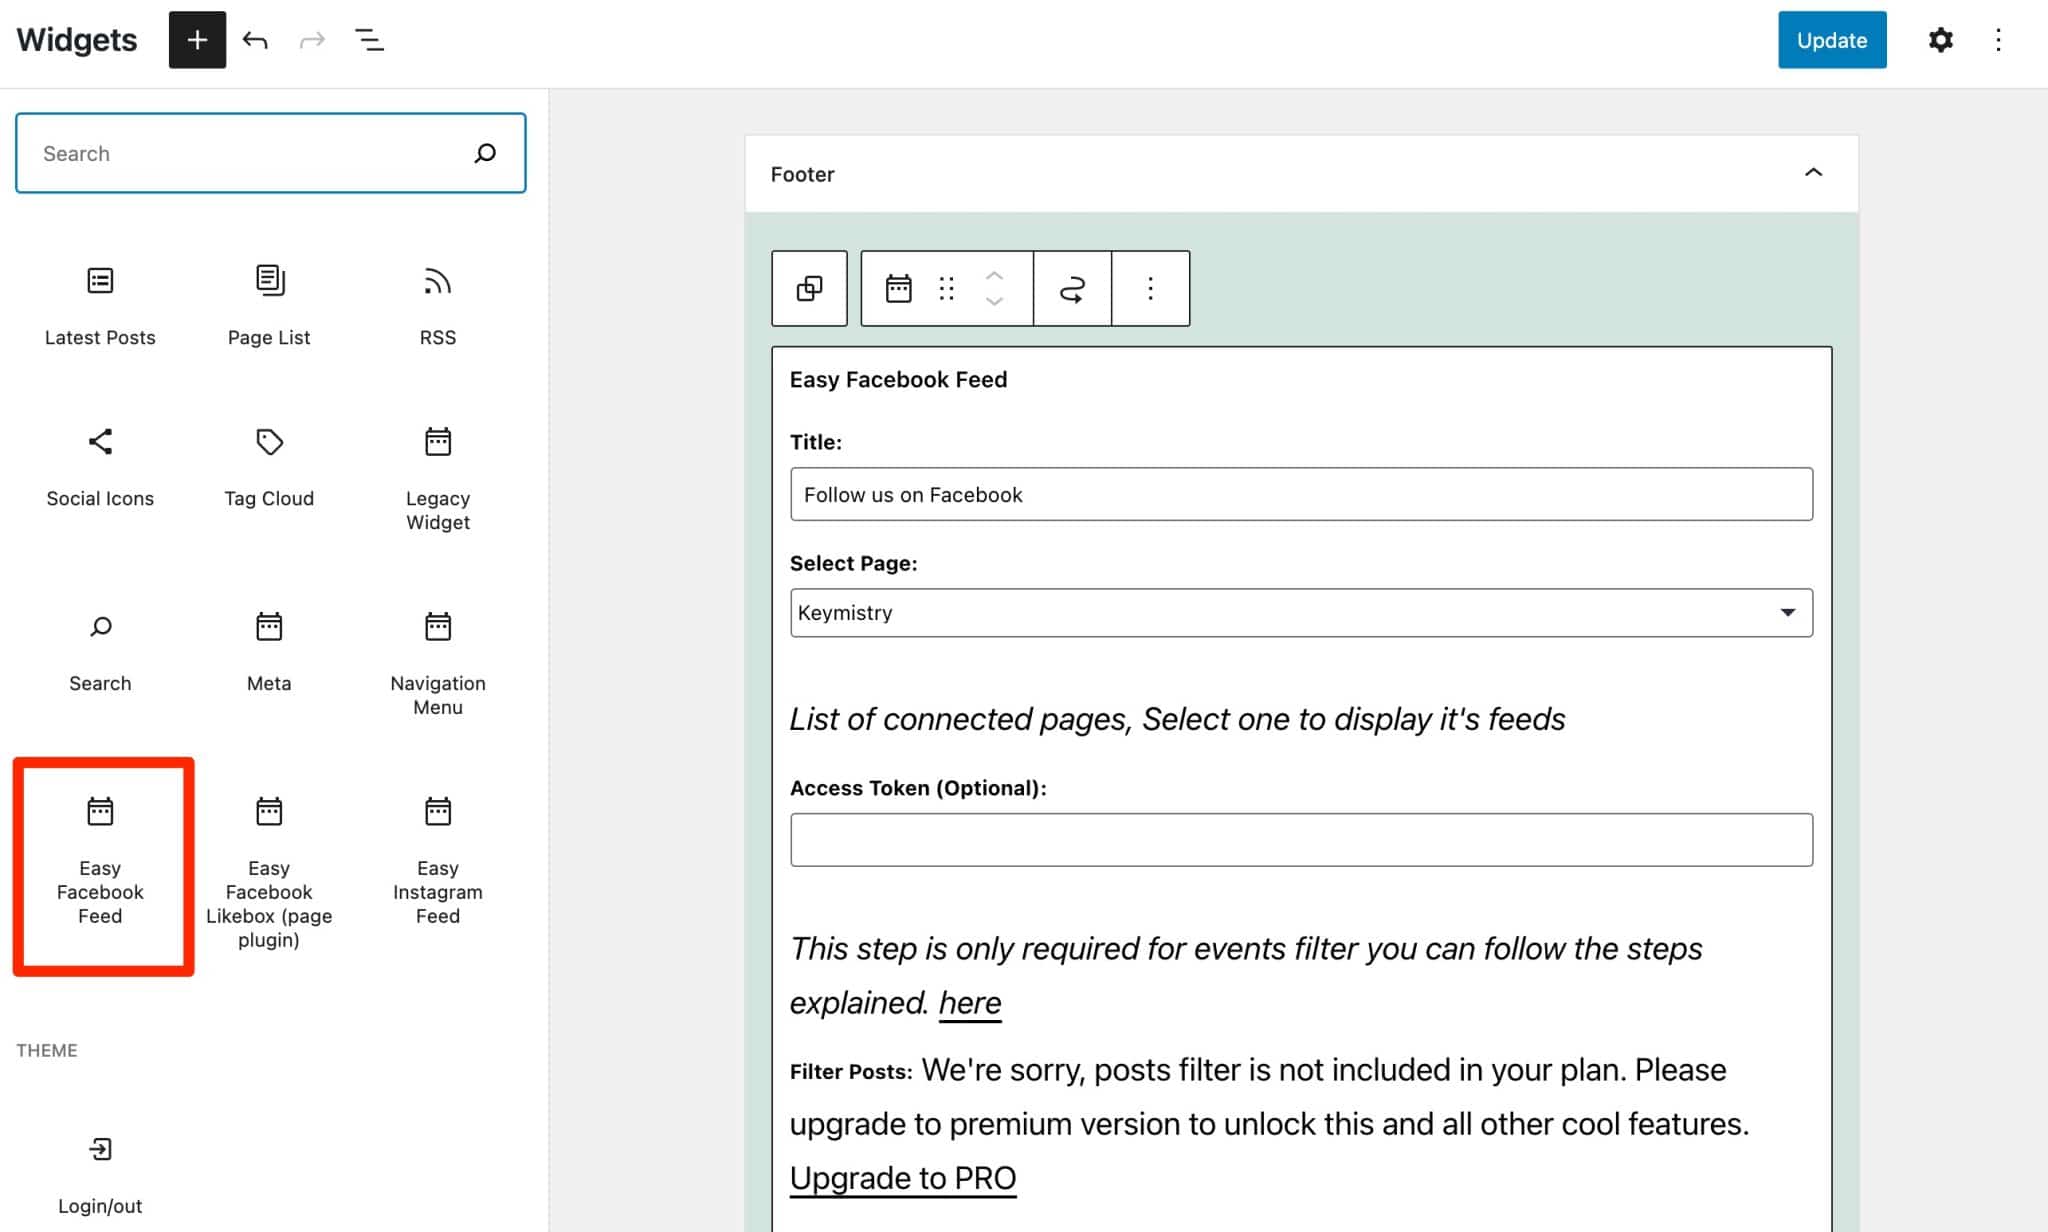
Case study #1
You want your readers to enjoy your news feed. Go to Appearance > Widgets and choose the “Easy Facebook Feed” block.
Then, fill in the required information as you wish (e.g. number of publications to display, logo, opening links in a new tab, etc.)
Case study #2
You just want to add a “Facebook Like Box” .
What’s the point of this thing? To promote your Facebook page and encourage your visitors to like it to reinforce your brand image and your reputation.
How to do it now? The procedure is exactly the same as for inserting your feed. The only thing that changes is the widget to be moved to the area of your choice, such as the sidebar or the footer.
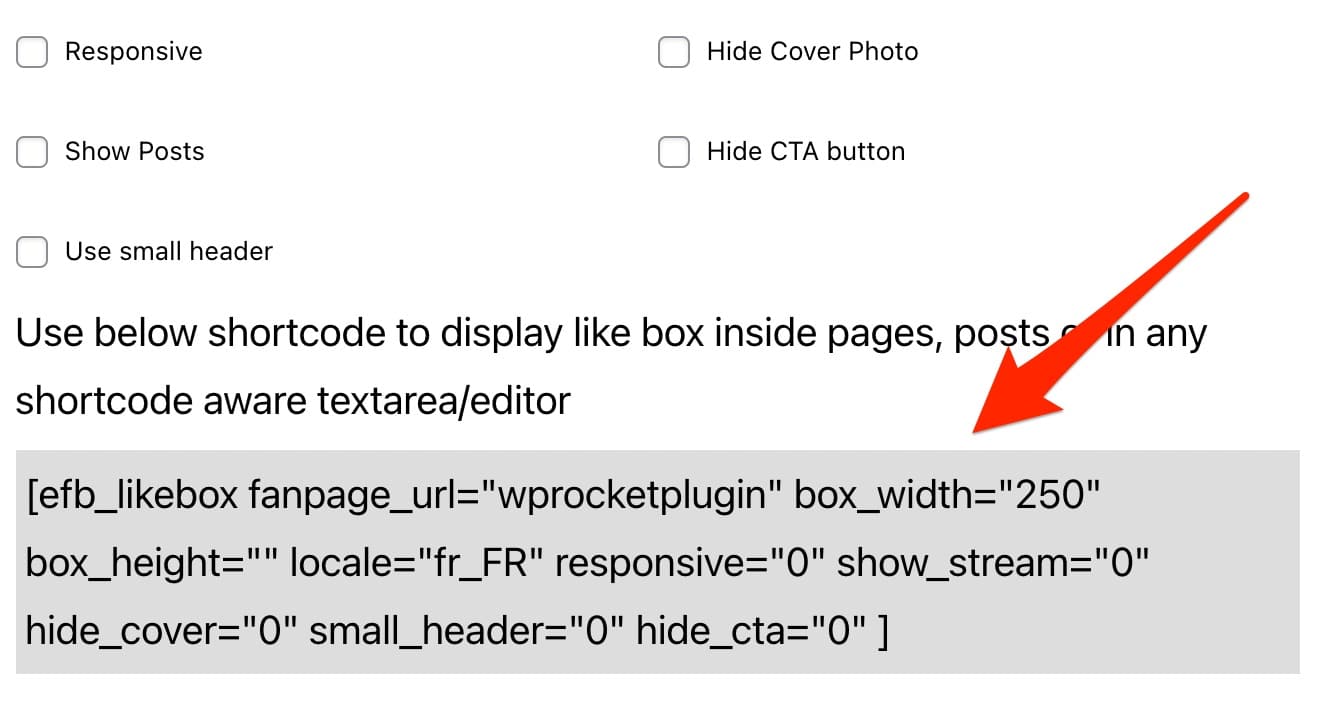
This time, select the “Easy Facebook Like Box” block (page plugin) in Appearance > Widgets. Set it up as you wish. And that’s it.
For the example, we used the Facebook page dedicated to the WP Rocket cache plugin:


If you want to present the like box inside your content, copy and paste the generated shortcode directly into your post or page, using the “Shortcode” block of the content editor (Gutenberg).

Case study #3
You want to integrate a popup window to make sure your visitors see your page.
A popup is a window that opens automatically when a visitor browses a web page. It is often used to send an advertising message that makes you want to break your screen because it prevents you from reading content quietly.
This can be intrusive. It’s up to you to see if it is really useful to your readers.
If you want to set this up, Easy Social Feed no longer offers an option for this.
To take advantage of this feature, you will have to use a dedicated plugin created by the developers of the plugin, called Top Bar.
Note that Easy Social Feed also offers a Pro version (from $39/year), which offers more layout options for your news feed, a filter system for your publications, or an advanced popup creation module.
Download the Easy Social Feed plugin:


Social Reviews & Recommendations

Active installations: 10K+
Social Reviews and Recommendations is a plugin with a very specific use.
As it is defined on its presentation page from the official directory, it allows you to display the reviews published on Facebook by your customers and/or users within a widget area on your WordPress site.
This can be very interesting to reinforce the social proof: we are more likely to trust a product/service if other people have already used it and validate it.
If you have a WooCommerce store for example, this can help you make more sales.
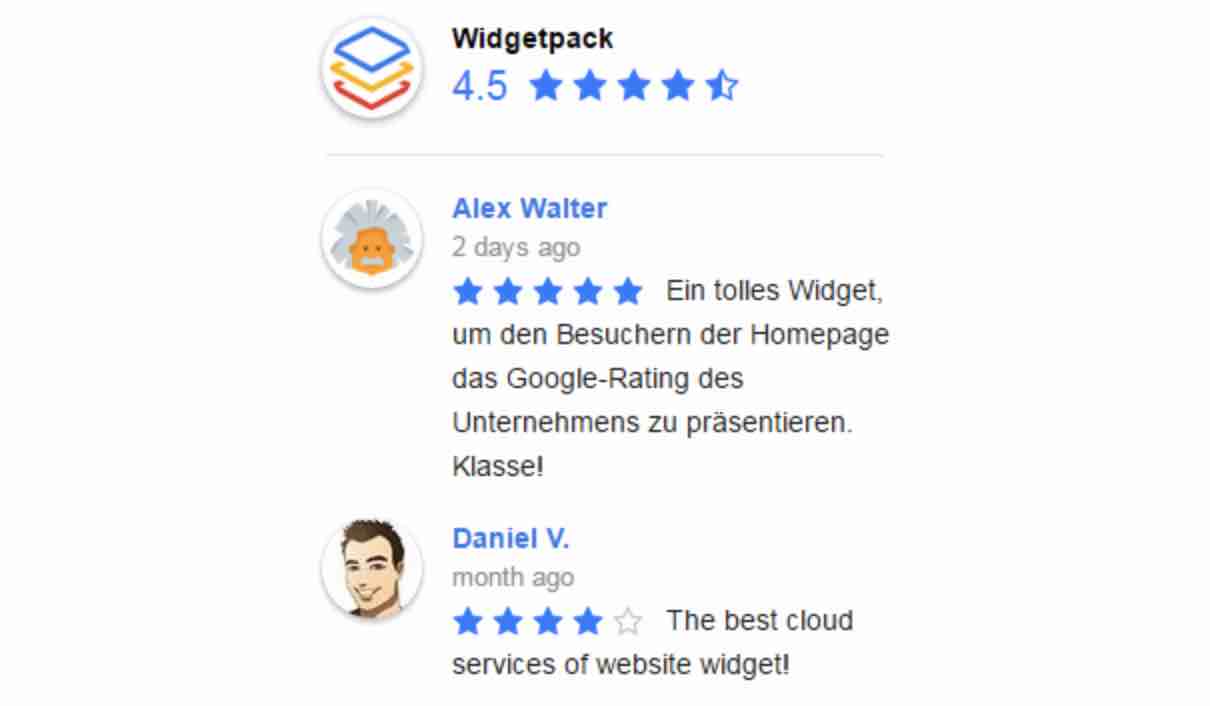
Beyond its singularity, this plugin also seduced me because it is extremely well rated (wpm_dotorg_data plugin=”fb-reviews-widget” field=”rating”] out of more 300 reviews submitted at the time of writing this post).
In use, I can confirm that the plugin is very efficient: it’s easy to use and you get a final result very quickly.
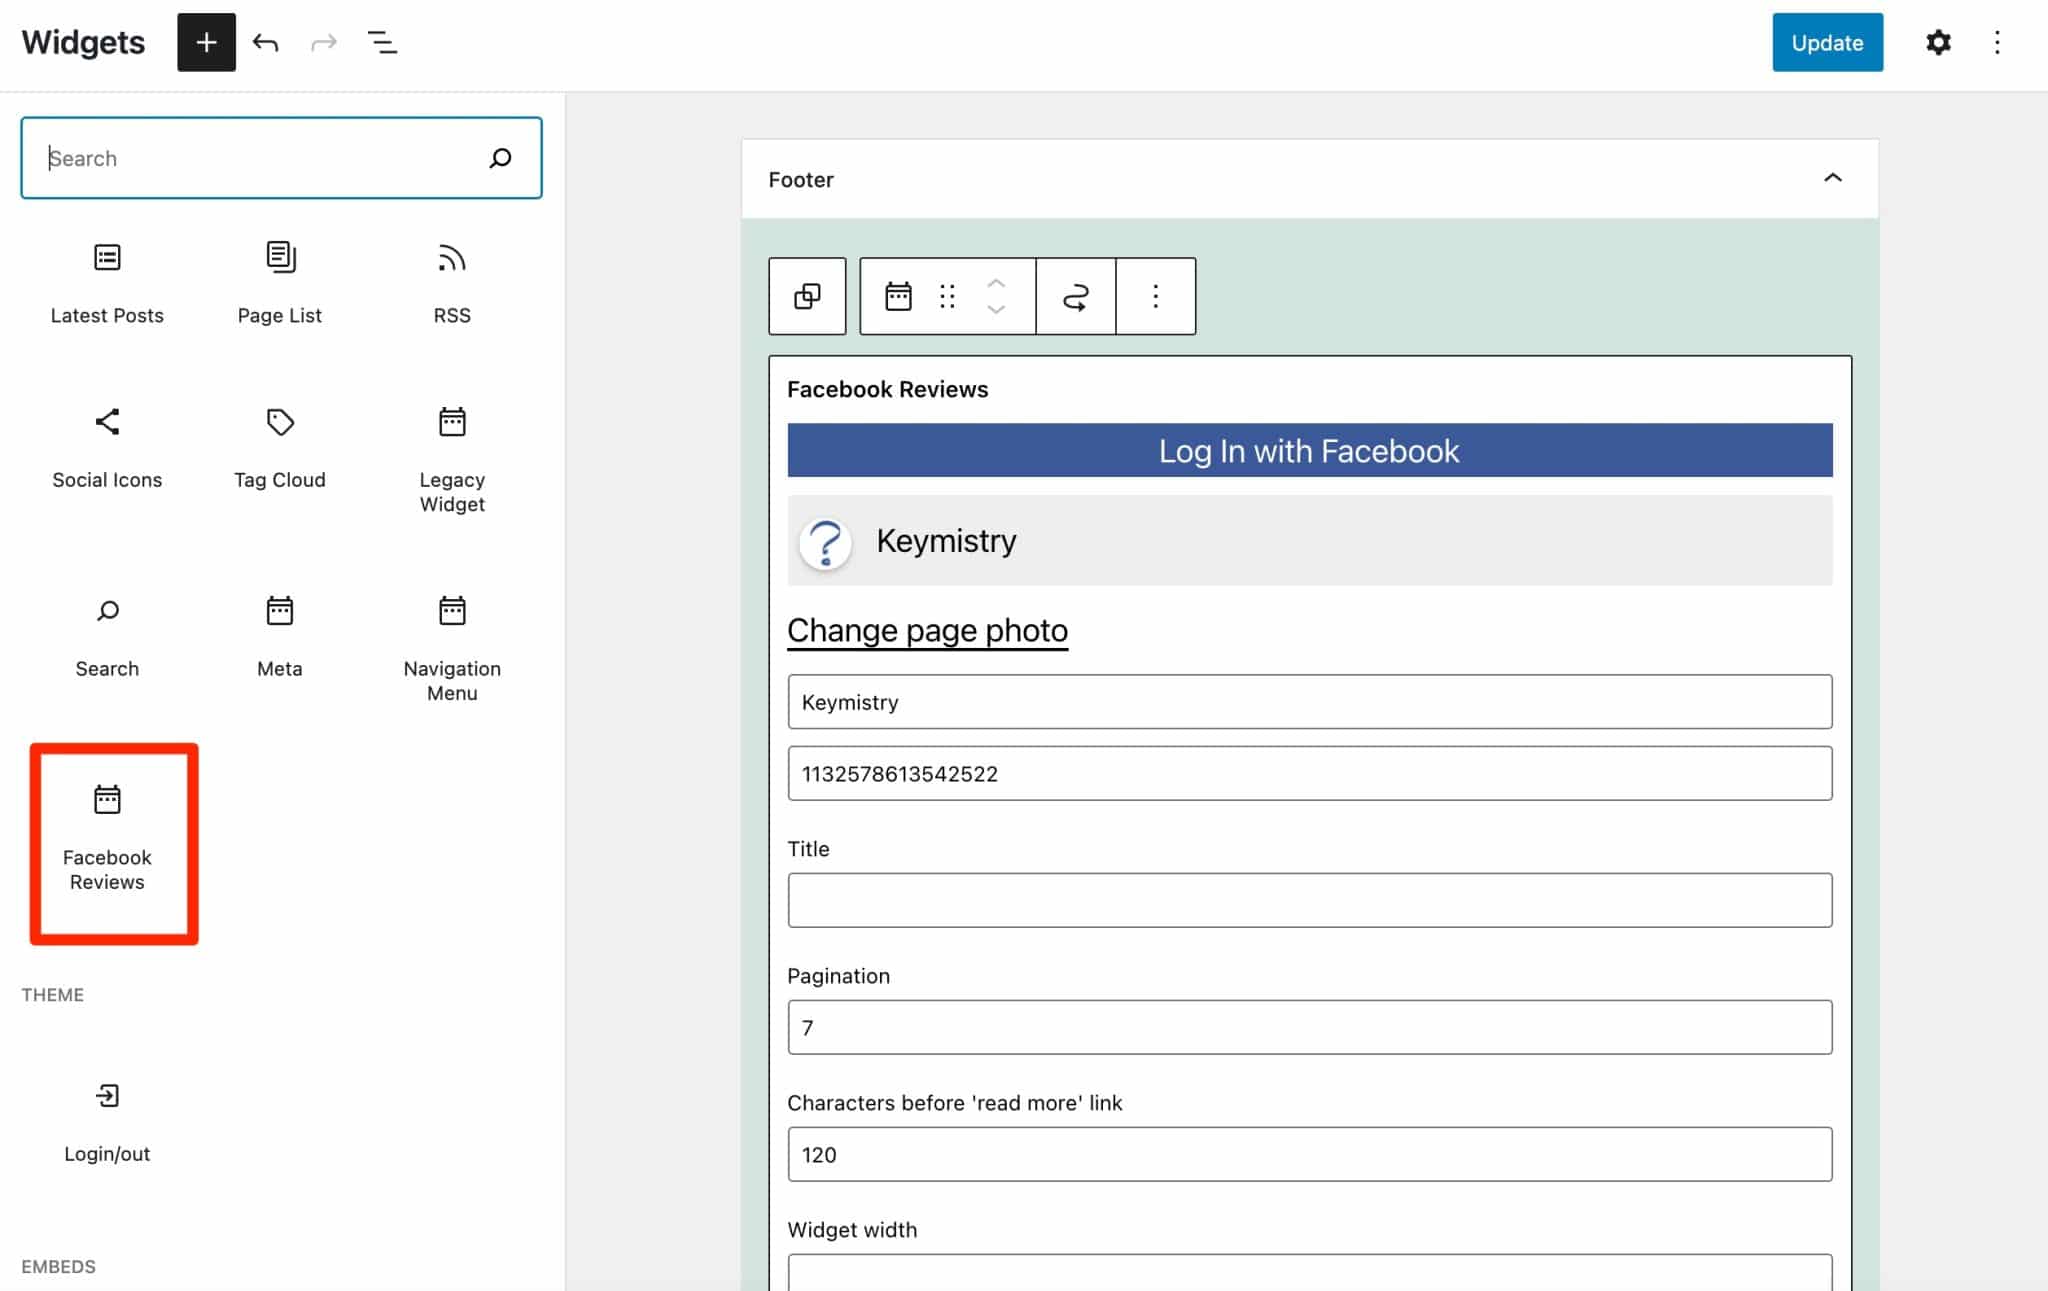
To display these famous Facebook reviews, just go to Appearance > Widgets, then select the “Facebook Reviews” block.
Log in to Facebook, then make the settings of your choice. It is possible to set the following:
- The height and width of the recommendations that will be displayed.
- The number of characters to display before the “Read more” link appears.
- The display of notes left by users/customers: you can hide them.
- The opening of links in a new tab.
In the end, the page rendering looks like this:

Beyond the widget areas offered by your theme, note that you can also display the reviews left on your Facebook page in a page or post. For this, the use of a shortcode is required.
You can generate it by going to Settings > Facebook Reviews > Shortcode. Once it’s available, use the “Shortcode” block on the content editor to embed it within your content.
Finally, you should know that the plugin created by the RichPlugins team offers a premium version (starting at $85/year for use on one site).
The latter allows you to display reviews from Google and Yelp (in addition to Facebook), more options in terms of display and filters, as well as the possibility to allow your visitors to leave a review directly from your WordPress website.
Download the Social Reviews and Recommendations plugin:
Widget for Social Page Feeds

Active installations: 70K+
Formerly known as Facebook Widget, the Widget for Social Page Feeds plugin has more than 70,000 active installations and relatively frequent updates.
So, we expect something functional to integrate your Facebook page in WordPress via a widget.
Start by installing and activating the plugin, which also allows you to display your news feed on your WordPress.
The plugin automatically redirects you to the WordPress widget settings (in Appearance > Widgets).
Select the “Facebook Page Like Widget” block where your theme allows it. This time, I choose the sidebar.
Let me make it clear that I’m not playing favorites and I’m not married to it. Let’s just say that it makes me feel good. 😉
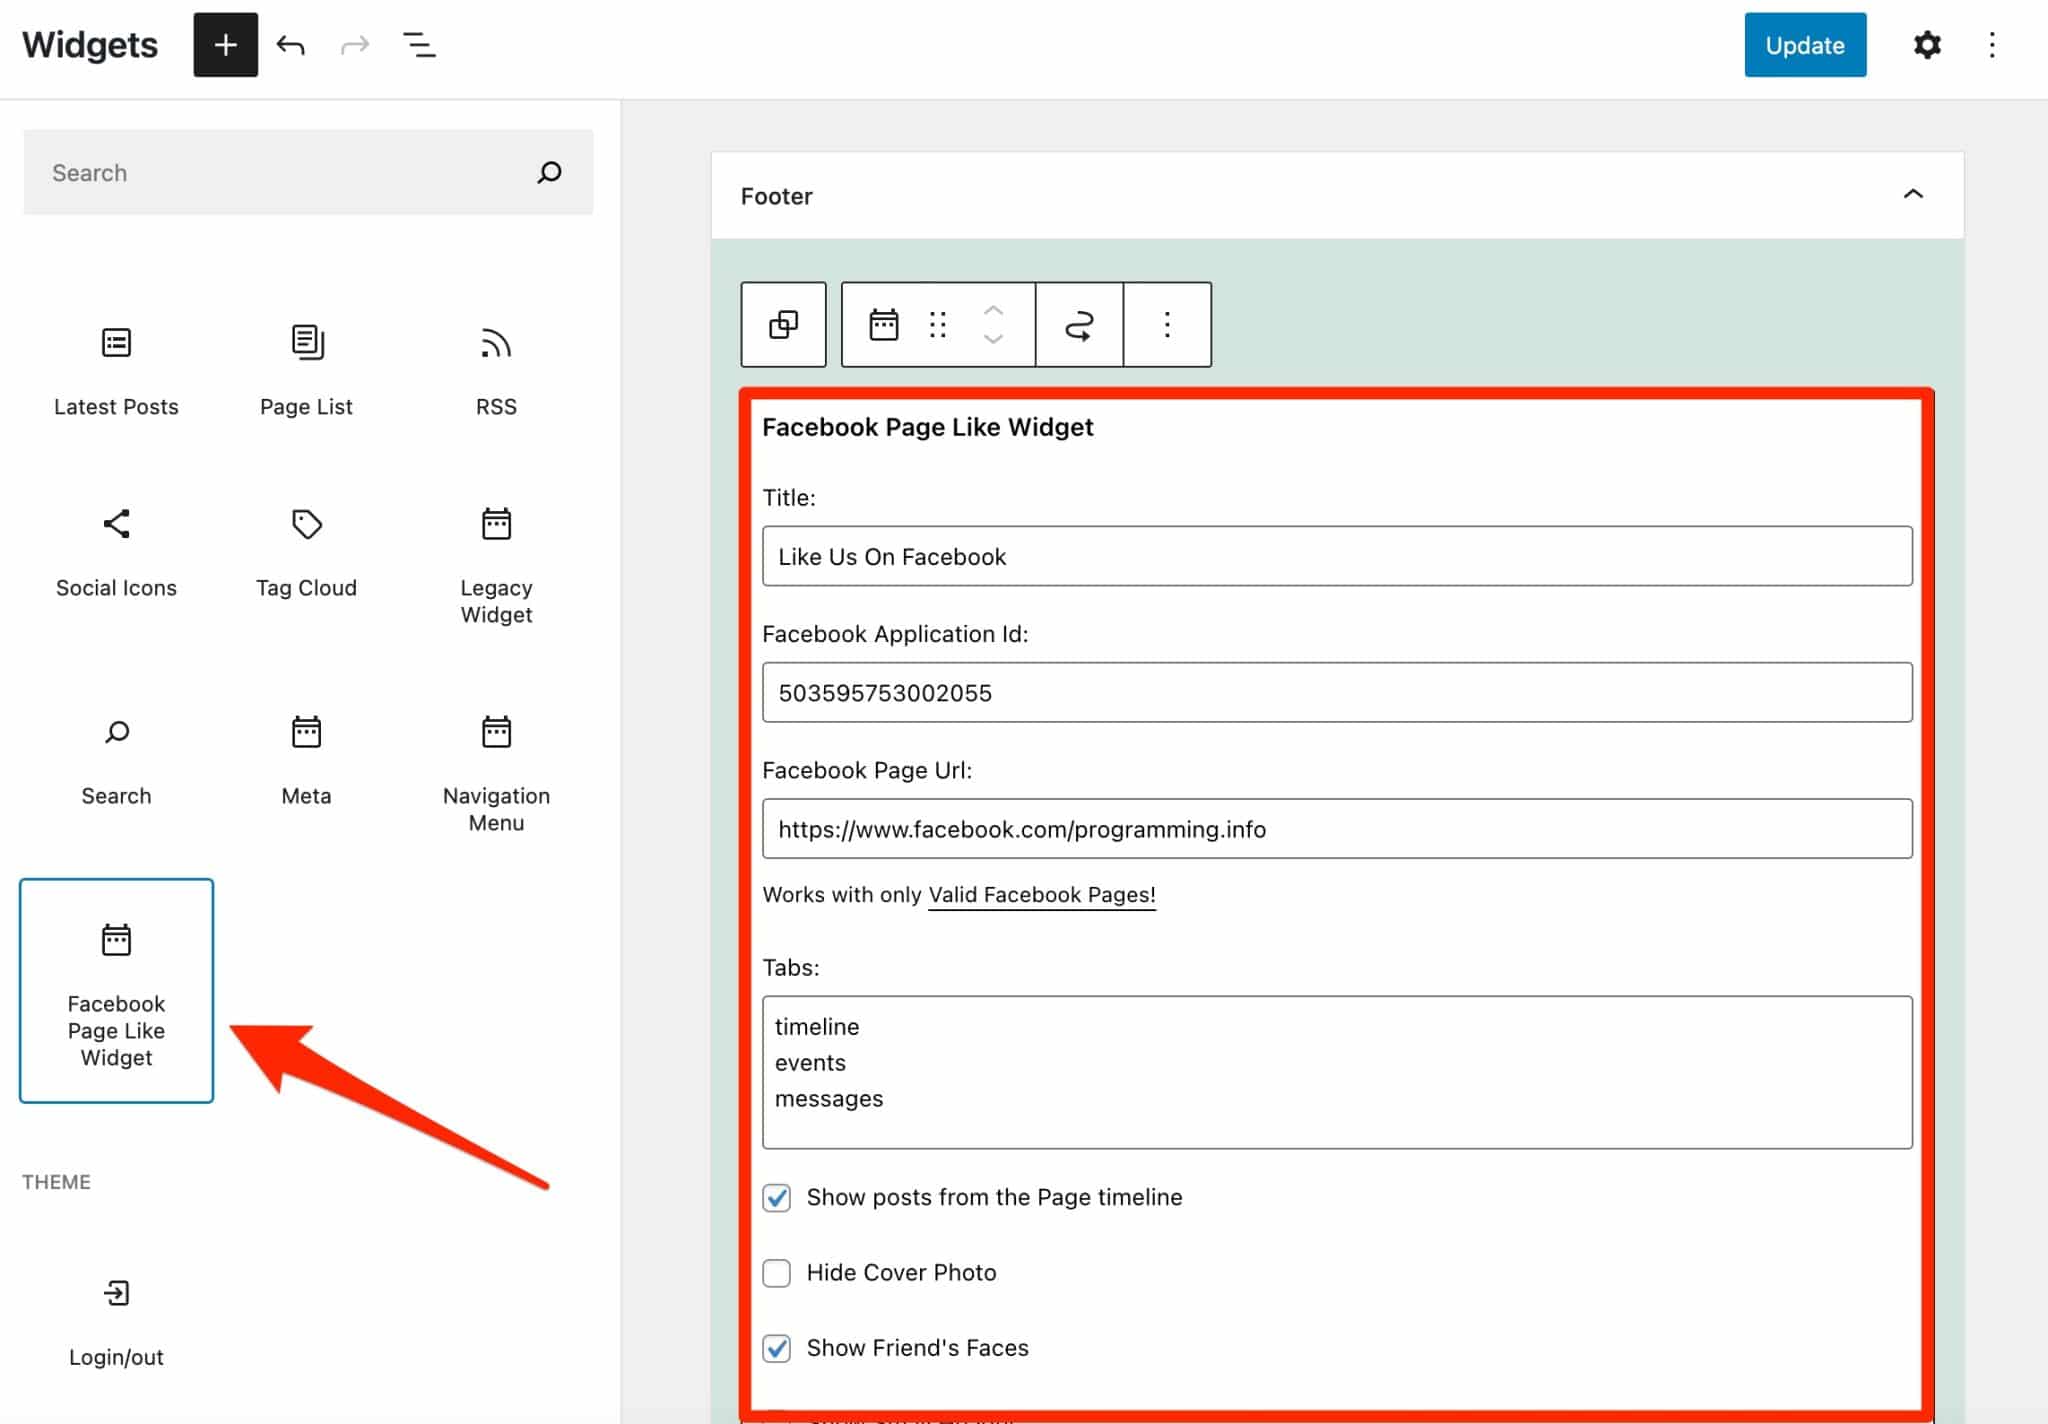
After that, it’s a breeze. Set, write, and check off as you see fit.
For the example, I chose the WordCamp Europe page.
Want to see the result? Let’s go.

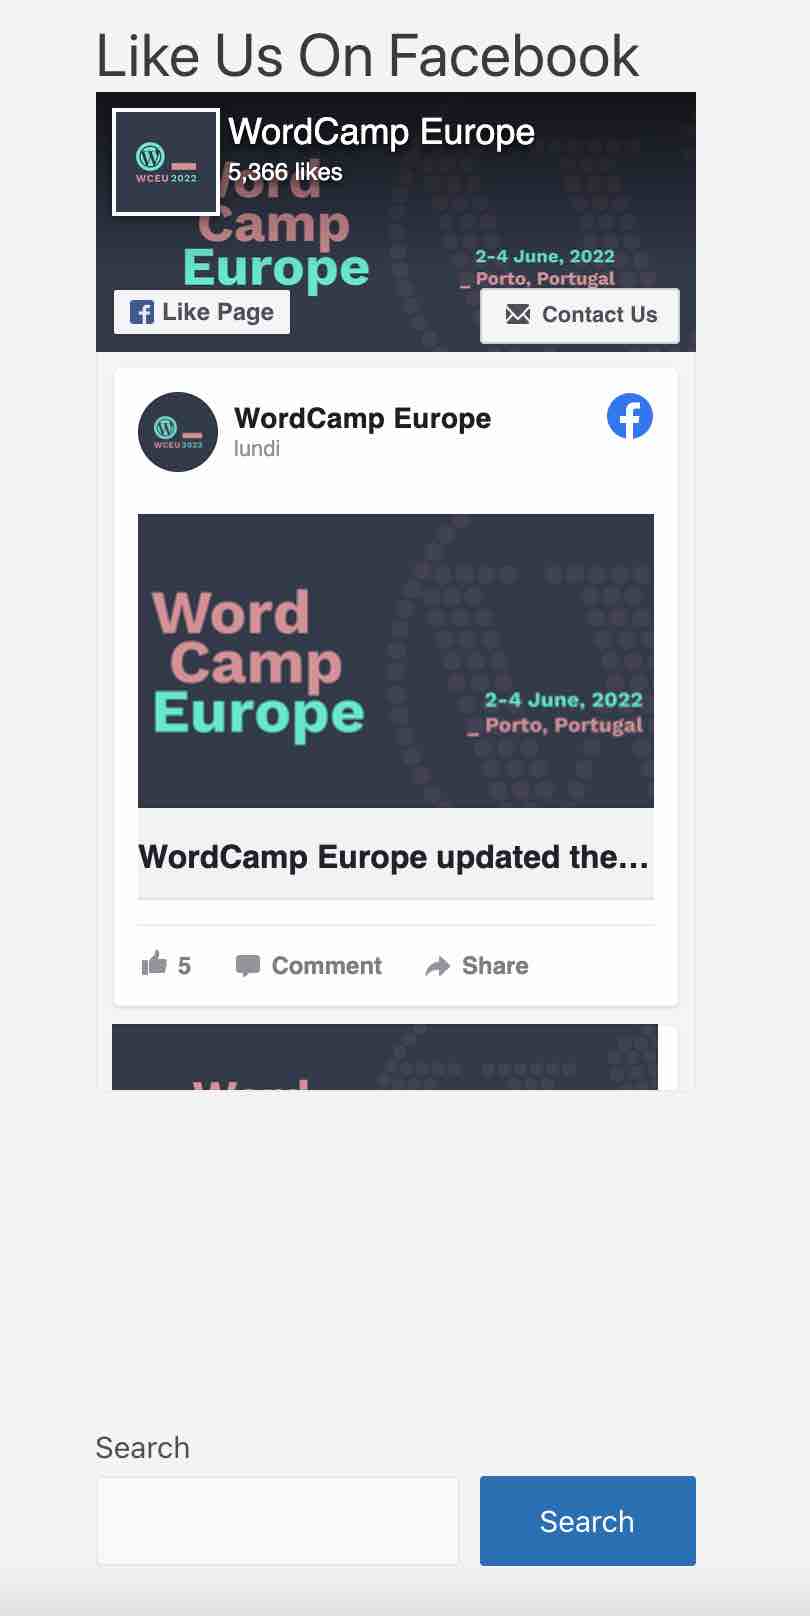
And that’s it. It was simple, fast and efficient: everything we like, in short.
Download the Widget for Social Page Feeds plugin:
BestWebSoft’s Like & Share

Active installations: 7K+
As the name suggests, this plugin allows you to add Facebook-specific buttons to your WordPress. Namely the famous:
- Like
- Follow
- Share
Its use meets a very specific need and will not allow you to display your news feed, for example.
Once the plugin is activated, go to the WordPress admin and select Like & Share > Settings, as shown in the picture below.
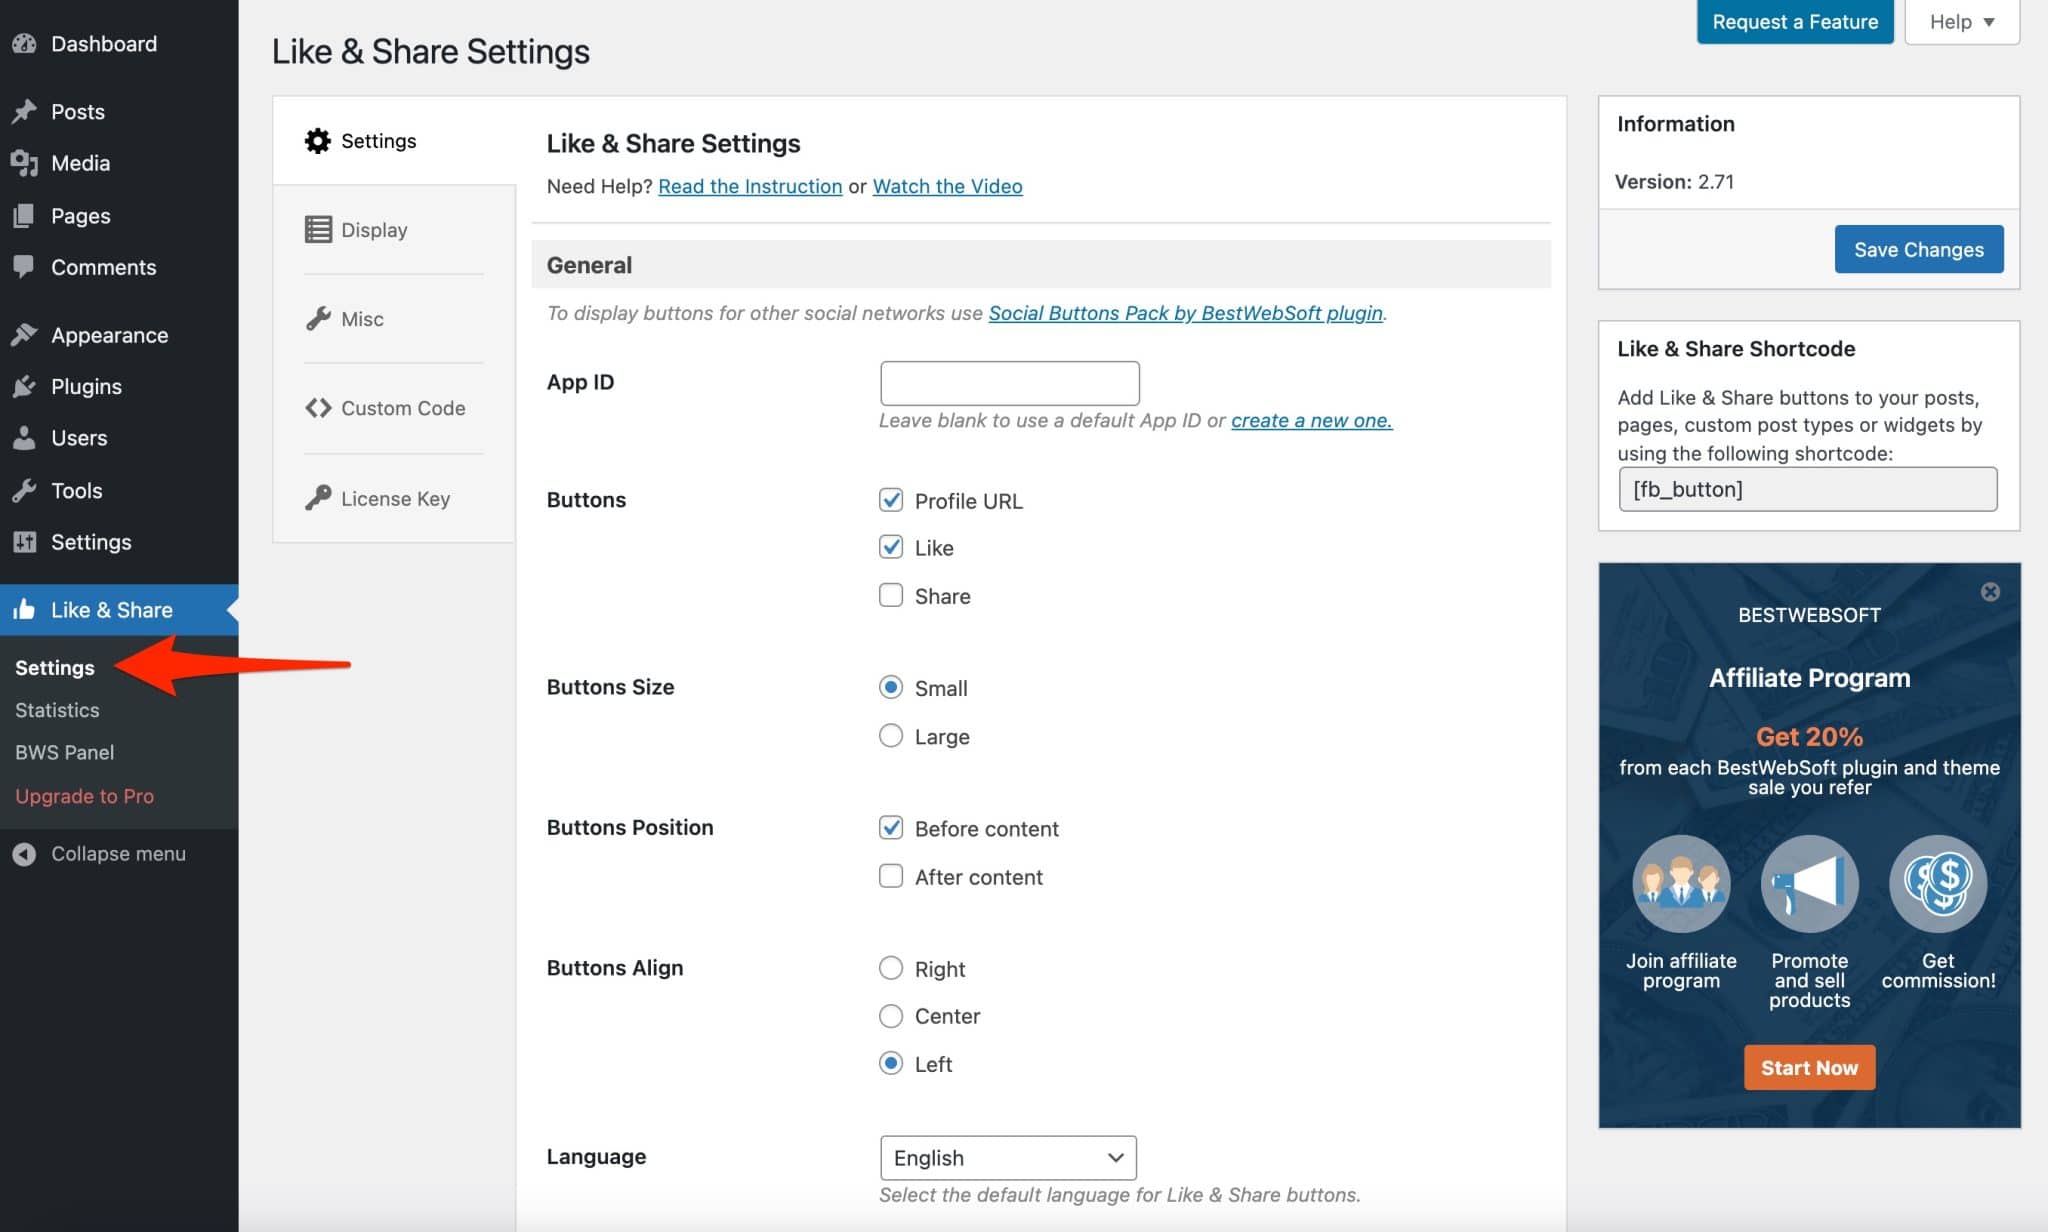
In the free version, the configuration possibilities are quite limited. You will only be able to act on general settings like the type of buttons to display, their size, their location (before and/or after the content) etc.
However, this is sufficient in most cases.
Once you have set up your settings as you wish, remember to save.
The plugin then automatically displays the selected buttons before/after or before and after the content of each article/page.
Here is what it looks like in action.

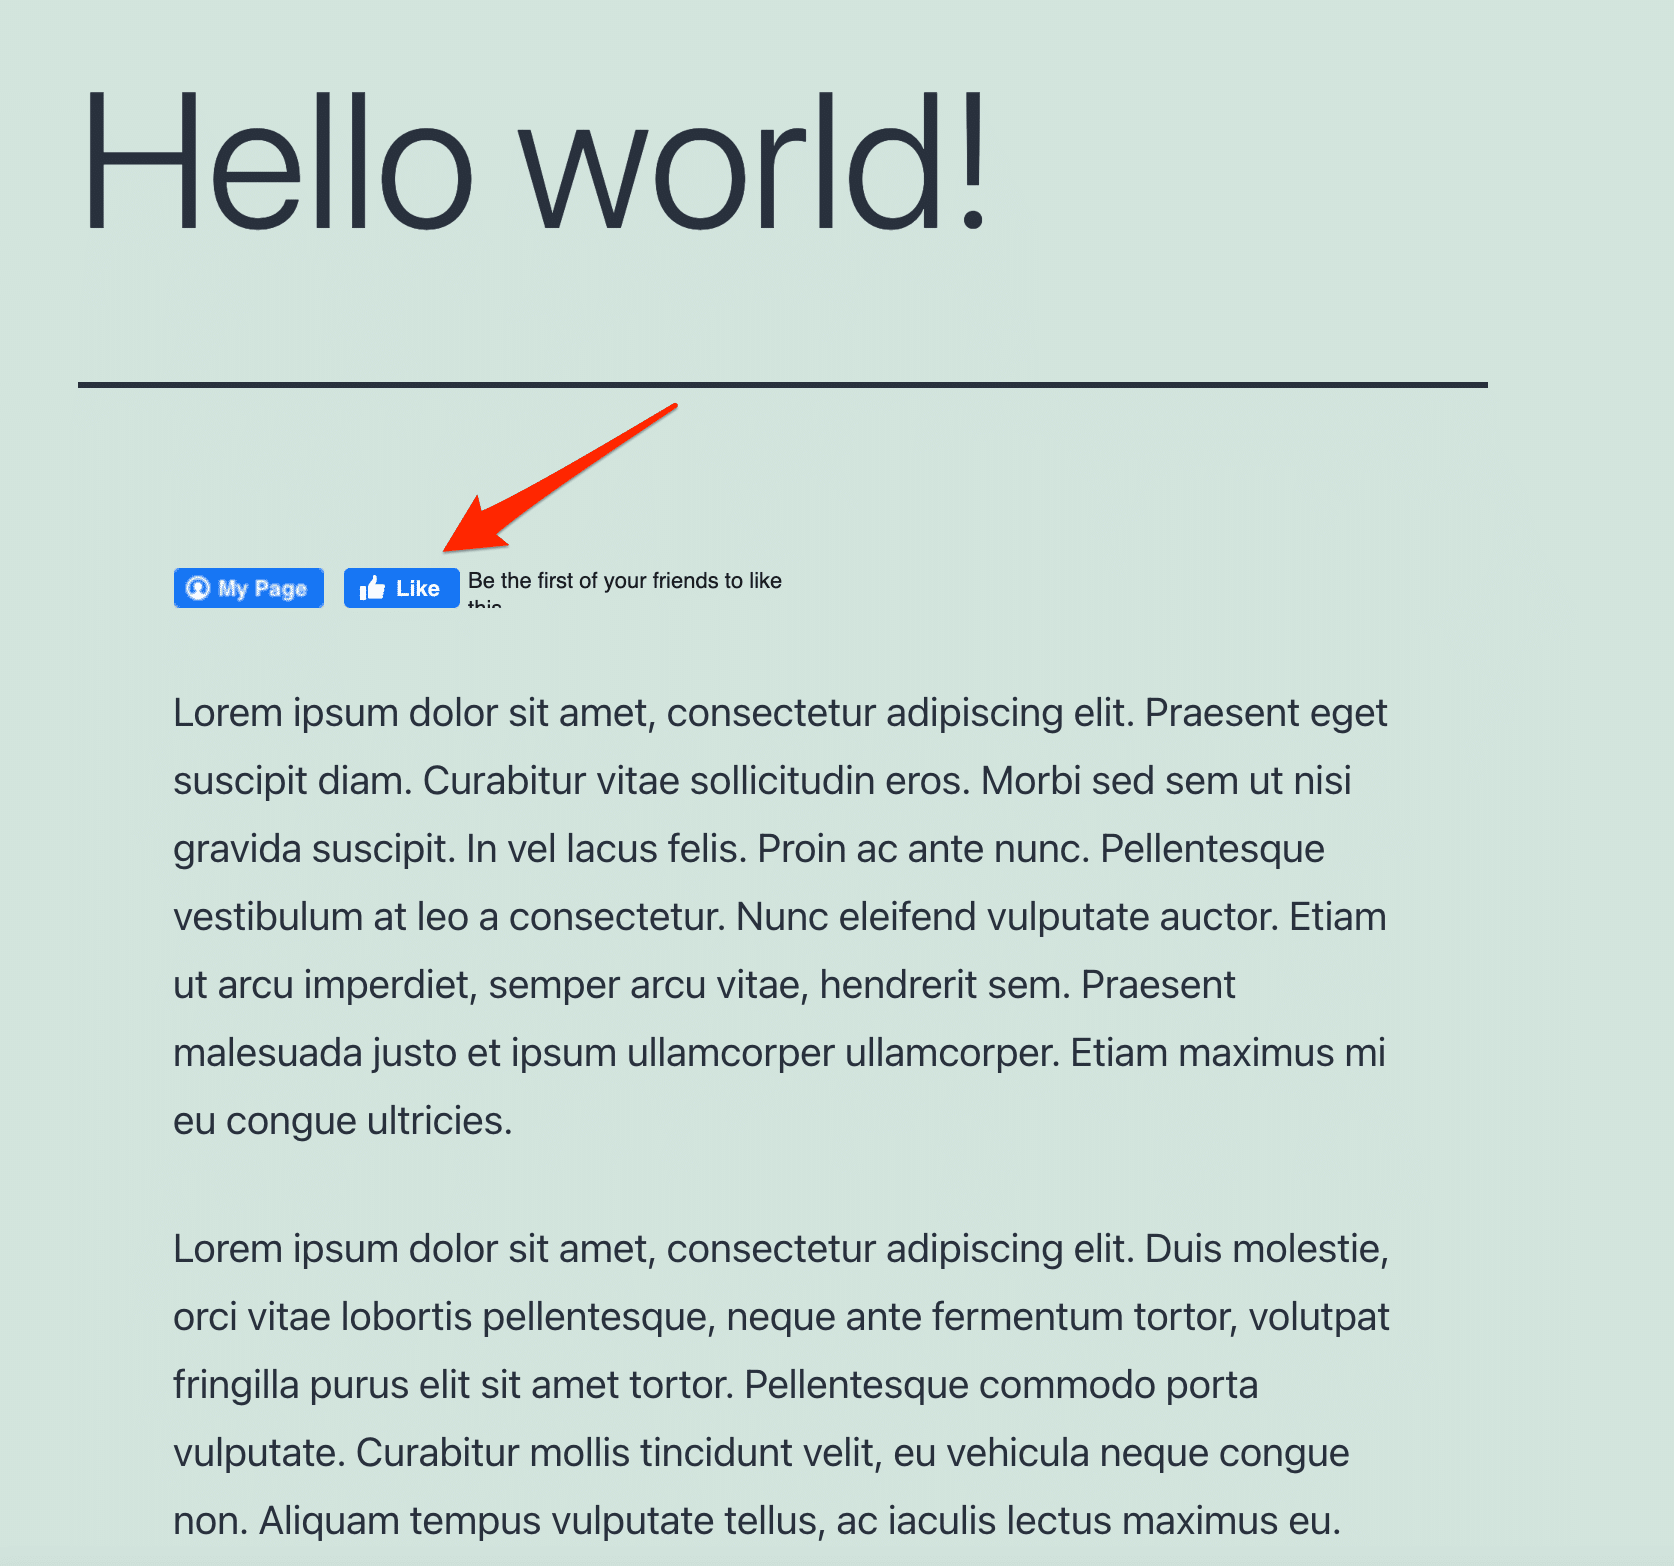
Note that it is possible to add a link to your Facebook page via your username in your URL. When a visitor clicks on the “My Page” button, he will be redirected to your page.
It is also possible to customize this button with an image or a logo representing your services.
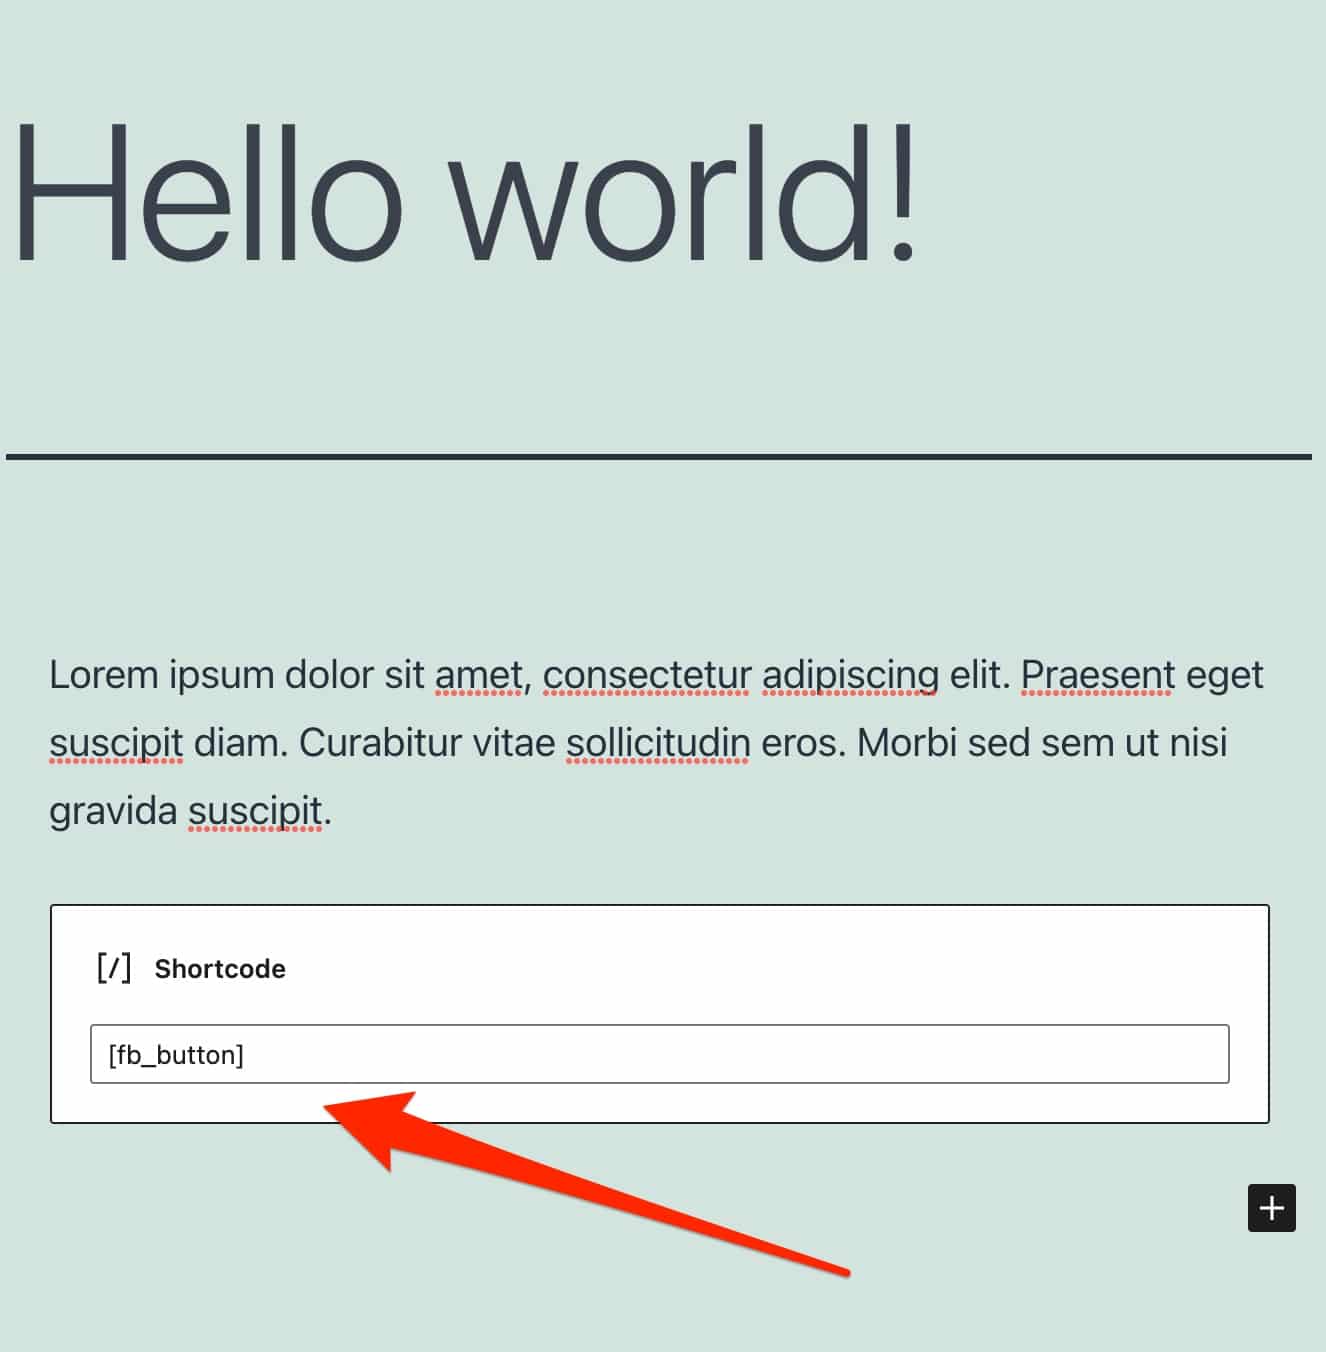
To integrate the buttons where you want them (body of an article/page, widget, custom post type), just copy and paste the following shortcode [fb_button] into a Gutenberg “Shortcode” block.

During my test, it was impossible to display the Facebook “Like” button on my site. You could have the same problem on your side, since Facebook has made changes to this button for European users. I’ll come back to this in a little more detail at the end of this post.
In the end, this sober and accessible plugin does the job. For more customization, you can tinker with the CSS code or go for the paid version, which costs $30/year for one site.
With the latter, you can for example choose the pages or custom post types on which to display your buttons, or display a widget with the most liked posts.
Download the BestWebSoft’s Like & Share plugin:
WP2Social Auto Publish

Active installations: 10K+
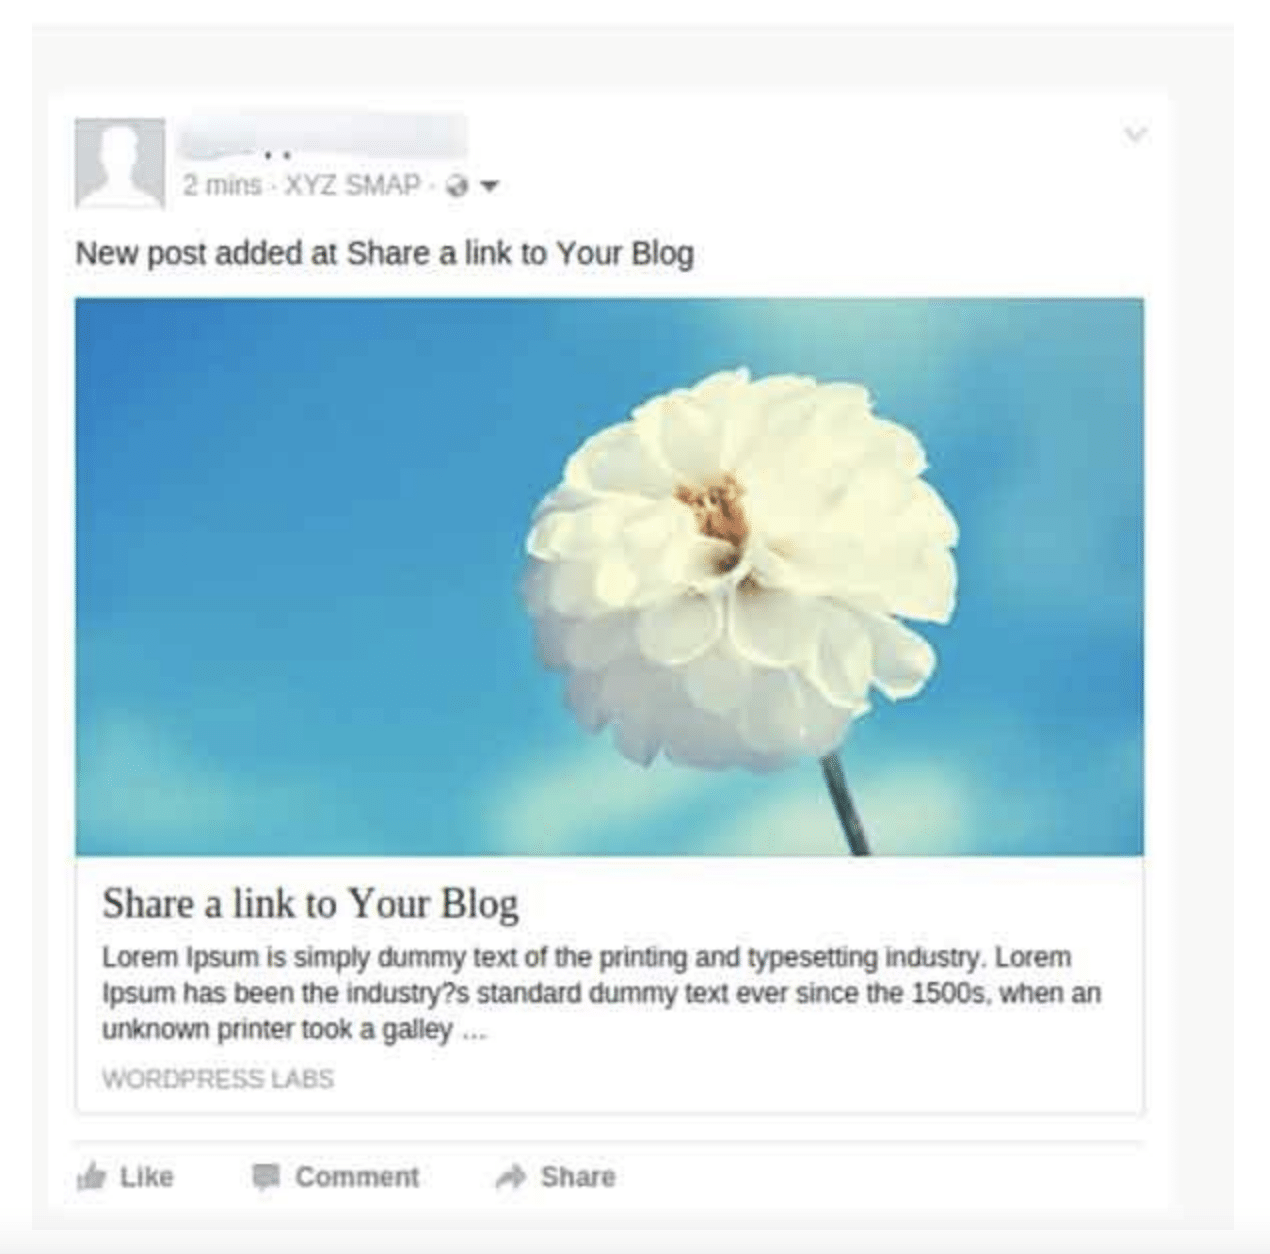
Want to publish to Facebook from WordPress? This plugin is made for you.
WP2Social Auto Publish, formerly called Facebook Auto Publish, allows you to “publish posts automatically from your blog (or site) to Facebook”, explains the plugin’s developer.
For the settings, it is first necessary to create a “Facebook Application”. But you know how to do that now. 😉
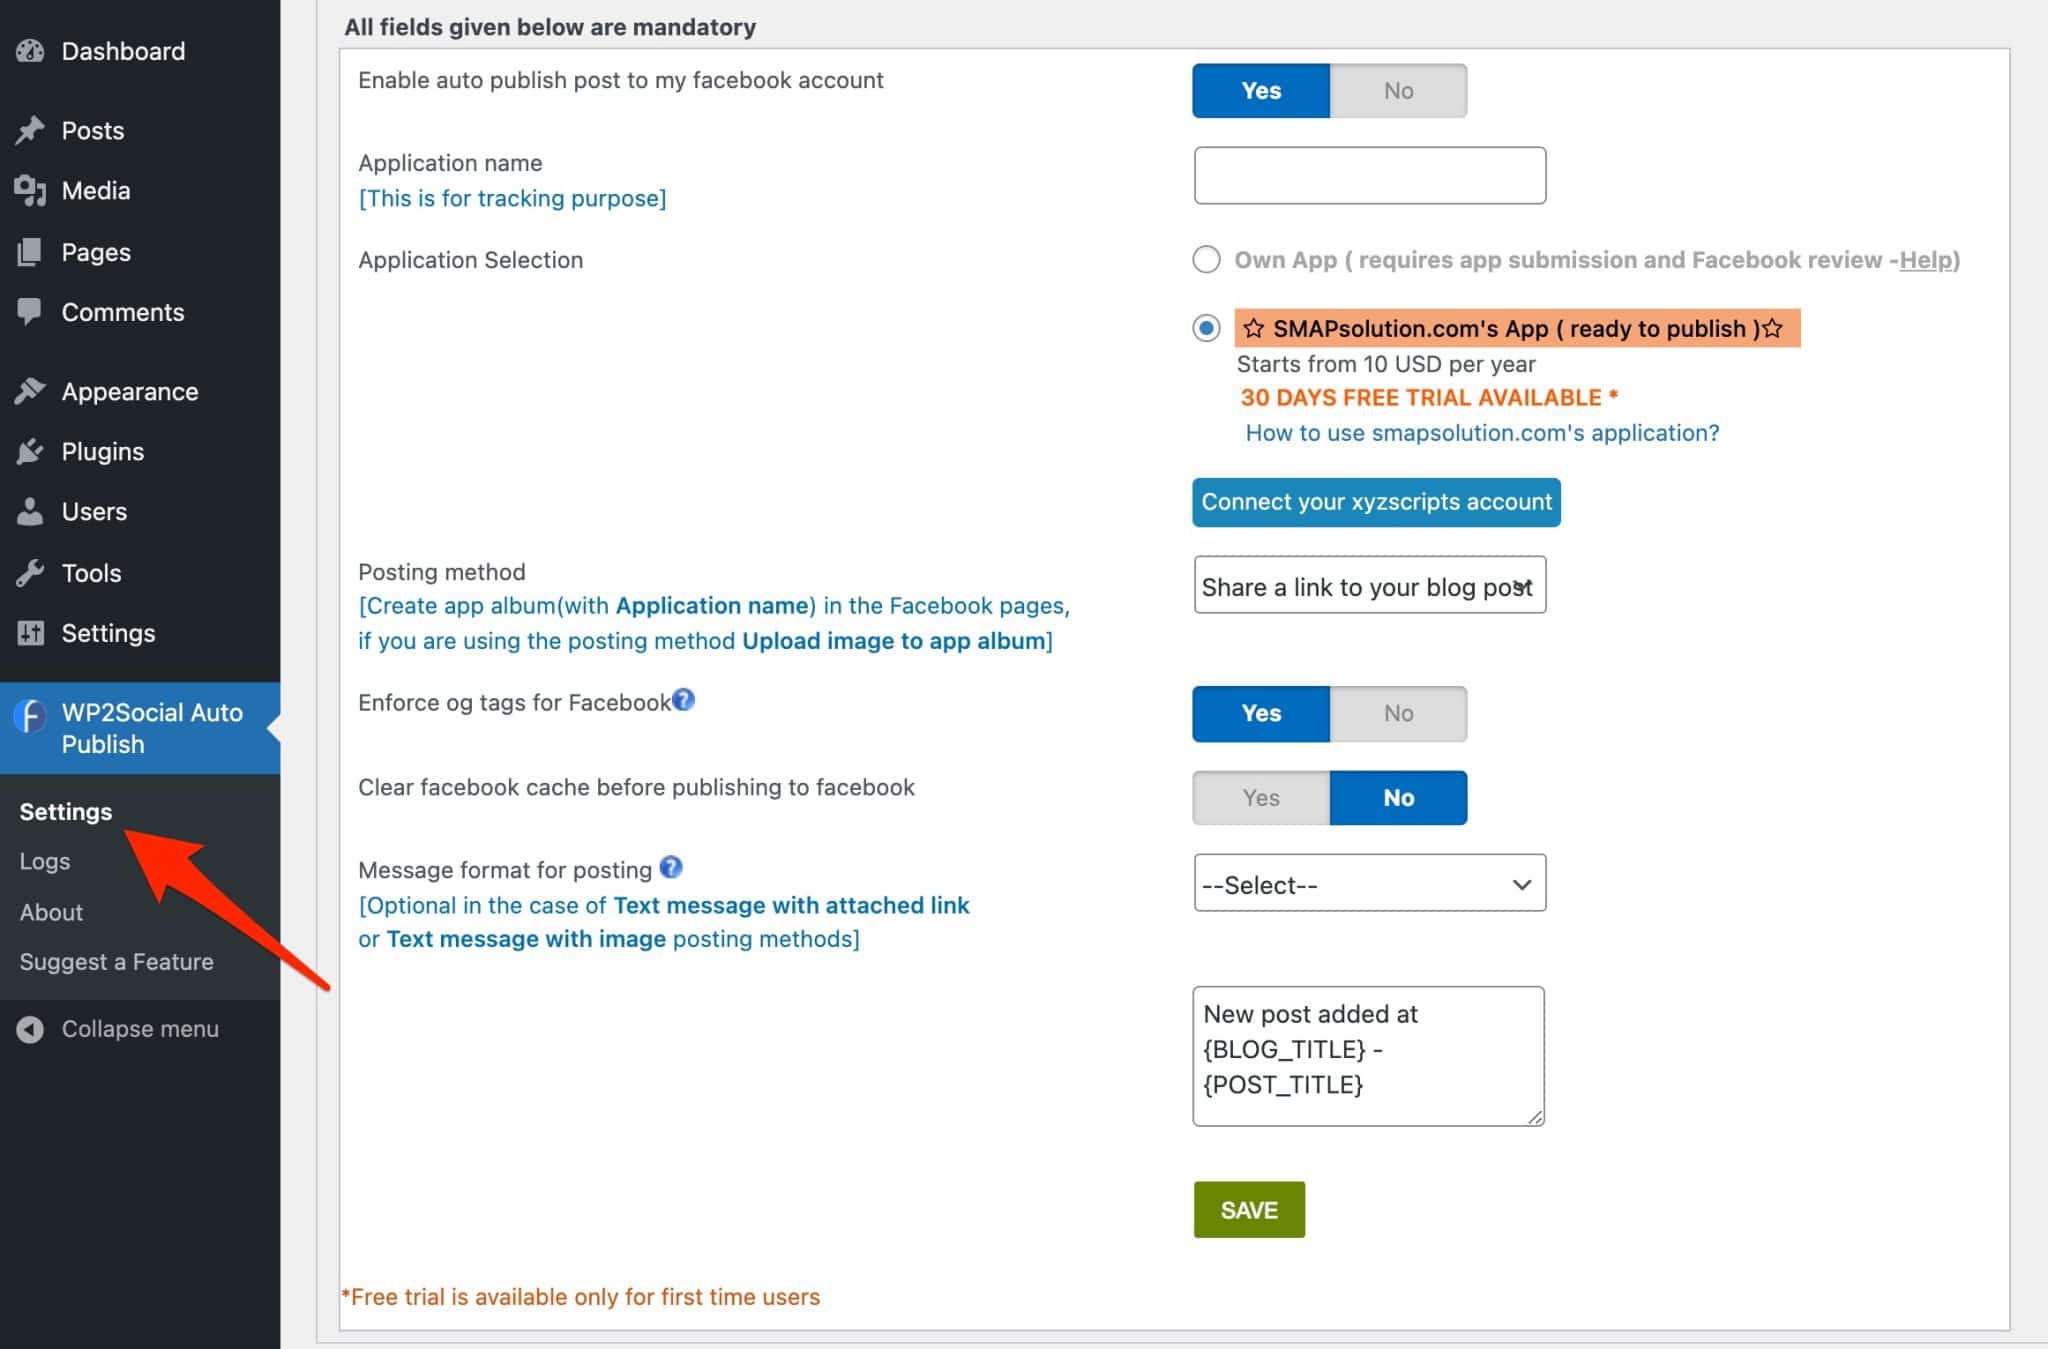
Then, let’s move on to the configuration. You can choose, among other things:
- The way your content will be displayed on Facebook (text, text with image, text with link).
- To automatically publish your posts, or your pages, or both.
- Choose which categories of posts should be automatically disclosed.
Save your favorite settings and take a look at Facebook the next time you publish.

Note that the “Logs” section, located under the plugin’s “Settings” in your WordPress administration, allows you to monitor the status of publications.
Download the WP2Social Auto Publish plugin:
Social comments by WpDevArt

Active installations: 10K+
This plugin allows your visitors to comment on the content of your site using their Facebook account.
This has several advantages:
- The possibility to comment anywhere on your site.
- Reducing spam and encouraging quality discussions. “When people comment with their Facebook profile it leads to higher quality discussions and less spam” says Facebook on its developer area.
- “Improve engagement, increase time spent on site”, again according to Facebook.
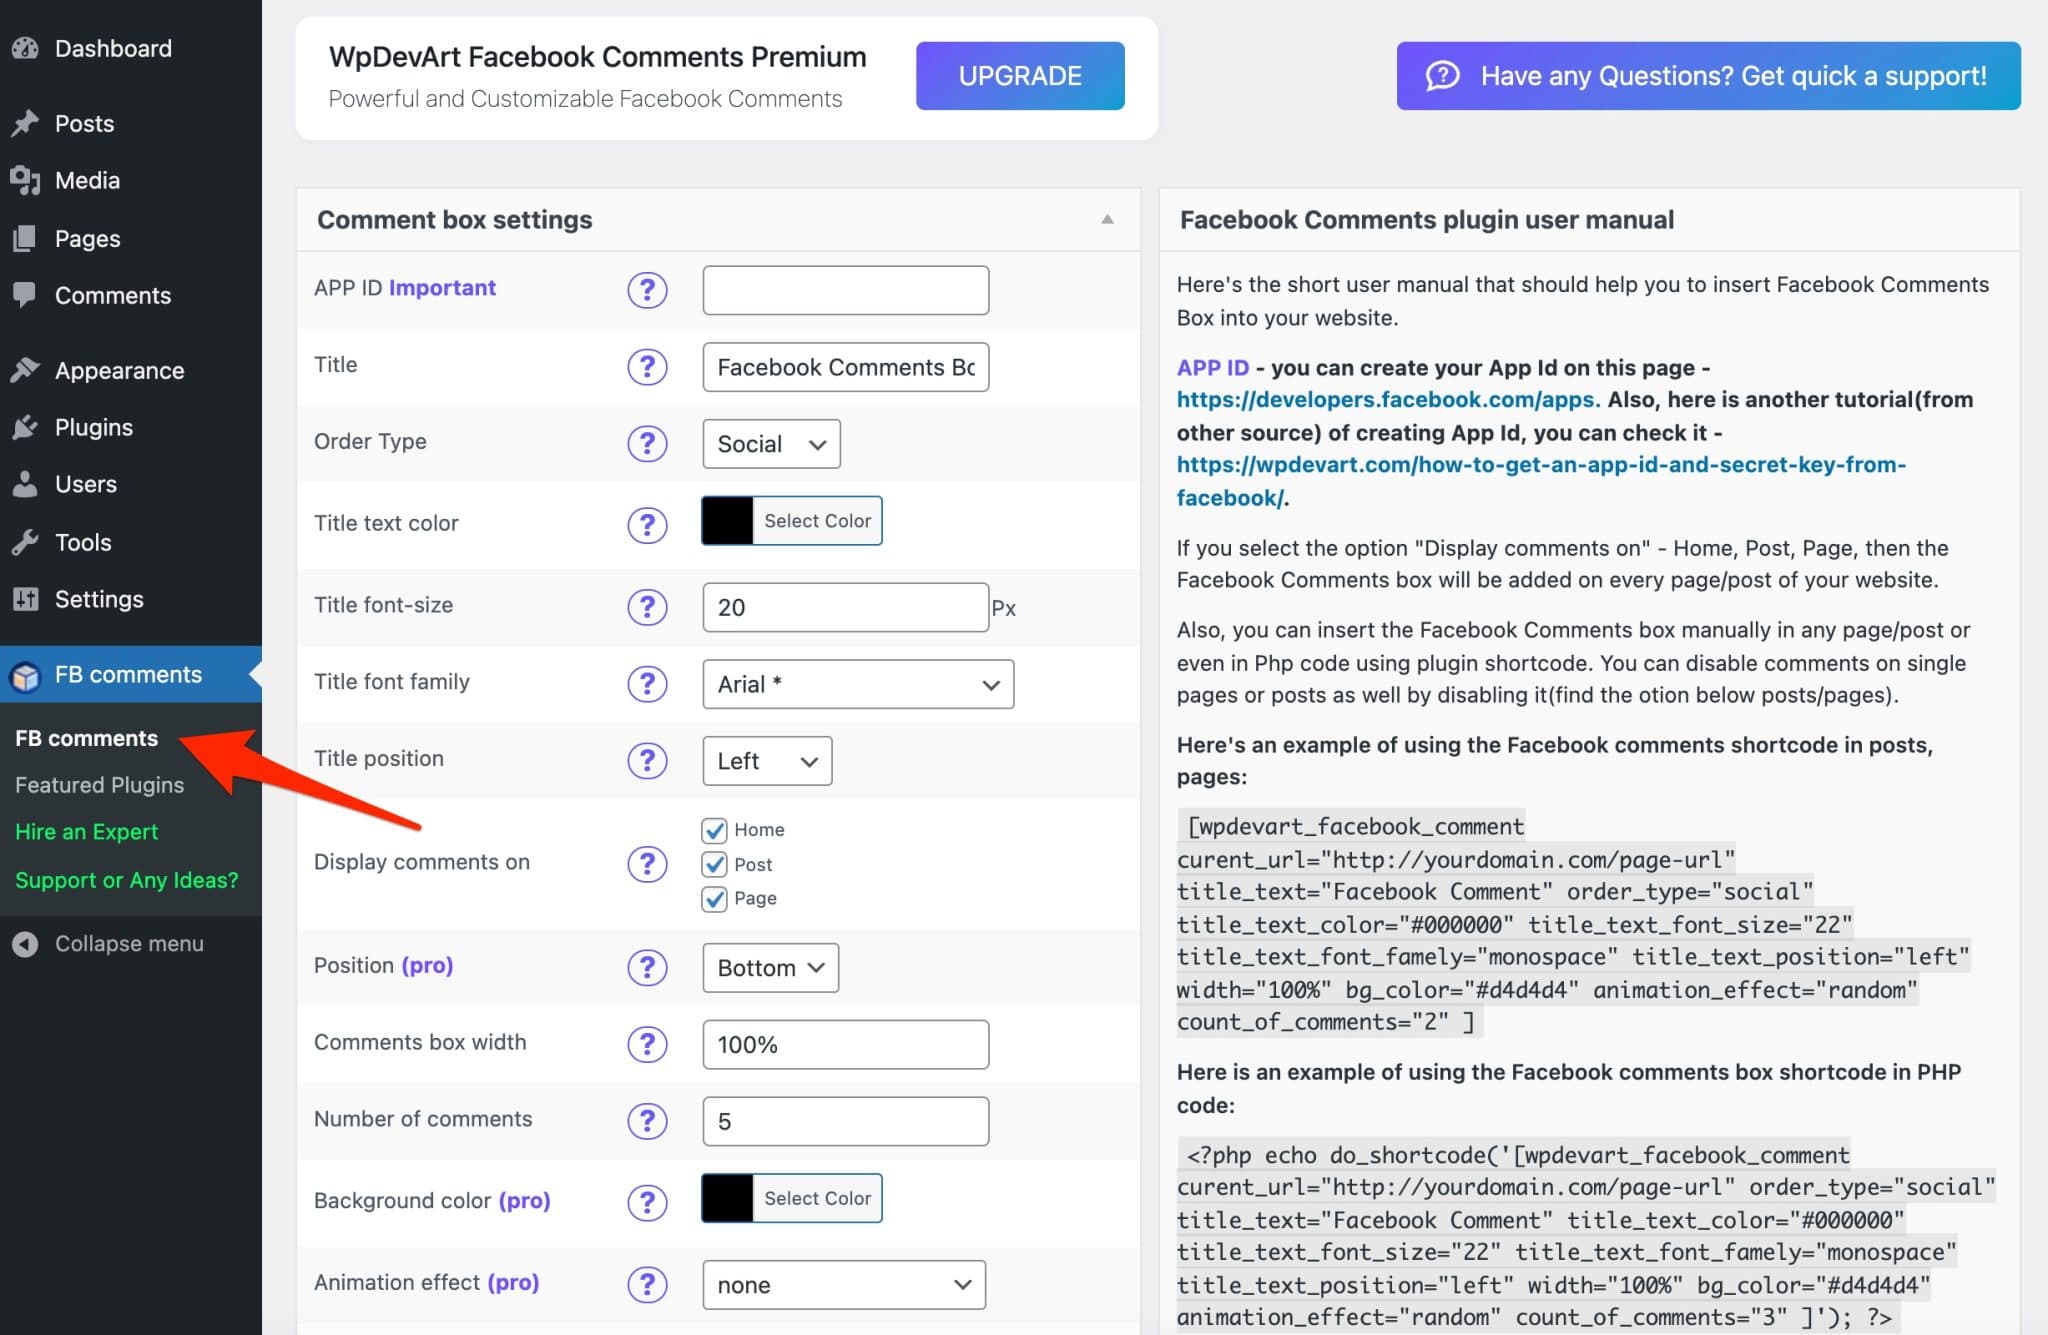
To set the plugin, go, as usual, in the admin bar of your WordPress, on the left.
Make sure you have installed and activated it beforehand.
For this plugin to work, you need to create a Facebook app.
Then, configure your future comment space by choosing the following elements:
- Title
- Color
- Font
- Number of comments to display
- Place of appearance of the comments (posts, pages, home)
- Language
Save by clicking on “Save section” and go to one of your posts, for example. By default, the comment box will be automatically integrated at the bottom of the publication.
If you want to integrate and import comments inside your content, you can use and customize the shortcode proposed by the application developers.
It is located in the right part of the plugin settings.
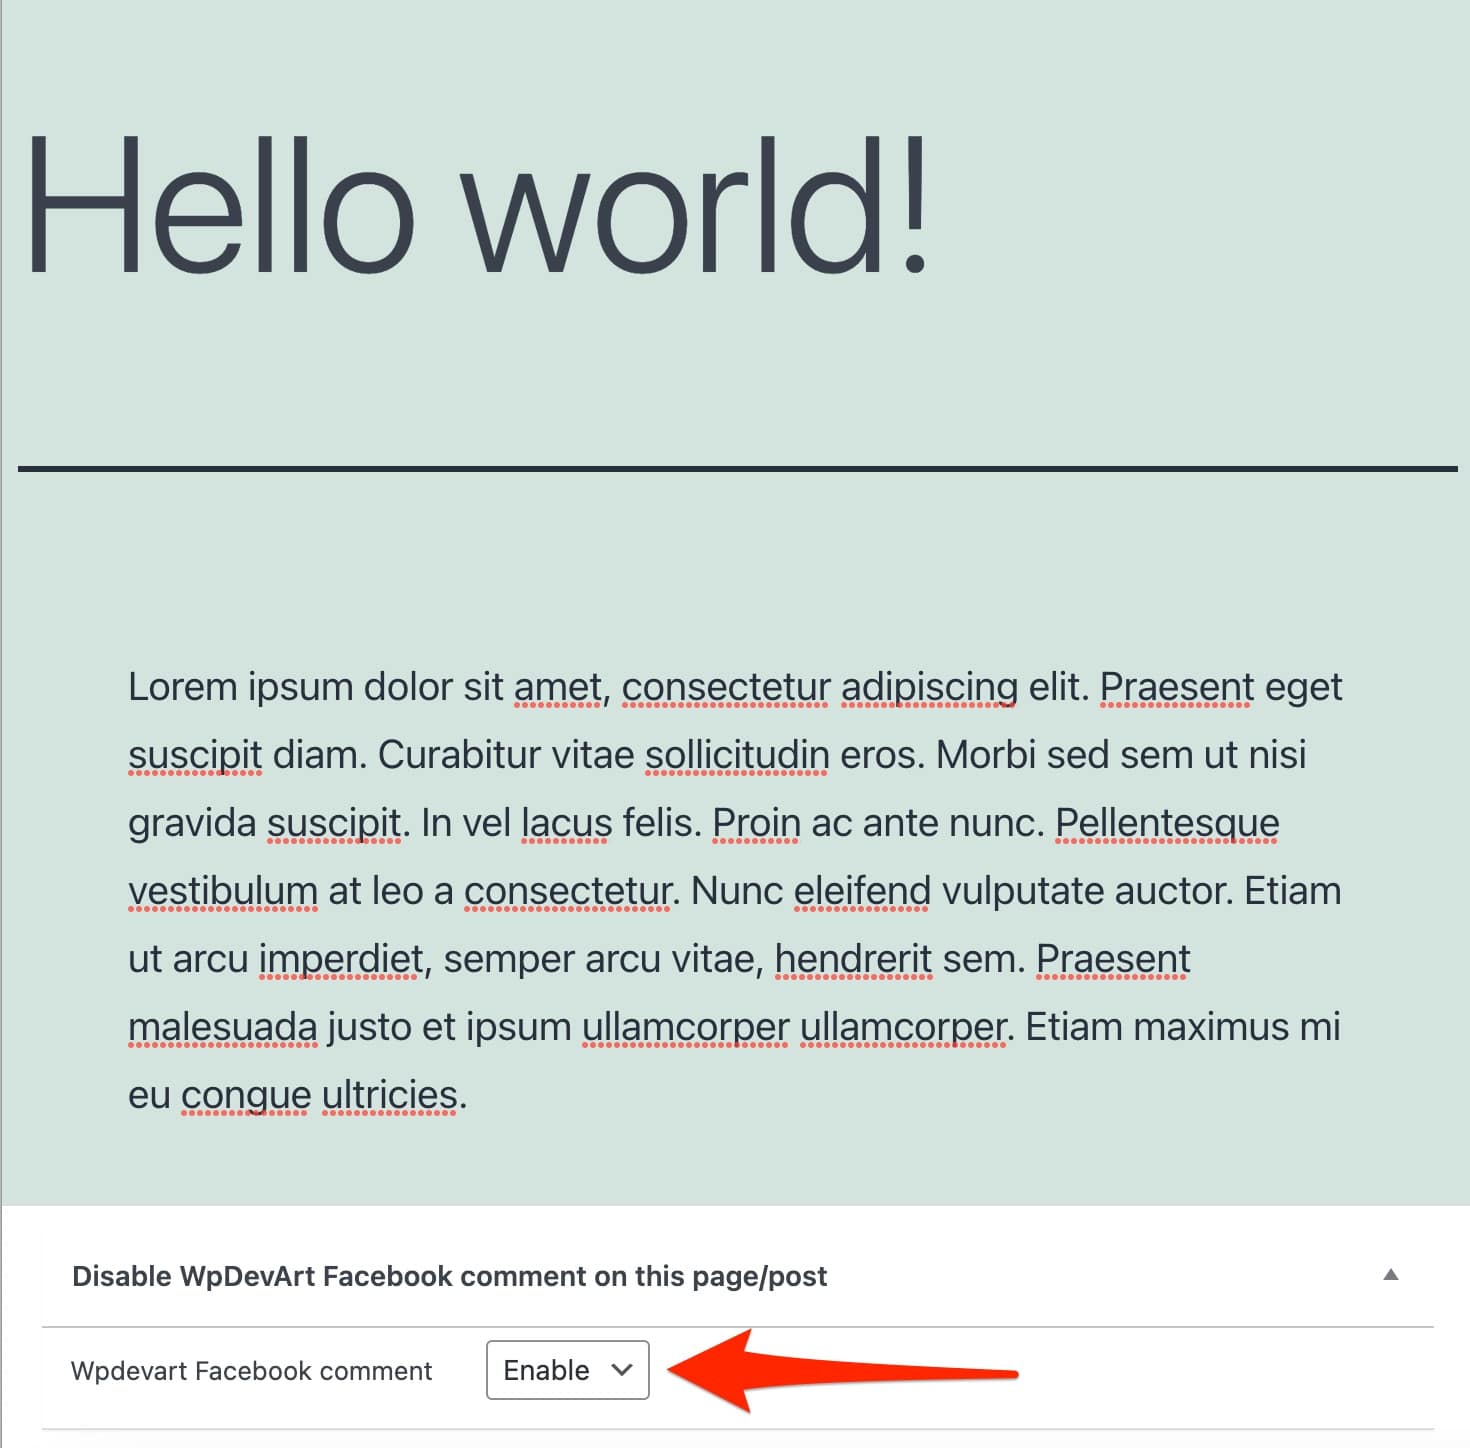
Note also that you can choose to disable the display of Facebook comments individually, by post or by page. To do this, use the small box located at the bottom of your content.

For more options, there is a pro version sold from $10/year for one site. It allows you to customize the background color of your comment box and add animation effects.
Download the Social comments by WpDevArt plugin:
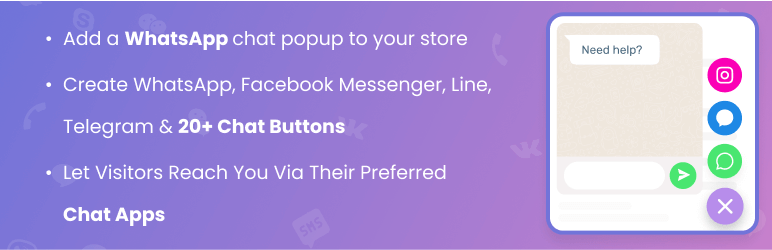
Floating Chat Widget – Chaty
Active installations: 200K+
This plugin designed by Premio allows your visitors to start a chat with you via Facebook Messenger in particular, but also WhatsApp, Instagram and other social networks, as well as by phone. All from your WordPress blog/site.
Which is pretty good to allow your readers to ask you questions about your products, or to offer support.
Facebook also offers its official live chat plugin, called Facebook Chat Plugin. However, it has received a lot of very mixed reviews from its users, which is why I preferred to focus on the Premio plugin, which was much better received by critics.
Once you have installed and activated the plugin, you will be redirected to its setup page, in the menu that just appeared on your administration interface.

Click on the “Facebook Messenger” icon to set up a Messenger chat on your WordPress site, and enter the URL of your Facebook page (number 1 on the screenshot below). You can also give your widget a name (2).

If you wish, you can choose to hide the chat icon on mobile or computer (3). A box on the right side of the screen allows you to see how the icon is displayed on both devices (4).
As for customization, you can choose the background color of the icon and the text that will be displayed when you hover over it. In the Pro version, you can also change the shape of the icon, all by clicking on the “Settings” button.
Then click on the “Next” button at the top right of the screen.
Here you will be able to customize different elements:
- the position of the widget
- the call to action text, its color and its display (you can hide it after the first click or decide to display it permanently)
- the animation that will be triggered when the icon is hovered over
- the display or not of messages not read by the visitor
- the font
- the size of the widget.

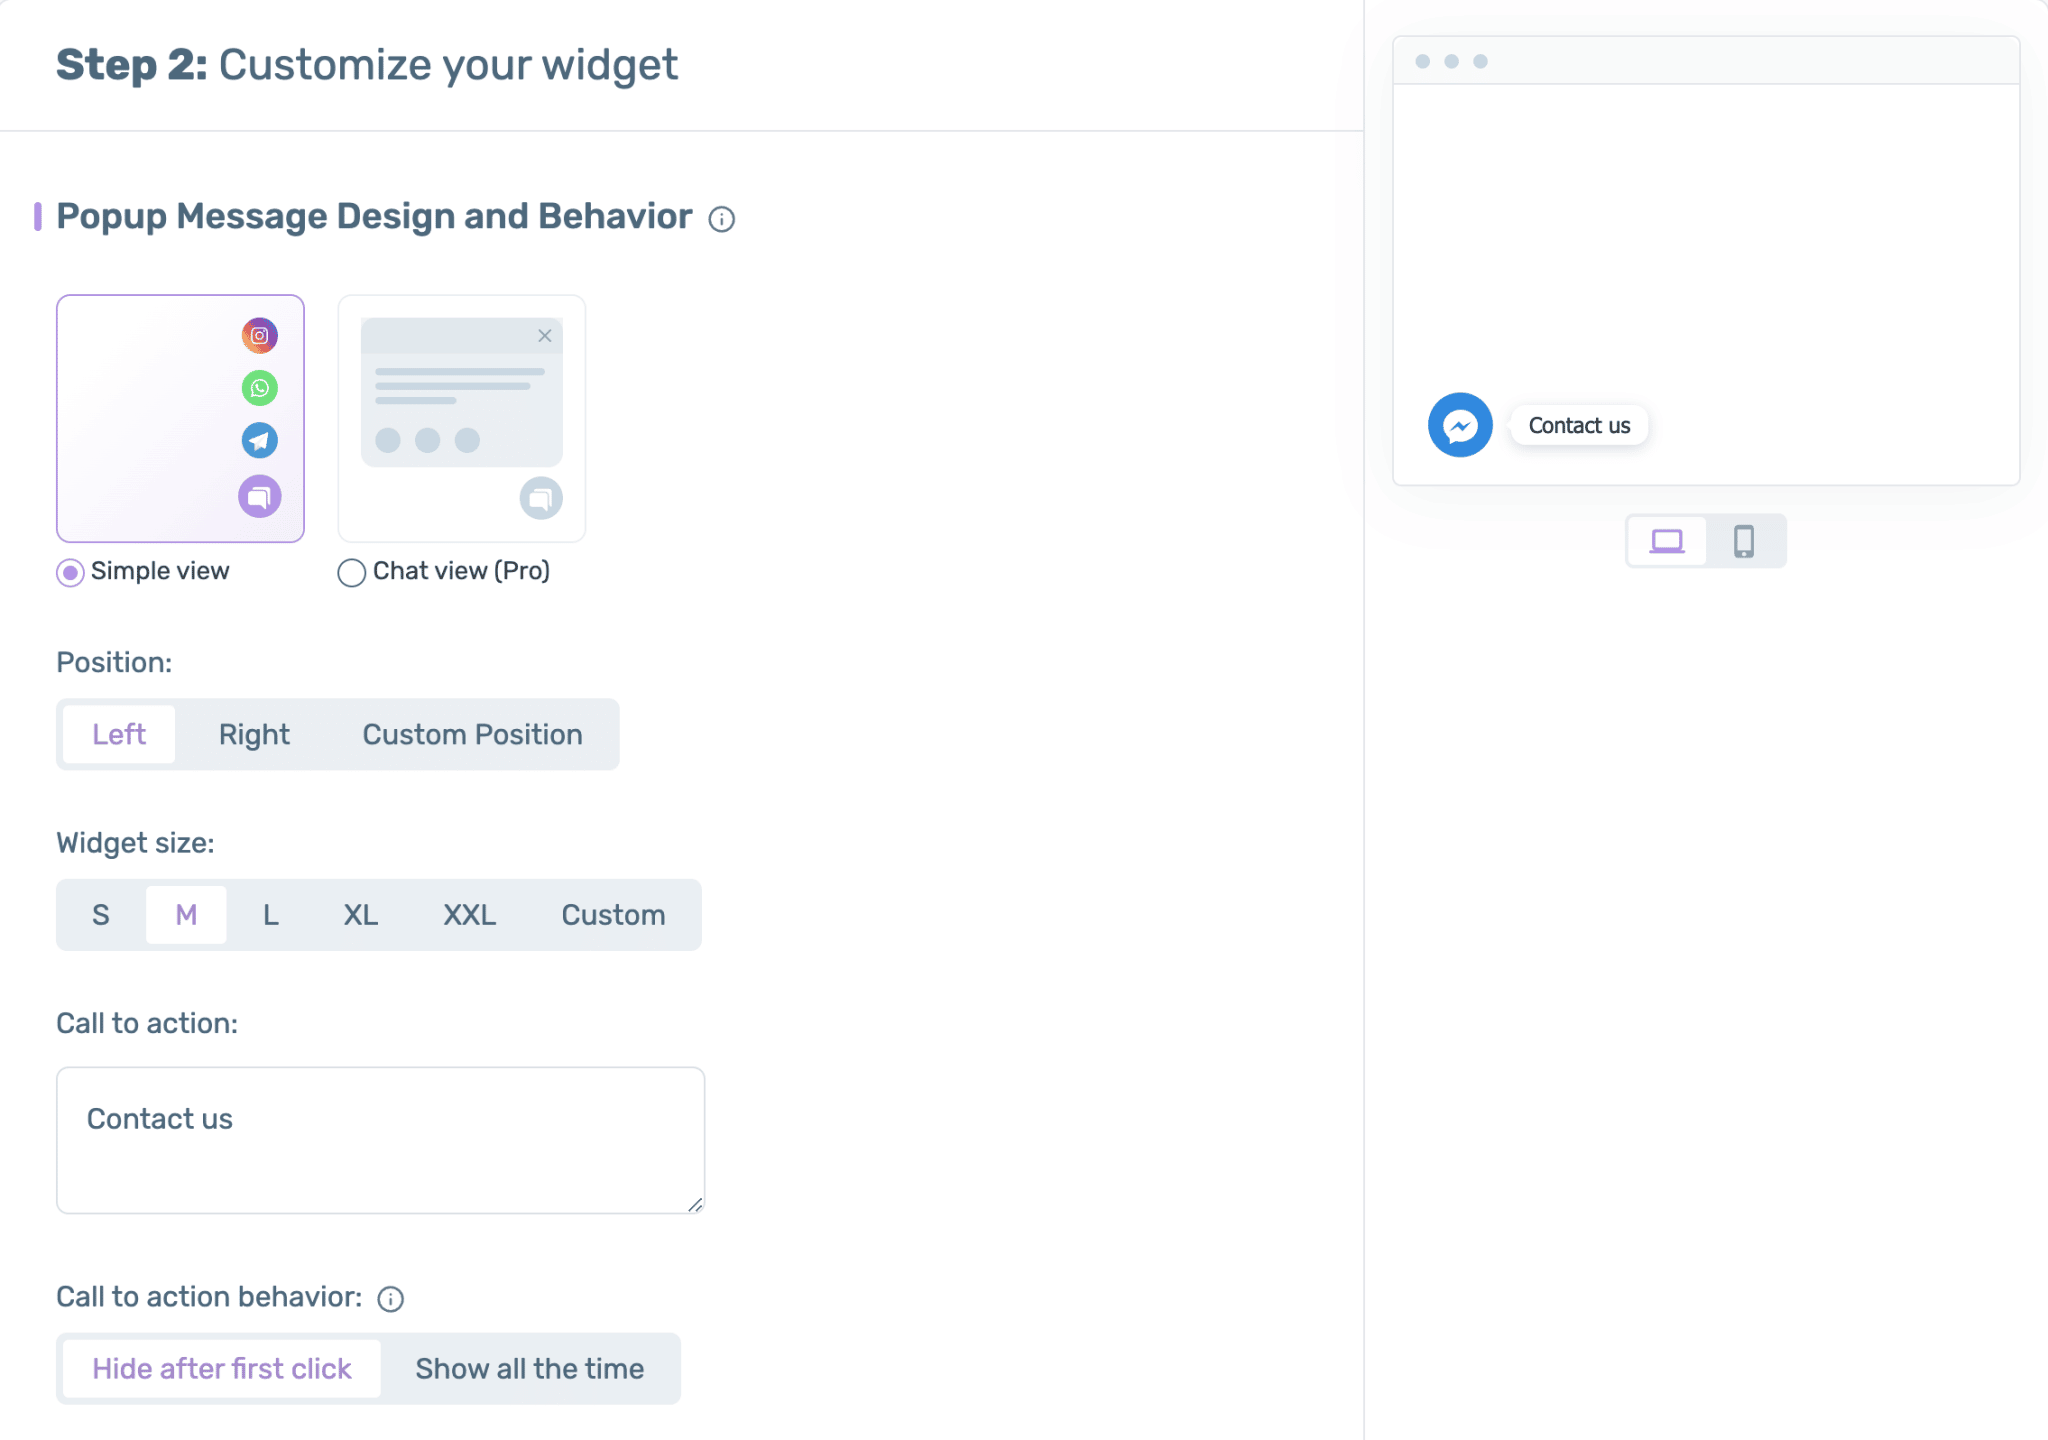
In the Pro version, you can also connect your widget to Google Analytics.
Once you are done, click on the “Next” button again to make the final adjustments.
On this third page, you will be able to set the conditions for the widget to be displayed. Most of the options are reserved for the premium version of the plugin.
In the free version, you can choose to display the widget after a certain time spent on the page of your site, when the visitor is about to leave it, or after a certain percentage of reading of your page.
If you purchase the Pro version, you can configure the widget display more precisely, by defining for example :
- a date and time
- specific pages
- traffic sources, to display the widget only to visitors who landed on your site via social networks, search engines, etc.
- countries, to display a different widget depending on the country where the visitor is viewing your page.
Finally, a field allows you to enter custom CSS code.

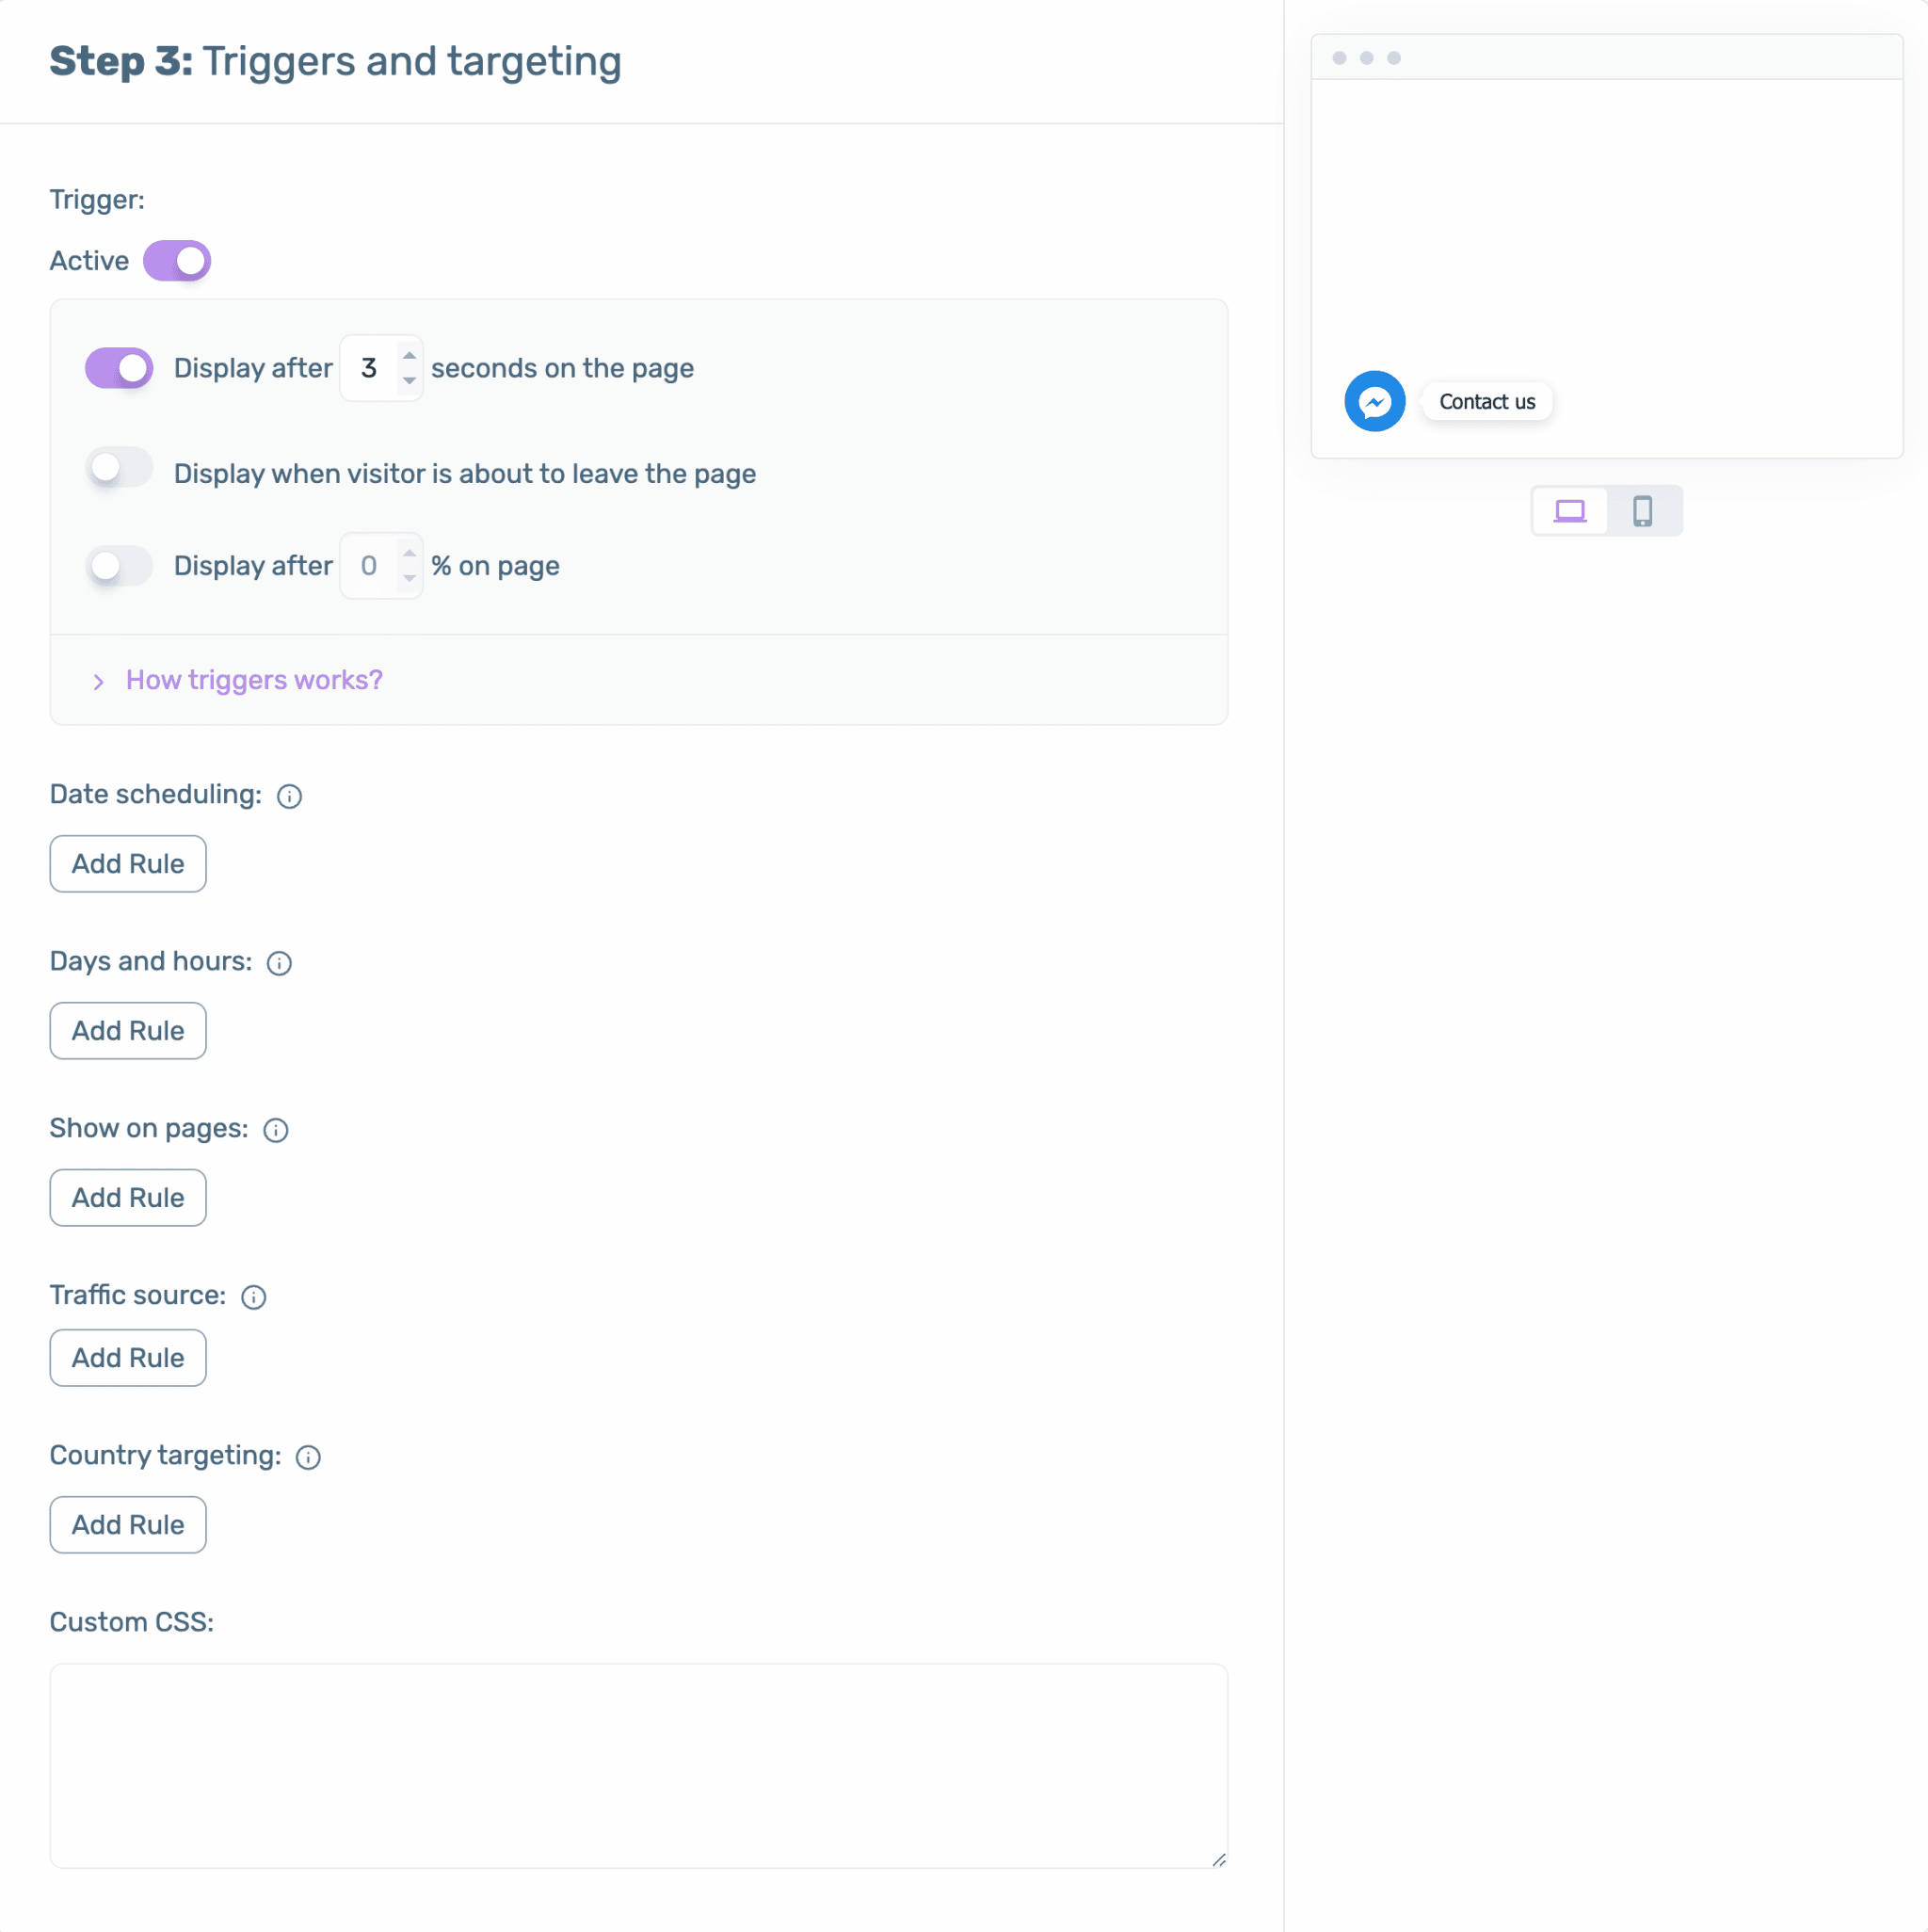
Once your settings are complete, click the “Save widget” button to save them.
From now on, your visitors will see your Facebook chat when they land on your site.
The plugin is very efficient and easy to use. The options provided in the free version are limited but should cover a number of needs.
To enjoy Chaty’s premium features, it will cost you $39/year (about €36) for use on 1 site.
Download the Floating Chat Widget – Chaty plugin:
Nextend Social Login and Register


Active installations: 300K+
Nextend Social Login and Register adds a Facebook button to your login page (but also Google and Twitter, if you wish), so that you can log in to your site using your social network credentials automatically.
To configure the plugin, created by the designers of the Smart Slider 3 plugin, go to Settings > Nextend Social Login. Then choose the insert dedicated to Facebook by clicking on “Getting started”.
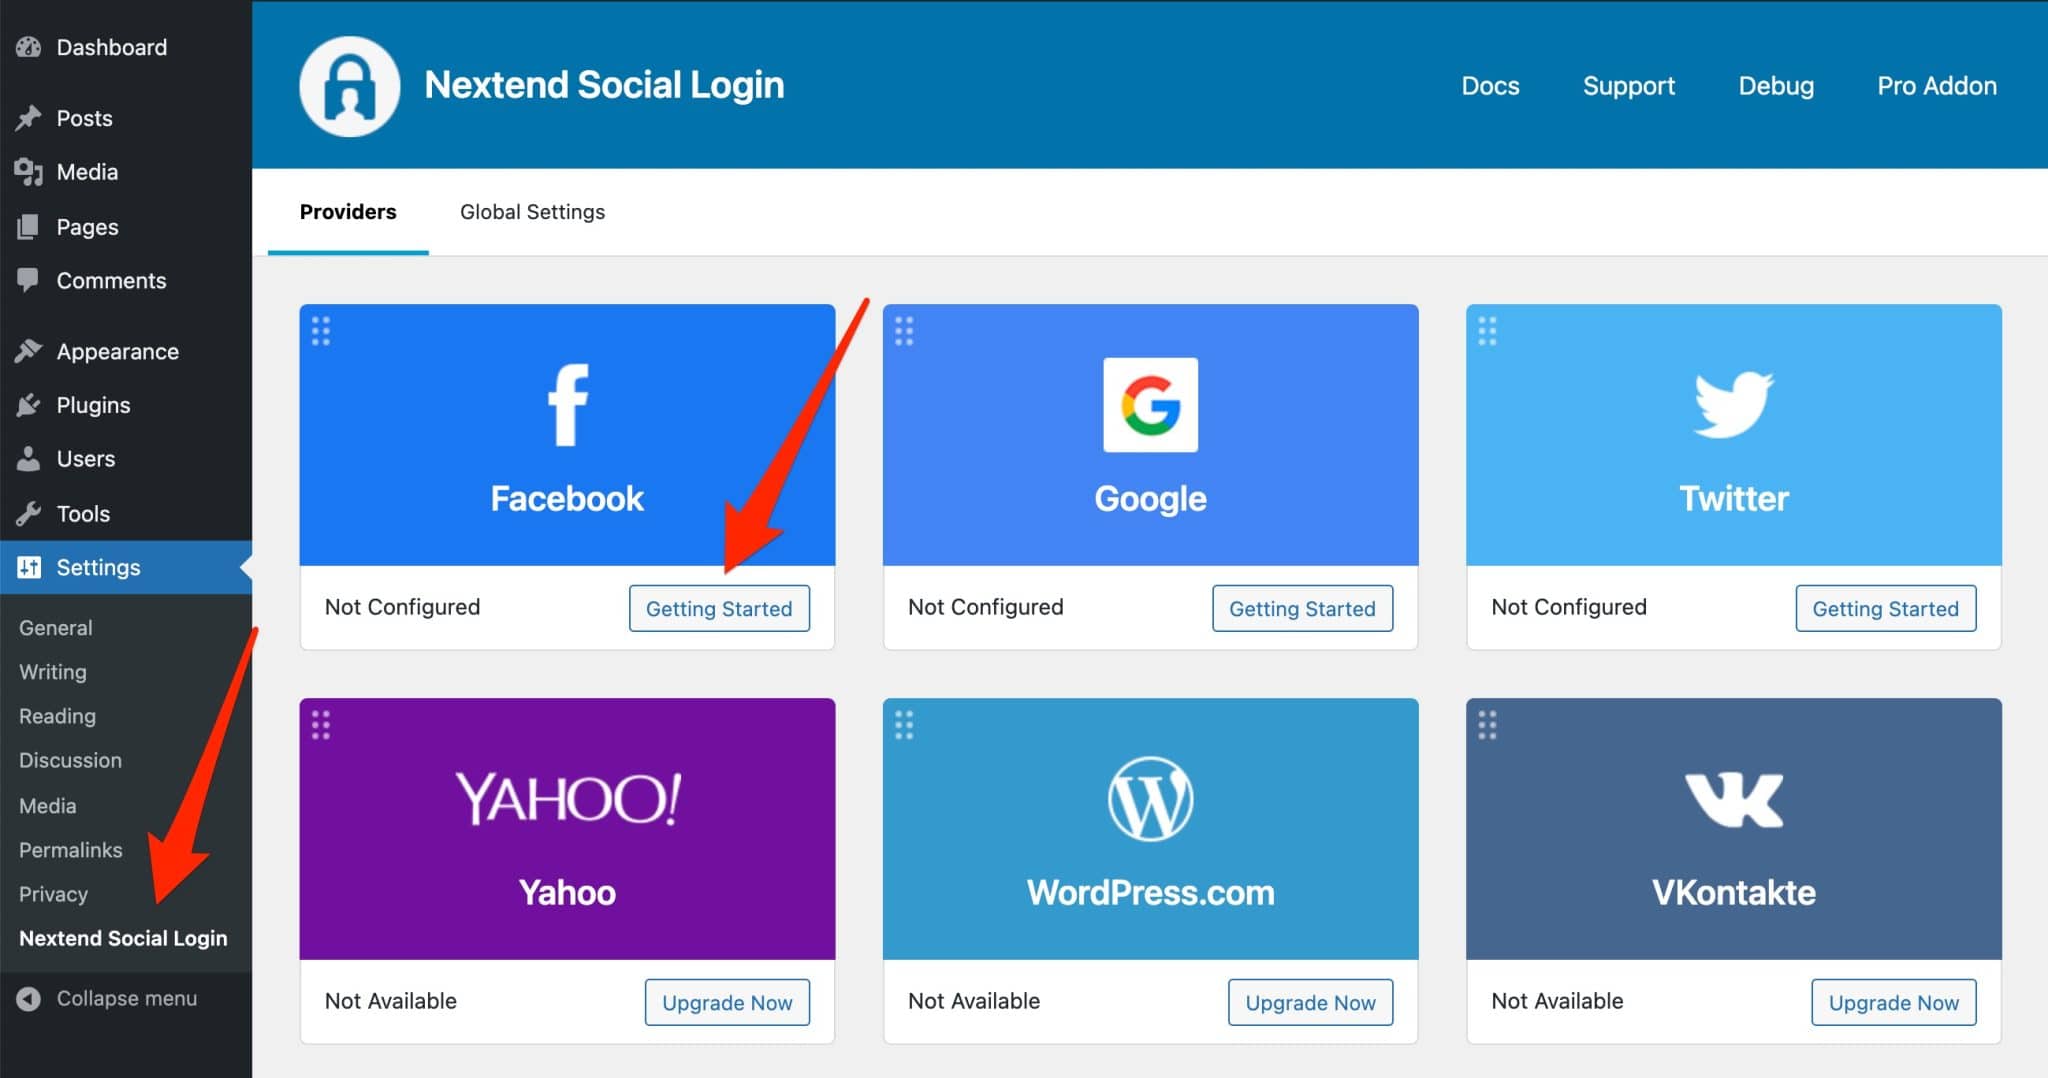
To configure the plugin, just enter your Facebook app ID and the secret key associated with it in the “Settings” tab:

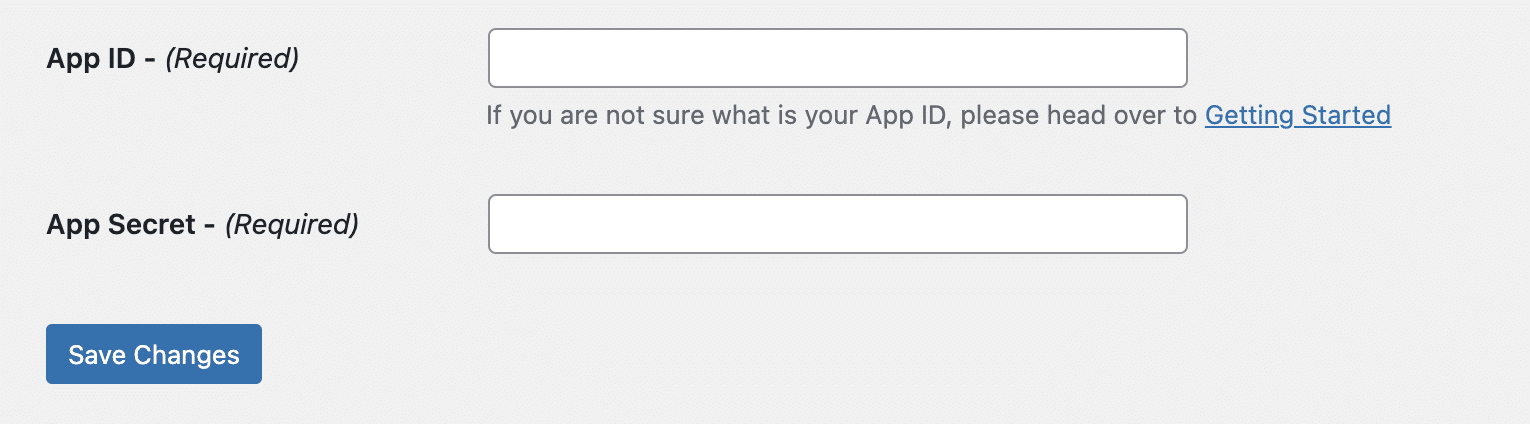
Remember to save your changes. To see the result, disconnect from your site.
In principle, you are redirected to the WordPress administration login page. And there, magic: a pretty blue button with the mention “Connect with Facebook” has just appeared.
You can use it to log in. Note that you still have the option to join your site using your WordPress login and password.
The plugin also has a premium version, available from €48 i.e. ± $50 (lifetime license), for use on 1 site.
It features WooCommerce integration, so users can easily log in to their user account on the checkout page.
You will also be able to customize the look of your login buttons, or allow your users to leave a comment on your site by logging in using their favorite social network.
In the initial version of this post, I presented you the Wp Facebook Login for WordPress plugin. Also very effective, it is closed since May 2021, which is why I replaced it with Nextend Social Login and Register.
Download the Nextend Social Login and Register plugin:
Feed Them Social

Active installations: 30K+
Looking to add your Facebook feed to your WordPress site? Feed Them Social should be of interest to you, since it is made for that. 🙂 Finally, it also allows you to add your Instagram, Twitter and YouTube news feed.
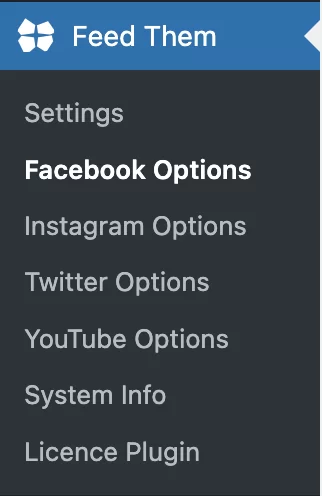
For the settings, go to the “Feed Them” menu on your admin interface. First, you need to associate the extension with your Facebook account.

Once this is done, you can :
- select the language of the Facebook feed (i.e. the language of the Facebook titles and buttons)
- configure the “Like” and “Share” buttons
- customize the display style of your Facebook feed (text and link size and color, maximum media width, internal and external margins, etc.).
Save your settings by clicking the “Save All Changes” button at the end of the page.
Go to the Feed Them > Settings submenu, and select the “Facebook Feeds” option from the drop-down list that appears:

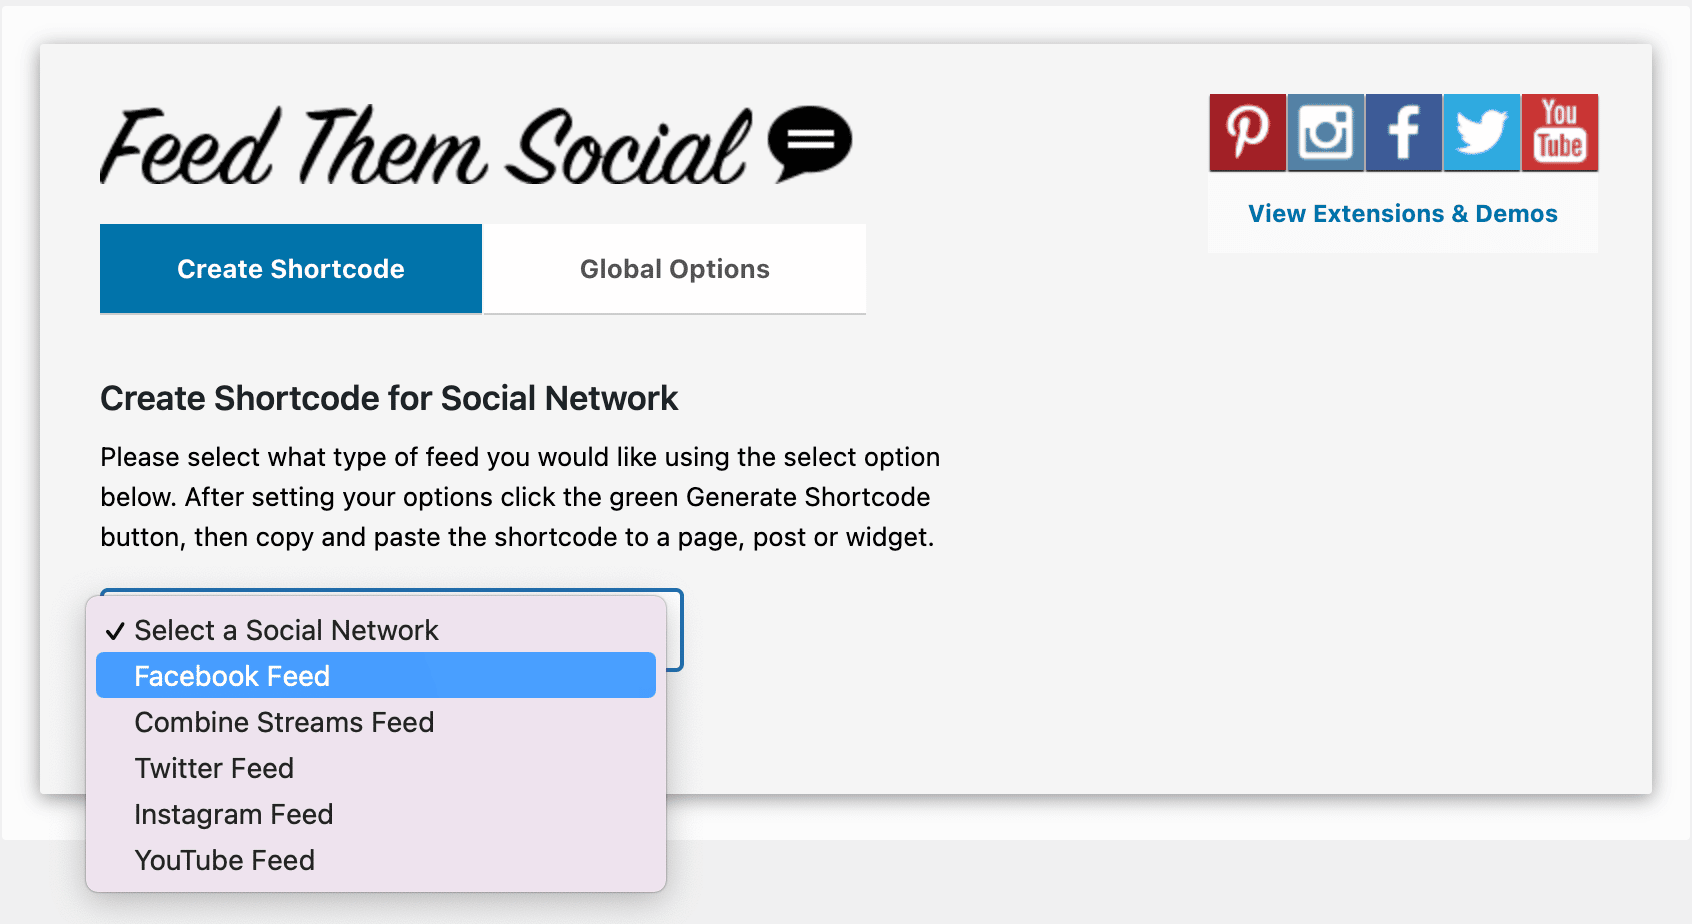
Scroll down the page and click on the “Generate Shortcode” button. Copy the shortcode that appears and paste it into the post or page where you want your Facebook News Feed to appear. Publish your content, and you’re all set.
In the end, the plugin does the job well. A bit of CSS code will allow you to intervene precisely on the design of the news feed to make it fit your style guide.
A premium version, available from $50 for use on one site, allows you to customize the display of your Facebook News Feed more finely.
Download the Feed Them Social plugin:
With these plugins, you can also integrate Facebook on WordPress
Since the beginning of this post, most of the plugins dedicated specifically to adding Facebook on WordPress have been discussed.
However, you should also know that there are more generalist plugins that allow you to “marry” Facebook and WordPress in certain ways:
- Social Warfare is a plugin that allows you to add sharing and following buttons (Social follow) on social media. Of course, it is possible to do this with Facebook.
- Jetpack is a Swiss army knife plugin whose goal is to improve the management and operation of your site on 3 main aspects (design, security, marketing). Jetpack offers a widget to add a Facebook Like Box in a widget.
- Yoast SEO is a plugin that primarily allows you to optimize your SEO. However, it has a “Social” tab that allows you to make certain settings related to Facebook, such as adding Open Graph meta data.
- Pixel Cat is a plugin that allows you to install the Facebook pixel on WordPress. The Facebook pixel is a piece of code that is used to measure and optimize your Facebook ads. Note that Facebook also offers its own plugin to add the Facebook pixel to your site: Meta pixel for WordPress. However, it is very poorly rated and can even be deactivated after an update. So avoid it.
How to integrate Facebook on WordPress without a plugin?
If you’re a fan of ease, allergic to code and cry when you see the phrase “Facebook Developer Platform”, you should probably opt for a plugin.
For the others, you should know that it is possible to integrate Facebook on WordPress manually. Sometimes you won’t even have a choice because a plugin can:
- Conflict with another plugin and make your site crash.
- Slow down your site.
- Have security holes.
- Require the creation of a Facebook Application. And that’s a no-go for you.
So it looks simple. And it was before this post was updated!
To add a Facebook button to your content (e.g. “Like”, “Share”), all you had to do was to go to the platform dedicated to Facebook’s developer tools (newly named Meta), in the “Social Plugins” section.
After choosing the button of your choice, you could generate a piece of HTML code with one click, and then add it wherever you wanted on your WordPress site.
Facebook’s new rules
But that was before. Yes, before Facebook made “Changes to Social Plugins in the European Region” as it explains. Now, the “Like” and “Comment” buttons will no longer be displayed and seen by users, if two conditions are not met:
- To be logged into their Facebook account (we are talking about the user here).
- To have given their consent on the “App and Website Cookies” control.
In short, I can tell you that this will not be displayed often, which I noticed during my test. The famous buttons never appeared on the visible interface of my website… However, there are some ways to overcome this problem.
I think for example of the Elementor site builder. In its premium version, Elementor Pro (affiliate link), the page builder has several widgets dedicated to Facebook. They will allow you to display:
- A “Like” button (with the total number of “Likes”, if you wish).
- A Facebook news feed.
- An option to allow your visitors to comment on your website using their Facebook account.
- The addition of Facebook videos and posts.
The case of oembeds
Finally, note that since WordPress 4.7 you can include Facebook posts directly in WordPress.
It’s very simple, you just have to paste the URL of the publication in question. To do this, click on the date of your post, which will open it in a separate page. Select the URL and paste it directly into Gutenberg.
However, there is a “but”. As you read at the beginning of this post, Facebook is no longer on the whitelist established by WordPress for oEmbed link providers , as of October 2020.
As a result, the Facebook post you choose will not be displayed on the visible interface of your site. For this to happen, you must have a Facebook application.
To activate all this, the easiest way is to use a plugin:
- Either Smash Balloon Social Post Feed, which you already know
- or oEmbed Plus.
This makes things quite complex, to say the least.
Which WordPress Facebook plugins really deserve a “Like”?
There are only a few meters left before the finish line.
Before you cross it, I’ll give you a few final tips. Try to apply them every time you install a plugin:
- Check the loading time of your pages after installation.
You can use GTmetrix for example to get an idea. If you want to go further, I advise you to read our post: How to optimize a WordPress site without breaking the bank. - Save your site before a big update.
- Check the number of downloads. A highly downloaded plugin is often synonymous with quality, even if you shouldn’t generalize.
- Take a look at the comments of the users and the ratings (stars).
- Check the last update date. If the plugin you’re looking at hasn’t been updated in the last 2 years, don’t download it.
I hope you’ve figured out how to add Facebook to WordPress.
It’s hard for me to give you a top 3 of the tested plugins, as they are not all for the same purpose. Nevertheless, I liked using Smash Balloon Social Post Feed and Widget for Social Page Feeds.
And you, which plugin did you choose for your website?
Tell me all about it in the comments.