Fasten your seatbelt. Sit comfortably. Stow your tray table. Breathe deeply and calmly.
I hope you are ready for your imminent take-off. Destination? The world of… landing pages and, more generally, the marketing world.

In this post, you will learn about OptimizePress. It:
Is a powerful solution that turns WordPress into a complete platform for building marketing websites, sales funnels, landing pages and membership portals.
As showcased on OptimizePress LinkedIn page
The flagship product of this platform is a page builder called OptimizeBuilder, which will be extensively analyzed throughout this presentation (without forgetting other surprises).
Operating mode, design, customization, user experience, value for money: we tested and triturated the beast through and through.
Find out our detailed review and conclusions without further delay.
Overview
This post contains affiliate links. This means that WPMarmite will get a small commission if you buy plugins or other products through our links. This won’t cost you more and it will help rewarding the research and writing work of the writers.
What is OptimizePress?
Presentation
If I say James Dyson, who do you think about? Without taking too many risks, I guess you must visualize the creator of the wireless vacuum cleaners of the same name.
Well, that was easy… Did you know that there is a namesake (and he might not be the only one) who has some kind of reputation in the WordPress community? This James Dyson founded OptimizePress in 2010.
As you noticed in the introduction, OptimizePress is primarily qualified as a platform (only premium, FYI). Several tools are available (e.g. a theme, a sales funnel builder), but the most important one, the one on which OptimizePress focuses all its communication, remains the in-house page builder.
A page builder is a plugin or a component of a theme that enables you to build your website design without coding, thanks to a range of add-ons (image, text, button, video, etc.) and ready-to-use page templates.
Called OptimizeBuilder, it is mainly intended for “marketers, coaches and creators”, as outlined by its designers on the presentation page dedicated to the tool.
After having conquered its audience in its early days, our British page builder has suffered a slowdown facing the emergence of many competitors. First in the marketing niche (ClickFunnels, Leadpages, Thrive Architect), before having to face the onslaught of more generalist page builders (Elementor, Divi, Beaver Builder etc.).
In order to renew itself, OptimizePress then undertook a major redesign of its page builder. After two years of development, a new version of the plugin, richer in functionalities and more graphically accomplished, has been launched: OptimizePress 3.0.
This is the version you will learn about in detail in this test.
What is it about?
You have just read it: the OptimizePress solution is first associated with its page builder, which is technically an extension.
In overall, OptimizePress enables you to create:
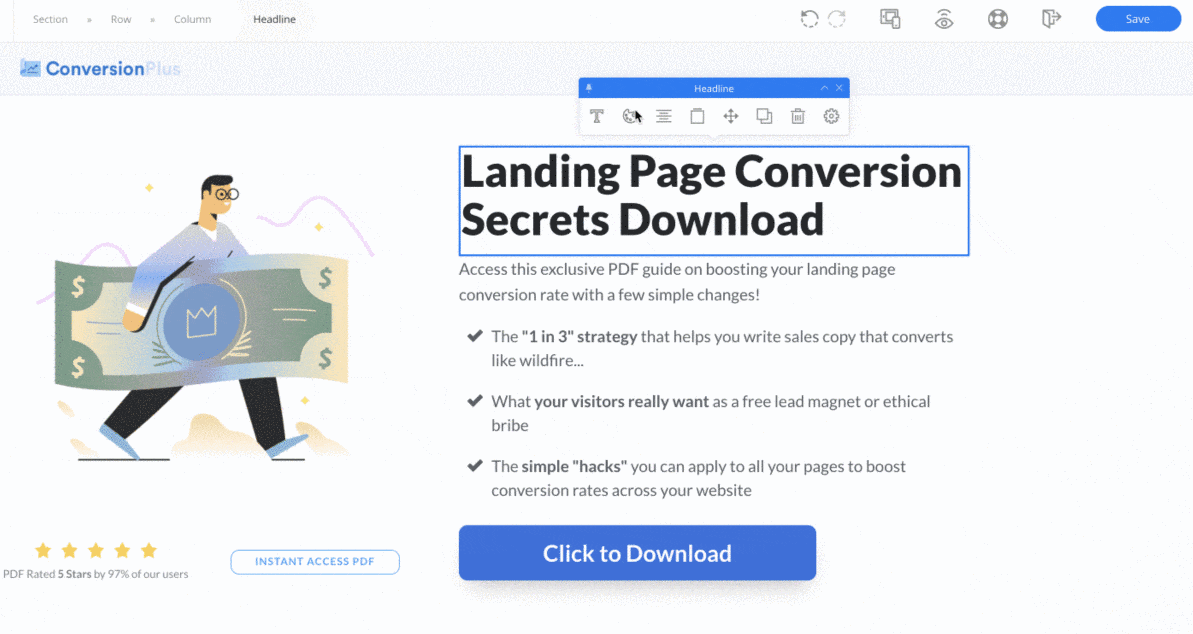
- landing pages which promote an offer on a website. Their goal is to convert visitors by encouraging them to download content (ebook, white paper), to subscribe to a newsletter, or to purchase a product or service. It looks like this:

- sales funnels referring to the journey undertaken by the visitor on a website, from the discovery of your product or service to its purchase.
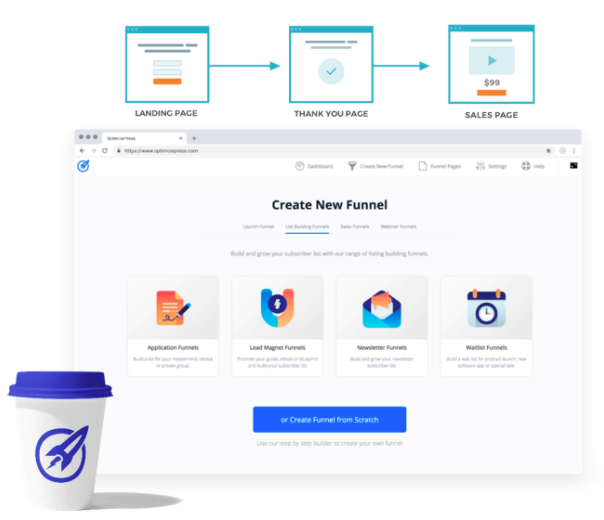
- membership website – understand a website that only authorized visitors (members) will be able to access to view the content you will be making available to them.

In addition, OptimizePress also provides the ability to create sales pages – pages designed to engage your visitors to buy your product or service.
Without forgetting the so-called opt-in forms, i.e. forms that offer your visitors the opportunity to enter their email address so that you can contact them in the future.
I hope you’re still following and that things are clearer for you. In short, keep in mind that OptimizePress enables you to “create any type of page to increase your number of subscribers, sell your products, and share your content”.
To do this, it offers you the classic options that one has the right to expect from any good page builder that respects itself. Namely:
- Visual front-end editing (what your visitors see) in real time, thanks to a WYSIWYG (What you see is what you get) interface.
- The manipulation of content elements is done through drag and drop.
- Availability of templates and sections (page pieces) ready to use.
- No knowledge of code (HTML, CSS etc.) is required to use OptimizePress.
- The page builder is natively optimized for mobile device browsing (smartphones, tablets).
Promises are tempting, but I bet you want something specific, don’t you? So let’s get to the technical part without delay, just to see what OptimizePress has in store for you.
OptimizePress, an easy-to-use tool?
Getting started and dashboard overview
OptimizePress being a paying plugin only, you must first get one of the 3 proposed plans (starting from $99/year, about €88) on the official website, in order to use it.
Each plan gives access to the page builder and an in-house theme. Then, depending on the selected plan, you will have access to additional options such as the sales funnel builder, opt-in builder etc. For this test, please note that we will be testing the Essential offer ($99/year).
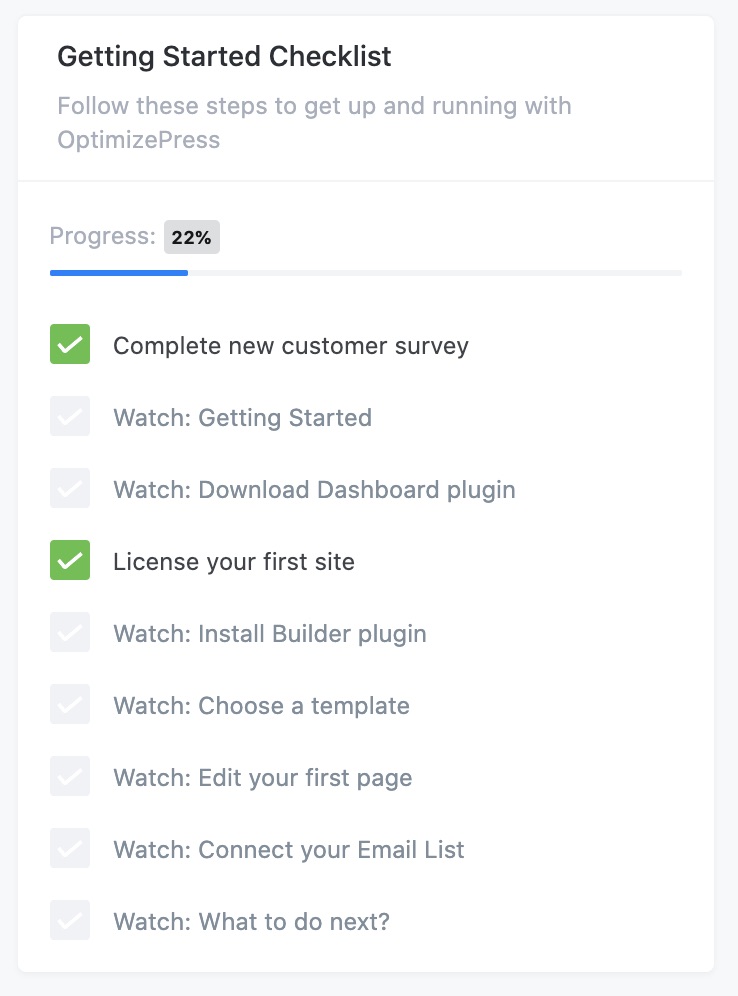
To download the page builder, you must log in to your members area:
Here you will find, among other things:
- Nearly 150 videos to help you master OptimizePress. This goes from tutorials on how to get started and how to use the builder, to much more advanced videos to teach you how to create a sales funnel, for example. The videos are practical and very well designed.
- Websites on which you have installed OptimizePress (Licenses Sites).
- The templates that you will have saved while building your pages (Your Templates).
- News and updates on the latest product updates (News & Updates).
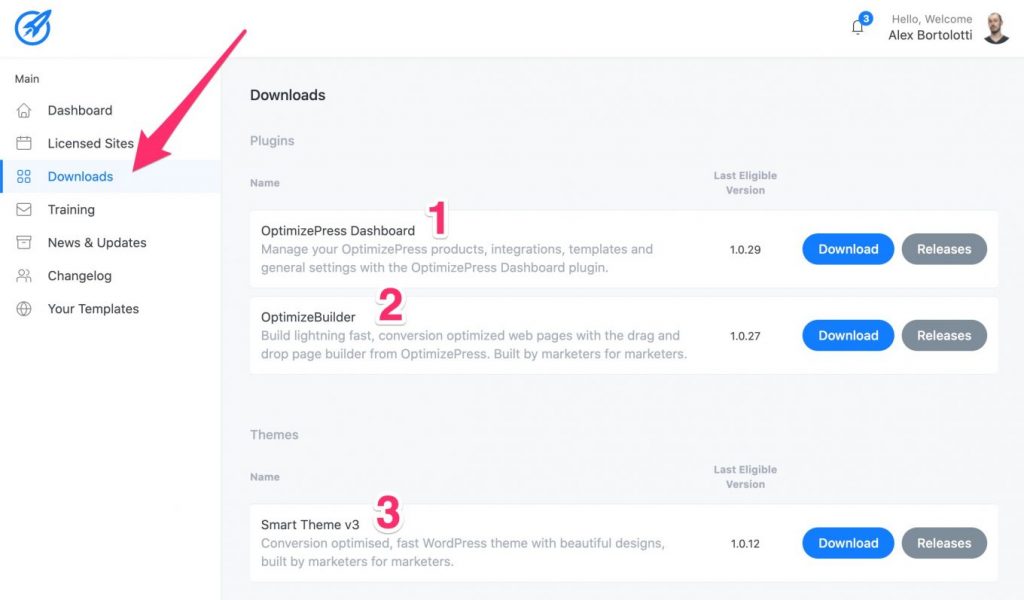
In order to install OptimizePress on your WordPress website, you must first download it via the Downloads tab. This is where you will find:
- The OptimizePress Dashboard extension (number 1 on the screenshot below). This is the “command center for your OptimizePress products”. Installing this extension is necessary to be able to use the page builder.
- The OptimizeBuilder extension (number 2) is the page builder itself.
- The OptimizePress in-house theme (number 3), called Smart Theme v3.
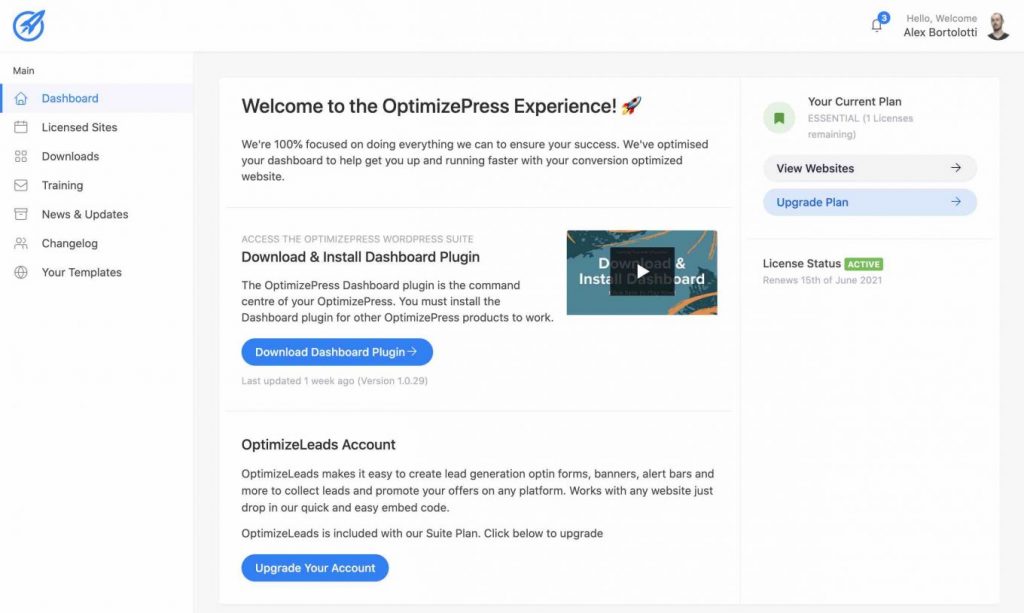
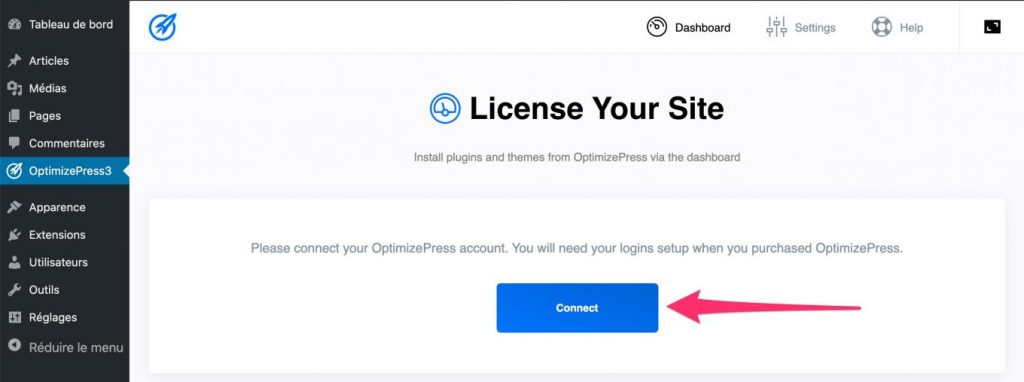
Download the OptimizePress Dashboard plugin, then activate it on your WordPress dashboard through the tab Plugins > Add New.
Once this is done, OptimizePress will ask you to activate your license to be able to link your account and use the plugin. Click the Connect button to do so.
You will then be automatically redirected to the OptimizePress settings page:
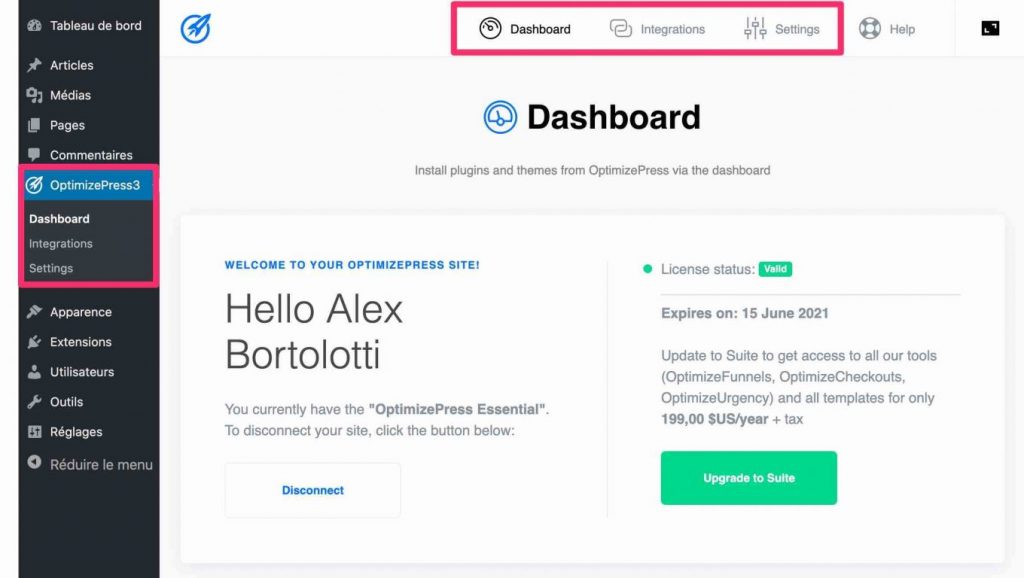
We appreciate this clean menu which only has 3 tabs, avoiding being overwhelmed with information:
- Dashboard: this tab summarizes the validity period of your License and enables you to install the OptimizeBuilder plugin, Smart Theme, but also, if your License allows it, the OptimizeFunnels and Optimize Urgency plugins.
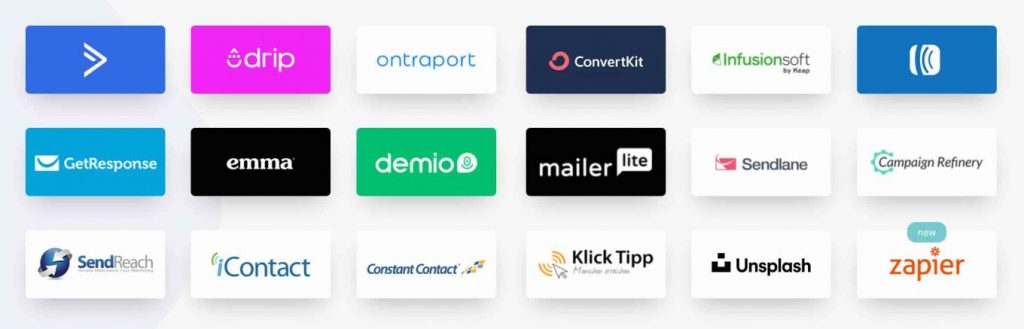
- Integrations: this is where you will be able to connect OptimizePress to third party marketing tools, especially services to create newsletters such as MailChimp, ActiveCampaign, ConvertKit etc.
- Settings: This tab contains more advanced settings such as the ability to enable OptimizePress on your posts, enable a Google ReCaptcha on your forms to protect you from spam.
Review of the dashboard control: OptimizePress takes you by the hand to take your first steps with its page builder. We appreciate the clarity that emerges, the numerous video resources, and the checklist that helps us to acquire the first basics (available on your members area).
It’s all pretty well done!
After this rather successful introduction, let me introduce you to the OptimizeBuilder page builder. Download it and then activate it on WordPress. Now you know how to do it! 😉 Then, see below to find out what’s next.
For the purpose of this test, I encountered a problem that you may face if you want to use OptimizeBuilder locally. When downloading the page builder, the following message was displayed: “the link has expired”. It is impossible to use it locally, which is a real shame. If this problem occurs on a live website, the simplest way is to ask your hosting provider to increase the size limit of the files to download. Also remember to check the system requirements listed in the documentation to avoid this type of problem.

How the page builder works
The interface and layout options
When OptimizeBuilder is active, you will see a Create New Page option on the left column of your WordPress administration interface.
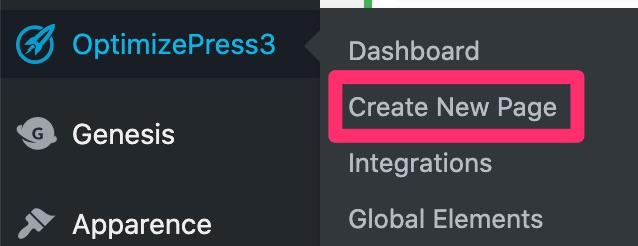
Click on it and choose either to start from scratch (Blank template) or to use a ready-to-use template.
You can also add a page via the menu Pages > Add New, then click on the blue Edit with OptimizePress button to start working on your page.

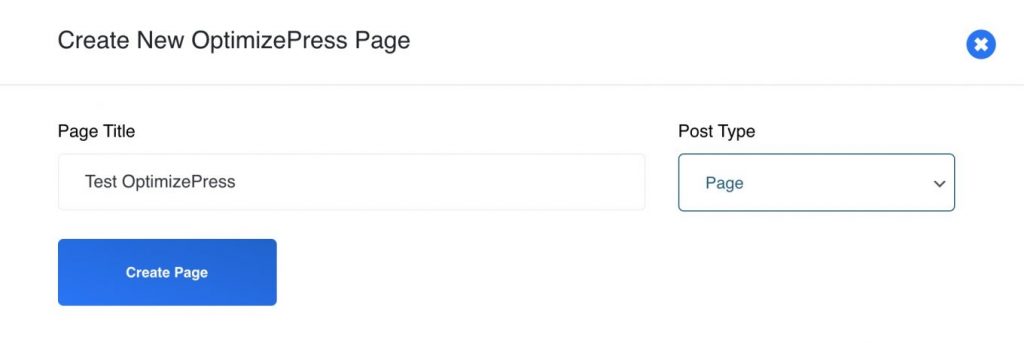
To save time, I choose to activate a landing page template. OptimizePress will ask you to give it a name and choose on which type of content you want to use it (page or post).
The toolbar
OptimizePress displays an horizontal toolbar at the top of your page.
It breaks down into two parts:
- On the left, you have access to settings to add, customize and edit content (e.g. elements, sections, pop-up windows).
- On the right, you have icons to preview your page, control its display on computer, tablet and smartphone, save your work, or options to undo/redo your previous action.
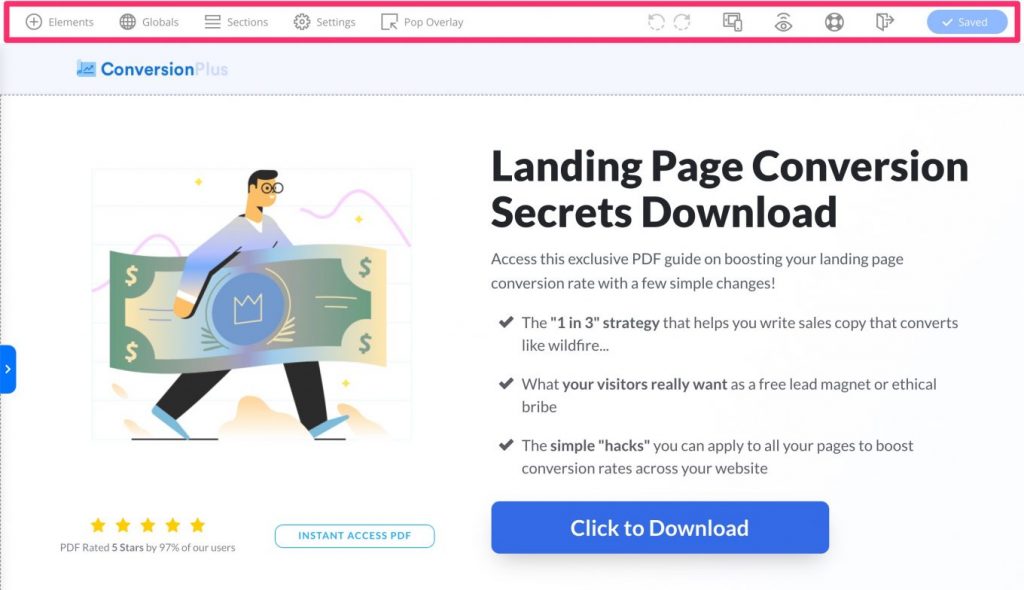
It’s globally clear and efficient and the icons are obvious enough to quickly understand what it is about. OptimizePress opts for sobriety and it works.
Editing and customization
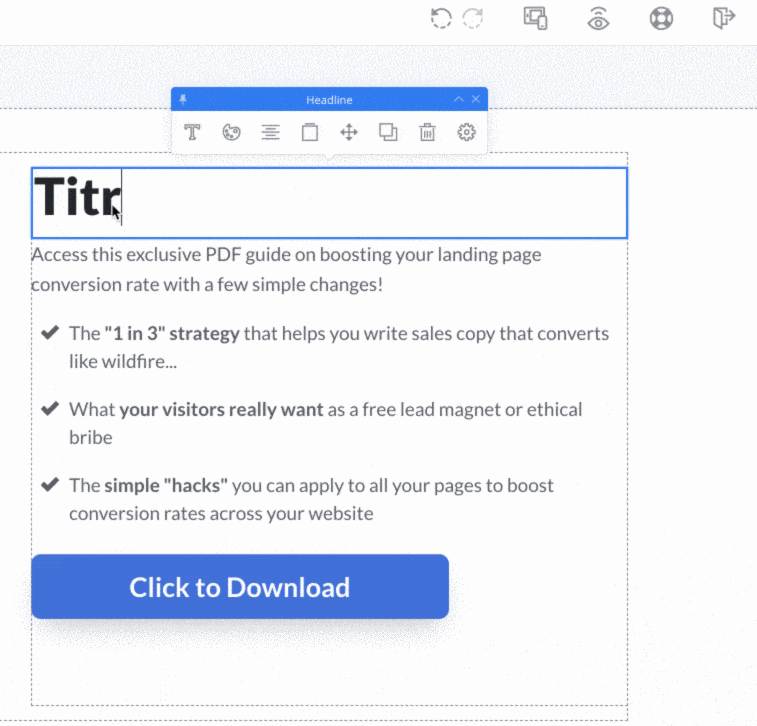
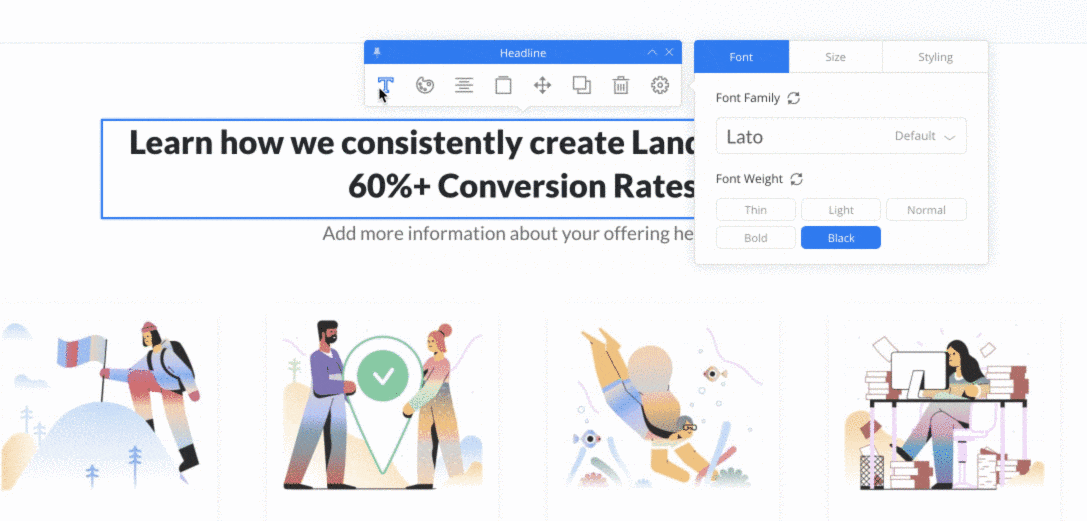
To edit an element of your page, the way OptimizePress works is similar to the one proposed by most page builders: you hover over an element with your mouse, then you click on it to see the range of possibilities.
A context bar will then open and offer you several specific options depending on the element you want to edit. If you are using the Divi Builder, you are familiar with this kind of practice: Elegant Themes’ Page Builder works the same way.
On the example below, I want to modify the text of a Title. I can change the font, color, alignment etc.:
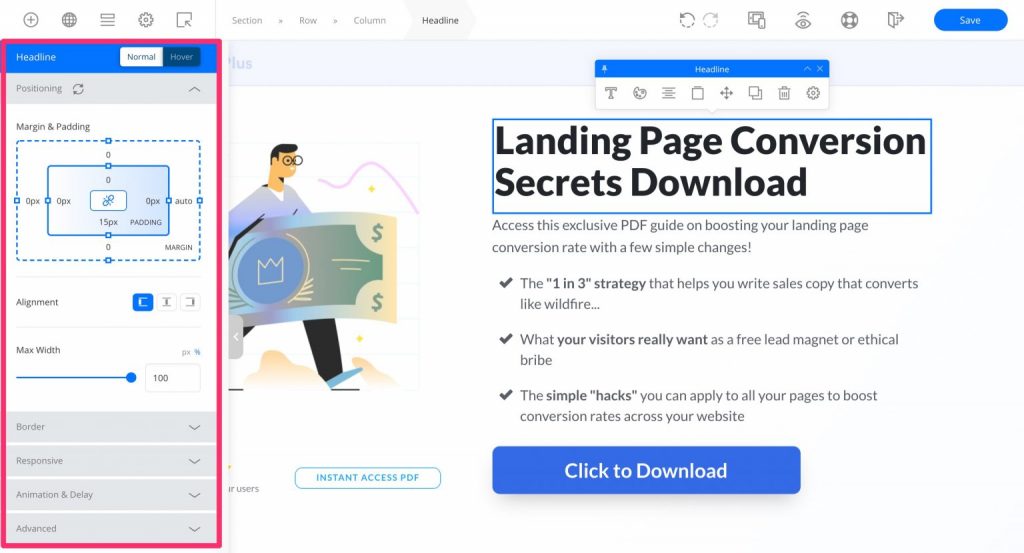
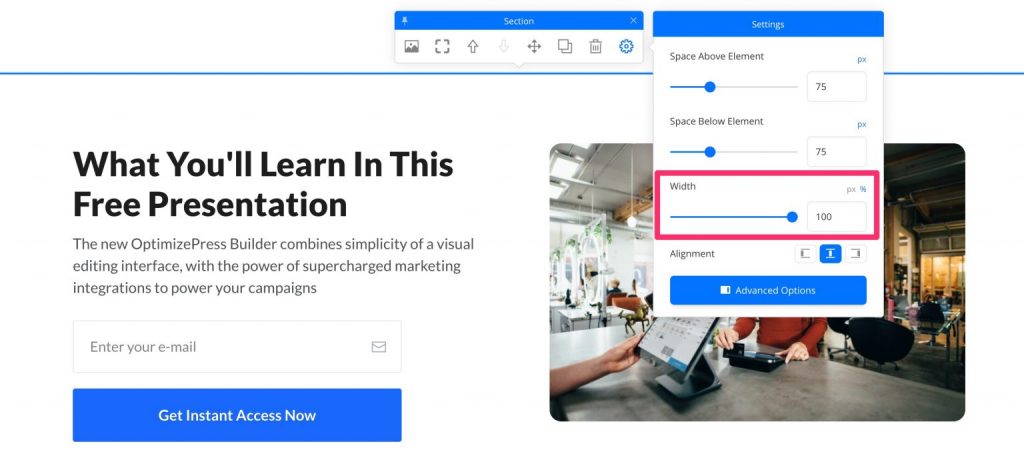
If you want to manage other settings even more precisely, just click on the small arrow on the left side of your screen. It will open a new contextual menu where you will be able to manage:
- The positioning of your content: internal and external margins, alignment and maximum width.
- The borders.
- The responsive aspect (adaptation on all types of devices): you can choose to display a given element on a particular device.
- Animations: for example display an image when scrolling or after X seconds spent on your page by your visitor.
One of the features I particularly liked is the ability to resize your elements manually. That’s very handy and you just have to stretch or shorten a content item to achieve your goals:
Moreover, editing is done in real time and online: you act directly on the content you want to modify, without latency.
In summary, the editing experience is very satisfying and clear. It is easy to find your way around, which makes it easy and quick to get started.
During my test, the use was sometimes cumbersome. First of all, the loading of a page or a template is slower than with other page builders I tried (Elementor, Divi, Beaver Builder, Oxygen): count about ten seconds on this point. Then, the test page I worked on crashed several times, forcing me to go back to my dashboard to open it again. Now, we’re not going to blame OptimizePress. This kind of problem can happen due to a bad connection or poor performance of a WordPress website.
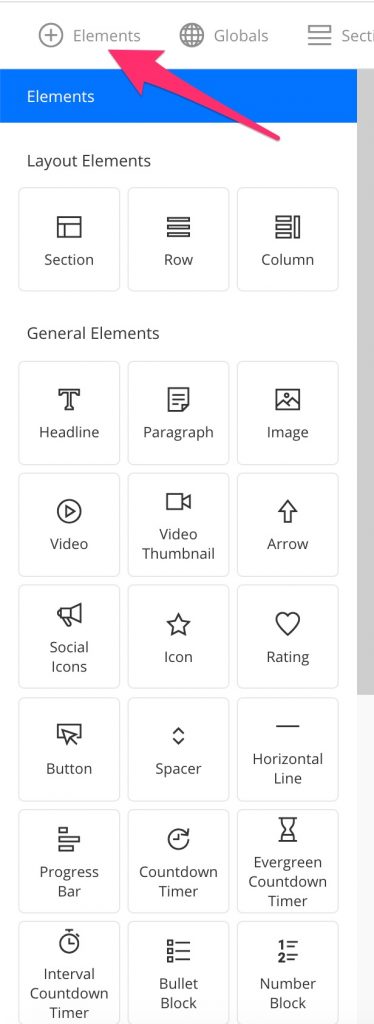
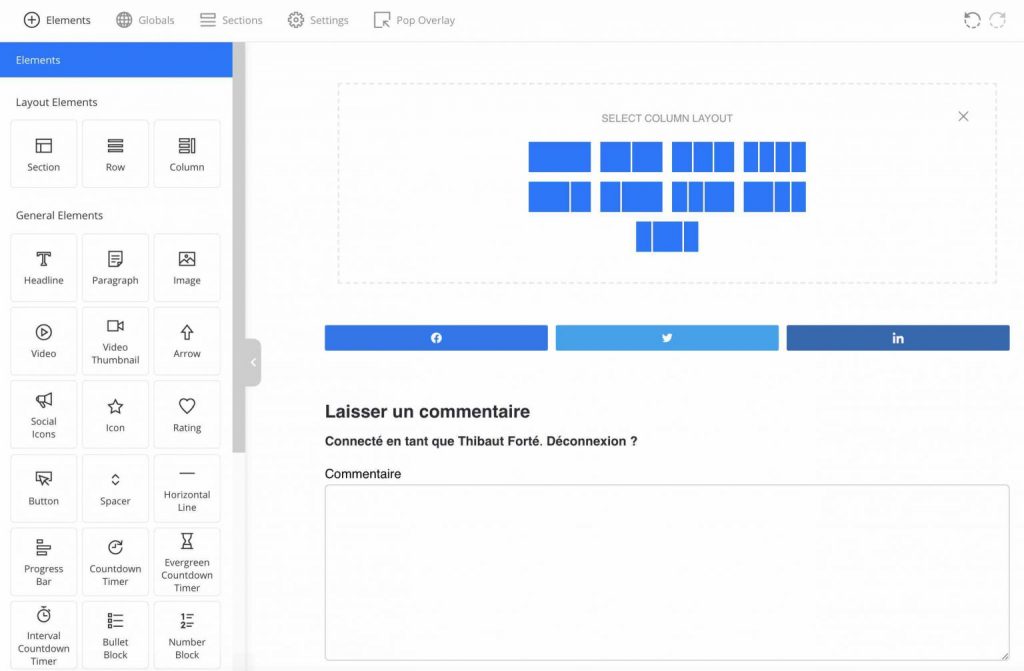
The elements
Now let’s focus on what OptimizePress calls Elements, understand ready-to-use modules to add to your page by drag and drop.
There are 31 of them. The classics are there: title, image, video, button, paragraph, social network icons.
But OptimizePress also offers more marketing oriented elements. For example, I could mention the Evergreen Countdown Timer, or Interval Countdown Timer elements.
The sections
Sections are ready-to-use pieces of page that you can add to your content with a simple drag and drop.
OptimizePress offers about 30 of them divided into 7 categories. You can use them to add testimonials, price tables, calls to action, or content.
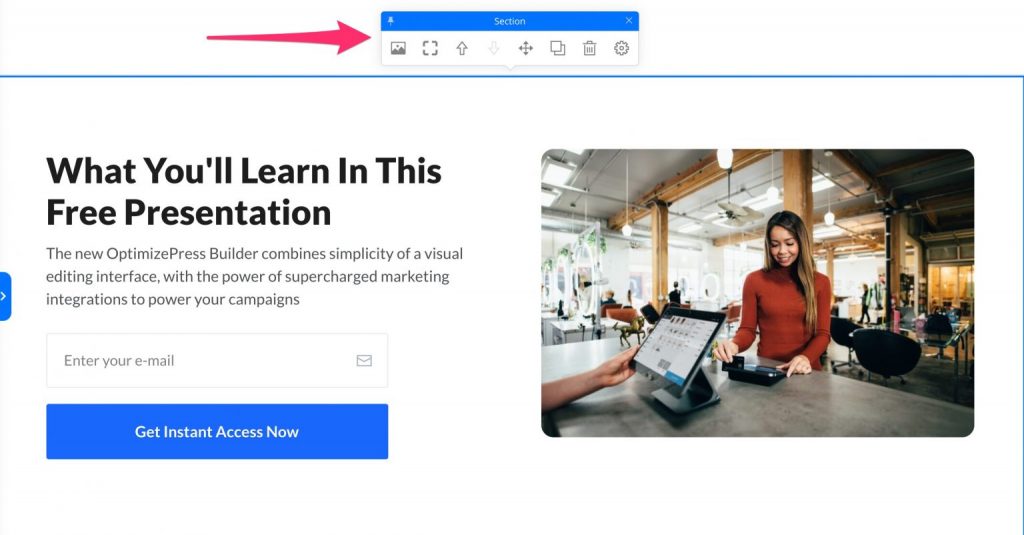
As you can see above, it is of course possible, as with an element, to edit a section using a dedicated toolbar that enables to:
- Manage the background: add a color, a photo or a video.
- Adjust the borders.
- Move the section to the top or bottom of the page.
- Clone and delete the section
- Manually adjust its width. This is very useful so that your content can be displayed on your entire screen, provided your theme enables it.
Tip: If you want to reuse an element or section in multiple places on your website, consider saving it as a Global Element. Right-clicking on it will open a menu with this option. After saving it, you will find it in the Global menu located in your top toolbar.
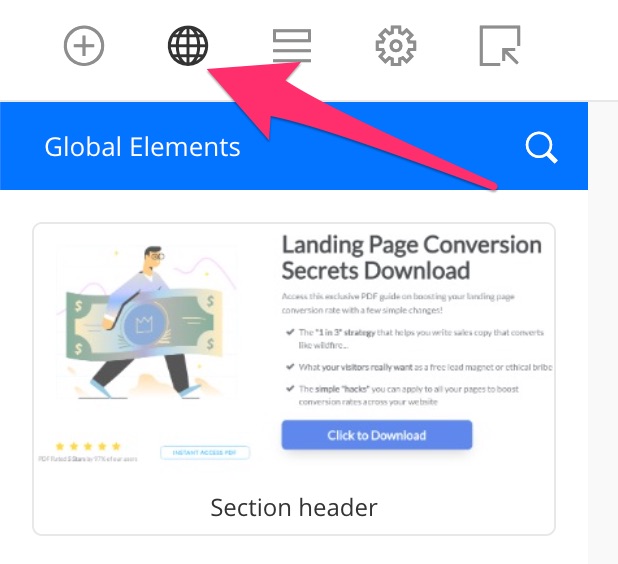
Thanks to this, any changes you make to a saved item will automatically apply to your entire website. You will no longer need to modify each element on a case-by-case basis and you will save time.
Templates
After this good dose of information, I suggest we stop on a big piece: the famous templates.
These are ready-to-use page templates that allow you not to start designing your pages from scratch.
All good page builders offer them, and OptimizePress is no exception.
I counted about a hundred of them, a very honorable number. They are accessible as soon as you create a page and are listed in several categories such as:
- Landing Pages
- Thank You Pages
- Sales Pages
- Webinar Pages
- Launch Pages
- Membership Pages
These templates are graphically pleasant: the visual appearance is pretty thanks to a clean and airy design.

On the other hand, you will only come across very marketing oriented templates with an obvious focus on conversions (a specific action you want your visitor to perform such as downloading a white paper, for example).
Marketing, remember, is OptimizePress’ business. Don’t expect to find generic homepage templates here, as is the case with more generalist page builders.
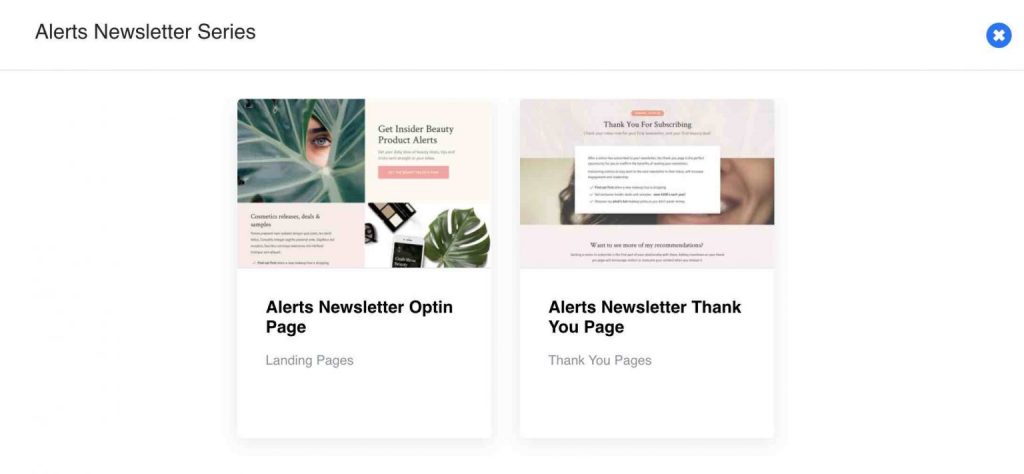
Note that OptimizePress offers a very practical option: collections of templates. These are templates that have the same design and that you can use to keep a graphic unit if you want to design a small sales funnel.
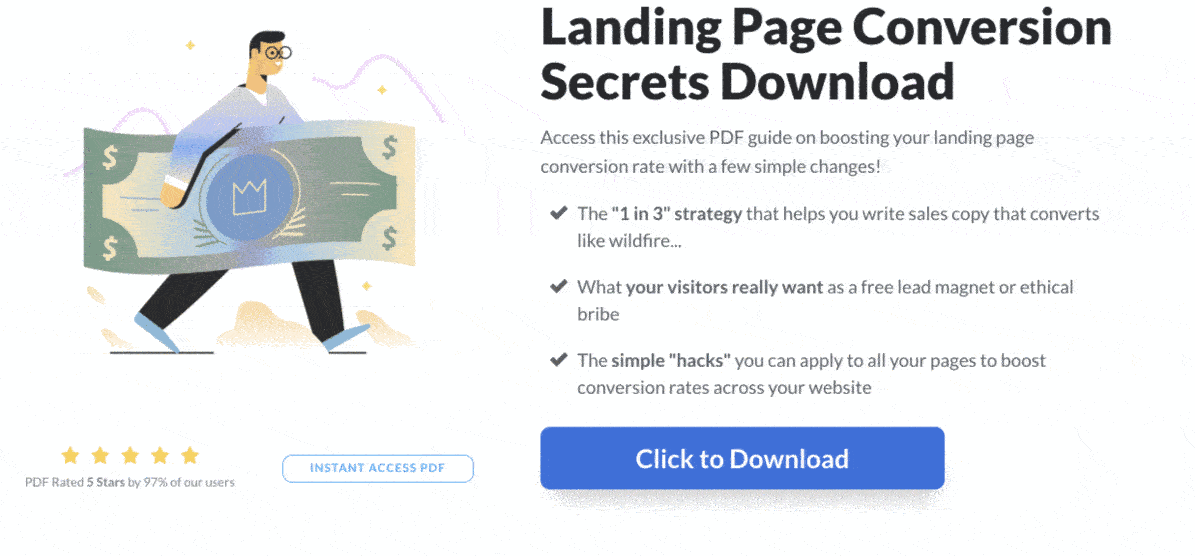
On the screenshot below, you can see an example of an opt-in page to subscribe to a newsletter, with the proper thanks page.
An integrated pop-up builder
In addition to various and varied templates, OptimizeBuilder also offers its own popup builder.
A popup (or lightbox) means a window that automatically appears on a web page, based on an action made by the user. Usually, a popup has 3 objectives: to get emails, to highlight a promotional offer, or to call to action.
Something quite rare in other page builders, OptimizePress integrates this option directly on the front-end interface of its builder. You will find it in the toolbar of the top menu under the name Pop Overlay.

To create and edit your first popup window, you will have a popup menu on the left. As soon as you make a setting, the changes will be visible in real time on the right side of your screen.
You can also modify the texts to be displayed directly in the concerned areas (e.g. title, button, etc.).

You can of course set the colors, the text, the background (ex: adding an image), or the borders.
Not forgetting one decisive element: the display of your popup. OptimizeBuilder enables to:
- Trigger it after a certain amount of time spent by the visitor on your page, or when he is about to leave the page (this is called Exit intent).
- Configure the way your window will be displayed to your visitors. About twenty settings are available (e.g. appearing from the left of the visitor’s screen, “falling” from the top of the screen, etc.).
This pop-up builder will help you for example to create opt-in forms to get emails.
Opt-in means membership option. We are talking about an opt-in form when you want to collect the email address of your visitors via… a form.
To go further, OptimizePress includes in its Suite plan only (the most expensive) its own in-house software called OptimizeLeads.
There, you’ll have plenty to do thanks to dozens of ready-to-use templates and much more advanced features for triggering your opt-in forms (e.g. by click, scroll, based on a period of inactivity, etc.).

OptimizeBuilder also works on your posts
If OptimizeBuilder is set by default to work on your pages, you can also use it within other content types, such as your posts.
The page builder works the same way as it does on pages. It replaces Gutenberg, the default native WordPress content editor, and you can add elements of your choice (e.g. Title, Paragraph, Image etc.).
Let’s say the PageBuilder takes control of the content. Personally, I find that the user experience is much more pleasant with Gutenberg than with OptimizeBuilder for creating and editing posts.
I wouldn’t recommend the builder for that, especially since it’s not possible to use both Gutenberg and OptimizePress at the same time (for example to add buttons).
After this overview of the different components of OptimizeBuilder, I suggest you look at another element included in the OptimizePress License: its in-house theme.
In-house theme: Smart Theme WP Marketing Theme
In its Frequently Asked Questions, OptimizePress states that its page builder “will work with any theme that is well coded and respects WordPress standards”.
For the purpose of this test, I used it with the native TwentyTwenty theme, then with GeneratePress. I didn’t encounter any problems.
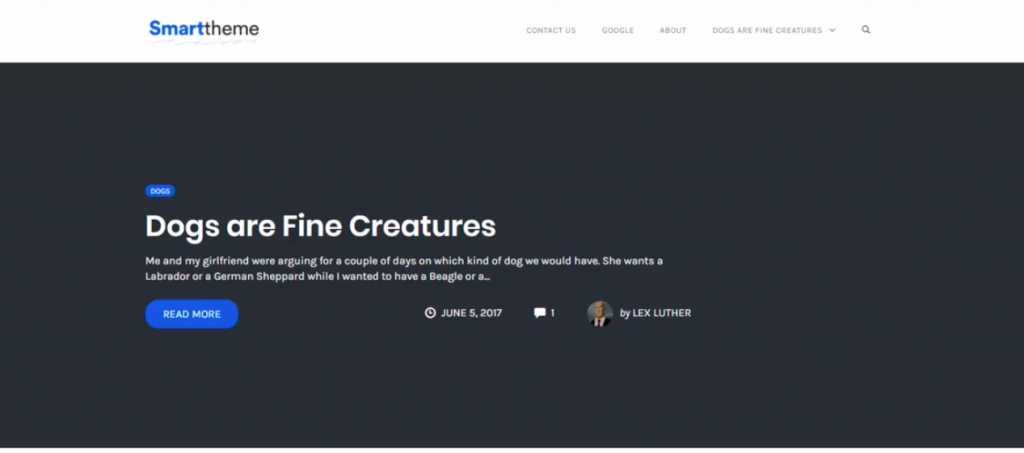
If you don’t have a favorite theme, OptimizePress automatically proposes its own when you buy one of its 3 Licenses. Its name? Smart Theme v3.
A theme described as “built by marketers for marketers” (what a surprise!) and “optimized for conversion, fast with beautiful designs”.
Once activated, its basic appearance looks like this:
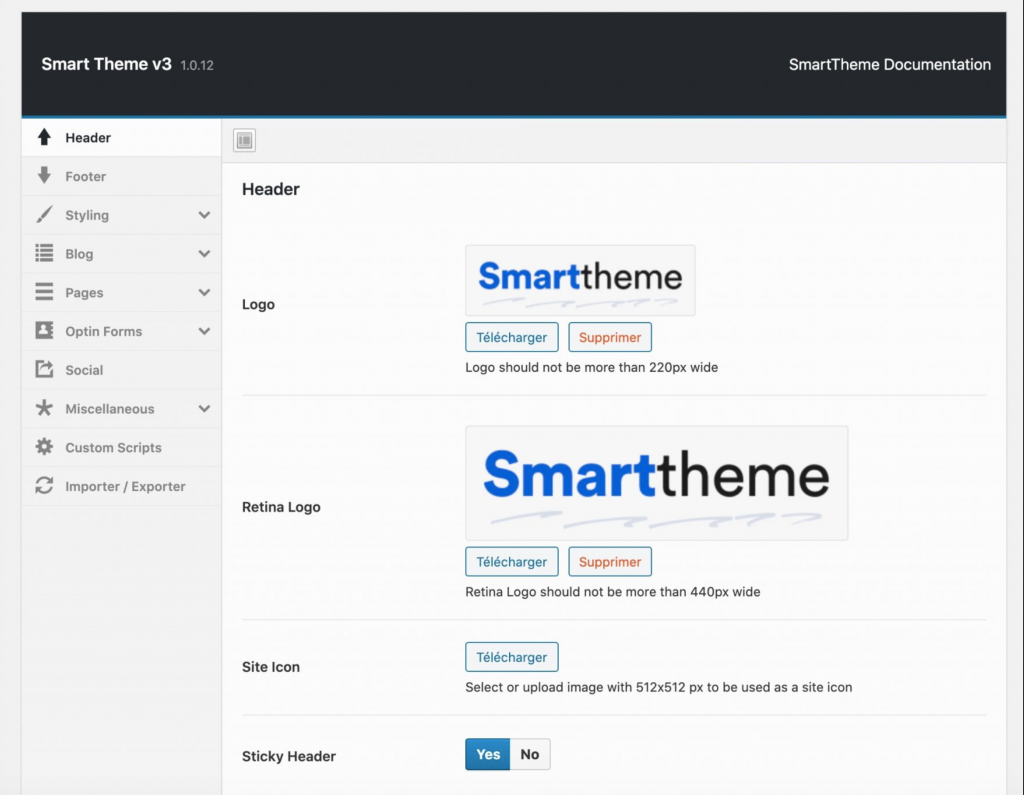
To customize it, its designers had the good idea to propose settings in the WordPress Customizer. Thanks to this, you will have a real time preview of the changes made.
You can find the settings by going to Appearance > Customize.
You will have 13 different sub-menus to act on classic elements such as the header, the footer, the style (typography, links), or the appearance of your Blog page.
The customization options are quite extensive. Among them, I would highlight the following possibilities:
- Create a sticky header (a “floating header” that remains displayed as the user scrolls through the page).
- Add an insert to present the author of a blog post, or display related posts.
- Integrate pre-created opt-in forms into your content.
- Insert share buttons on social networks (Facebook, Twitter, Pinterest, LinkedIn).
You can also customize the theme from your administration interface (in Appearance > Theme Options).
In the end, I would say that the appearance of this minimalist theme is graphically pleasant, and the handling of its settings is easy. Thanks to the Customization Tool, you don’t get lost in complicated menus full of options.
The main advantage of using Smart Theme lies in its excellent integration with OptimizeBuilder. Both tools have been designed and optimized to work hand in hand.
However, I found some limitations:
- You can’t change the footer credits without going through the code.
- You do not have access to Google Fonts to customize the typography.
- You can’t adjust the width of your page manually etc.
Personally, I prefer other themes that are just as easy to use (e.g. Astra, GeneratePress), but much more provided with options.
Other tools made in OptimizePress
At the beginning of this post, I revealed that OptimizePress is a complete marketing platform. If its flagship tool remains its OptimizeBuilder page builder, there are also other in-house plugins (available only in the Suite version of OptimizePress):
- Optimize Funnels: This extension helps you to create an automated sales funnel from A to Z. You can integrate it with OptimizeCheckouts, a payment module that works with Stripe, so that your visitors can shop on your website.
- Optimize Urgency: this plugin allows you to add notifications inside your posts and your pages in order to notify your customers of the latest news and purchases made by other customers, for example.

User Experience
Let’s continue our detailed review of OptimizePress with a focus on 3 fundamental aspects: your website loading time, SEO and responsiveness.
Performance
So, OptimizePress, are you more of a rocket or a cannonball? Even if I extrapolate a bit here, worrying about the loading speed of your page builder, and thus your WordPress website, has several interests.
First of all, it’s important so that the search engine robots that crawl your website can properly index it (visit your website and then copy its content to their servers).
Note: A crawl is when the robots of a search engine explore and retrieve information so that they can then index it.
It is also one of the 200 criteria used by Google to rank a page in its search engine. But don’t be so obsessed with it: its impact on this matter is very low, as recently confirmed by Gary Illyes and John Mueller, two analysts from Mountain View.
So why bother turning your website into a racehorse, then? Well, to satisfy your visitors, of course!
If your website is the kind of lazy nag, I’ll take bets: they’ll go elsewhere! Imagine that 60% of Internet users leave a website for a competitor when the loading time is more than 5 seconds.
The speed at which a page loads depends on many factors such as the efficiency of your hosting, the plugins you have installed, the compression of your images, the caching etc.
Your page builder can also have an impact on this – often a minor one, it must be said – so you might as well make sure that it doesn’t penalize you too much.
To do this, I tested OptimizePress by giving it a little test, using the free Pingdom Tools tool.
In this context, I used a test website hosted on a shared web hosting service of BlueHost, which had about ten pages of content, with all plugins activated (for your info, there were exactly 30 on the test website used).
I tested the page I had created with OptimizePress by activating one of its templates. Here is the result:
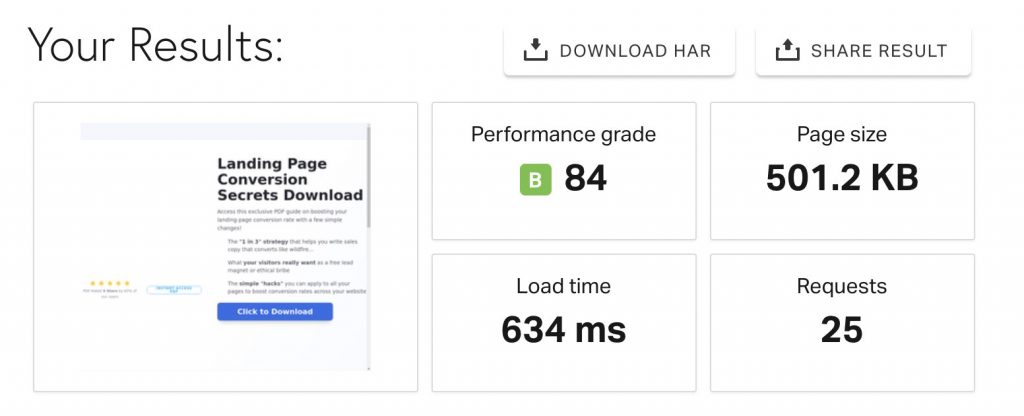
If the loading time in back-end is not great (remember the slow loading of the templates I told you about), the front-end rendering is much better here. OptimizePress has a pretty good loading time and doesn’t overload the weight of the page.
The above results provide a first glimpse, but cannot be considered as a final and conclusive judgement. You may have different data at home, depending on the criteria mentioned above.

SEO
In the previous part, I was talking about search engines, especially Google. Good thing, now we’ll talk about SEO!
This acronym stands for Search Engine Optimization.
It refers to all the techniques used to position your WordPress website as high as possible on a search engine. Focus in particular on Google, having over 90% of the search engine market share worldwide.
As I mentioned, there are over 200 factors at play. Roughly speaking, in order to do well, you will have to respect the standards set by Google (e.g. HTTPS website, optimized URL, responsive website etc.), create excellent content, and be recommended by other websites that will link to yours (backlinks).
On the technical side, a bit of work awaits you, in particular what is called on-page optimization (optimization of your content).
OptimizePress can give you a little help on this by helping you to do things properly, in particular by choosing your hn tags (title tags such as h2, h3, h4 etc.).
To do this, simply select the element of your choice (e.g. a title), then in the Text Options, choose the tag of your choice (Tag name):
A good practice is to use only one h1 title per page or per post. Check manually that each title and paragraph has the correct tags. By default, when you activate a template, you may have some surprises, beware. A little tip is to check all the tags on your pages using the code inspector of your web browser (a simple right-click in your page on Google Chrome will suggest you to select it on screen).
If you want to go further on the subject of SEO, you should know that a dedicated plugin such as Yoast SEO or Rank Math can give you a lot of help in optimizing your content.
Responsive
Another point on which we can’t compromise: the responsive aspect of your WordPress website. This means that it must be perfectly readable on any type of support (computer, tablet and smartphone).
Focus on smartphone navigation for two good reasons:
- The smartphone is the first screen used worldwide to connect to the Internet on a daily basis. Thanks to a responsive website, you enhance the user experience of your visitors.
- Google mainly uses the mobile version of a website for indexing and ranking pages in its search engine: we also talk about mobile-first index.
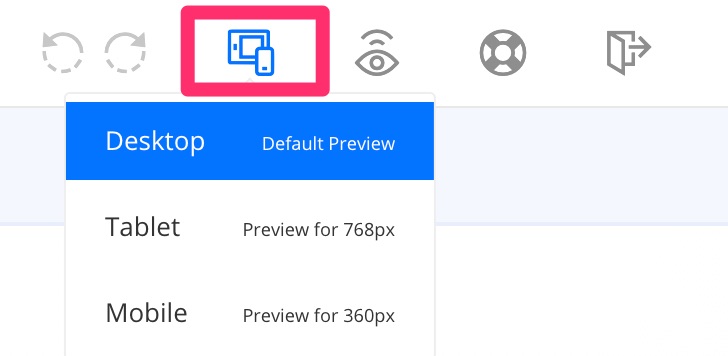
The good news is that OptimizePress makes it easy for you to be responsive. The templates it offers are already responsive. You can check this by previewing your page on the screen of your choice, thanks to a small icon located in the top toolbar.
Do not hesitate to use the google’s mobile optimization test to find out if your page is mobile-friendly.
In addition, you can also make some nice adjustments to the elements that allow it, for example by choosing not to display them on a given screen.
OptimizePress, how much does it cost?
As you know, OptimizePress is not free and comes with 3 plans:
- Essential: this is the basic offer available for $99/year (about €88) for use on 1 website only.
- Business: proposed at $149/year (about €133) for use on 5 personal websites maximum.
- Suite: available from $199/year (about €177) for use on a maximum of 20 personal websites.

A 30-day money back guarantee is available in each Plan. This enables you to test the product without risk, so to speak, to find out if it’s really made for you.
Each plan contains access to personalized support by email, product updates, and of course the page builder and in-house theme.
On the other hand, only the Suite plan gives access to the Optimize Funnels and OptimizeCheckouts plugins.
To know which plan to choose, ask yourself what your needs are, as well as the use you want to make of the platform.
If you just want to use OptimizePress on your website, without the need to create a sales funnel, the Plan Essential will suit you.
If you need an advanced marketing suite to use it on several websites at once, the Plan Suite will probably be the most convenient.
Regarding usage, OptimizePress talks about “personal websites” in its sales offers, i.e. “websites that you own, manage and that are registered in your name”. While specifying that they are not meant to be used on your clients’ websites. But this is indicated in a slightly hidden way in the FAQ at the bottom of the page, which is rather borderline.
If you need them to use them on your customers’ websites, how do you do it? OptimizePress gives 2 options:
- Buy one of their two Agency Licenses. But here, prices are soaring: the first one is offered at $399/year for use on 15 client websites, the second one at $599/year for use on 40 client websites maximum.
- Let your customer buy a License through an affiliate link obtained in their program, in order to get a commission on the sale.
All this leaves me a little confused and doesn’t really make things any easier. To tell you the truth, this is the first page builder I’ve seen working this way in terms of its pricing policy. More clarity on the use of their license would have been appreciated.
Competitors are much less bothered about pricing, without distinguishing between customer websites and personal websites. As a comparison, look at what other market players offer in terms of pricing:
- Thrive Architect is sold for $67 (about €59) for use on 1 website, but it gives lifetime access to the plugin (you don’t pay again every year). And its template offer is insane (nearly 350).
- LeadPages is available from $25/month (about €22) for a use on 1 website, or $300/year (about €266).
Elementor is not a page builder specializing in landing pages, but it has a lot of them. And it’s still the most famous page builder in the official directory (more than 5 million active installations).
If it doesn’t offer an unlimited and lifetime version, its most extended offer, called Expert, allows to use it on 1,000 websites at most, and costs $199/year (about €179).
Our final opinion
After reviewing many elements (operation, design, templates, in-house theme, user experience, price), it’s time to go over the strengths and weaknesses of our page builder of the day.
I’ll finish by telling you who it’s intended for, and in which case I think it’s appropriate to use it.
Strengths of OptimizePress
- The online editor of the page builder is very pleasant to use, intuitive and easy to learn: the learning curve is relatively fast.
- The aesthetic design of the templates.
- An adequate tool to create landing pages.
- A page builder suitable for beginners: it can be used without any technical knowledge of code.
- The responsive aspect of the page builder.
- Integration with many third-party tools (e.g. newsletter services).
- User help is abundant, whether it be through the hundred or so videos available, or the online documentation.
OptimizePress limitations
- OptimizePress is specifically dedicated to marketers. If you want a generalist page builder, this will not be the most suitable
- The number of templates offered is less than other page builders such as Elementor, Thrive Architect or Divi.
- OptimizePress is not a Theme Builder, as some Pro versions of famous page builders (e.g. Elementor, Divi) offer. With it, you can’t build a website by acting on the header and footer as well. You can only customize the content. Which by the way is logical, in itself: most templates are landing pages. And a good landing page usually has neither header nor footer, to avoid distracting the visitor as much as possible.
- On my test website, I encountered slowdowns during use. The loading time to create and edit a page was sometimes very, very long (more than a minute at times!). And the page had difficulties loading several times. In terms of user experience, I’ve known better. But, as indicated, it’s hard to say that it is the main culprit. One thing remains: once OptimizePress was disabled, I had no more problems loading my website.
- Its price to use it on several websites remains high. Let’s say that for a single use, it’s in the market prices ($99/year). But if you want to use it for customers, it’s going up fast. And their policy on this matter is not very clear, to say the least.
- It is not possible to do A/B testing, except with the Suite plan. That’s pretty annoying for a marketing tool. As a reminder, A/B testing allows you to test two different versions of the same content (e.g. a form) to see which one converts the best.
Who is OptimizePress for?
As explained in its Frequently Asked Questions, “OptimizePress is designed for business owners, marketers, designers, bloggers, influencers and almost anyone who wants to grow their business with better landing pages and sales funnels.”
Personally, in the same range, I prefer Thrive Architect, which I find even more complete, but also more economical.
If you’re absolutely looking for a page builder and you’re not “obsessed” by the marketing aspect, I recommend you rather opt for a more generalist page builder like Elementor, Divi or Beaver Builder.
Even if you want to get your hands a little dirty when creating landing pages, these three will also offer you a lot of ready-made templates. They’ll be more complete and also cheaper if you want to use them on multiple websites.
From now on, I’ll leave it up to you. Let’s continue the discussion in the comments: what do you think of OptimizePress? Do you have anything to tell me about it? Feel free to share your point of view with me.

Receive the next posts for free and access exclusive resources. More than 20,000 people have done it, why not you?
Continue reading
Articles posted in WordPress PluginsOur review of B2BKing: A WooCommerce plugin built for B2B commerce
“Hi, I need 200 units of this product with fast shipping please”. As an online store owner, receiving this kind of message puts a smile on your face. Answering it, on the other hand, becomes a lot less fun… Basically,…
GTranslate on WordPress: our full review of this tool for creating a multilingual site
“Hello, how are you?” “What do you think of this computer mouse?” For you, everything is easy to understand in these two sentences. For someone living deep in the Shetland Islands or Yucatán, it’s probably a bit more complicated… If…
Air WP Sync: Test and review of this plugin for integrating Airtable into WordPress
Do you use Airtable and WordPress? Then some of your days probably look something like this. In the morning, you update your Airtable database as soon as something changes. In the afternoon, you copy and paste the same data into…