You know what a funnel is, right? It’s “a tube or pipe that is wide at the top and narrow at the bottom, used for guiding liquid or powder into a small opening”, says the Google definition.
But the funnel is not limited to a use in your kitchen or garage (yes, you could use a funnel to change the oil on your car for example).

But today it’s about another type of funnel that smells more of marketing than of exhaust pipes. I’m talking about the famous sales funnel.
When used properly, the sales funnel can help you get more leads, sell more, and boost your revenue.
A handy plugin called Cartflows can help you create this funnel and automate it. Even if you’re starting from scratch. And even if you don’t know much about marketing.
Fantastic? Well, that’s what you’ll discover in this detailed test. The goal at the end of your reading: to understand everything in the sales funnels.
Overview
This article contains affiliate links. This means that WPMarmite will earn a small commission if you buy plugins or translations through our links. It doesn’t cost you any extra money and it helps reward the research and writing work of the editors.
To learn more about our affiliate policy, check out this resource.
What is Cartflows?
Cartflows is a freemium WordPress plugin that makes creating sales funnels quick and easy. It requires WooCommerce to be activated and uses ready-made templates that can be activated in 1 click and can be customized with most page builders on the market.

A page builder is a plugin or a theme element that allows, thanks to modules (image, text, button, video, etc.) and ready-to-use page templates, to design your site without coding. It is very often used in drag and drop.
As explained on the homepage of its dedicated site, Cartflows aims to make you “generate leads” and “increase conversions & maximize profits”.
A lead is a business contact registered with a prospect. A conversion is a specific action you want your visitor to take (e.g. download a white paper, sign up for a newsletter).
Does this make you drool? Wait, Cartflows makes your mouth water even more by stating that you can hit the mark without even needing to “invest more money in paid advertising or generate more traffic…”.
And I saved the icing on the cake for last. Cartflows promises to turn “your WordPress website into an optimized selling machine“. Well, that’s just it.
As you can see, we’re dealing with seasoned marketers to promote their product. And not just anyone, you’ll see.
A solution to “frustrations”
Behind Cartflows, there are two big names:
- Sujay Pawar, the co-founder of Brainstorm Force, the company that created the famous Astra theme (1M+ active installations).
- Adam Preiser, one of the most famous shaved heads in the WordPress sphere. Preiser is the founder of WPCrafter, a site that teaches non-technical people how to use WordPress.
Frustrated with the product/service buying process on WordPress that they felt wasn’t optimized enough to drive conversions, the two decided, starting in October 2017, to create a plugin to “make ecommerce easier, more profitable, while still being a pleasure to use”.
Since then, Cartflows has been endorsed by some of the top names in the WordPress ecosystem, from Chris Lema to Dave Foy and Troy Dean (Agency Mavericks, former WP Elevation).
The latter even talks about “the most exciting WordPress product he has discovered in the last few years”.

One plugin, two versions
The praise from users continues on the plugin’s page on the official directory.
At the time of writing, Cartflows was collecting rave reviews: an overall rating of 4.8 out of 5 stars.
If you are already looking forward to using this plugin, you should know that it comes in two versions:
- A free version (Cartflows free) available on the official directory (200K+ active installations). It will allow you to create custom sales funnels, but you won’t have all the possible options (I’ll come back to this later). Think of it as a gateway to start using Cartflows.
- A premium version starting at $239/year. At that price, you’ll get the full-featured plugin with no limits.
Since the beginning of this article, there might be a term that intrigues you: the sales funnel.
This marketing concept is the main theme of today’s article.
In order to fully understand how Cartflows works and what happens next, I think it is necessary to understand what it means and to give you some basics, even if they are very quick.
This is the purpose of the next part.
What is a sales funnel?
A sales funnel is the path taken by a website visitor, from the discovery of your product or service, to its purchase.
You will also find it under the name of “pipeline“.
In the course of this journey, the future customer goes through 4 stages, which can be illustrated by a funnel. This is also known as the AIDA method, and you will understand why:
- Step 1: Awareness. This is the awareness phase. Your prospect has just discovered your website, for example via a Google search. For the moment, he is “cold” and is at the top of the funnel.
- Step 2: Interest. At this stage, your prospect shows an interest in your products or services. Basically, he says to himself: “Oh, that’s not bad what he is doing. Maybe I could even use it.” Relationships warm up a bit, here he has slipped into your funnel a bit. But there’s still work to be done to convert him into a customer.
- Step 3: Decision. This is where things start to heat up. Your prospect studies in detail what you offer and decides if he will buy your product/service. Look, he’s slipped a little further down your sales funnel.
- Step 4: Action. We get to the end of the process, it burns: the prospect finally takes action (e.g. purchase your product or service, etc.). He becomes a customer. Congratulations, you’ve guided him to the end of your funnel.

Without going into detail, since this is not the point here, you should know that some prospects never leave the top of the sales funnel, and others only discover it at the end.
Finally, to make your funnel as effective as possible, it is necessary to know your target and its habits, while creating content adapted to each step of the funnel.
For example, marketers usually use a blogging strategy by creating articles during step 1 of the funnel (Awareness).
Ok, that’s enough for this aside, which I thought was necessary. Now let’s get back to Cartflows.
Find out how it works and what you can do with it.
How does Cartflows work?
One of the great things about Cartflows is that it integrates directly with WordPress.
You set it up directly on your admin dashboard, without having to go through a third-party site.
This is a good thing: it limits the need to go back and forth, you find all your settings in the same place, and you don’t have to waste time learning how to use a new platform.
Normally, if you follow WPMarmite carefully, you know a little about WordPress. 😉
To know how to create a professional WordPress site in 5 steps, check out our complete guide.
Cartflows requires WooCommerce
Note that there is a prerequisite for Cartflows to work: you need to have WooCommerce enabled on your site/blog.
WooCommerce is the most famous WordPress ecommerce plugin (7M+ active installations on the official directory).
Basically, it adds ecommerce features to your WordPress site.
Then, the creators of this plugin to create a sales funnel on WordPress indicate that no matter what your level, a funnel can be up and running in… 20 minutes.
For the time being, this leaves me rather doubtful and seems illusory but, after all, why not.
You will see later, when I test it, if the promises have been kept.
Why bother with Cartflows if you already have WooCommerce to sell?
From a technical point of view, WooCommerce allows you to sell the products/services of your choice. It’s a great tool to do so.
But from a marketing point of view, it’s not super optimized to move your visitors from one step to the other of your funnel and maximize conversions.
That’s a shame, even more so if I tell you that nearly 70% of people who start a checkout process don’t finish it. This is called cart abandonment.
And it turns out that one of the main reasons for cart abandonment is that the checkout process is too long or too complex.
This is one of the reasons why Cartflows proposes to act on this aspect. In order to discover all its options, please see below.
Cartflows: features that stand out
A page builder-friendly plugin…
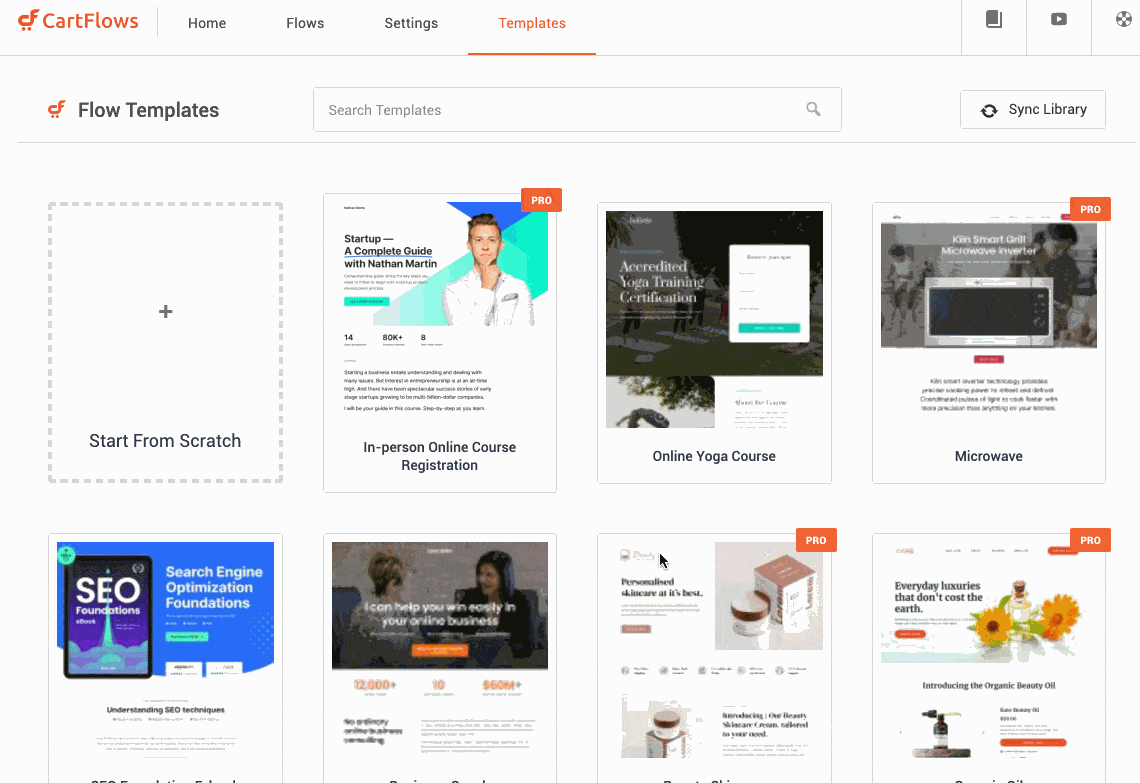
To make your life easier and to make the process of creating your sales funnel as fast as possible, Cartflows offers nearly 40 templates ready to use, of which a dozen are free (usable without going through the Pro version).

These templates can be activated in 1 click and are divided into several categories. You will find:
- Landing page whose objective is to convert your visitors by encouraging them to download content (ebook, white paper, etc.), to subscribe to a newsletter, or to buy a product or service.
- Checkout page.
- Thank you page.
- Pages for upsell and downsell (I’ll come back to this).
- A page to collect emails from your visitors (optin page).
Among the templates present, we will note for example the presence of a page to incite you to buy a microwave, or another to promote a moisturizer.
Now, what if your business has nothing to do with these areas? Let’s say you sell cat food instead of dog food?
No problem! Cartflows uses a flexible shortcode system that allows it to work with any page builder. So you can change the visual aspect of your content as you wish, even if you use Brizy, for example.
By activating Cartflows, you will see that it offers you templates compatible with Elementor, Beaver Builder and Divi. Obvious, these are the 3 most used page builders on the market.
It is also possible to access templates for Thrive Architect, but you have to download them from your customer account. For the moment, they are not yet available on the settings interface of the plugin, on WordPress.
… and compatible with the WordPress content editor
In the first version of this article, I explained that Cartflows was planning to launch templates compatible with the WordPress content editor (Gutenberg).
This was missing and in the meantime, the Cartflows team has taken action. By activating the Ultimate Addons for Gutenberg plugin, you can now take advantage of some page templates to create your funnel with the content editor blocks.
In addition, you also get access to the page templates offered by this plugin. There are about 80 of them, and even if they are not landing pages, you can use them as a basis for your funnel pages by redesigning them.

A conversion-optimized checkout process
Creating your sales funnel pages with the page builder of your choice is already a great asset. For the design part, it’s clearly a big plus.
On the marketing/sales side, you won’t be outdone either. Among the features to be detached, I could mention:
- The addition of product offers (on sale or not) on the checkout page, at the time of the order. This is called an order bump.
- The customization of the fields on your payment form. By limiting them as much as possible, you can increase your conversions.
- The possibility of making additional sales. On the one hand, via upselling by offering “a higher-end version of a product than what they originally intended to purchase”, according to this site.
On the other hand, via downselling, i.e. offering a product that is less expensive than the one your prospect was initially interested in, and that he did not buy.
Basically, we kick him in the butt by saying: “Hey, don’t go so fast, I have another great thing to offer you even cheaper than what I showed you at the beginning”.
Not bad, right? And that’s just the beginning. Find out below how to set it all up technically.

How to create a funnel with Cartflows in 6 steps
Step 1: Install and activate Cartflows
On the presentation page of the plugin, Cartflows promises to create a sales funnel in 20 minutes. It’s time to check if this is true.
To start, you need to install and activate both versions of the plugin on your WordPress installation:
- The free version available on the official directory.
- The Pro version.
You will find both of them in the customer account of your Cartflows account. Of course, if you don’t want to use the Pro version, the plugin will work by activating only the free version.
Once the Pro plugin is activated, you will be asked to add your License. Thanks to it, you will benefit from the plugin updates.
Step 2: Installing WooCommerce
Is the plugin working for you? Very well, I suggest you now move on to its configuration.
To help you, Cartflows takes you by the hand by providing you with a setup wizard.
There are 5 steps to follow to make the product operational. For example, Cartflows asks you to choose a page builder among Elementor, Beaver Builder and Divi.
And, most importantly, it asks you to install WooCommerce. As you recall, the ecommerce plugin is required for Cartflows to work.

You can go here for an automatic installation. However, be careful: remember to check all the settings afterwards.
For example, by default, WooCommerce will be set for a physical store based in the United States, with the US dollar as currency.
But you can install WooCommerce separately, without going through the Cartflows configuration wizard. It’s up to you and your desired settings.
Step 3: Create a flow
The next step is to create what Cartflows calls a “flow”. This is an in-house nomenclature for a sales funnel.
If you want to create a funnel to encourage the purchase of a product, remember to add it to WooCommerce beforehand so that your checkout page can work properly. Regarding the payment gateway, Cartflows recommends the use of Stripe but PayPal will also work without any problem.
In the Cartflows menu located on the left column of your administration, select Flows > Add New.
Cartflows offers you 15 ready-to-use templates (10 usable with the free version and 5 present only in the Pro version, if you have chosen to create your pages with Elementor). They correspond to your future landing page.
I select the template called Evergreen Product 02, which corresponds the most to what I would like to do with my landing page (present a WPMarmite t-shirt). When you click on the “View all steps” button, you’ll get to a page that shows you 3 templates:

Click on the “Import Flow” button on the top right of the page, then give a name to your flow.
Now you can see that Cartflows has created a funnel with 3 steps:
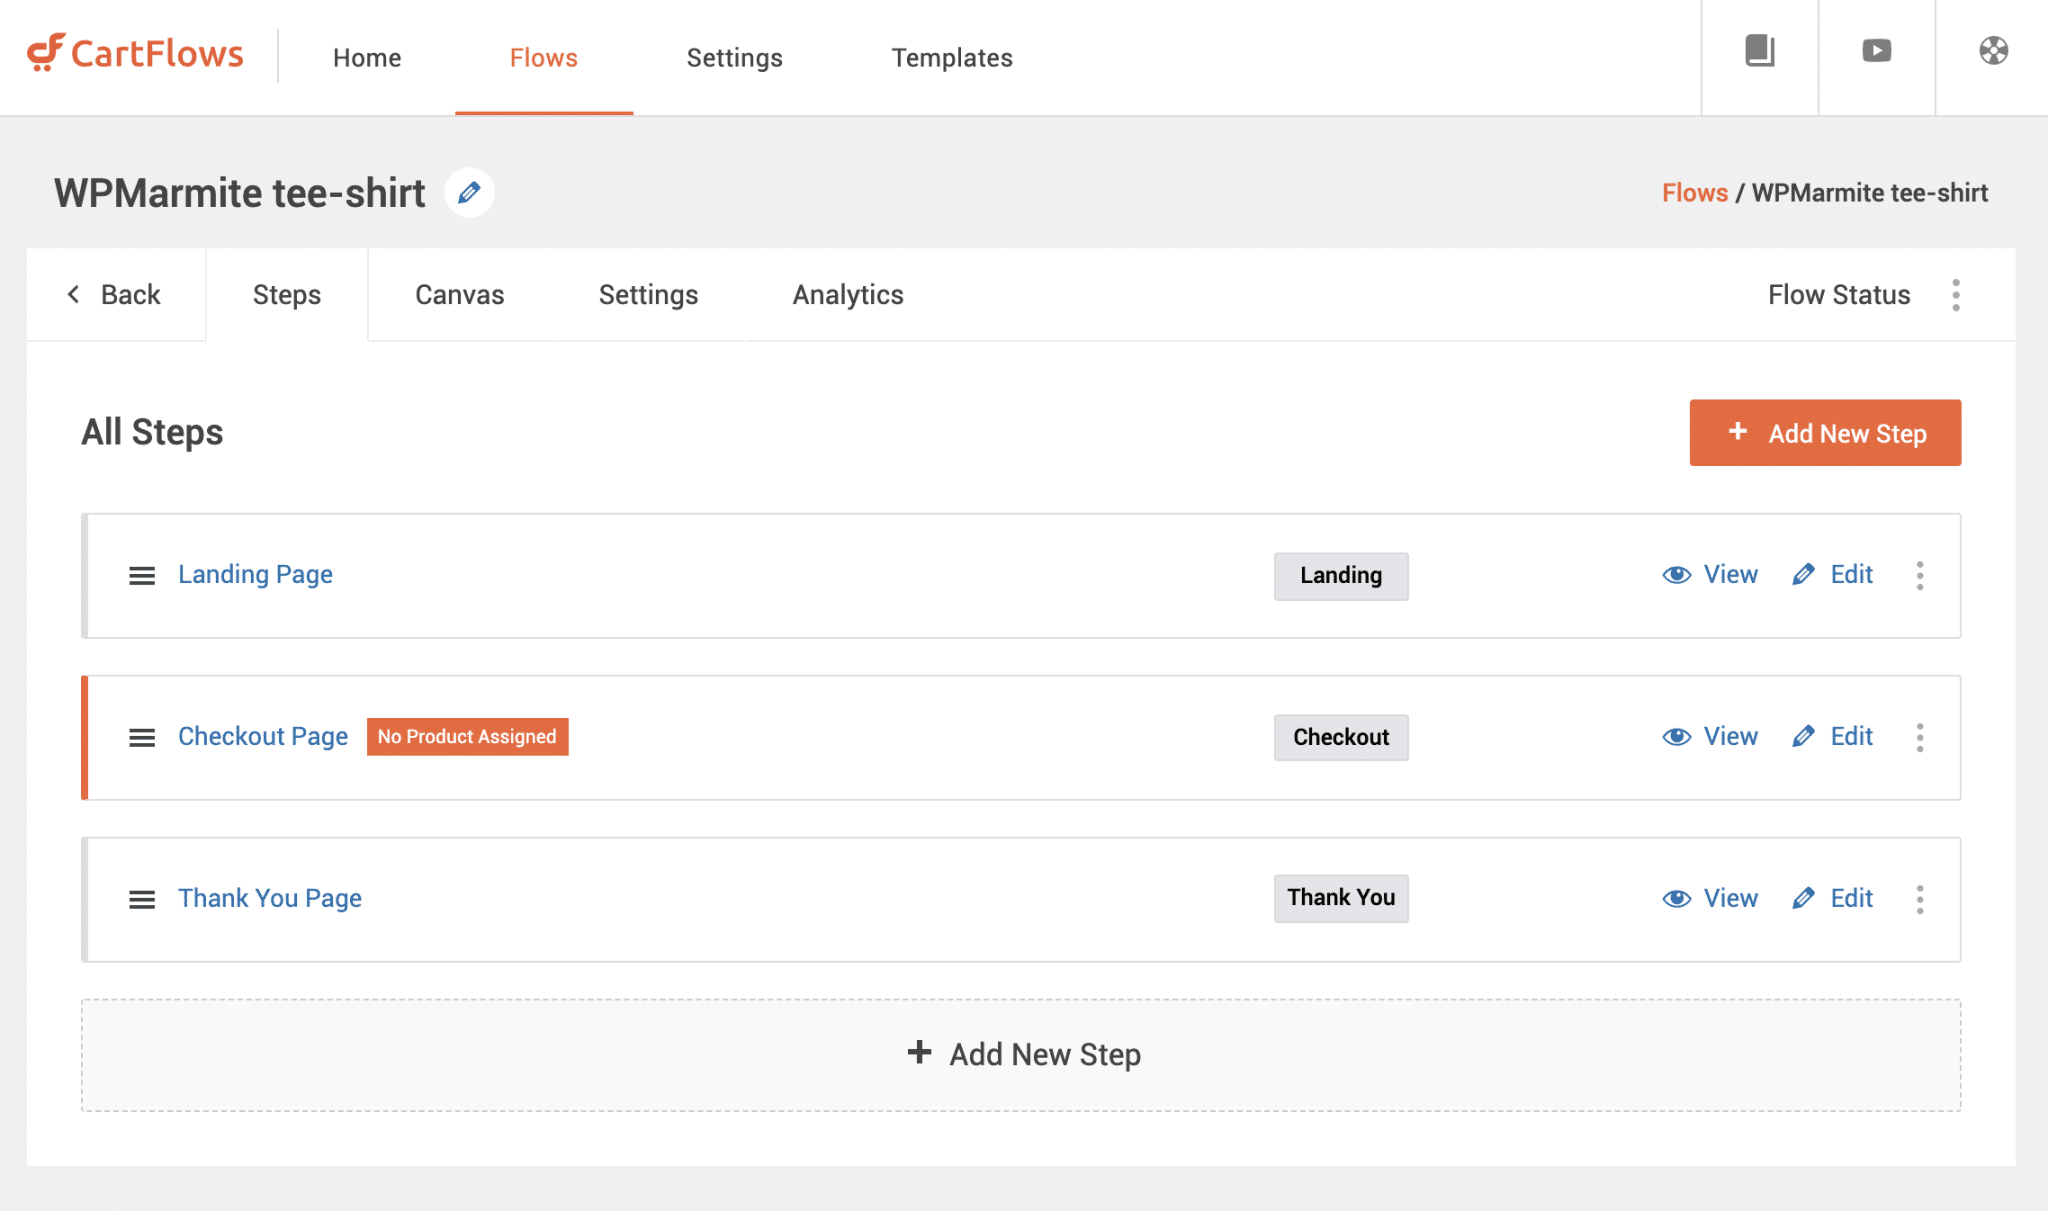
In detail, you have for now:
- A Landing page to present your product to your visitors. Of course, you can (and should) modify it as you wish using your page builder (in my case Elementor, which I had chosen during the setup phase on the configuration wizard). To do this, click on “Edit”.
Note that it is also possible to create any page of the funnel from scratch.

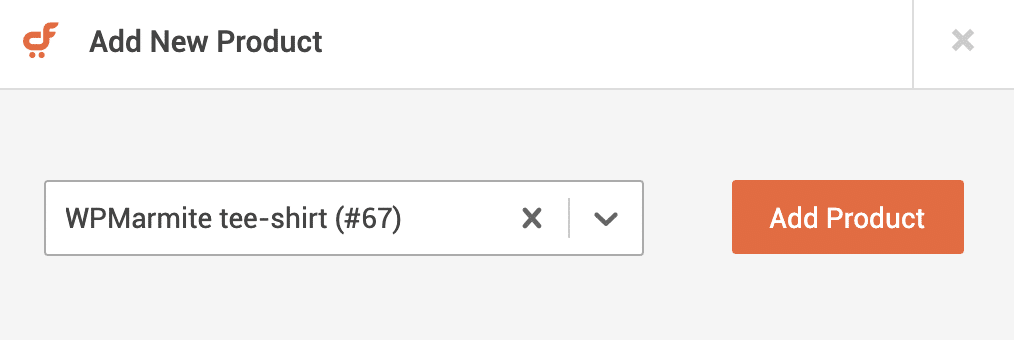
- A Checkout page. For the moment, no product is assigned to it. You can add one by clicking on Edit > Products.
- A Thank You page. It will be displayed once your visitor has purchased the WPMarmite t-shirt.
You could stop there: your funnel would be operational like that. But one of the big assets of Cartflows, as mentioned before, is its additional options and especially the upsell and downsell, to make a coupled sale.
However, be careful: they are only available with the Pro version of the plugin.
Step 4: Adding an upsell and/or a downsell
You want your future customer to buy your WPMarmite T-shirt, but why stop there?
Maybe he wants a more complete outfit, with a matching jacket, for example? Yes, you can look good with WPMarmite, don’t you think?
Offering this option to your visitor is a no-brainer. It is possible thanks to the addition of a new step in your funnel (click on the “Add new step” button of your flow).
Choose one of the proposed templates (4 in all) in the “Upsell (Woo)” tab.

Then, as for the payment page, you just have to add the product of your choice. Once your visitor has bought your first product (the T-shirt), he will be offered a new one (the jacket) just before the thank you page.
You can proceed exactly the same way if you want to make downsell. The only difference is that you will only have one template.
Logically, the Upsell step can only be placed after the payment page. As for the Downsell step, it can only be placed after the Upsell step: Cartflows will offer a cheaper product in case your customer refuses to upsell.
Step 5: Add an order bump
Another trump card to put new products under the nose of your visitors: the order bump.
You can set up a promotional offer in the settings of your checkout page, in the “Order Bumps” tab.

We particularly appreciate the possibility to:
- Position this offer in 4 different places on the page (before/after the payment, after the order, before the billing details).
- Add a descriptive text and a photo.
- Customize the colors (background, text, description, border etc.).
- Add conditions to display the order bump only if the buyer has done something (e.g. if he has previously purchased a product costing a total of $X, if the country for delivery is such and such a country, if he has used such and such a coupon etc.).
Step 6: Add an opt-in
We end this process of creating a funnel with a last step, available with both the free and paid versions of Cartflows: the opt-in.
It is intended for a specific type of use: lead generation.
In short, the Opt-in step of your funnel allows you to propose a form to collect the email address of your visitor, so that he can download a free product (an ebook, for example).
This opt-in will be placed after your landing page and before your thank you page and will launch the download of the product of your choice.
In order for it to work, you must link it to a virtual or downloadable product sold for $0.
Congratulations, you’ve just gone through all the steps you can create with Cartflows.
So, does it deliver on its promise of setting up a funnel in 20 minutes?
Technically, yes. It’s doable if you touch very little of the text and design. You can even go faster than that.
But if you want a truly personalized result, don’t think that 20 minutes will be enough. If your goal is to boost your conversions, you’ll need a couple of hours to design everything from scratch (design, texts, WooCommerce settings etc.).
Bonus step: say no to cart abandonment
To go even further and optimize your conversions, the Cartflows team also offers a super-practical third-party plugin to fight cart abandonment: WooCommerce Cart Abandonment Recovery.
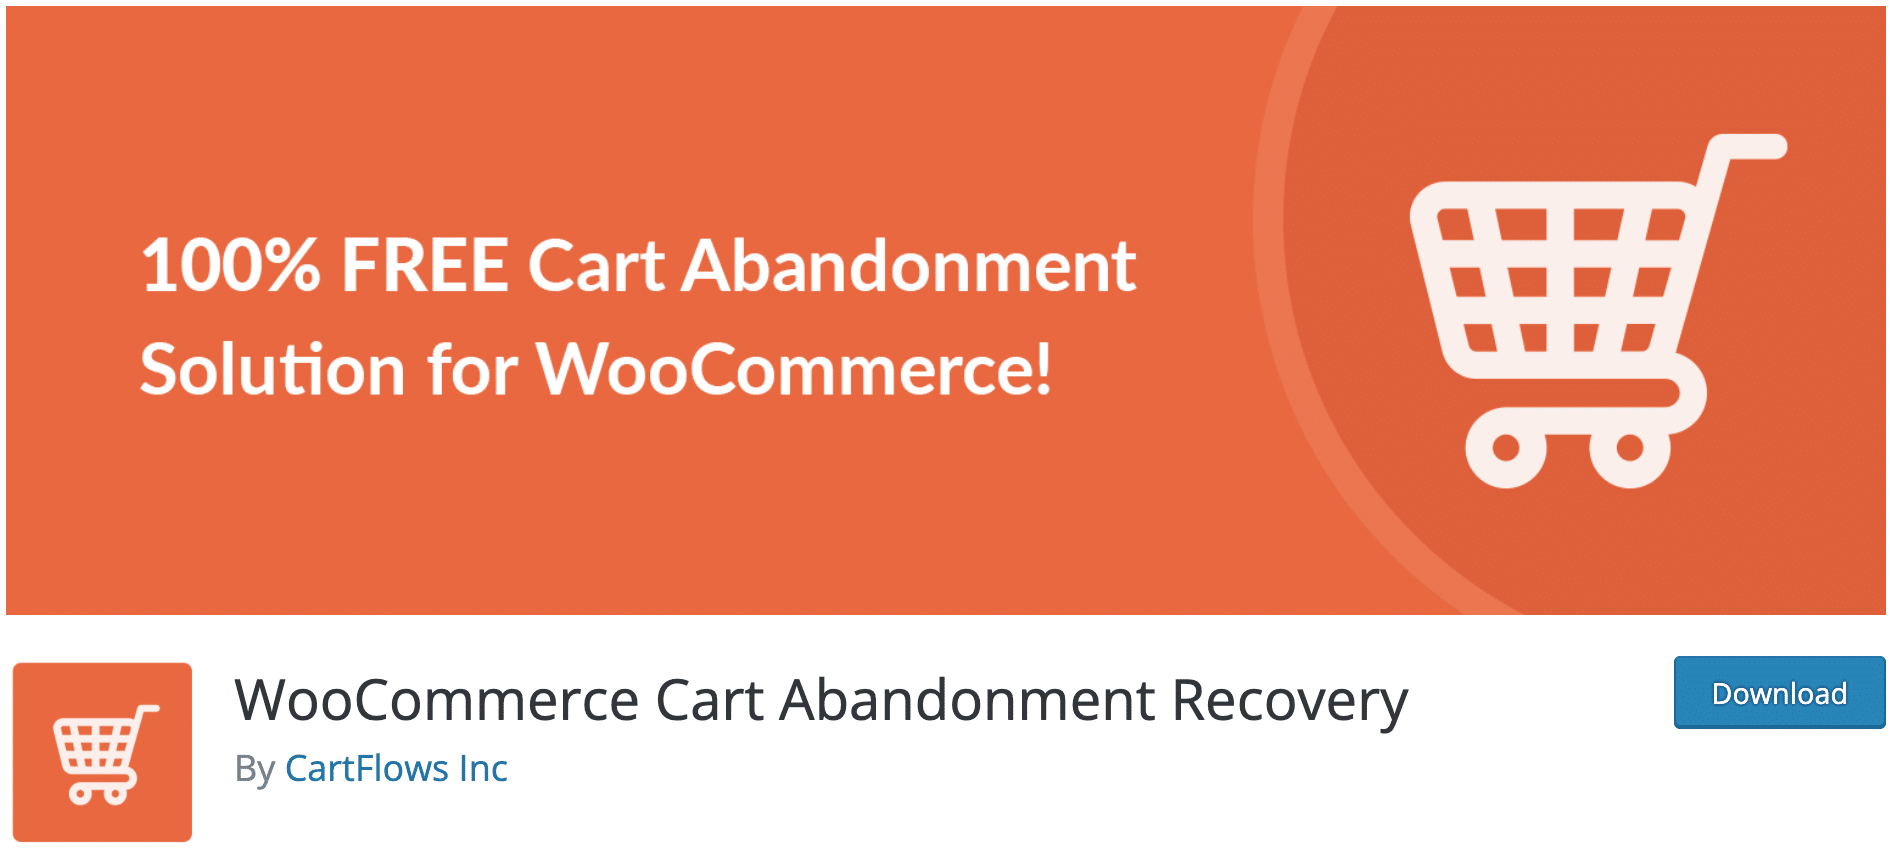
Note that it will be installed automatically if you go through the setup wizard. You will find a link to its settings via the WooCommerce menu on your admin:

The plugin works like this: once on the checkout page, if your user has not proceeded with the purchase, he will receive one or more emails (provided you have previously filled in an address in the billing details) in order to prompt him to take action, to offer him a discount, or to ask him for a reason for not purchasing.
You never know, in case he fell asleep on his keyboard, a little reminder never hurts, what do you think?
You are free to modify the text of each email and, above all, to indicate how long it will be sent after the detection of the cart abandonment.
With this plugin, be careful about the compatibility with the GDPR (General Data Protection Regulation). If the user has not purchased, it means that he has not agreed to the General Terms and Conditions of Sale, and therefore he has not given his consent to receive an email. In this case, filling in his email will not be enough.
Now, without any transition, let’s review the advantages and disadvantages of Cartflows.

Let’s debrief: Cartflows in use, what is the result?
After getting my hands dirty, here is my opinion on this plugin. I’ll come back on what I liked and what I would improve.
The pros of the plugin
On the handling side, the plugin is very pleasant to use and especially easy to handle.
Clearly, the Cartflows team has put a lot of effort into the user experience by trying to imagine themselves in the shoes of a beginner funnel creator. And they succeeded.
On this point, I particularly liked:
- The drag-and-drop interface to change the positioning of each step of your sales funnel.

- The setup wizard to help you configure the plugin after its activation.
- WordPress integration: you don’t get lost and you don’t have to go back and forth to a third-party software. Everything is on your Dashboard.
- Settings reduced to the bare minimum of the menu. Thank you for avoiding us to enter a Rube Goldberg machine by proposing only three sub-menus: Flows to create your funnel, Settings to set up your settings, and Templates to visualize and use page templates.
- The ease to customize your flow. 5 basic options are available: View, Edit, Clone, Delete and A/B Test.
- The possibility to perform A/B tests, i.e. design two different pages (e.g. with different texts) to see which one converts better… and thus readjust to increase your conversions.
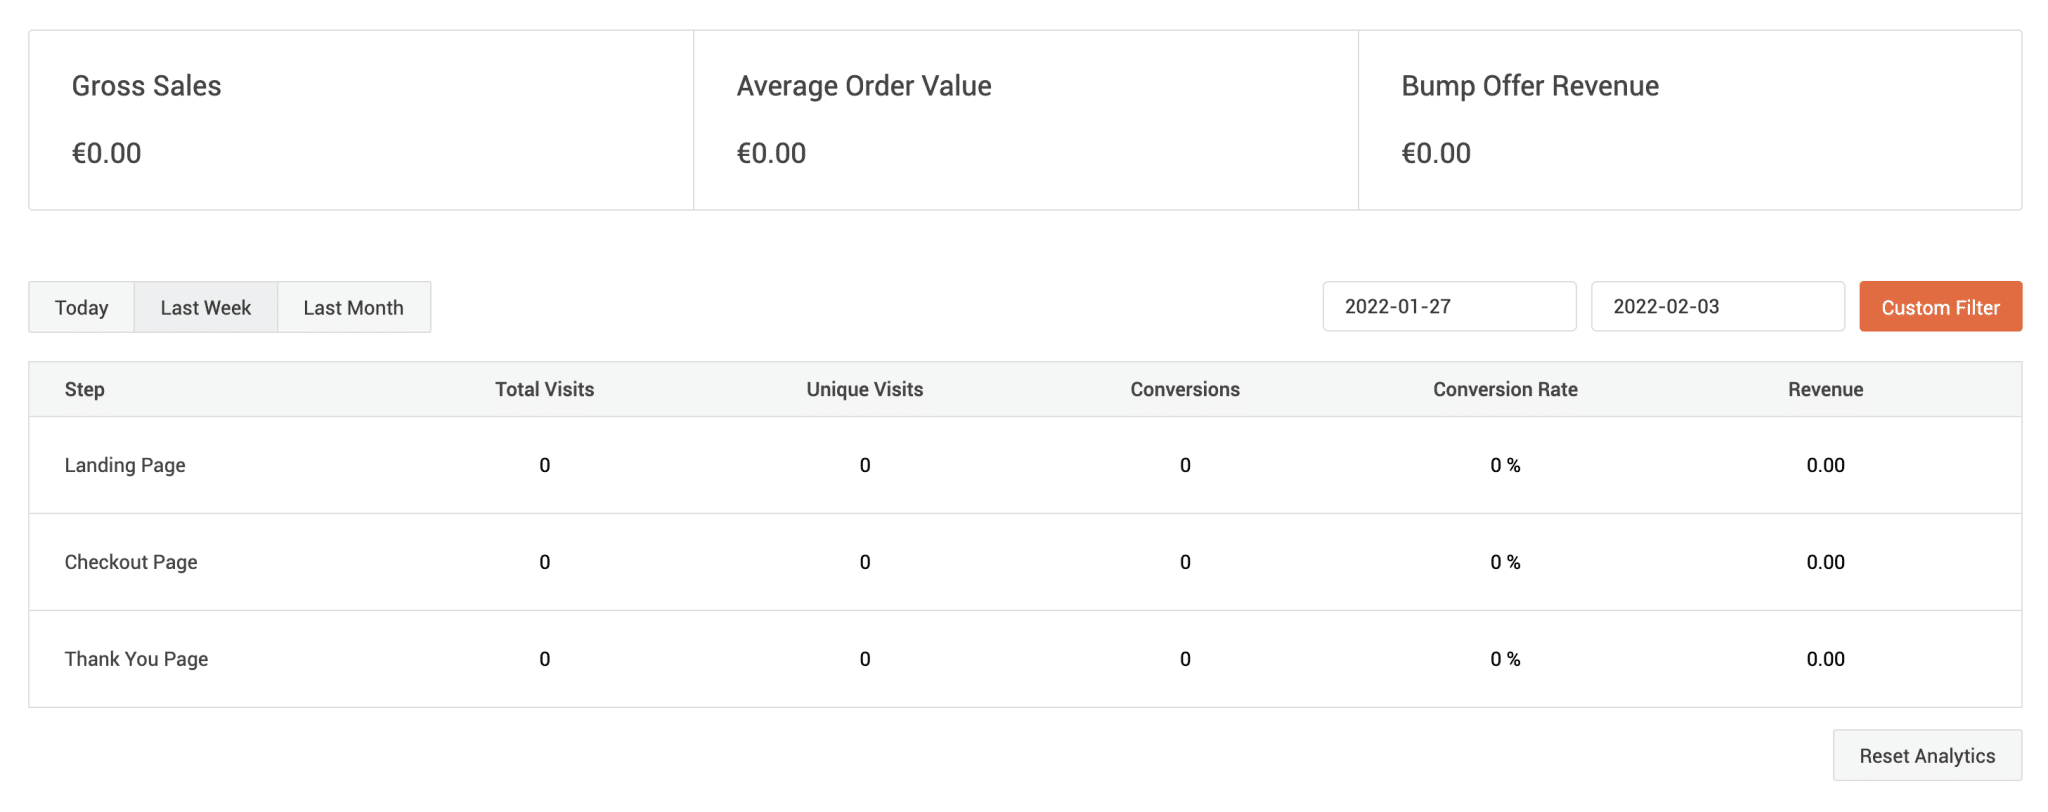
- Access to analytical data (stats) to know the number of visits, conversions and sales generated by each of your pages.
In addition, Cartflows has a very interesting feature that acts as a submarine for you: thanks to dynamic links, the plugin is able to link the different pages of your funnel together and send your visitor from one step to another without any adjustment on your part.
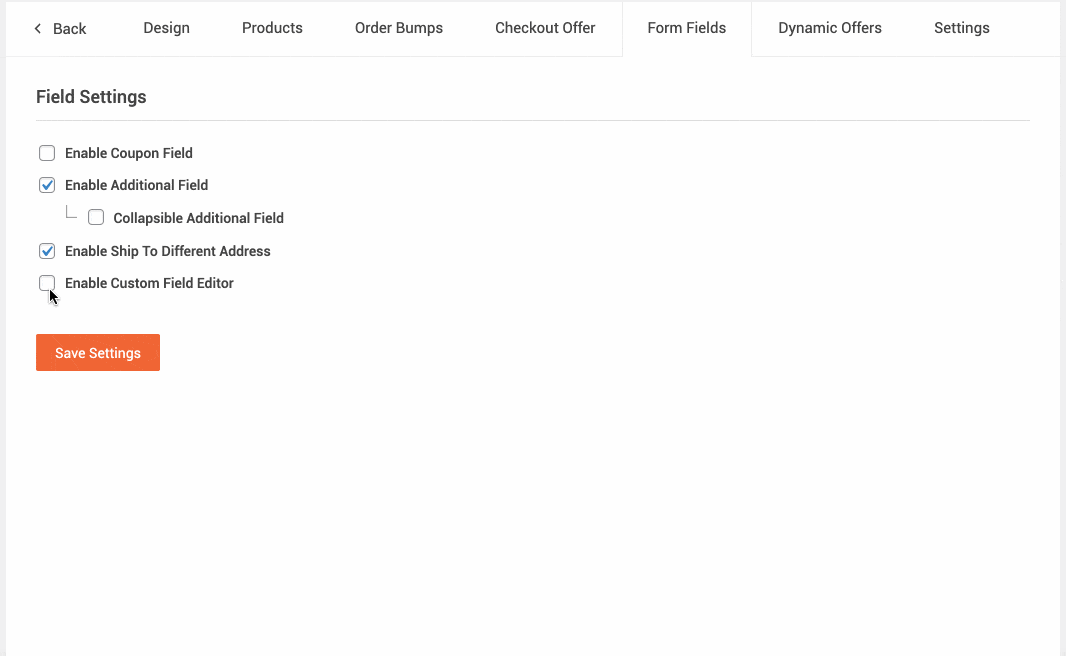
But that’s not all, I may have even better, check it out. Cartflows does not limit you on the presentation of the form fields on your checkout page. On the contrary. In its Pro version, you can:
- Add custom fields.
- Reorder them with a simple drag and drop.
- Choose to show or hide them.
- Change their labels.
In short, it’s very powerful. To activate this option and design great forms, go to your Checkout page and in the “Form fields” tab, check “Enable Custom Field Editor”.
Speaking of checkout pages, you can also use Cartflows to replace your traditional WooCommerce checkout page (only in the Pro version). I think it’s really smart.
The advantage? You can take advantage of the options to upsell/downsell and offer order bumps, which WooCommerce does not allow 100% natively (it offers related products on the Shopping Cart page, but not on the Order page).
Areas for improvement
After the good points, let’s move on to the “can do better”. If Cartflows is a good student, it can still improve on some points.
First of all, I would say that it can be improved in terms of customization. For example, the number of templates offered is not huge at the moment (e.g. 6 landing page templates for Elementor in the Pro version), as well as the number of compatible page builders (Elementor, Divi and Beaver Builder).
Although, it’s true, you can use any other page builder with Cartflows thanks to a system of shortcodes.
Also, it’s not always easy to find your way around at first, especially since some terms are specific to the marketing field.
In this case, you’ll have to go to the documentation. It is rather well done, clear and didactic.
Just like the Facebook group dedicated to the plugin (more than 7,000 members) and its YouTube channel with about 40 videos on how to use it.
To translate your theme and plugins, I recommend you to use the plugin Loco Translate.
Finally, one last thing, to end this part.
You will have to think about setting up WooCommerce if you use the configuration wizard because it will apply basic settings that will surely have nothing to do with the desired settings for your store.
Cartflows, how much does it cost?
First of all, a free version is available on the official directory. But, of course, it will not allow you to benefit from all the features offered by the plugin.
To go to the next level, you’ll have to put your hand in the wallet and opt for the premium version.
Its price? $239/year. For this price, you can:
- Create an unlimited number of funnels. However, be careful, there is a small nuance to understand: a license can be used on 30 sites at most. This leaves enough to do.
- All plugin options: premium templates, custom fields for the payment page, promotional offers on the payment page, upsells/downsells, etc.
- Access to support (personalized user assistance) and updates for 1 year. At the end of this period, you will have to check out again to continue to benefit from these last two services for another year. I recommend you to do so: for security reasons, it is better to have your plugins up to date. If you don’t want to renew, you can still continue to use the plugin.
Cartflows also has a Lifetime License – you only pay once and don’t have to renew every year – for $999.

In addition, Cartflows also has a 30-day money-back guarantee, so you can test it without risk during this period.
$239/year is a substantial investment, it’s true. Does that sound expensive? Take a look at two major alternatives to Cartflows, for example:
- Click Funnels: probably the most famous – and most complete? – to create a sales funnel. Created by Russel Brunson, it starts at $97/month, or a whopping $1164/year. That’s more than four times the price at which Cartflows is sold. Of course, I insist, the comparison is imperfect because I only compare prices here, I don’t go into all the options in detail. But this gives you a first idea.
- ThriveCart: this tool offers a Lifetime License via a one-time payment of $495. Over time, this can be interesting. On the other hand, a big drawback: ThriveCart can only be used on one domain per license. So if you want to use it for several clients, it may be very expensive…
- WooFunnels: a competitor that offers very similar features to Cartflows and can also be used directly on the WordPress interface (WooCommerce must also be integrated). WooFunnels starts at $199/year but it can only be used on one site.
Find your domain name with the help of our guide. And when you’re ready with your WordPress website, browse our selection of the best free themes.
Speaking of usage, we’ll end this article on that. Is Cartflows right for you?
Cartflows, which version and for whom?
In order to answer this question, it all depends on the use you will make of it.
In this sense, it may be useful to differentiate between the free and the paid version (Cartflows Free vs Pro):
- The free version will be sufficient to start taming the sales funnels, but it is limited, obviously.
- The Pro version will be essential if you want to maximize your conversions. Remember: the must-have features (upsell/downsell, order bumps and global checkout) are not available with the free plugin.
In conclusion, I was seduced by this plugin that will be suitable for both beginners who want to create a sales funnel, as well as more experienced marketers who want a quick, simple and cost-effective solution to build a funnel (compared to the behemoth Click Funnels, for example).
Get Cartflows:
Now, the floor is yours. Do you know Cartflows and do you use it?
Tell me all about it in the comments below.

Receive the next posts for free and access exclusive resources. More than 20,000 people have done it, why not you?
Continue reading
Articles posted in WordPress TipsWhat type of website should you build for your project? The guide to making the right choice
You want to create a website, but you’re not quite sure where to start? Don’t worry, that’s completely normal. When starting a web project, most people don’t realize just how many different types of websites exist, each designed to achieve…
How much does a WordPress site cost in 2026? A guide to setting your budget
$1,000 on your left. $4,300 on your right. And do you remember that one day you came across an offer to create a site for $7,500 not including tax?! With all these widely differing prices presented online, it’s very difficult…
The Best WordPress Plugins — the Top 25 you can’t do without
. This figure represents the number of WordPress plugins available on the official directory. And I’m not even talking about those on dedicated platforms, such as Code Canyon or independent shops. Do you have a specific need? I’m convinced that…