Speed up your WordPress site. Get a 90+ performance score on Google PageSpeed Insights. Optimize your Core Web Vitals metrics.
Do you dream of it? That’s the promise of NitroPack, an all-in-one plugin for optimizing the page loading speed of your WordPress site.
Spoiler alert: without giving anything away, we can already tell you that these declarations of commercial intent are no empty words.

To find out more about how it works, its settings and all its little secrets, read on. We’ll deliver our NitroPack review on a platter.
By the end of your reading, you’ll know absolutely everything about this plugin (installation, settings, support, pricing, alternatives etc.). Fasten your seatbelts, we’re off!
- What is NitroPack?
- What features does this plugin have?
- How to install and activate NitroPack on your WordPress site?
- How do I configure and use the NitroPack plugin?
- Does NitroPack really improve page load speed on your WordPress site?
- Support and customer service
- How much does NitroPack cost?
- What are the user reviews for NitroPack?
- What are the alternatives to NitroPack?
- Our final review of NitroPack
This article is sponsored and contains affiliate links to the NitroPack website. This means that WPMarmite will earn a commission, should you decide to use this tool.
Affiliate revenues enable WPMarmite to remunerate the research and writing work of the blog’s editors. However, we remain impartial. If a product isn’t worth it, we’ll say so (or we don’t tell you about it).
What is NitroPack?

NitroPack is an all-in-one premium plugin that automatically optimizes your website’s loading speed. It offers features such as advanced caching, optimization of images, fonts and HTML, CSS and JavaScript code, and an integrated Cloudflare CDN.
What’s important to know about NitroPack?
Here are just a few of NitroPack’s unique features:
- It’s easy to set up and use, with installation in no more than 5 minutes.
- It works automatically, with no effort on your part, 24 hours a day, 7 days a week.
- It requires no code knowledge to use.
- It works on different types of platforms and CMS (Content Management System): WordPress (and its plugin WooCommerce), of course, but also Magento, OpenCart and on hand-coded sites.
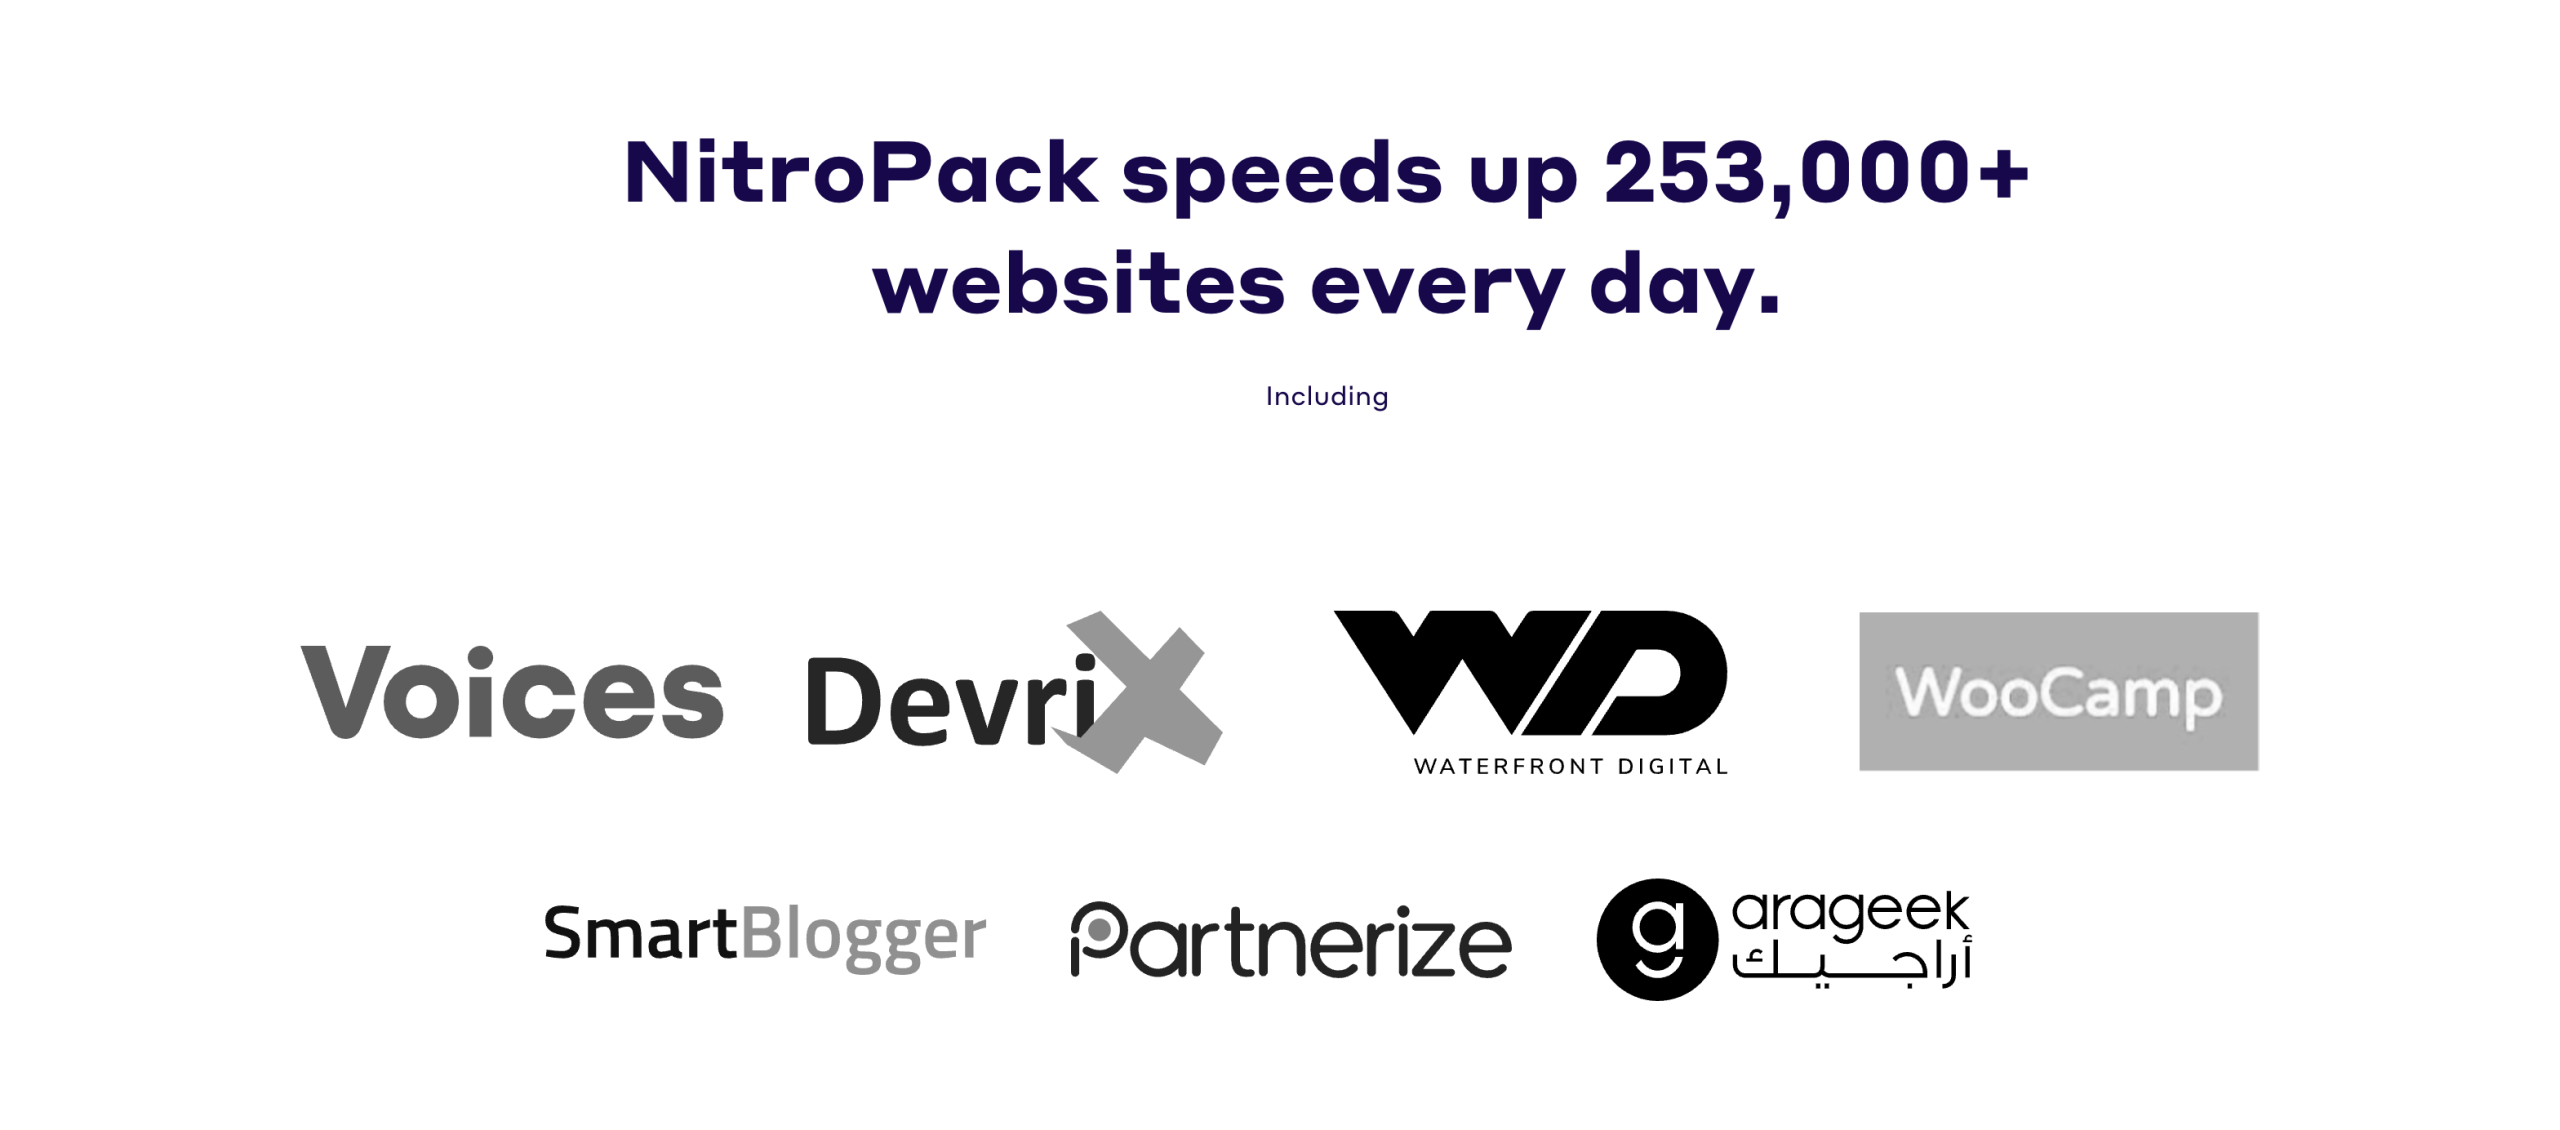
- It’s a tool with an excellent reputation, well established within the WordPress ecosystem. To date, it is used on over 250,000 sites.
- NitroPack automatically optimizes your WordPress site for Core Web Vitals, ensuring excellent load times on three key metrics: Largest Contentful Paint (LCP), Interaction to Next Paint (INP), and Cumulative Layout Shift (CLS).
- Thanks to a cloud-based infrastructure, the plugin manages all optimizations on its own servers. This allows you to conserve resources on your WordPress hosting, while improving your performance!
If you’d like to learn more about the strengths of this tool and how it works, take a look at this video presentation:
When was NitroPack founded (and why)?
Based in Sofia, Bulgaria, NitroPack’s mission is to offer everyone “an easy way to get world-class performance for their website”, says the service’s About page.
Its co-founders created NitroPack as “a service that anyone can use to improve their site’s speed”.
Launched in 2012, NitroPack was initially a service designed exclusively for OpenCart eCommerce software.
A switchover took place in 2018, with the creation of a company in its own right under the name NitroPack, and then an opening up to other CMS, such as WordPress.
Since then, growth has been exponential. By 2021, the tool was being used daily by 20,000 sites. A tenfold increase since then.
At the time of publishing this post, in June 2025, NitroPack claimed daily use on over 250,000 sites.
What features does this plugin have?
One of the reasons NitroPack is so successful is that it offers advanced features to boost the performance of your WordPress site.
These features can be grouped into 4 main families. Find out more about them:
Advanced caching
NitroPack uses two types of caching:
- Server-side caching (storage of pre-generated HTML files)
- Client-side caching (storing static resources locally on a user’s device)
In detail, its cache system includes the following options:
- automatic cache warm-up (NitroPack cache warmup): this caches pages before users interact with them
- device and cookie-aware caching
- “intelligent invalidation” of the cache (caching performed only on changes made to content)
- integrated browser cache.
Image optimization with NitroPack
- conversion to WebP
- lossy and lossless compression support
- advanced lazy loading of images, GIFs, locally hosted videos and videos on YouTube, Vimeo and Wistia
- responsive image sizing.

Code and font optimization
- HTML, CSS and JavaScript (JS) minification and compression
- lazy loading of CSS and JS
- critical CSS optimization
- DNS pre-connections
- fonts compression and lazy loading.
CDN
- integration of a CDN with hundreds of servers in over 100 countries
- Gzip compression and Brotli (a compression solution offered by Google)
- HTTP/3 compatibility.

At the time of writing this blog post (June 2025), NitroPack had also just released new advanced features:
- Dynamic Queue: available with the Pro license, it dynamically adjusts the optimization queue to prioritize the optimization of pages visited by users in real time, for an almost instantaneous loading experience.
- Instant Cache Reoptimize: available with the Pro license, this automatically updates the cache as soon as it expires, ensuring continuous optimization without interruption. In concrete terms, NitroPack monitors site modifications and proactively regenerates the cache.
- Extract large inline CSS: available with the Pro license, it automatically moves inline CSS exceeding 30 KB to an external file to reduce the page’s initial weight and speed up loading, while maintaining the site’s visual integrity.
- LCP Preload: available with the Plus package, this feature automatically identifies and preloads the Largest Contentful Paint (LCP) to reduce display time. This process improves your Core Web Vitals metrics, offering visitors a perception of increased speed.
- Lazy Load Self-Hosted Videos: available with the Plus package, this feature delays the loading of self-hosted videos until the user is about to view them, in order to save bandwidth, improve Core Web Vitals metrics, and reduce page load time.
- Animated Image Optimization: available with the Plus package, this optimization targets animated GIFs and PNGs, reducing their size without compromising their quality, to guarantee a fluid experience for visitors, while reducing loading times and bandwidth usage.
- Optimize Google Tag Manager: with this feature, available with the Pro package, NitroPack optimizes the loading and execution of Google Tag Manager by reducing unnecessary scripts and deferring their execution.
Now, you’re more familiar with this performance optimization tool. Get to know it even better by discovering how to link it to your WordPress site, in the next section.
How to install and activate NitroPack on your WordPress site?
This is one of NitroPack’s promises: “Installation takes less than five minutes”. Having done it ourselves, we can confirm that this is indeed the case. 😉
Here’s how to take advantage of NitroPack’s services on your website and start speeding it up.
Step 1: Create a NitroPack account
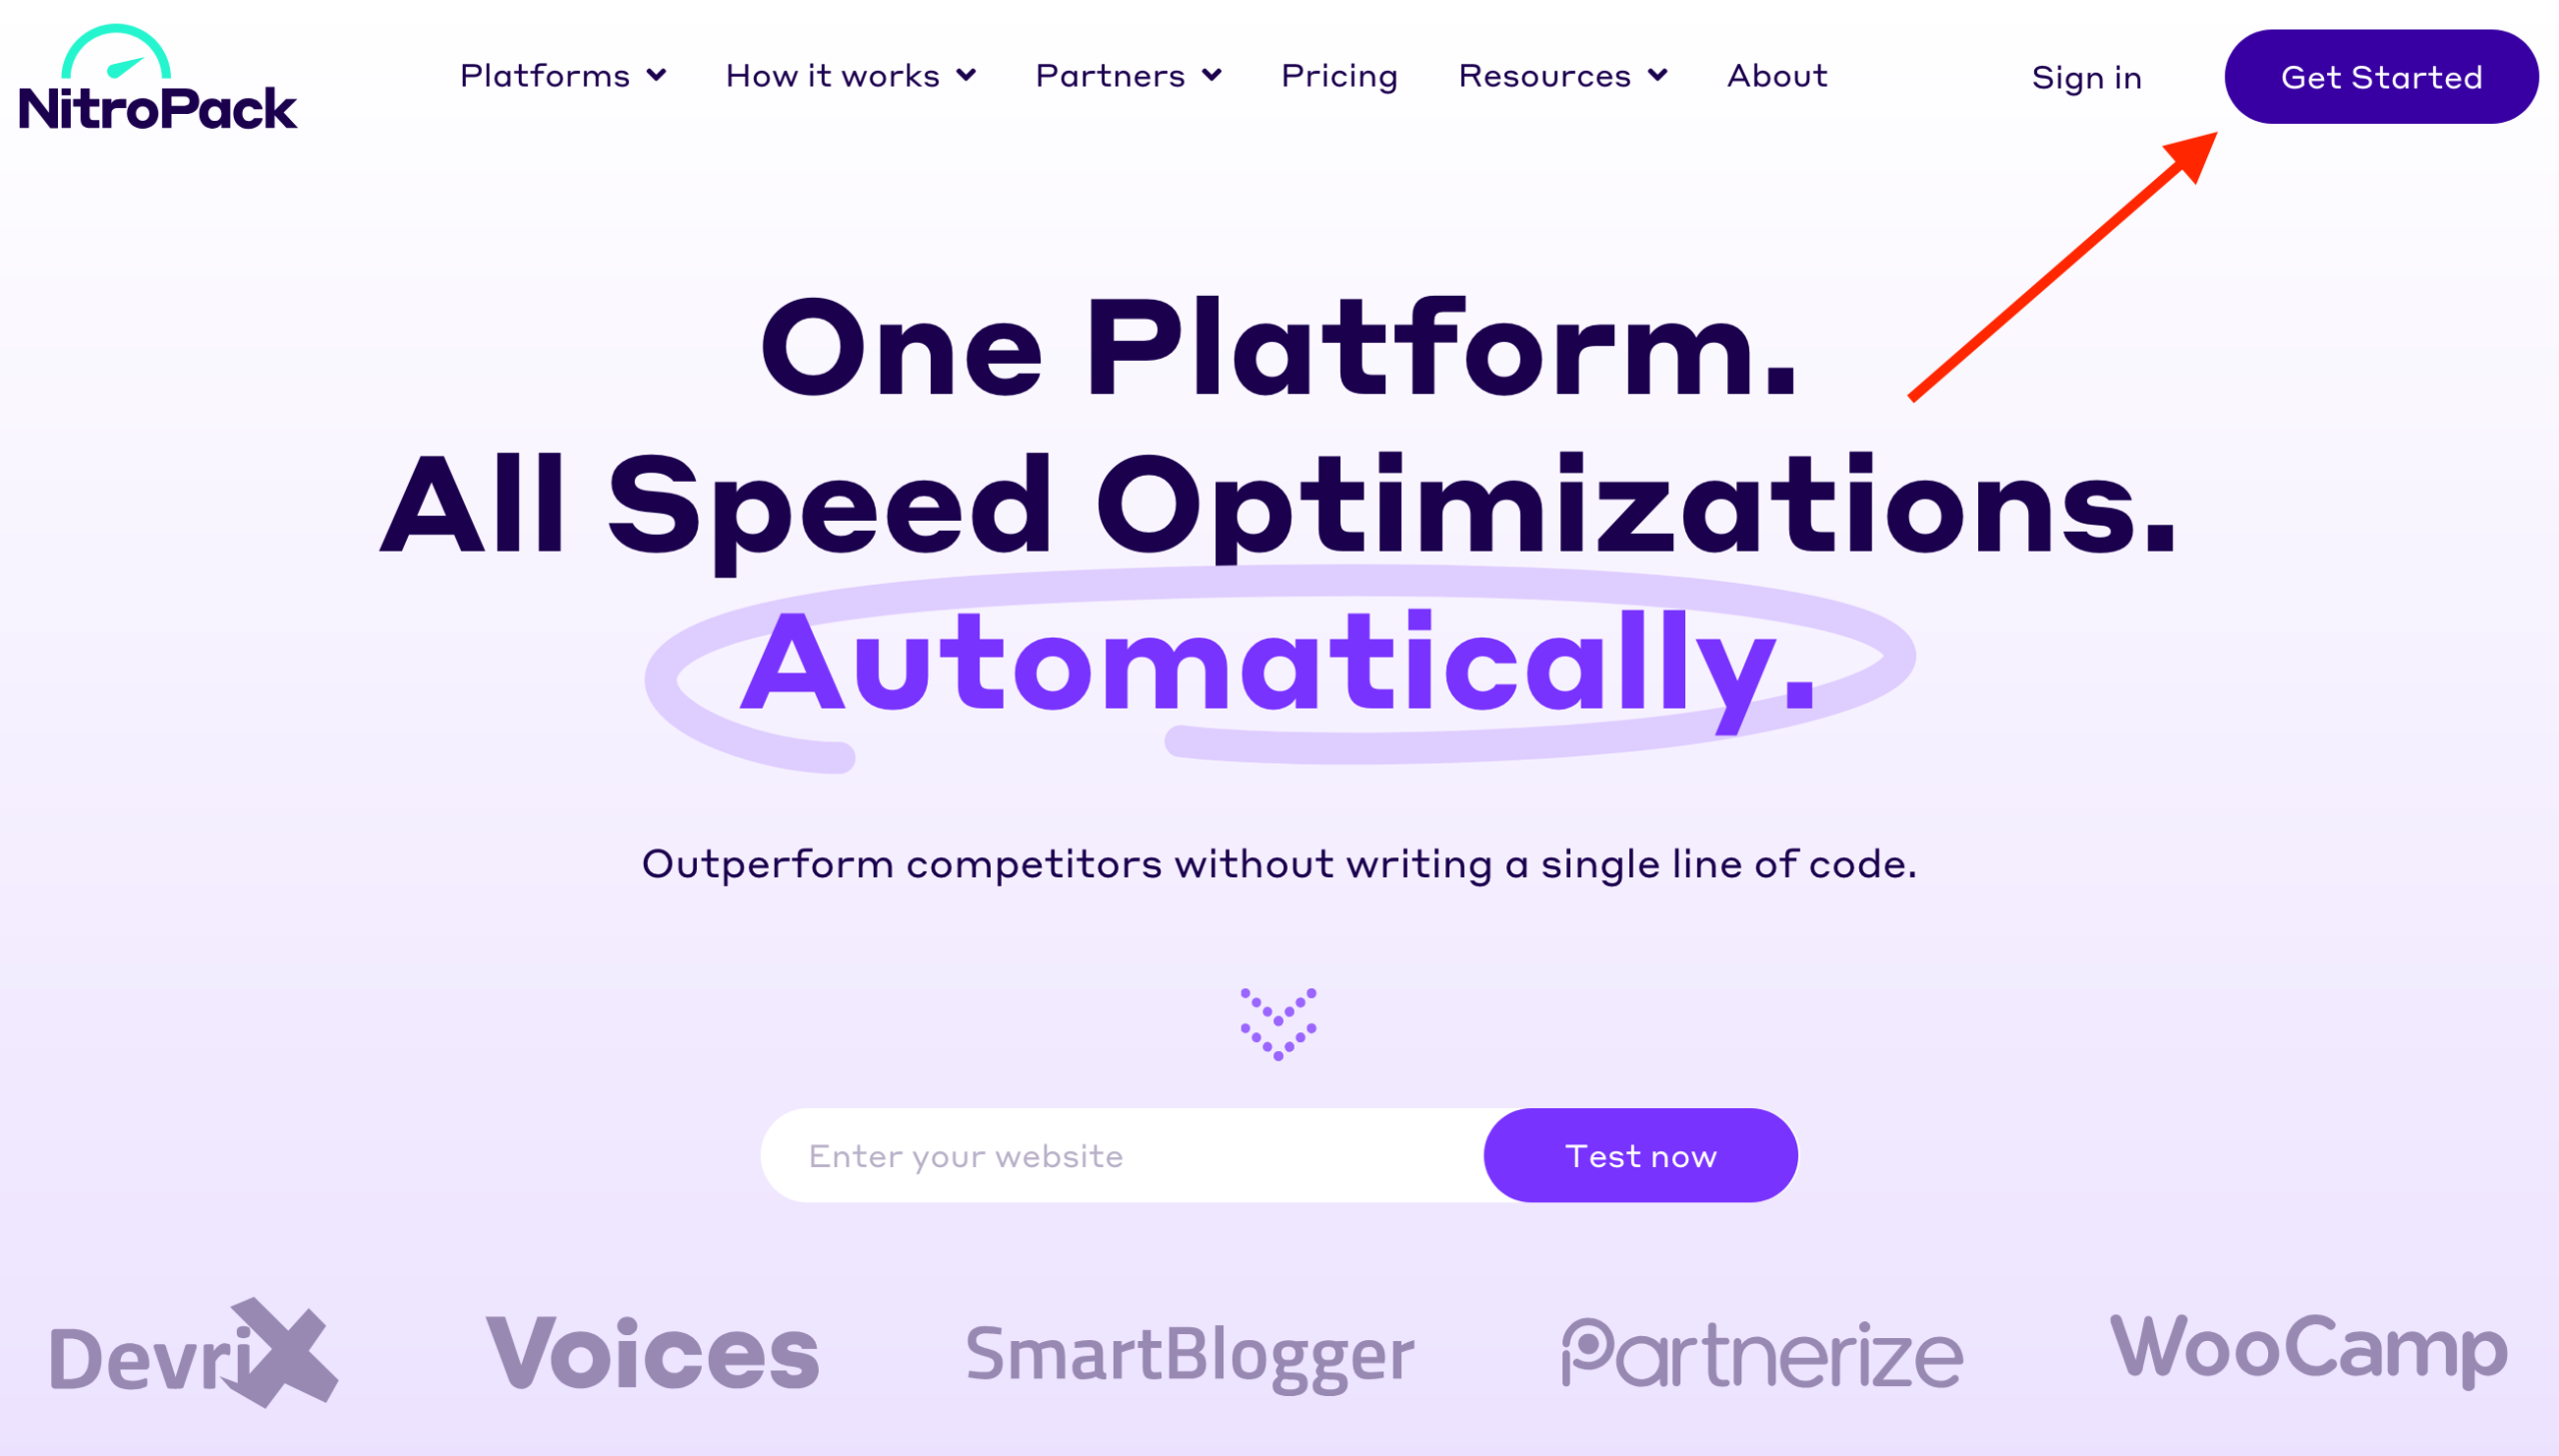
First, create a NitroPack account by clicking on the “Get started” button in the top right-hand corner of the official home page:
You’ll be redirected to the tool’s pricing page. If you’d like to use NitroPack straight away, choose the license of your choice(more info in the pricing section of this article).
Prefer to try out the tool first to see what it’s all about? NitroPack has a free plan. To take advantage of it, click on “Free plan”, just below the price table.
Then follow the on-screen instructions to create your account:

Step 2: Link your NitroPack account to your WordPress site
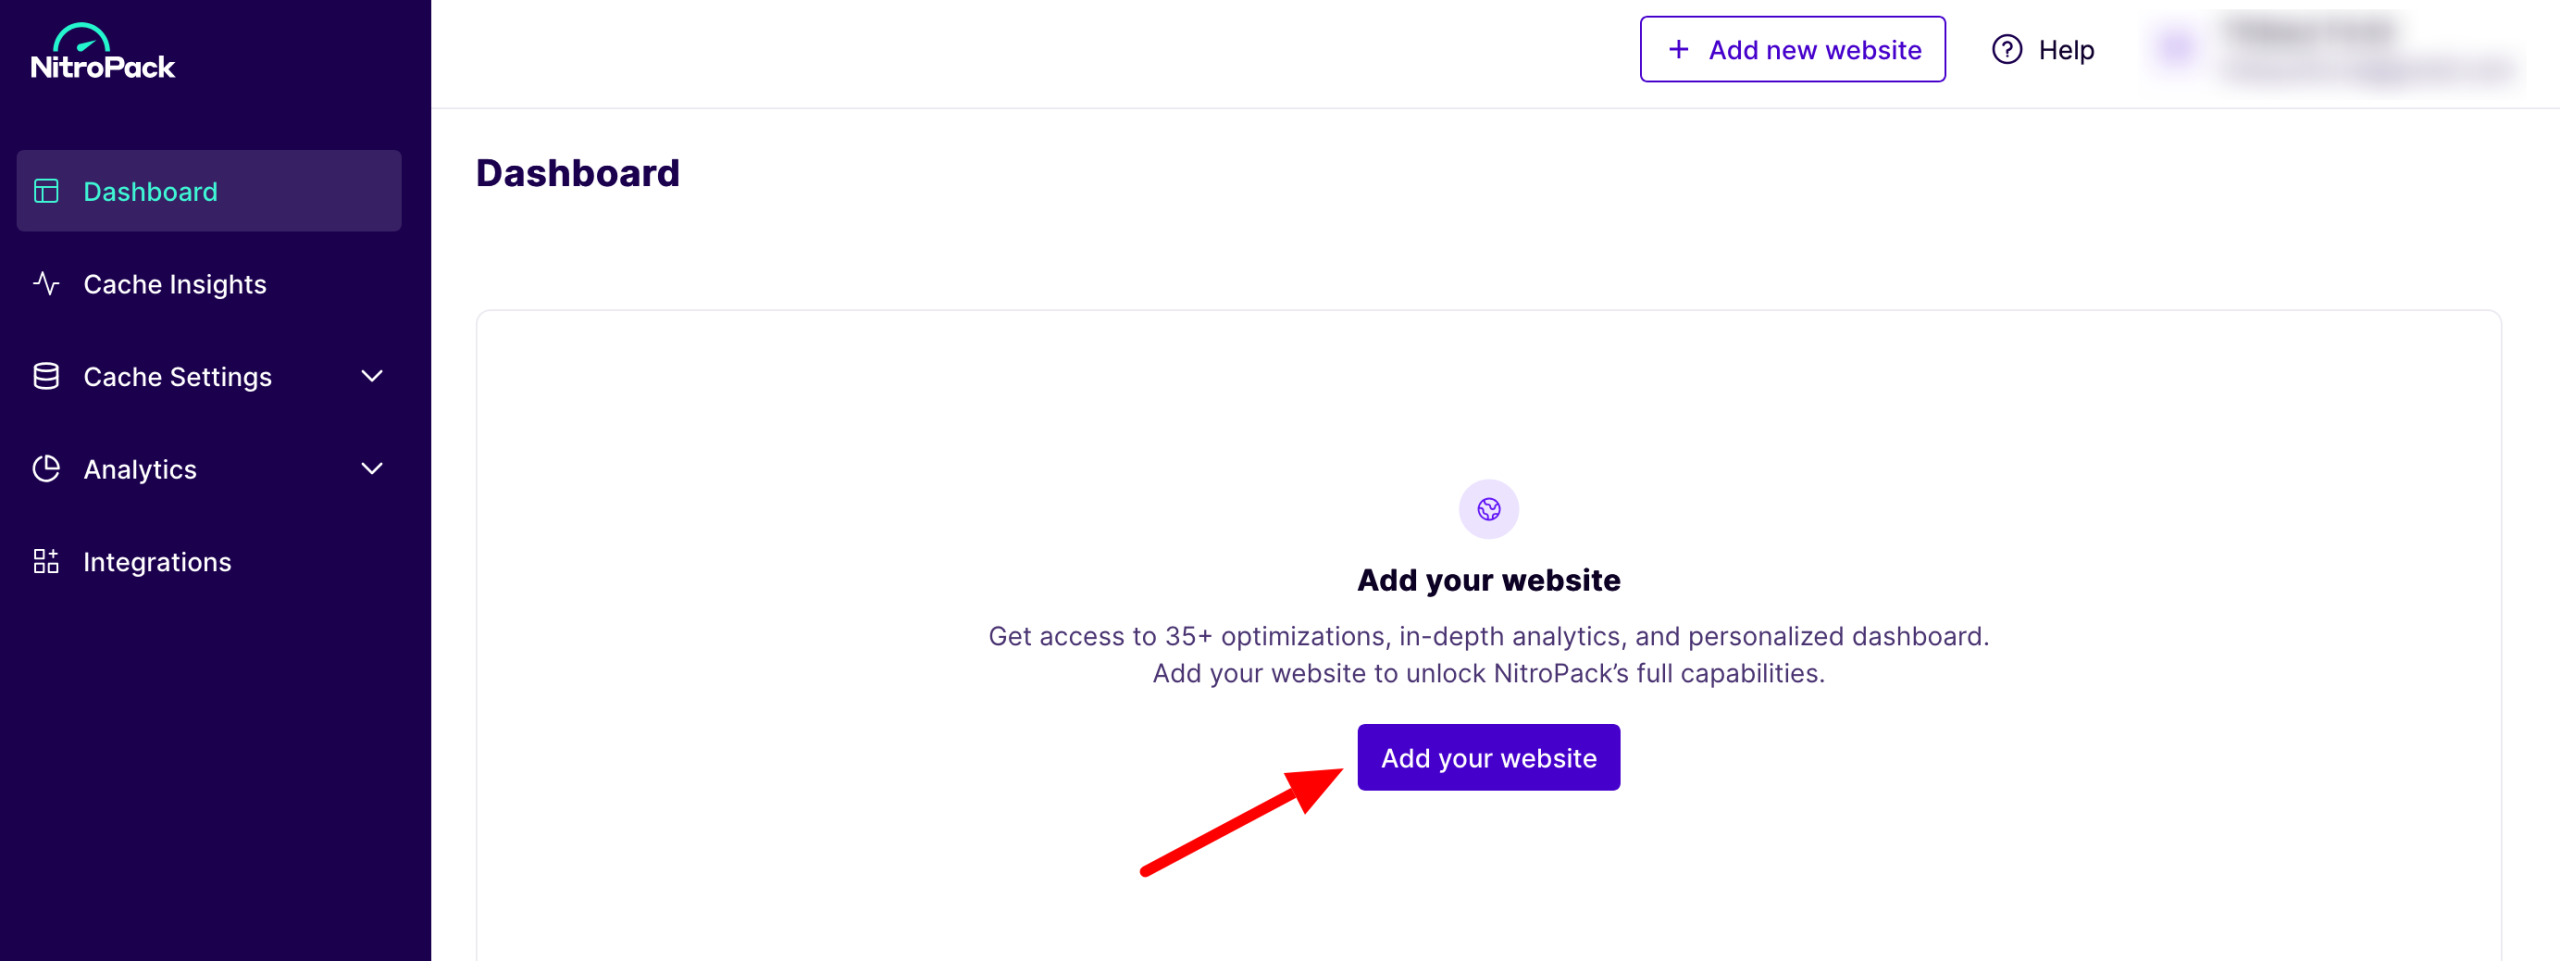
Once you’ve filled in the few required details, you’ll parachute into your NitroPack dashboard.
Click on the “Add your website” button to link your WordPress website to your NitroPack account:
Continue by entering your site’s URL (its address, for example: https://wpmarmite.com/), then tick the “Free” box to benefit from the free plan. Then click on the “Add” button.
Then go to your WordPress dashboard. Go to Plugins > Add plugin. Type “Nitropack” in the search bar. Install and activate the dedicated plugin:

Once this is done, go to the plugin settings, then click on the “Connect” button:

Congratulations: your site is now connected to NitroPack. All that’s left is to configure it as you wish. Good news: if you want to, you don’t have to do a thing – optimizations are automatic!
However, you can go even further by activating certain additional options offered by the tool. We’ll tell you more in the section below.
How do I configure and use the NitroPack plugin?
First of all, you can make adjustments in two different places:
- On your WordPress dashboard, where basic settings are available.
- On your NitroPack interface (i.e. outside WordPress), where you can access more advanced functions.
NitroPack settings on the WordPress dashboard
Once NitroPack has been correctly connected to your site, you’ll be presented with several settings inserts.
Some options are already pre-checked, such as:
- the ability to empty the cache (“Purge cache”) when content is updated or published
- HTML Compression.

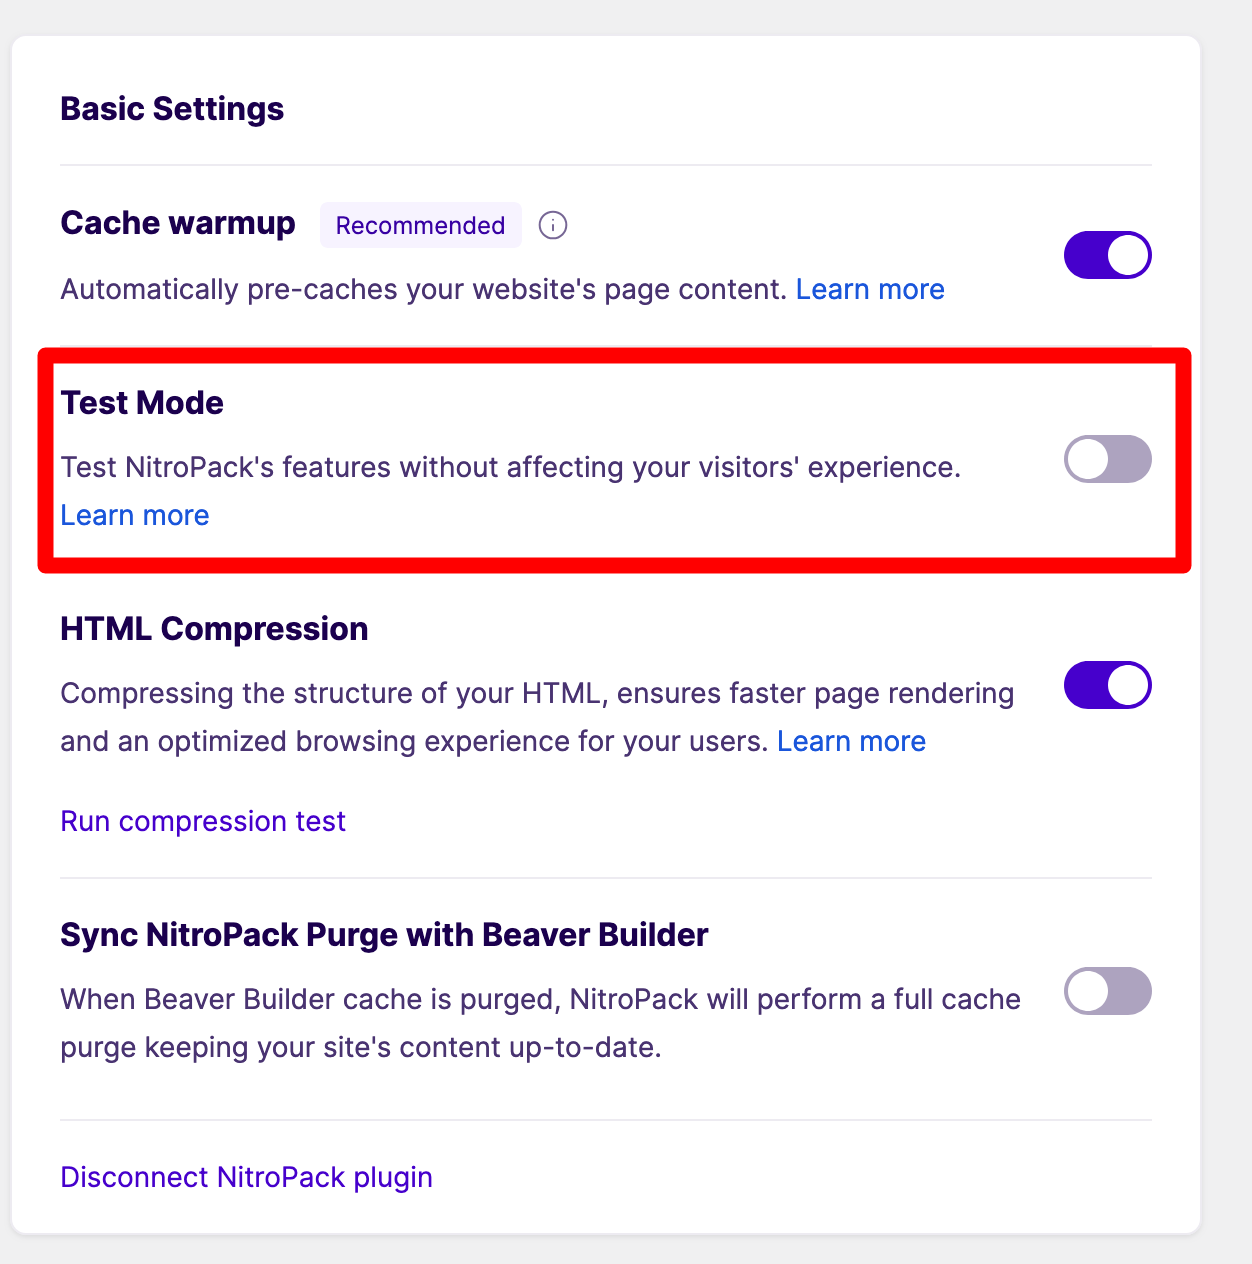
For peace of mind, activate NitroPack’s Test Mode. You’ll be able to test your settings in an isolated environment (without affecting your production site), while preserving your users’ experience. To find out more, take a look at this resource.
To make the tool even more effective, activate “Cache warmup”. This allows the tool to simulate an organic visit to each page of your site, queuing them up for optimization.

NitroPack optimizes a page only when it receives a new organic visit. You can see which pages have been optimized in the “Optimized pages” insert:

Finally, you can decide on the level of optimization for your site, in the “Optimization mode” box. Five options are available:
- Standard: activates standard optimization functions, such as image optimization, without going much further. An interesting choice if you’re looking for maximum stability.
- Medium: adds image lazy load to standard optimizations. Uses the browser’s built-in techniques for loading resources.
- Strong: offers even more advanced optimizations than Medium mode. This is the mode that offers the best balance between speed and stability.
- Ludicrous: the most aggressive mode (selected by default), aimed at achieving the highest possible performance score.
- Custom: to select your own settings.

Use Ludicrous mode with care, as it’s the most likely to “break” your site.
We’ve finished with the settings available on the dashboard of your WordPress site. Let’s move on to the NitroPack client interface, and discover some new configurations.
NitroPack settings on your customer interface
NitroPack’s uncluttered, UX-compliant customer interface is easy to learn. There are 5 main menus, accessible from the left-hand side column:
- Dashboard, which shows the optimization status of your pages, your optimization mode and the weight of cached files
- Cache Insights, where you have precise access to the optimization status of your pages (optimization status, date of last update, etc.) via the “Page optimization status” tab
- Cache Settings, where you’ll find settings for optimizing cache, images, HTML, CSS and JavaScript code and fonts
- Analytics, which provides data on page optimization in the form of graphs
- Integrations, which presents the tools that integrate with NitroPack.
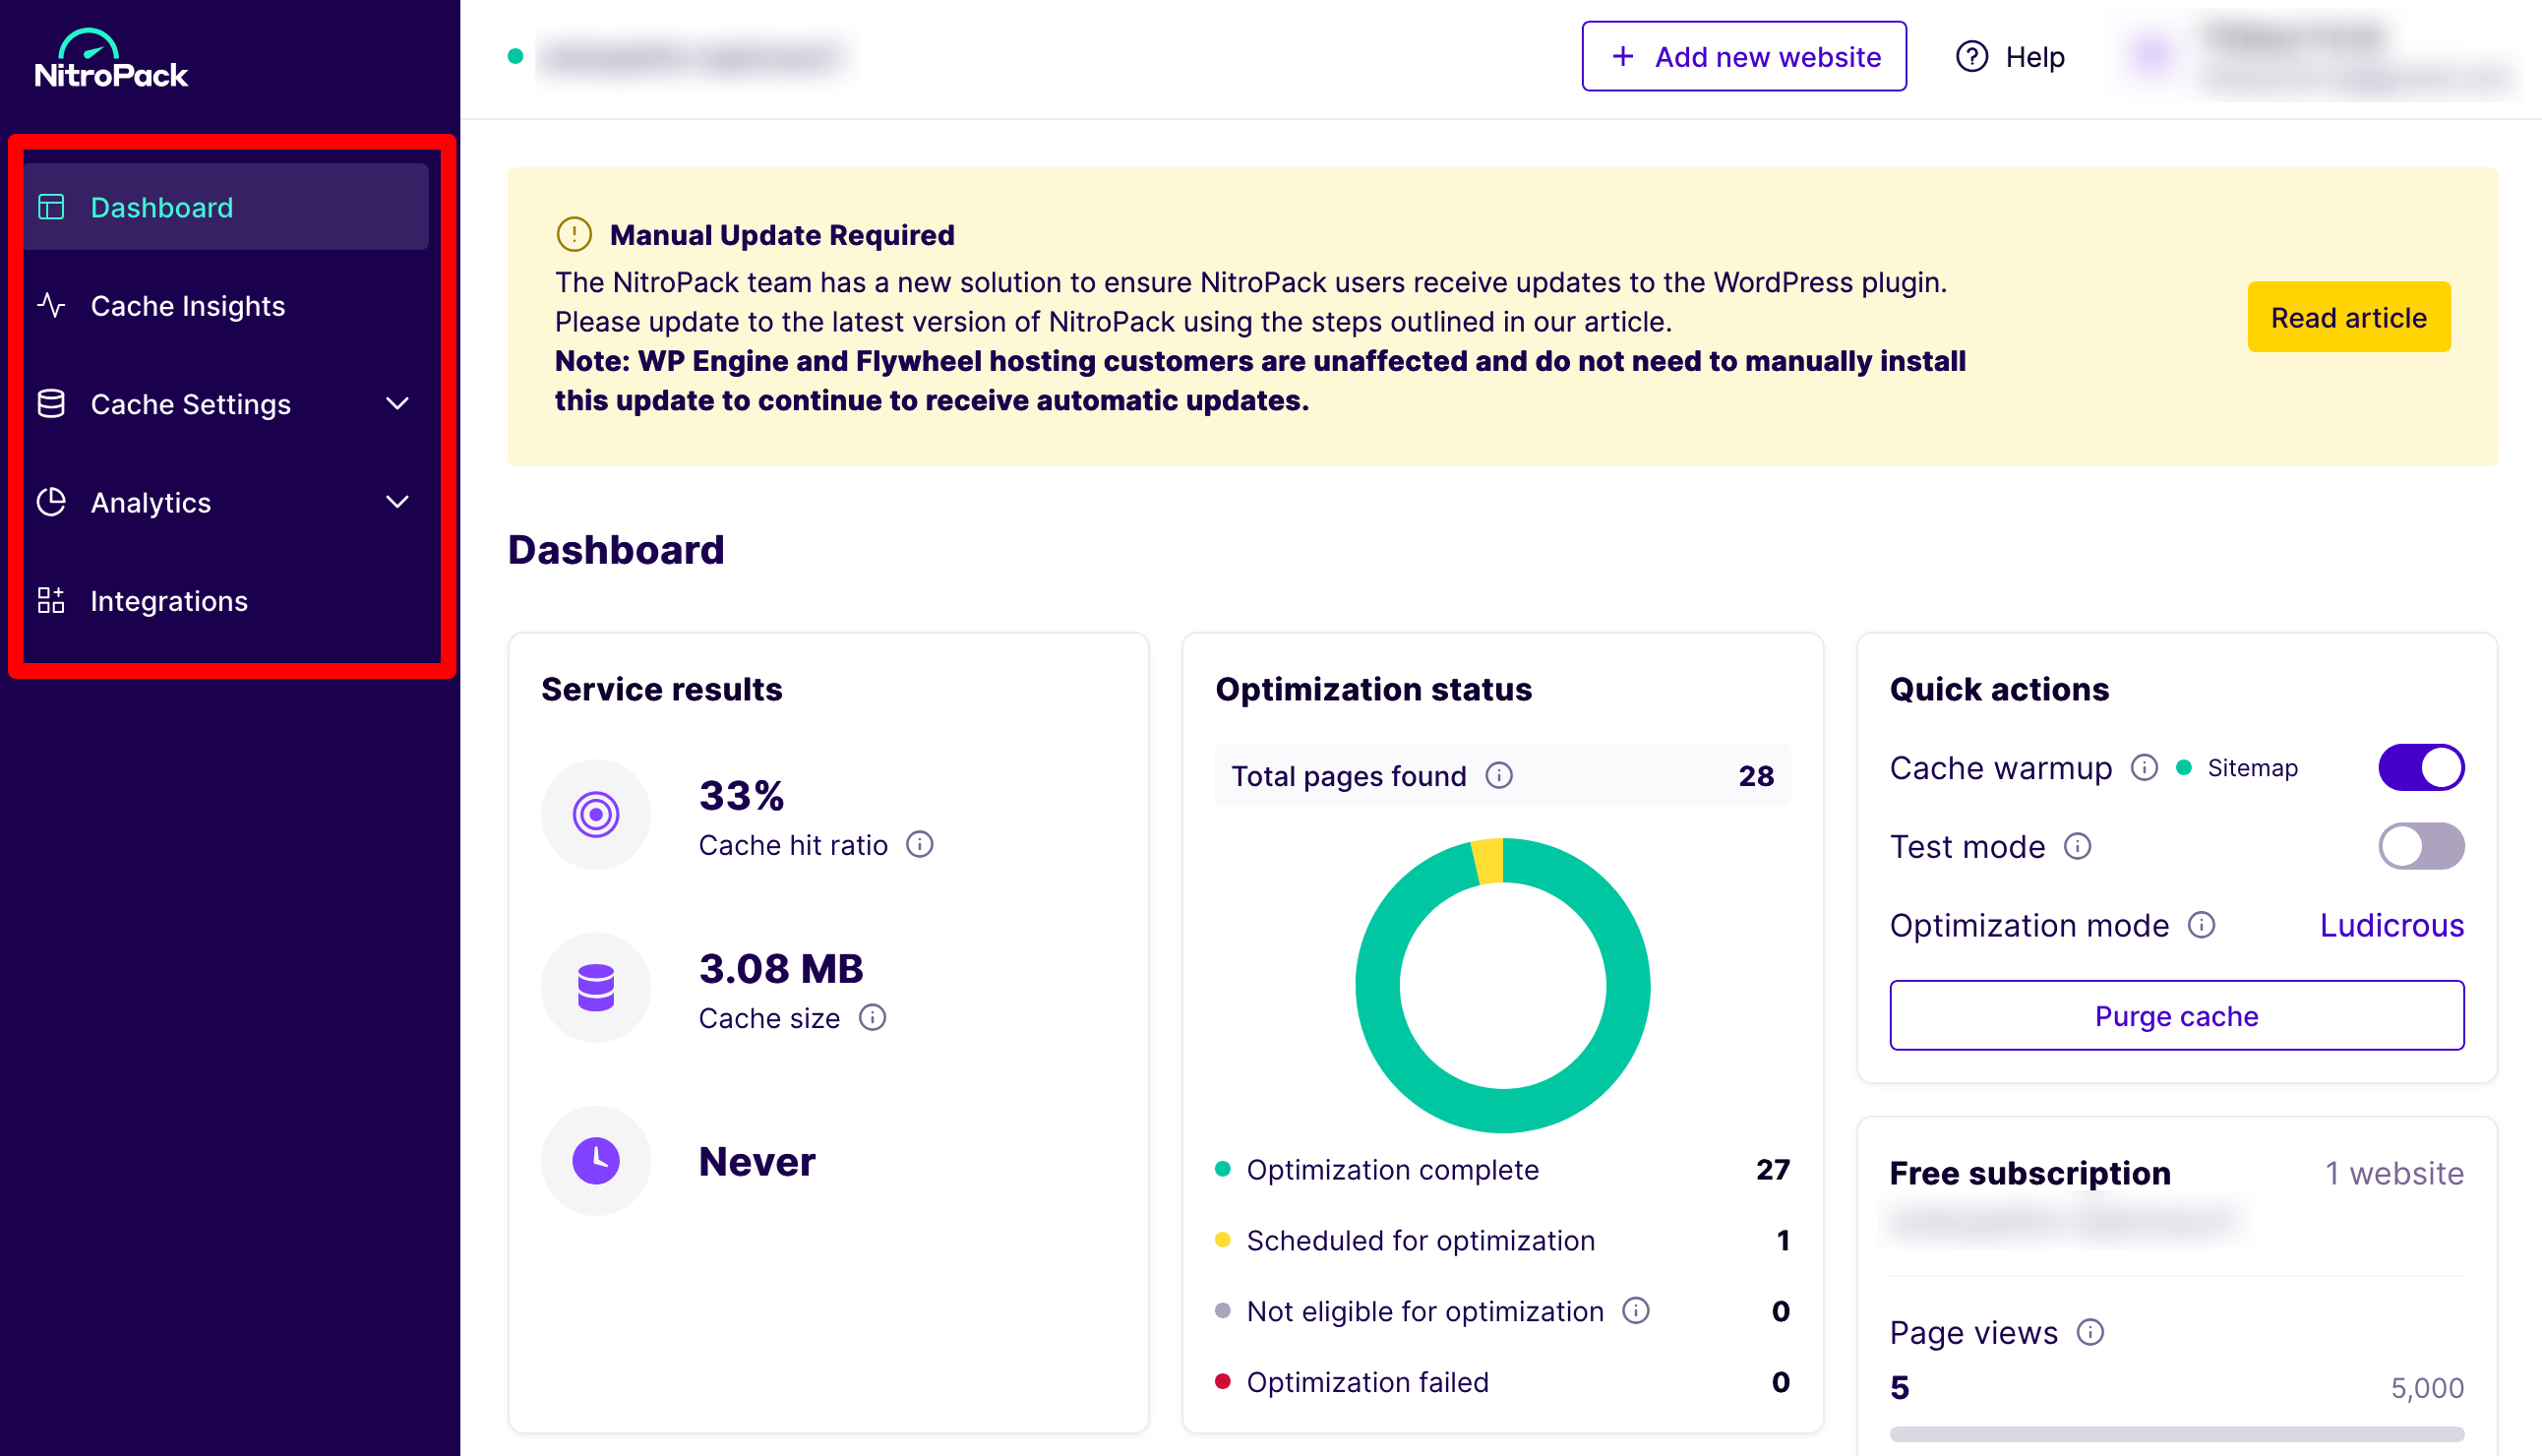
NitroPack’s Cache Settings menu
In concrete terms, most of your actions will take place in the “Cache Settings” menu. By default, you’ll see that many of the options are already pre-selected. If you do nothing more, the optimization of your pages will already be effective.

If you want to go further, you’ll find a few more advanced options, in particular for optimizing JavaScript, CSS and HTML code.
If you’re not sure what you’re doing, don’t touch anything. And if you’re ever in doubt, ask the tool’s support team for help.
We also recommend testing the tool on a pre-production environment to get you started.
Without being exhaustive, here’s an example of what you can activate to further optimize loading speed:
- delay the loading of the most common JavaScript scripts (chat widgets, pop-ups, analysis tools, etc.)
- combine JS files to reduce network requests and improve rendering performance
- minify your JSON elements in your HTML document
- delete unused CSS code
- specify custom CSS rules to be applied to optimized pages
- convert your fonts to WOFF2 format
- optimize your Google fonts by hosting them on the NitroPack CDN
- manually exclude resources or URLs you don’t want to optimize.

What options are available for a WooCommerce store?
As you can see, with the options listed above, there’s plenty to do. NitroPack doesn’t forget WooCommerce store owners either.
In addition to the settings already offered, NitroPack also offers a feature called “Cart cache”, which can be activated in the “Basic Settings” insert of your WordPress dashboard.
Thanks to this, caching continues to be active, even when a visitor adds one or more items to their shopping cart. This ensures that they continue to enjoy an optimized page.
What integrations does NitroPack offer?
In addition to these settings, you can further enhance your performance by using NitroPack with your favorite third-party tools.
For example, NitroPack can integrate and synchronize with Cloudflare, Sucuri, or even reverse-proxies like Varnish or NGINX.
It is also automatically compatible with a large number of:
- themes: Astra, Neve, GeneratePress, Avada, BeTheme, Divi etc.
- plugins (including page builders): WooCommerce, Elementor, Divi Builder, Yoast SEO, All in One SEO Pack, Rank Math SEO, Contact Form 7, WPML, WPForms, Gravity Forms, Beaver Builder, SEOPress, Monster Insights etc.
A detailed list of available integrations can be found in the “Integrations” menu of your NitroPack customer interface:

Does NitroPack really improve page load speed on your WordPress site?
You now know how NitroPack works, and where to find its main settings to apply them to your WordPress site.
The question is, does it work? NitroPack tells its future users that improvements in loading speed are immediate after installing the tool.
Their team even points out that most Page Speed Insights scores “are typically 90+ for desktop and 75+ for mobile devices”.
To find out for sure, we ran two tests on two load speed measurement tools (Google PageSpeed Insights and Pingdom Tools).
Results without NitroPack
The site we tested is a small showcase site with 19 active plugins (including the Beaver Builder page builder), 16 pages and 3 published posts.
No optimization plugins (cache, images, CDN etc.) were active.
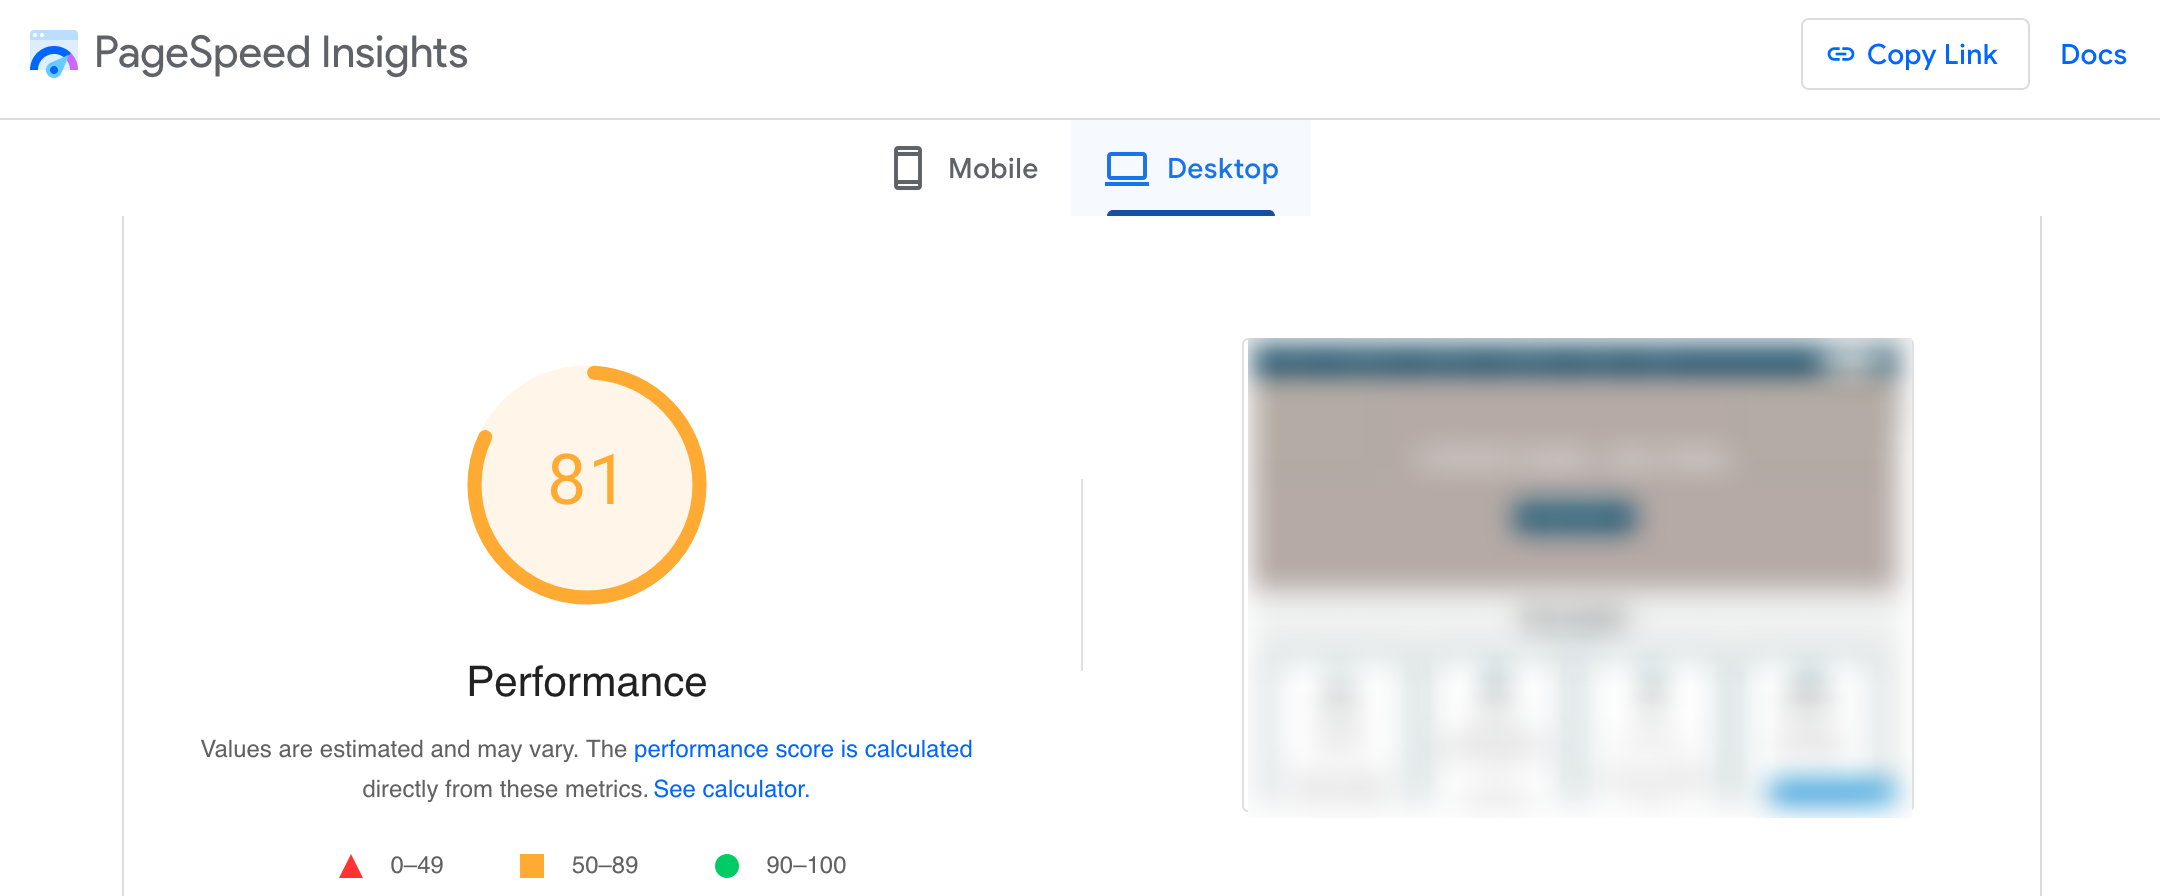
This site received a “Performance” score on PageSpeed Insights of:
- 81 out of 100 on desktop
- 55 out of 100 on mobile

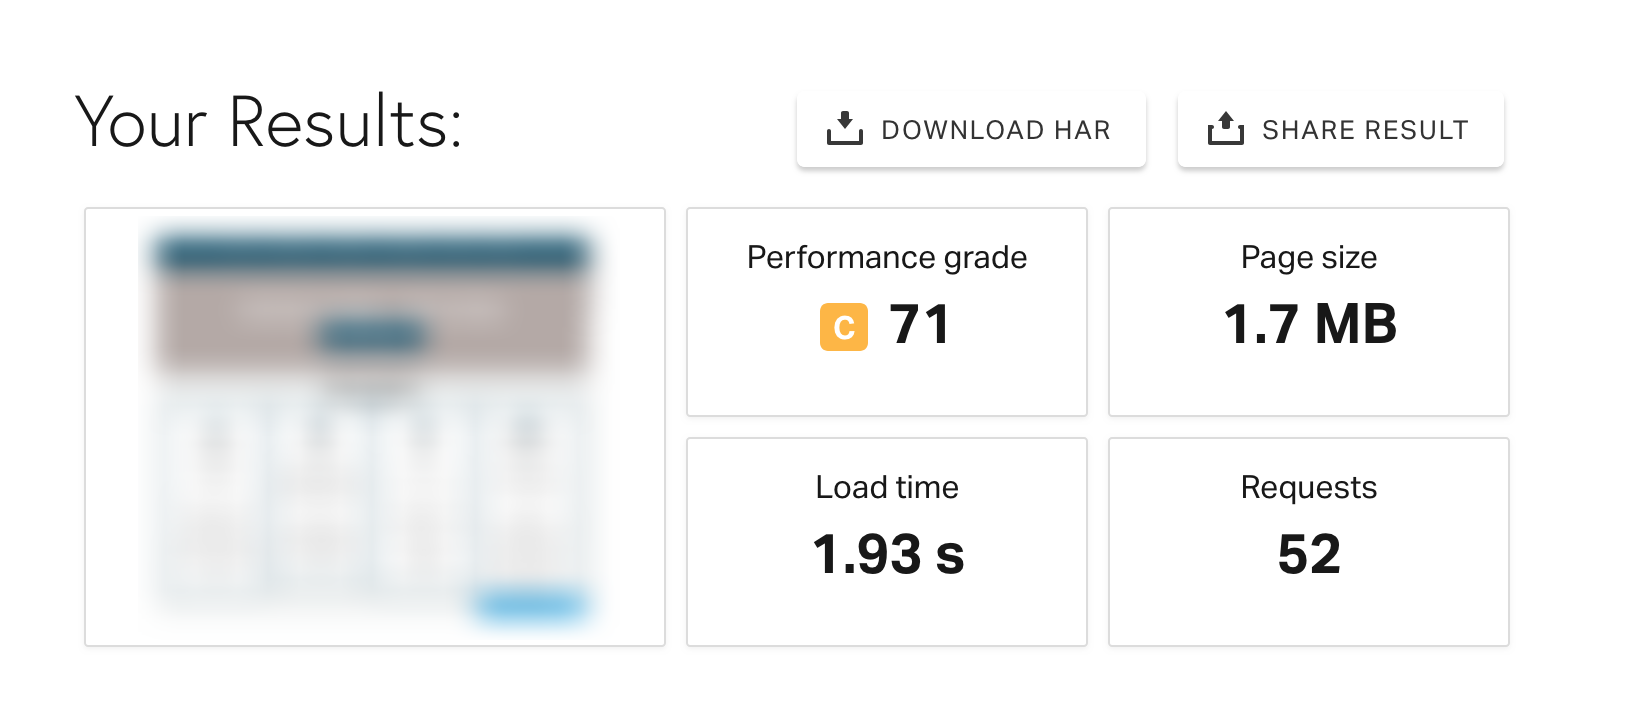
On Pingdom Tools, the site posted a performance score of 71 out of 100:
Results with NitroPack
We then activated NitroPack on the site in question, leaving the default settings active (as you’ll find them if you activate the tool yourself on your website).
The only exception: we only activated the “Cache warmup” option, since it was recommended by NitroPack on the WordPress dashboard.
For the record, the optimization mode was set to “Ludicrous”, i.e. the most aggressive optimization mode.
Here are the PageSpeed Insights scores:
- 74 on mobile
- 98 on a desktop computer
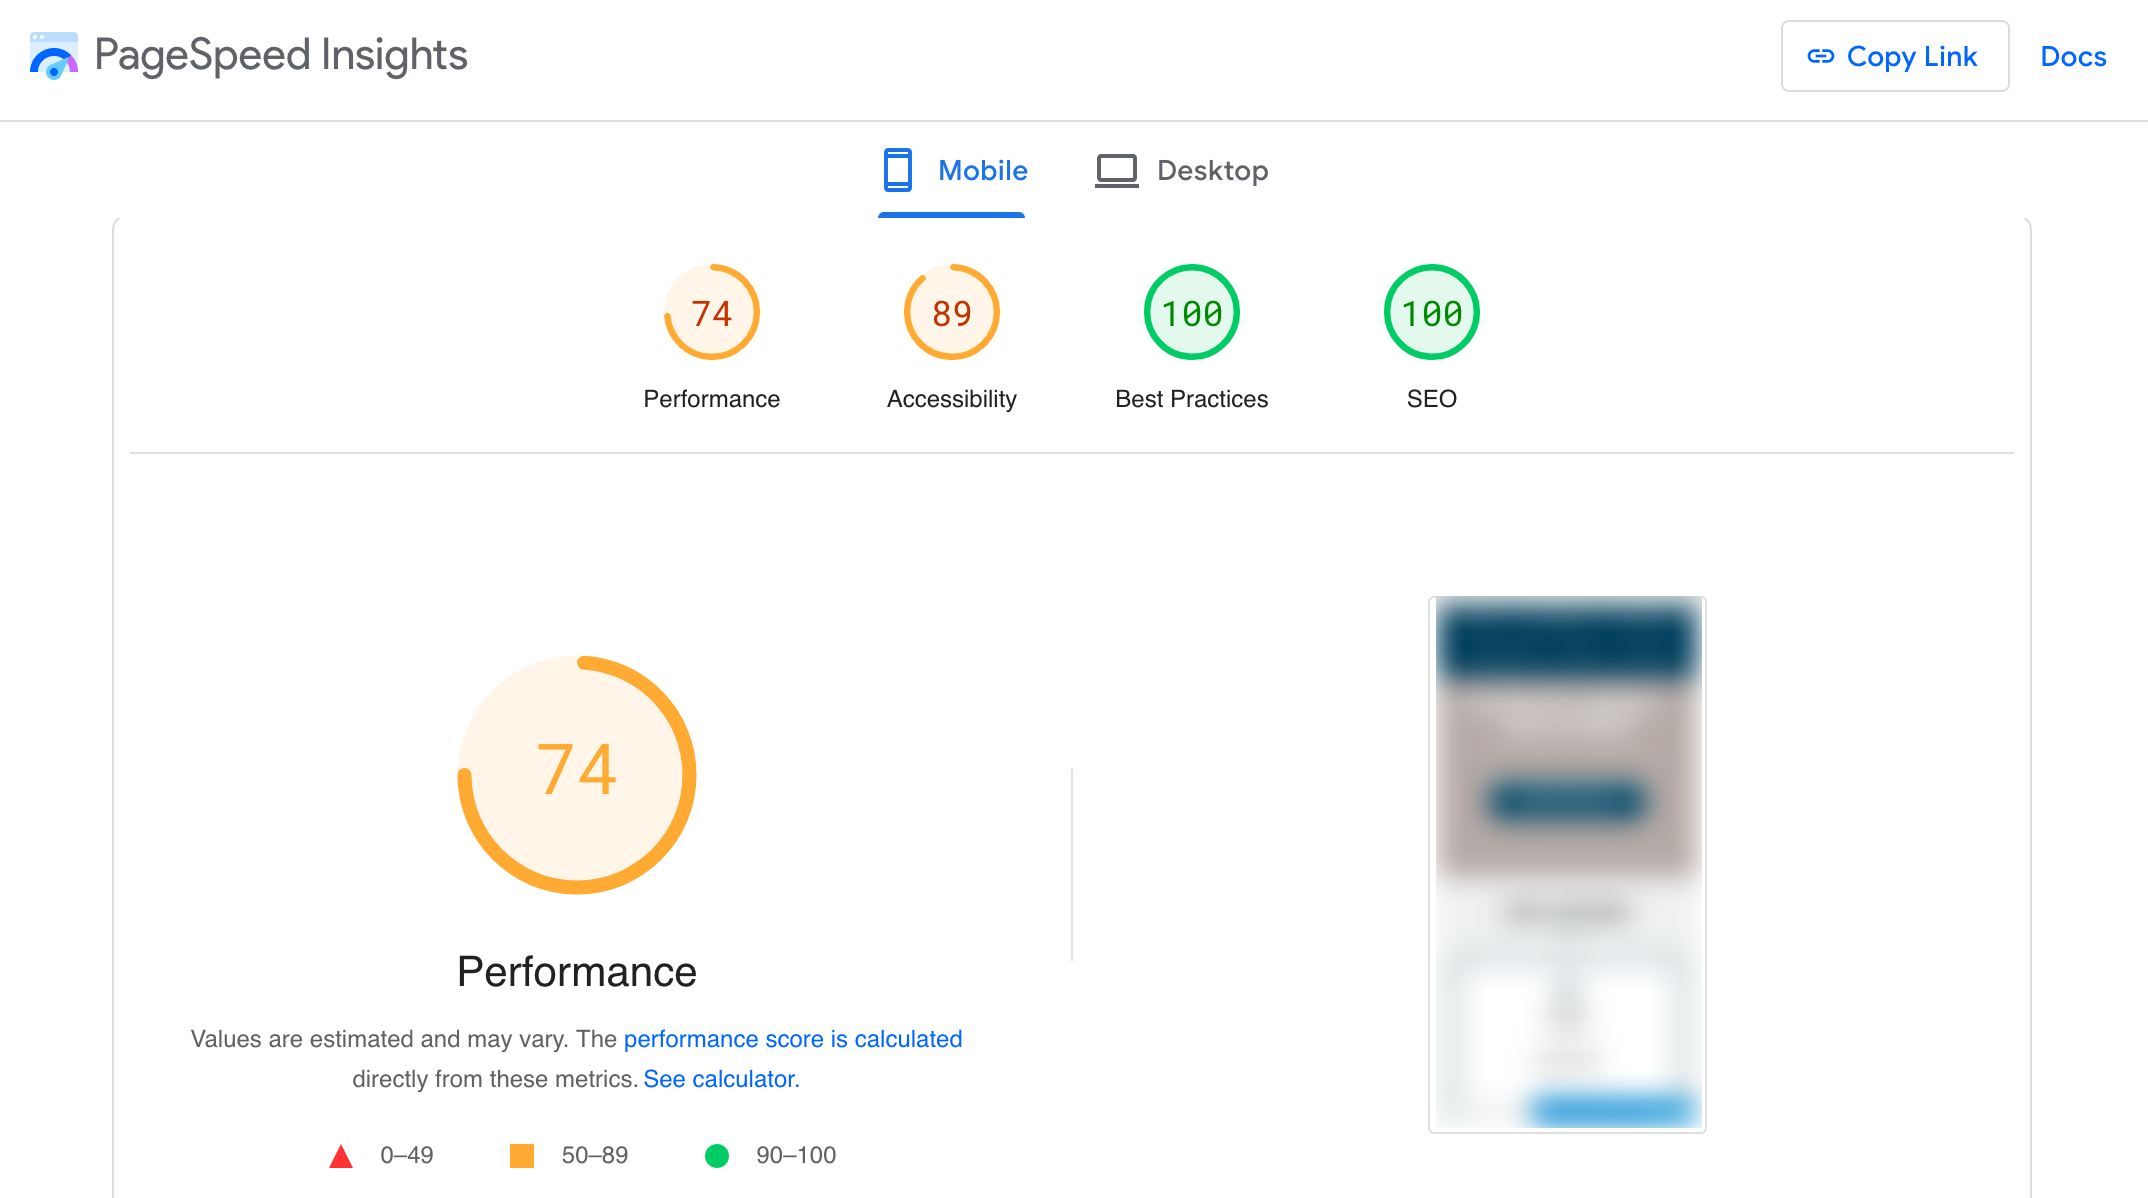

With the default settings alone, NitroPack offers a significant improvement in page loading speed, while still meeting the promised minimum score of 75 on mobile and 90 on desktop.
The same is true of Pingdom Tools, with a score that rises dramatically from 71 to 98. All this coupled with a drastic drop in loading time, page weight and number of requests made:

The bottom line: NitroPack is highly effective in making your WordPress site pages run faster. Thanks to NitroPack, you’ll be able to:
- offer your visitors a better user experience (UX)
- improve your conversions
- send positive signals to Google and the search engines, while encouraging the crawling of your pages.
Support and customer service
24/7 support with a premium license
As you may have gathered from the beginning of this article, NitroPack is very easy to use. If you’ve been following along, you’ll know that even without making any adjustments, the tool will improve the performance of your pages.
Even so, you may encounter problems at some point, or have specific questions to ask the team in charge of the plugin development and maintenance.
So what kind of support can you expect? Whether you’re a free user or a premium licensee, you’ll first have access to chat support.
You can ask your question by clicking on the small chat icon at the bottom right of your screen, on your customer interface:

Note that it’s a robot that answers you first. These answers are almost immediate and globally relevant, even if they don’t replace human precision.
In fact, if you need to, you can ask to speak to a human support expert, who will get back to you if you’re not satisfied with the bot’s answers.
Only a premium license gives access to 24/7 support. With the free offer, support is limited to the following hours: 9am-6pm.
In addition to customer service, NitroPack offers a range of resources to help you get to grips with the tool, solve a problem or improve your web optimization skills:
- documentation (in English only), including 18 articles dedicated to WordPress
- a blog
- a YouTube channel, including a NitroPack user guide, tips and webinars on web performance.
How much does NitroPack cost?
All NitroPack premium licenses offer advanced caching, image and code optimization features, an integrated Cloudflare CDN and 24/7 access to customer service.
In total, you can choose among five licenses:
- “Starter” license (from $7/month if you pay yearly): use on one site with a maximum of 8,000 page views, 5GB CDN bandwidth per month, account shared with one member of your team.
- “Plus” license (from $18/month): use on a site with a maximum of 40,000 page views, 25GB CDN bandwidth per month, account shared with three members of your team.
- “Pro” license (from $83/month): use on three sites with a maximum of 540,000 page views, 270GB CDN bandwidth per month, account shared with ten members of your team.
- “Agency” license (from $229/month): use of 10 or more sites, with account sharing for ten members of your team, and customized page views and bandwidth.
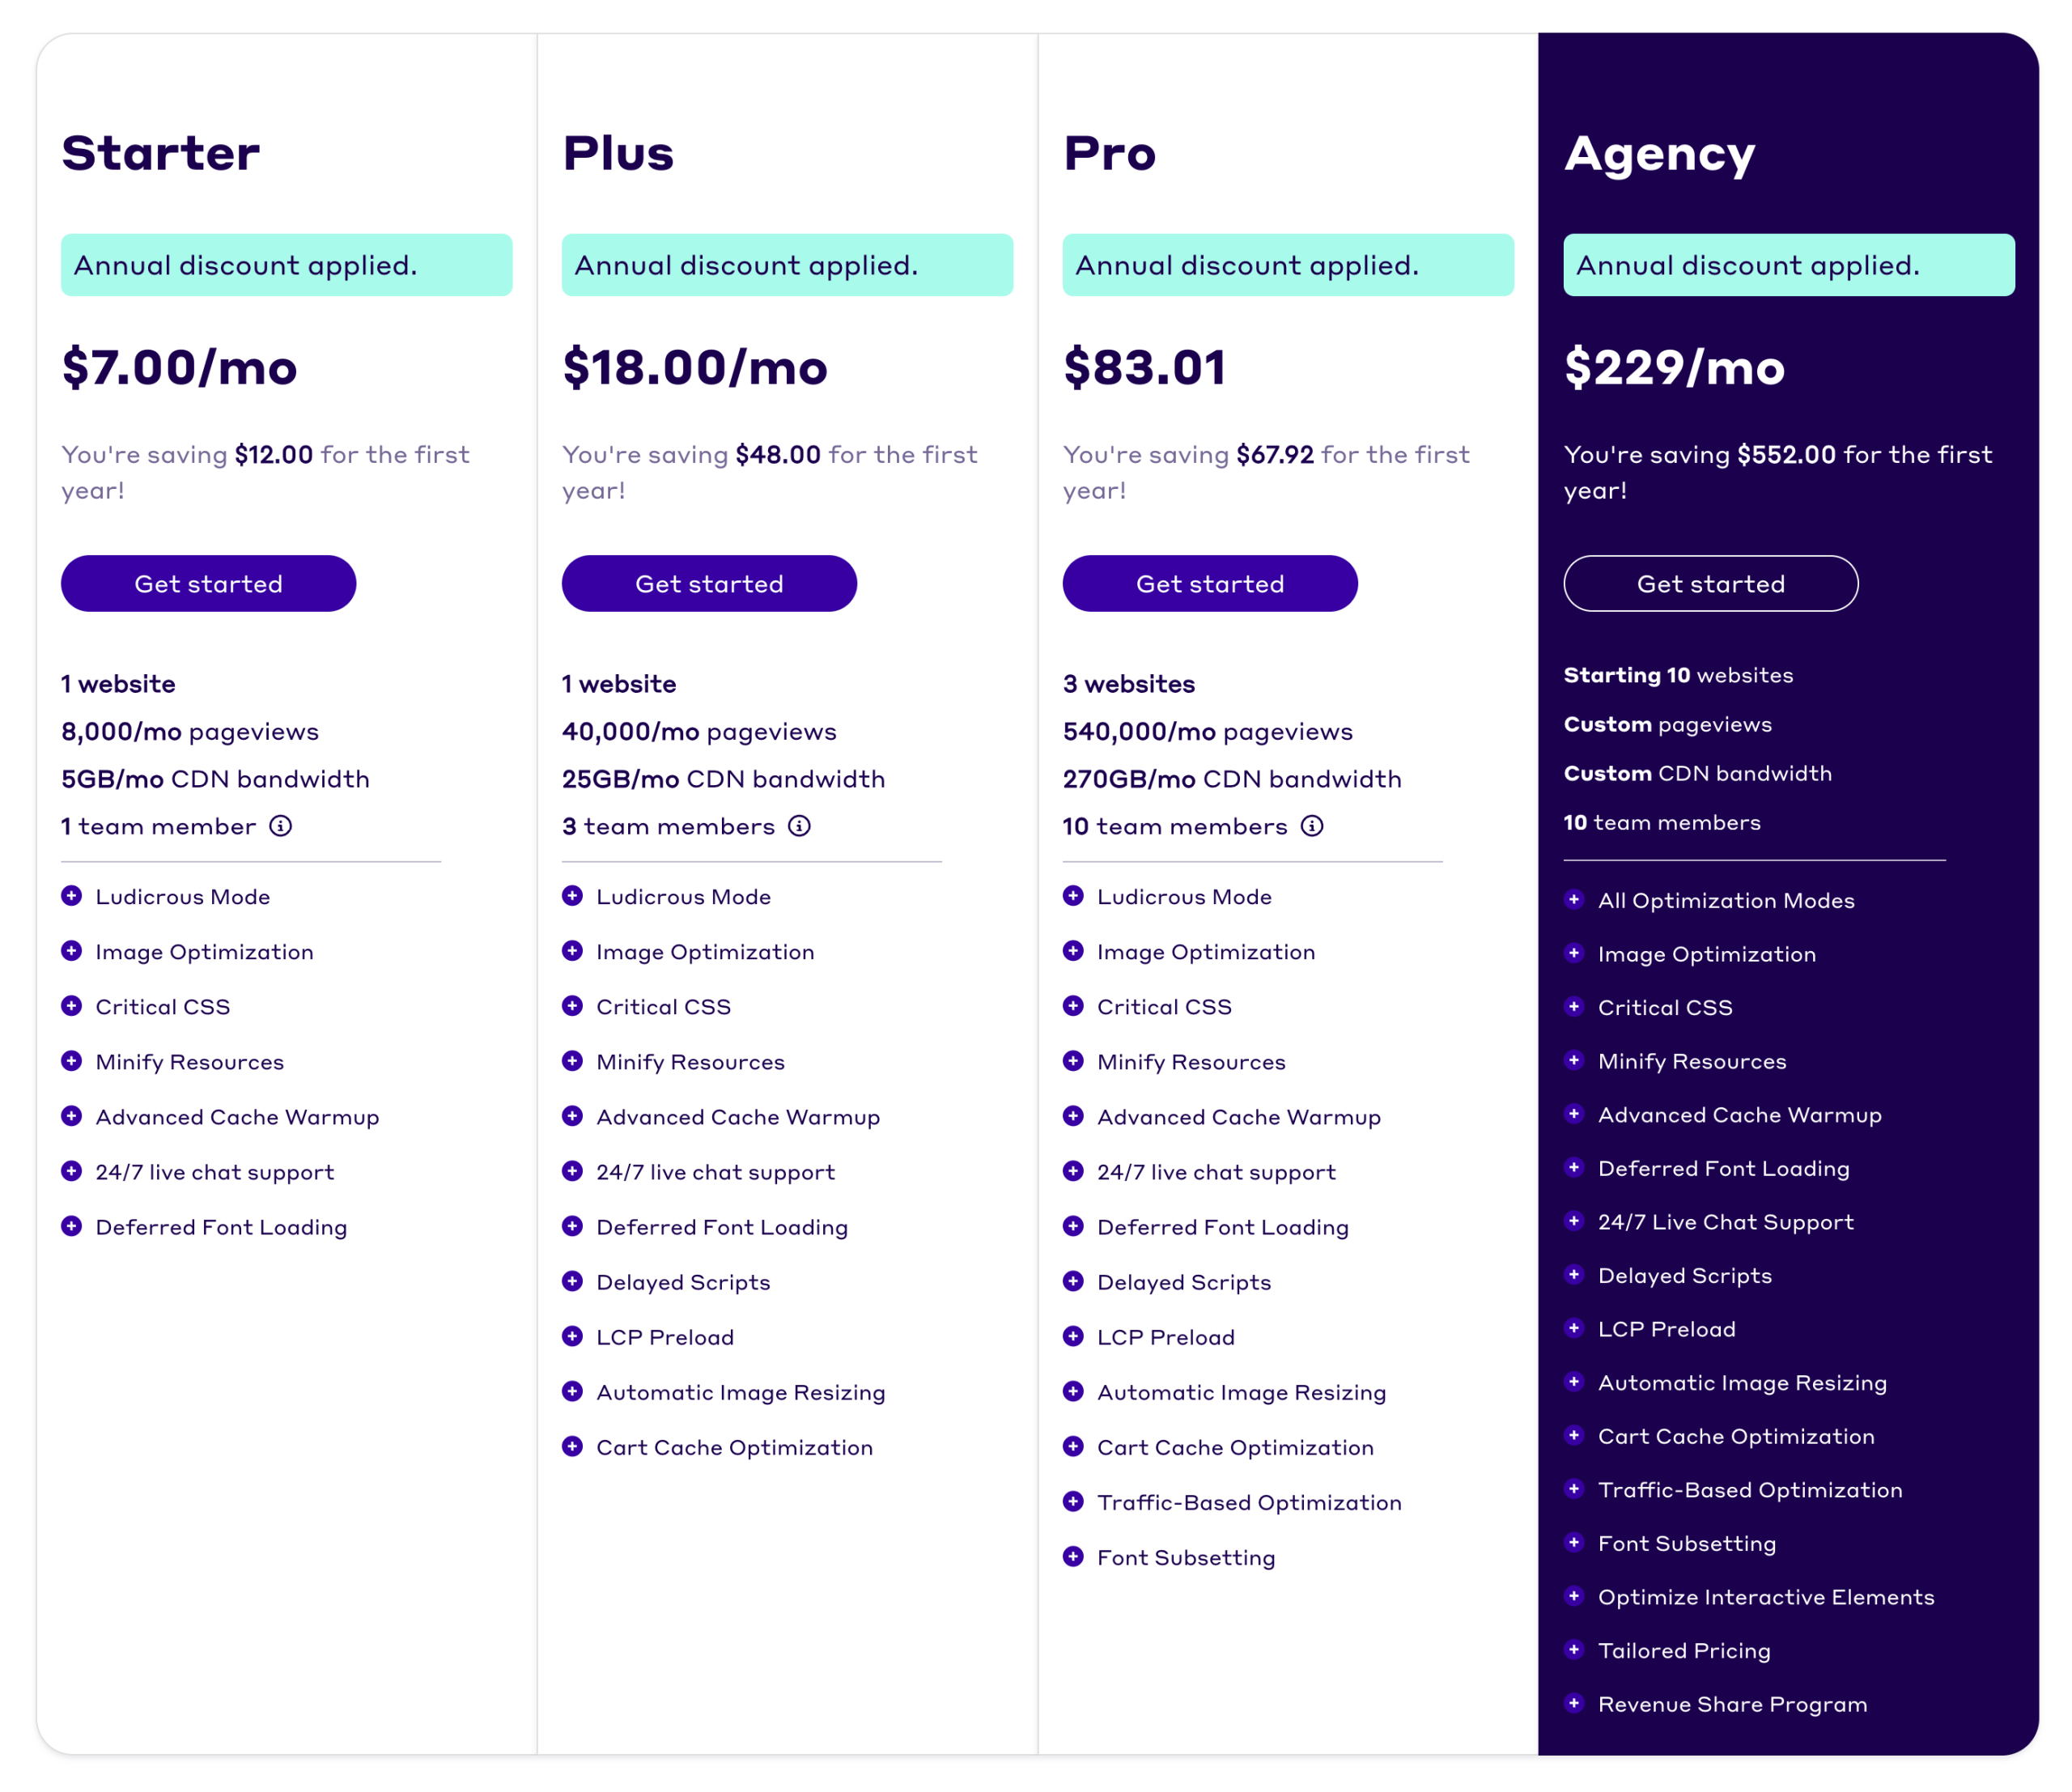
Which license you choose will depend on your needs, and the number of sites you want to use it on.
The difference between each license is based on the number of page views, CDN bandwidth and collaboration with your team members.
NitroPack offers both annual and monthly packages. If you opt for the annual package, you get two months free.
What’s more, every premium license comes with a 14-day money-back guarantee. This allows you to test the plugin without taking too many risks (if the free plan doesn’t meet your needs).
What are the user reviews for NitroPack?
So, are you interested in a NitroPack license? Before taking action, you may need one last piece of reassurance. Take a look at the opinions of users of this performance optimization tool.
You’ll find that most of the feedback is excellent. The company records 4 customer reviews with 5 stars out of 5 on Google. A panel that’s not necessarily very representative, of course, but which gives you an initial idea of the quality of the service.
Comments highlight the efficiency of the customer support and the tool itself, which “significantly improves website speed and optimization”.
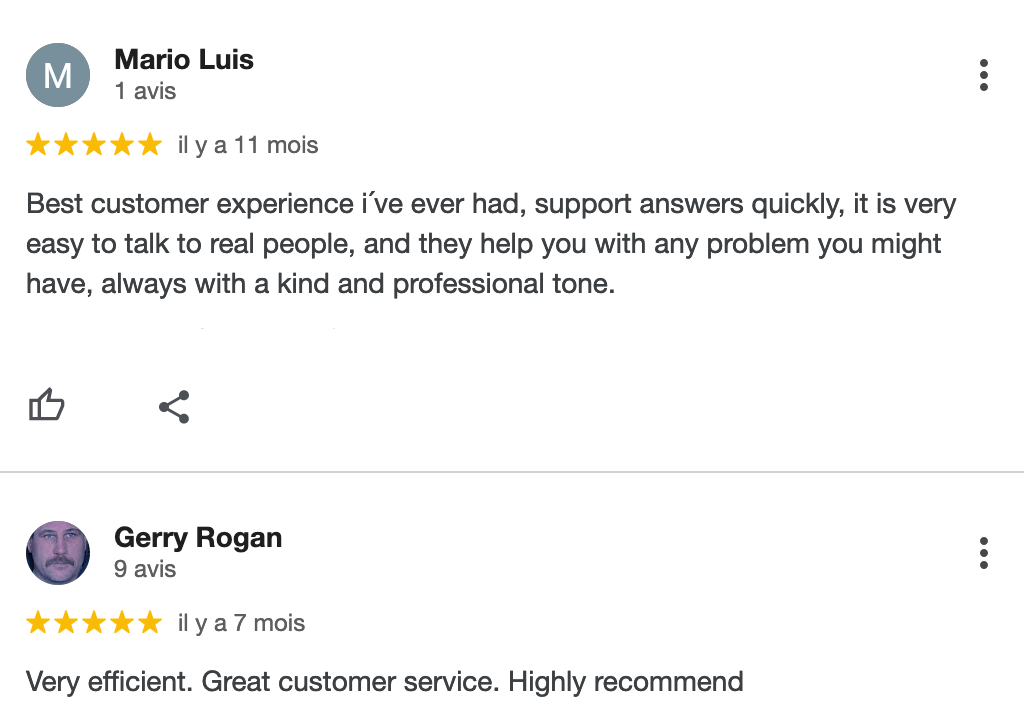
This trend is also evident on a wider scale on the Trustpilot verified reviews site. On this platform, NitroPack achieves an excellent rating of 4.9 out of 5, based on over 1,100 reviews submitted– a much more representative sample, for that matter.
Here again, users are particularly impressed by the efficiency of support (and the speed with which problems are resolved) and the quality of the tool.

What are the alternatives to NitroPack?
Before summing up this post and delivering our final NitroPack review, let’s address an important point that may also help you decide whether or not to opt for NitroPack.
As you’d expect, it’s not the only tool on the market for optimizing loading speed.
Despite this, most alternative plugins are designed to meet one specific need at a time (caching, image optimization, code optimization, CDN etc.).
The advantage of NitroPack is that it packs a wide range of services into a single tool, so you don’t have to activate several plugins on your site (and pay for several services at once, which is often more expensive).
NitroPack vs WP Rocket, what’s the difference?
The tool that comes closest to NitroPack is the ultra-famous WP Rocket (see our review).
WP Rocket is a caching plugin that also boasts multiple options for boosting your site’s overall performance: delayed loading of images and JavaScript, minification of HTML code, minification and concatenation of CSS and JavaScript files and more. Does this sound familiar? 😉
There are a few notable differences between the two tools, however, including the following:
- NitroPack is an all-in-one service, offering a particularly high level of functionality compared to other solutions on the market. WP Rocket, on the other hand, is a caching plugin, with which you’ll need to purchase and configure additional plugins to benefit from the same number of features as with NitroPack.
- WP Rocket offers an in-house CDN ($7.99/month), but you have to pay for it in addition to the price of your license if you want to use it (with NitroPack, the CDN is included in the overall package at no extra cost).
- Unlike NitroPack, WP Rocket doesn’t include a specific option for optimizing the weight of your images. You need to use a third-party plugin to do this, such as the excellent Imagify (developed by the… WP Rocket team).
Our final review of NitroPack
You’ve reached the end of this NitroPack tutorial and review. It’s time for a final review of this tool’s strengths and limitations, and to give you our final opinion on it.
Benefits
- A hyper-efficient tool for optimizing your page load speed and Core Web Vitals metrics.
- Quick installation and configuration of the plugin.
- Ease of use: even without making any adjustments, the tool will give you excellent results, since it works automatically as soon as it is activated.
- A clear, modern user interface.
- An all-in-one tool that eliminates the need to install multiple services/plugins.
- Each license includes all the tool’s features (with one or two exceptions).
- The presence of a free license that can already meet certain needs.
- The efficiency and responsiveness of the support team.
- A cloud-based infrastructure that lets you preserve your hosting provider’s server resources.

Disadvantages of Nitropack
- These rather high prices can also be explained by the quality of the services offered and the advanced functionalities. Yes, NitroPack is more expensive than its competitors, but it also includes services that are not included in the basic package of some alternative solutions (CDN, image optimization, etc.).
- If you wish to make further adjustments, you’ll need to “exit” WordPress to access your NitroPack customer account and make your settings.
WPMarmite’s opinion
As the tests we’ve put it through demonstrate, NitroPack is an excellent tool for optimizing the page load speed of your WordPress site.
We were impressed by the results, even though we hardly made any further adjustments after activating the plugin.
What’s more, we really like the ease with which the tool can be used, without weighing us down with tons of settings menus scattered here and there.
With NitroPack, it’s simple and effective: you activate it, and let it do the work for you! It’s suitable for all profiles, from beginners to advanced users.
In our opinion, the main obstacle to its adoption remains its rather high price, even if this is justified by the quality of the service offered. With that in mind, should you use this plugin?
The answer is yes, but under certain conditions:
- If your site receives less than 5,000 visits/month and you don’t have a problem displaying a badge in your footer, we recommend you start with NitroPack’s free offer, which will give you convincing results.
- Choose the premium license that’s right for you if you’re looking for a tool that offers caching, code, font and image optimization, as well as an integrated CDN, all within a single interface. You won’t find anything better on the market.
For your part, are you an inveterate NitroPack user? Tell us what you think in the comments – we can’t wait to hear from you!

Receive the next posts for free and access exclusive resources. More than 20,000 people have done it, why not you?
Continue reading
Articles posted in WordPress PluginsOur review of B2BKing: A WooCommerce plugin built for B2B commerce
“Hi, I need 200 units of this product with fast shipping please”. As an online store owner, receiving this kind of message puts a smile on your face. Answering it, on the other hand, becomes a lot less fun… Basically,…
GTranslate on WordPress: our full review of this tool for creating a multilingual site
“Hello, how are you?” “What do you think of this computer mouse?” For you, everything is easy to understand in these two sentences. For someone living deep in the Shetland Islands or Yucatán, it’s probably a bit more complicated… If…
Air WP Sync: Test and review of this plugin for integrating Airtable into WordPress
Do you use Airtable and WordPress? Then some of your days probably look something like this. In the morning, you update your Airtable database as soon as something changes. In the afternoon, you copy and paste the same data into…