It’s well known that every self-respecting handyman has his toolbox. Do you have a rod to be installed?
Lickety-split: here’s the box opened with a hammer, a level, some dowels, and a screwdriver to complete your mission (don’t forget your drill, though).

Now imagine a toolbox for your WordPress site. What’s inside? Blocks, advanced forms, and, most importantly, the ability to create custom post types, taxonomies, and fields without coding!
This is what the Toolset plugin offers, among other things. Its features allow you to create advanced, dynamic sites without any technical knowledge. Well, that’s what Toolset promises anyway.
In fact, what’s the real story? What is this plugin really worth and what do you need to do to use it? Find out the concrete answers in this detailed test.
Overview
- What is Toolset?
- How does Toolset work?
- What can you do with Toolset?
- How do I install Toolset?
- How is the Toolset dashboard organized?
- How to create custom post types, taxonomies, and fields
- The other features of Toolset
- How much does Toolset cost?
- What are the alternatives to Toolset?
- Our final opinion on Toolset
What is Toolset?

Toolset is a modular toolkit composed of a set of premium WordPress plugins.
Its goal is to help professionals create advanced sites by adding custom post types and fields, all without touching the code (HTML, PHP, JavaScript, or CSS).
With Toolset, you can design, for example:
- Custom templates and content lists
- Customized archive pages
- Registration forms, contact forms, etc.
- Advanced search bars with filters
- Custom WooCommerce sites
- Directories with interactive map integration
Toolset is developed and maintained by OntheGoSystems, the company behind the popular multilingual plugin WPML.
According to the data provided on its website, Toolset has 30,000 customers and has already been used on more than 120,000 WordPress sites.
How does Toolset work?
Toolset comes with six basic components
Toolset consists of six components (plugins):
- Blocks is a library of about 30 Gutenberg blocks divided into 5 categories (Form, General, Structure, Views, and WooCommerce). You are given ready-to-use blocks for the WordPress content editor, which are more or less advanced (ex: Button, Title, Card, Add to Cart, Add items with conditional logic, etc.).
- Types allows you to create custom post types, taxonomies, and fields. You can link different post types and work with relational databases.
- Forms is used to set up advanced forms.
- Access allows you to control and modify the roles and capabilities of your users, as well as the content they can access.
- Maps allows you to display content elements on a Google Maps or Azure map (e.g.: address, search results, etc.).
- WooCommerce Blocks offers 12 blocks dedicated to the WooCommerce plugin.
Toolset allows you to add custom content (among other things)
In order to understand how Toolset works and what you can do with it, let’s take a look at three technical aspects. These three “options” are normally intended for developers, but Toolset allows you to customize them without getting your hands dirty.
Toolset and Custom Post Types
Toolset allows you to create custom post types.
These allow you to set up content that is different (and differentiated) from the default content provided by WordPress, namely posts or pages.
Depending on the type of site (storefront, ecommerce, blog) that you manage, you may need specific types of content.
For example, if you run a blog about movies, you’ll need to add a custom post type (CPT) called “movie” to group the movies you show in one place.
Same thing if you run a cooking blog. It will make sense to create at least one “recipe” CPT to list all your good dishes.
By default, WordPress is too limited for that. You could of course add your movies and recipes in different pages (e.g. a Cakes page with all your cake recipes, an Appetizers page with all your appetizers, etc.).
However, your content would quickly become disorganized and unreadable as soon as you accumulate dozens and dozens of recipes on the same page.
Custom fields
Custom fields allow you to add additional content, on top of the main content.
By default, customization is fairly limited in WordPress and often requires some coding knowledge, as this article shows. With a custom field, you can add additional information to complement your custom post types.
Let’s use our cooking blog example to illustrate this. We would have a “recipe” CPT that lists our dishes.
Custom fields would then give additional information to readers. We might think of the following elements:
- Ingredients
- Cook time
- Prep time
- A note
- Etc.
Custom taxonomies
Finally, taxonomies allow you to classify content on your site. For example, WordPress offers the “categories” and “tags” taxonomies to classify your articles.
With custom taxonomies, you can classify your content as you wish. For example, you could classify recipes according to their difficulty level (beginner, intermediate, expert), or movies according to their director.
I hope this is clearer for you. Now I’d like to take a closer look at what you can do with Toolset.
What can you do with Toolset?
As you have just read, the core of Toolset’s utility is the creation of custom post types, taxonomies, and fields.
More broadly, Toolset allows you to design sites with dynamic content, that is, with elements that can interact with each other.
For example, an ecommerce site capable of displaying products based on filters such as price, size, etc.
With custom content, you can create just about anything you want. Nevertheless, Toolset highlights the following types of sites for which it will be particularly useful:
- WooCommerce sites
- Real estate sites (agency, rental, etc.)
- Membership sites
- Showcase sites and professional blogs
- Directory sites
To give you a better idea of what you can do with Toolset, here is a showcase of sites made with the tool:

On this site directory, you can see that Toolset has been used with many themes like Astra, GeneratePress, Hello Elementor, and Divi.
If you’re a fan of page builders, you should know that Toolset is also compatible with most of them (Elementor, Divi Builder, Beaver Builder, Oxygen, etc.).
If you work with Elementor, for example, you will be able to add your custom fields within pages designed with the most popular page builder in the WordPress ecosystem.
Well, that’s it for the theory. Now it’s time to see it in practice. Read on to find out how to use Toolset on your WordPress site.
How do I install Toolset?
Download and activate the OTGS installer
To begin, choose one of the three licenses offered by Toolset on their official website (more info on this subject at the end of this article).
In your customer area, click on the “Downloads” link and download the OTGS installer (an acronym for OntheGoSystems, the company behind Toolset), which includes all the plugins offered by Toolset:

Then go to your WordPress administration interface. Add the downloaded zip file in Plugins > Add New > Upload Plugin. Remember to activate the plugin to finish.
Enable automatic installation of Toolset plugins
In a second step, activate the automatic installation of the different Toolset components.
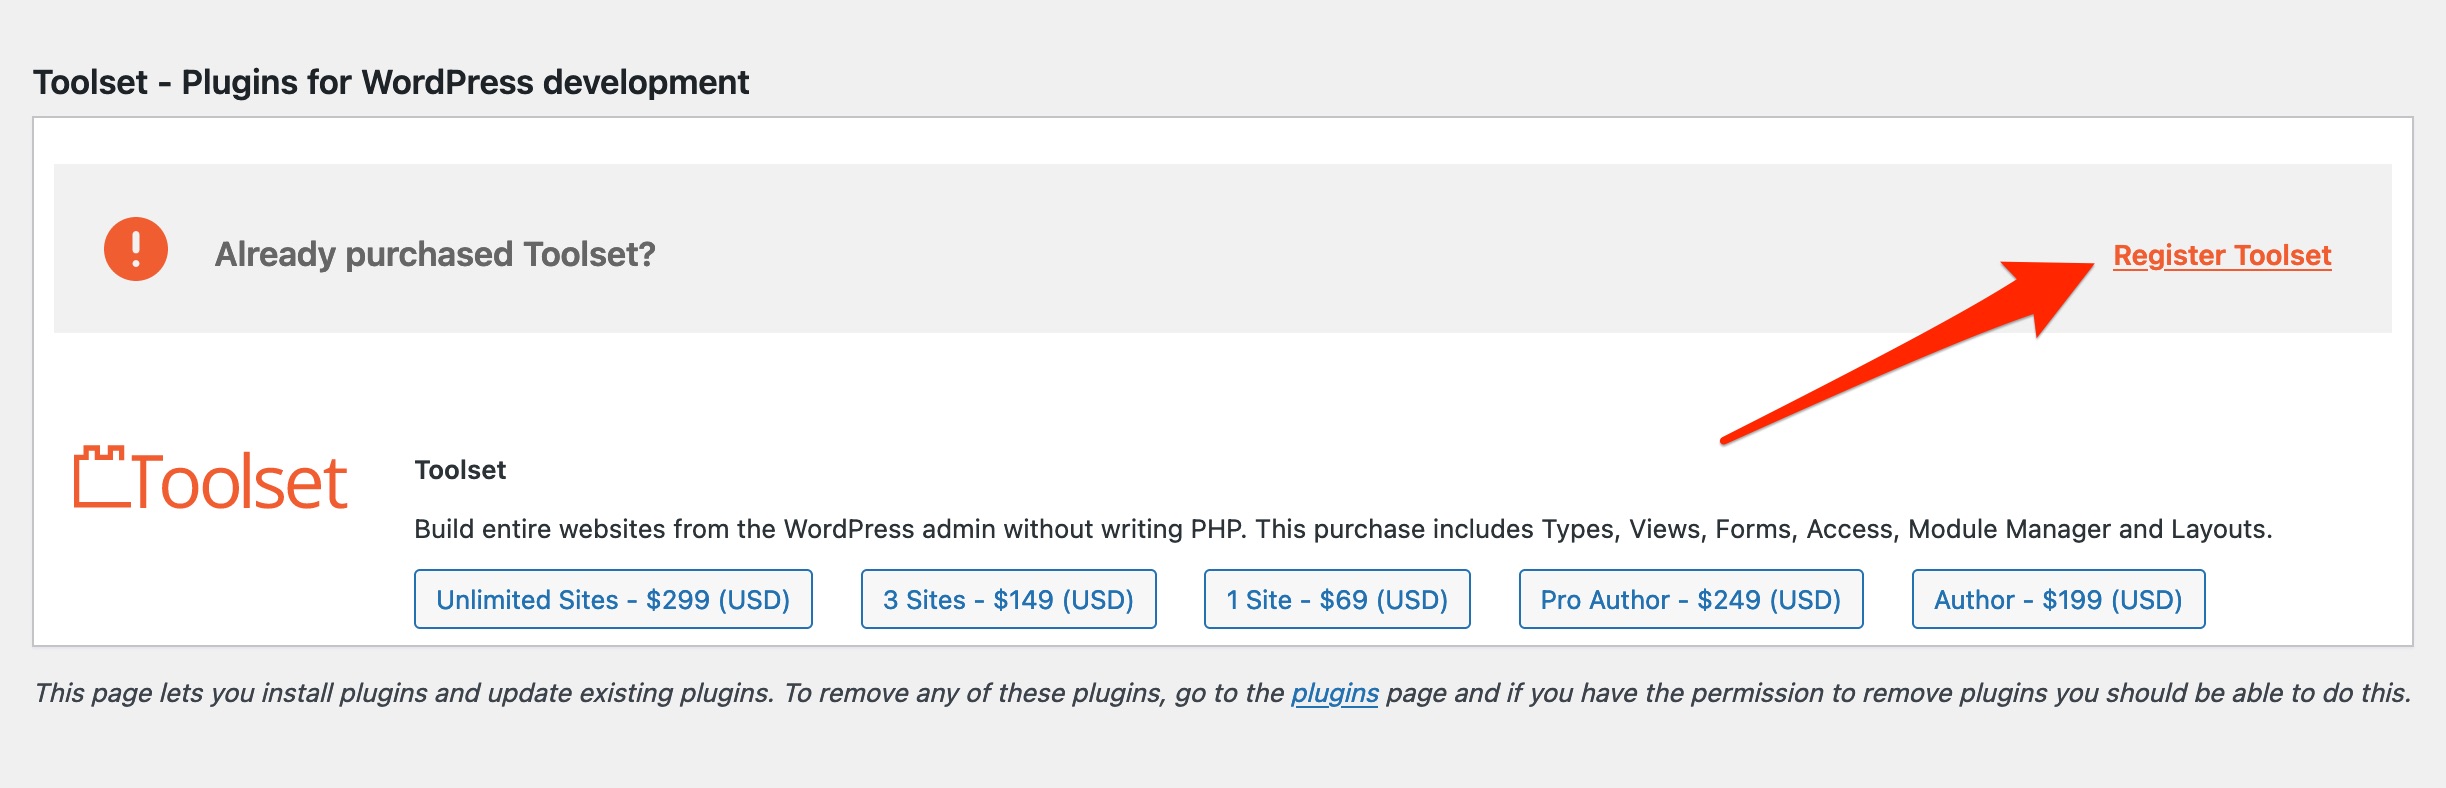
To do this, click on the “Register Toolset” link:
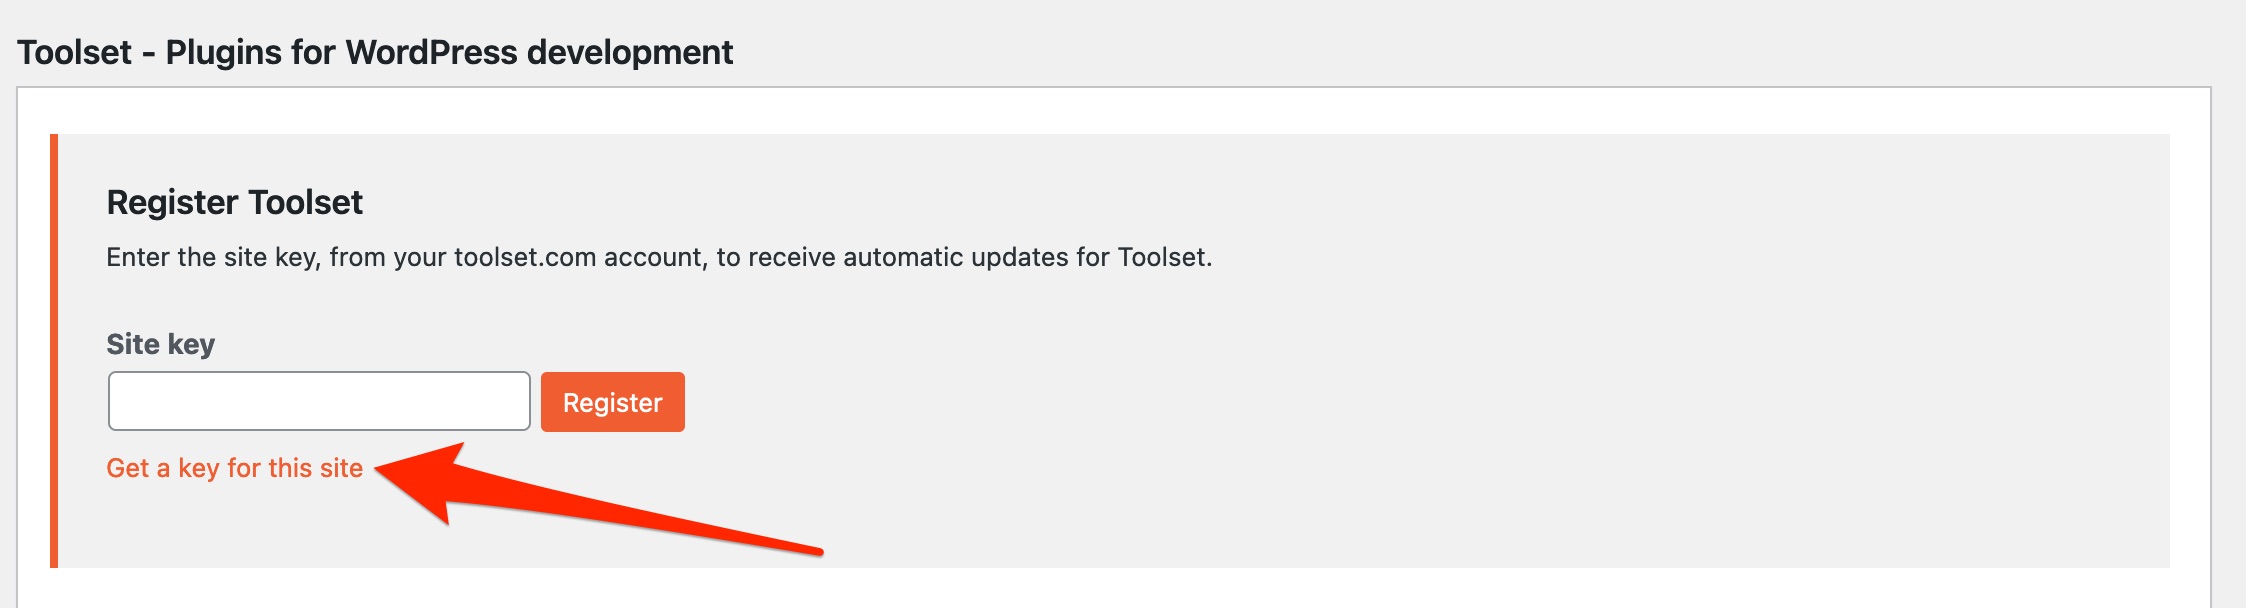
Then click on “Get a key for this site”:
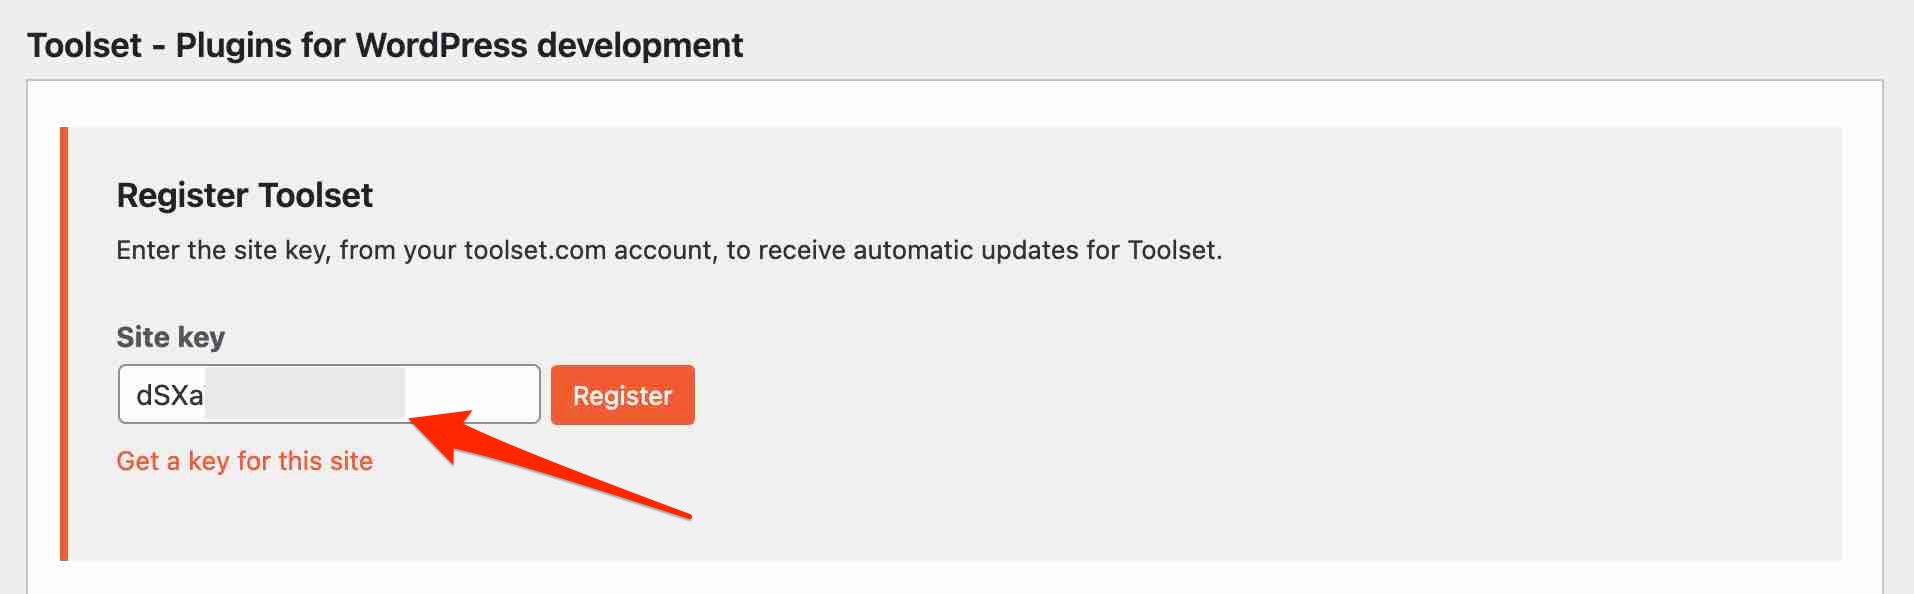
Retrieve the key generated by Toolset and add it in the box provided:
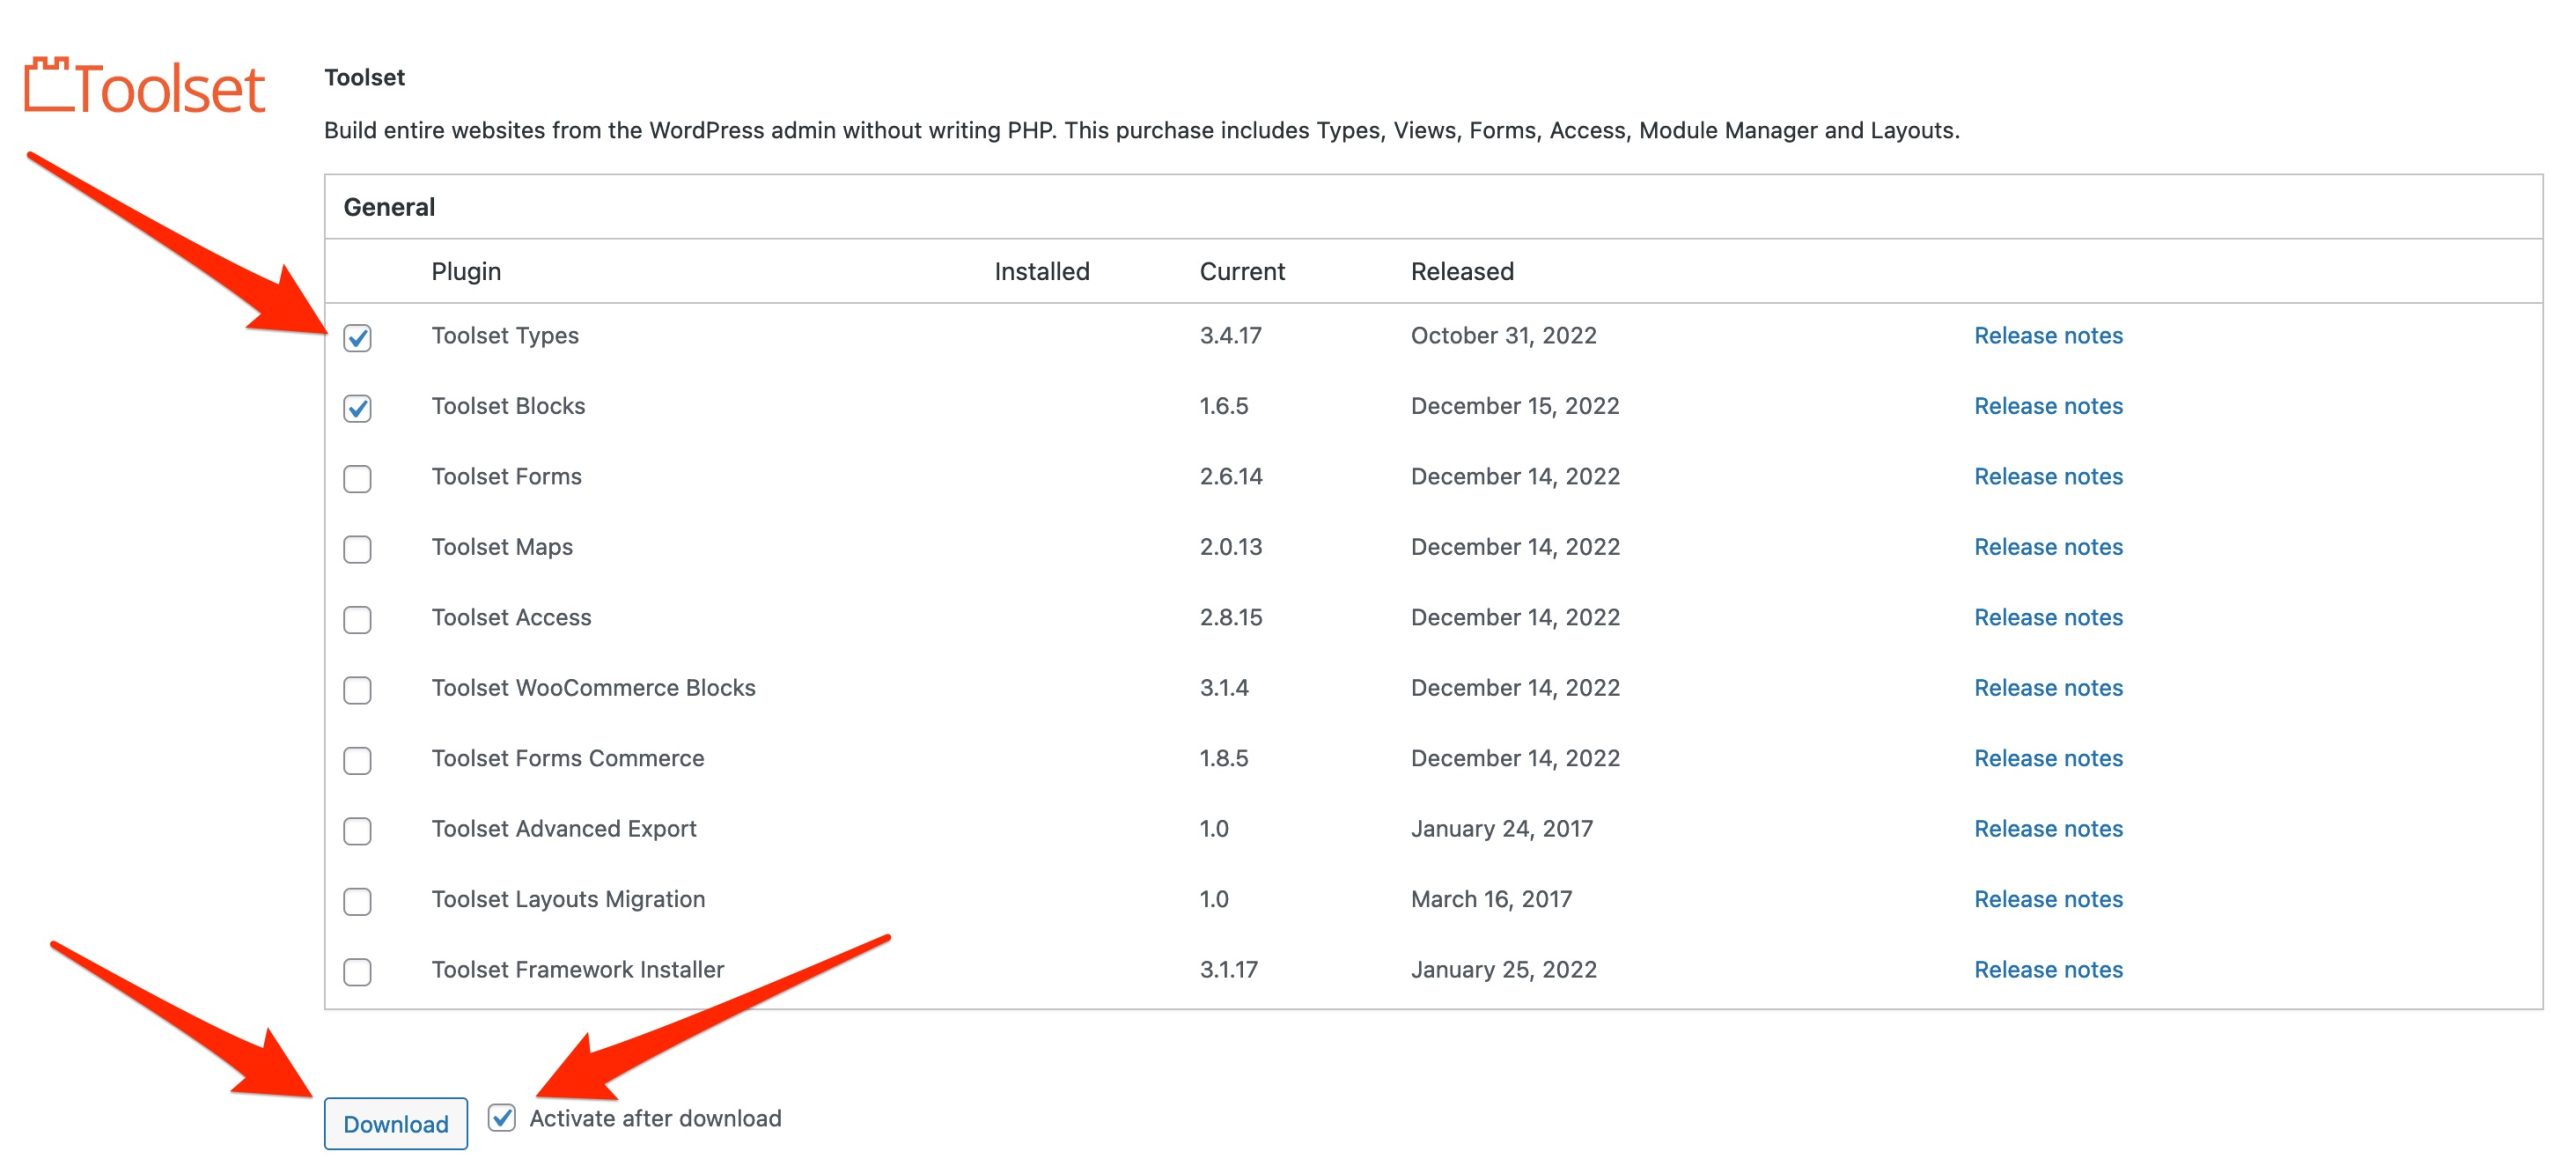
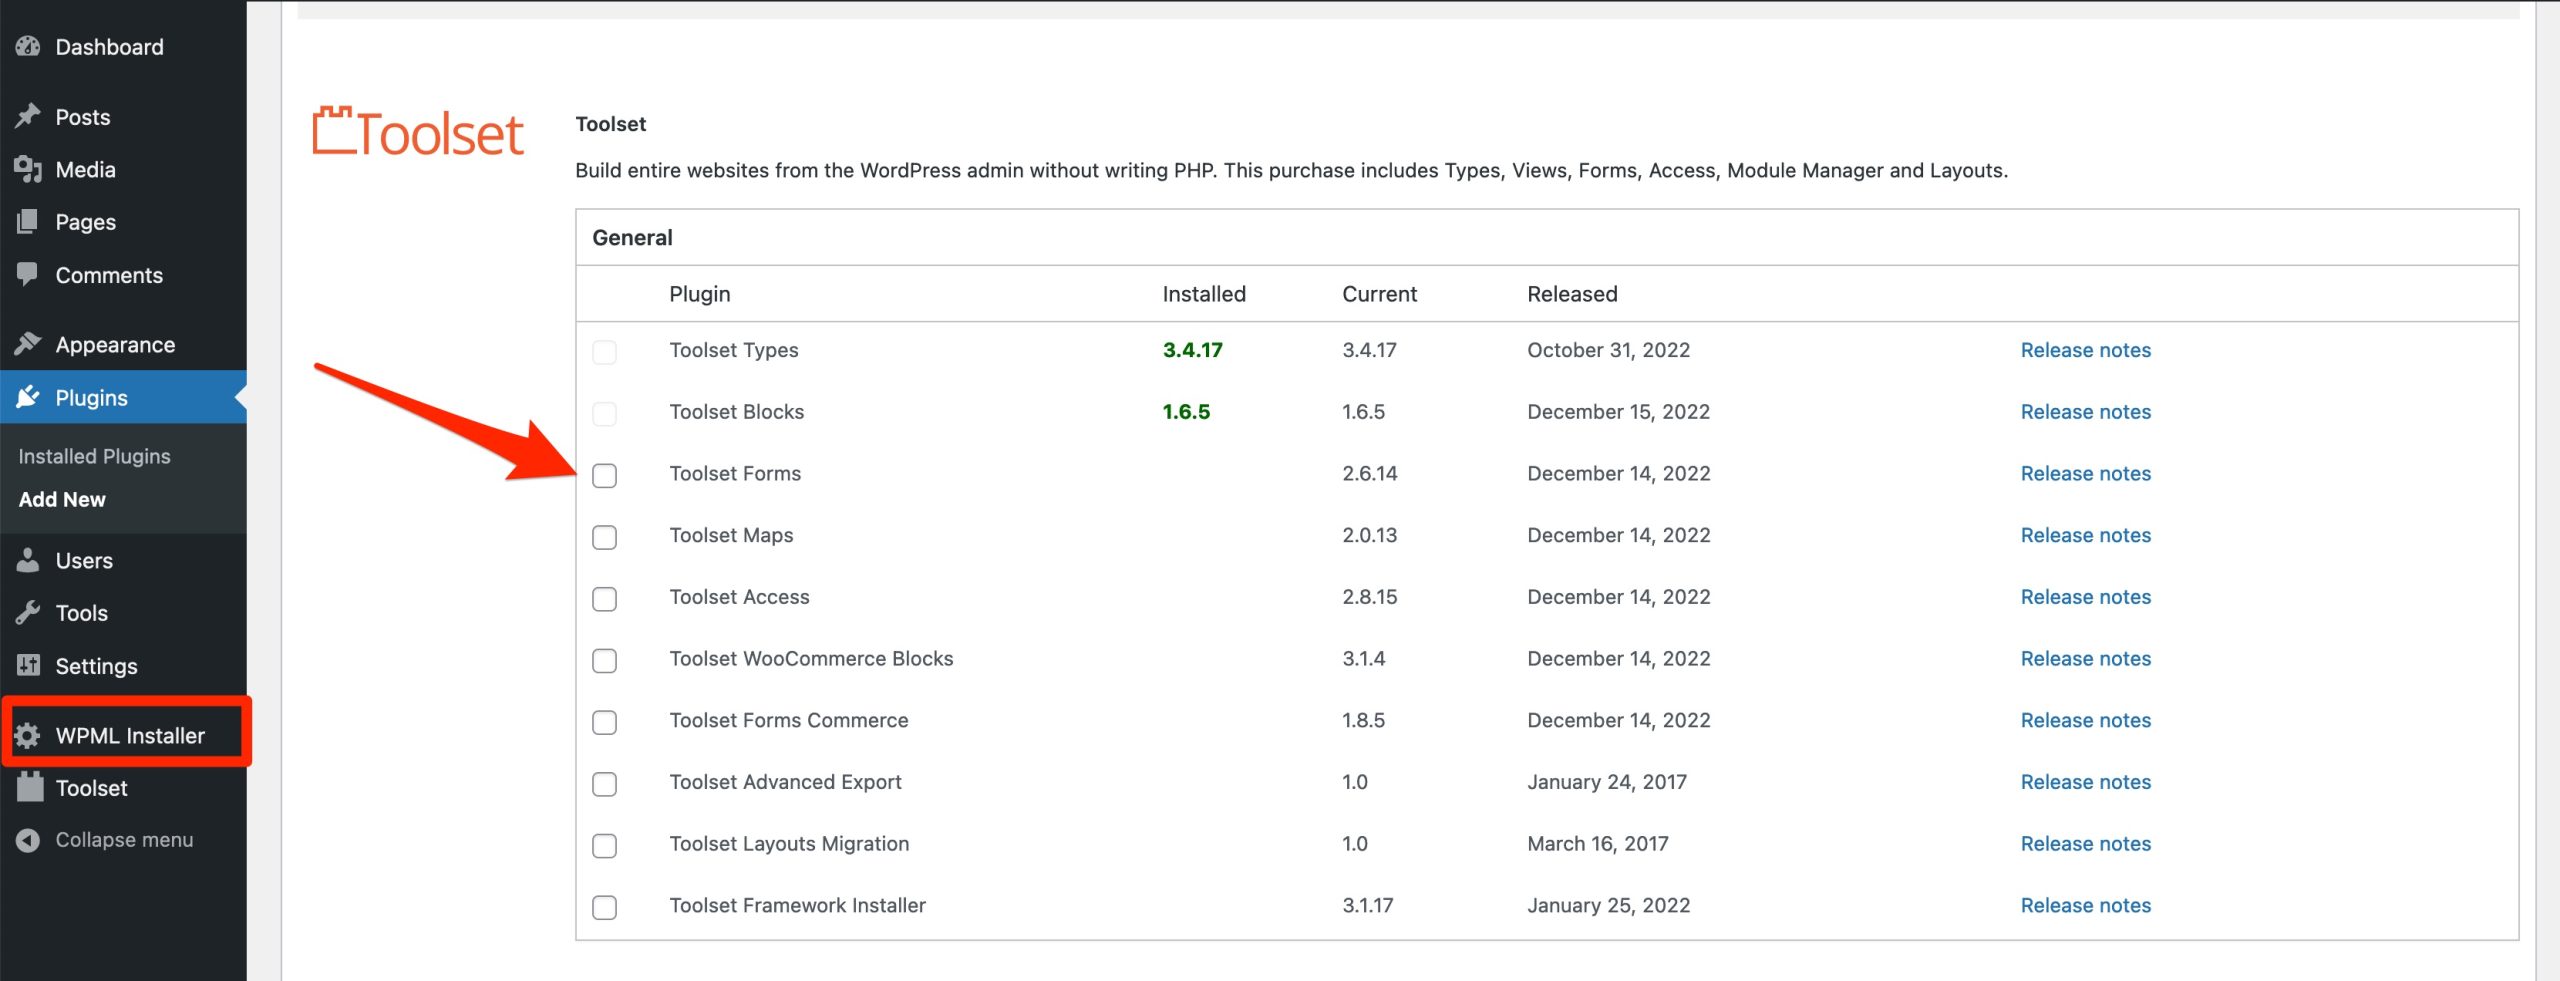
Then activate the components of your choice by selecting them (check the corresponding box).
By default, you will see that Toolset recommends the installation of “Toolset Types” and “Toolset Blocks” (the boxes are already checked) because it believes that their use is essential on any type of site.
Finish by clicking on the “Download” button. Remember to check the “Activate after download” box so that this action is performed:
Afterwards, you can first:
- Deactivate/remove active Toolset plugins from your Plugins > Installed Plugins menu
- Activate a new Toolset plugin (e.g. Toolset Forms or Toolset Maps) by going to the WPML Installer menu
In order for Toolset to function properly, some technical prerequisites are required. The memory limit of WordPress must be at least 128MB. In addition, your site must be running at least WordPress version 5.0 and PHP and MySQL versions higher than 5.6.
For security reasons, I recommend that you use the latest major version of WordPress ( at the time of writing) and a recent version of PHP (e.g. 8.0). For this last point and the server memory, contact your host to know more.

How is the Toolset dashboard organized?
The nerve center of the plugin’s settings is in the custom post type (yes, we’re back to that!), logically called “Toolset.” From here, you have direct access to the following items:
- Dashboard lists the types of content present on your site, with call-to-action buttons to create new ones
- Post types, to add new custom post types
- Taxonomies, to add new taxonomies
- Custom Fields, to add custom fields
- Relationships, to create links between different content types (posts, pages, custom post types, etc.)
- Content templates, to design custom layouts for your CPTs
- WordPress Archives, to design custom archive pages
- Settings lists settings grouped under eight tabs, including the appearance and display of Toolset
- Export/Import allows you to import or export data created with Toolset components

How to create custom post types, taxonomies, and fields
For our “technical” dive into the Toolset options, we’re going to focus on its plugin called “Types.” This is where you can create your future post types, taxonomies, and custom fields.
How do you design a custom post type?
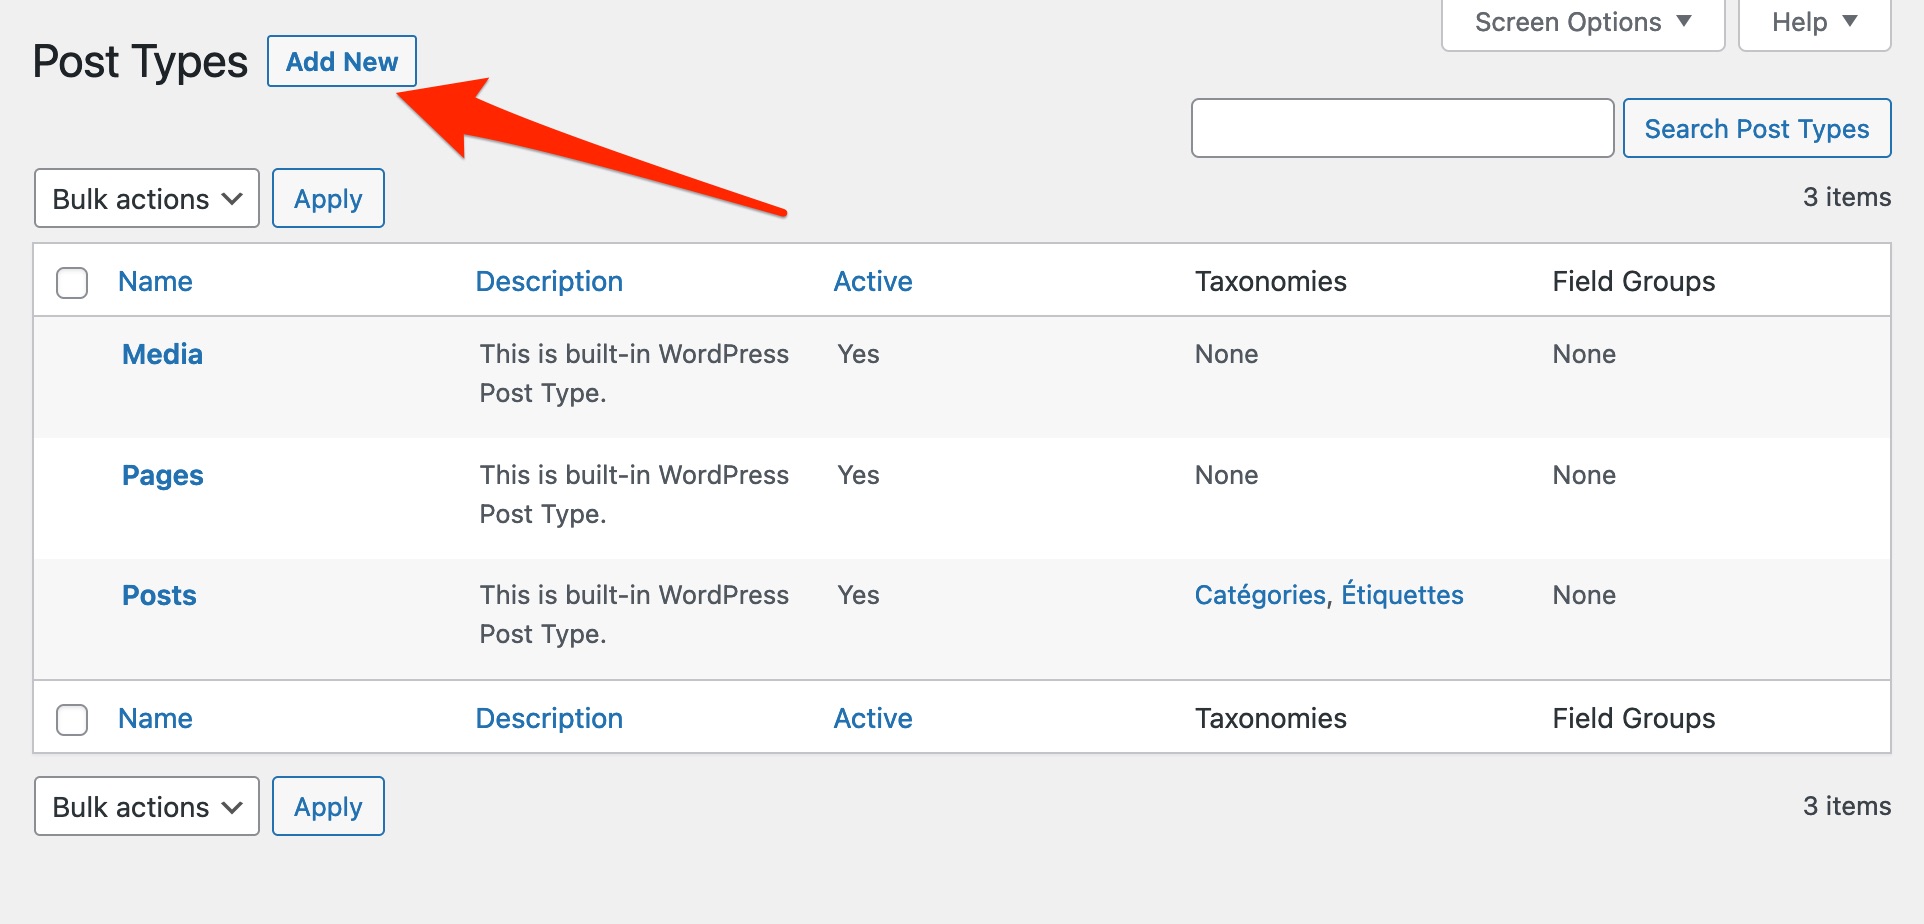
To create your first custom post type, you can either go through the plugin’s dashboard or through the Toolset > Post Types menu.
By default, you will see at least the three custom post types offered by WordPress by default:
- Posts
- Pages
- Media file
Click on the “Add New” button to get started:
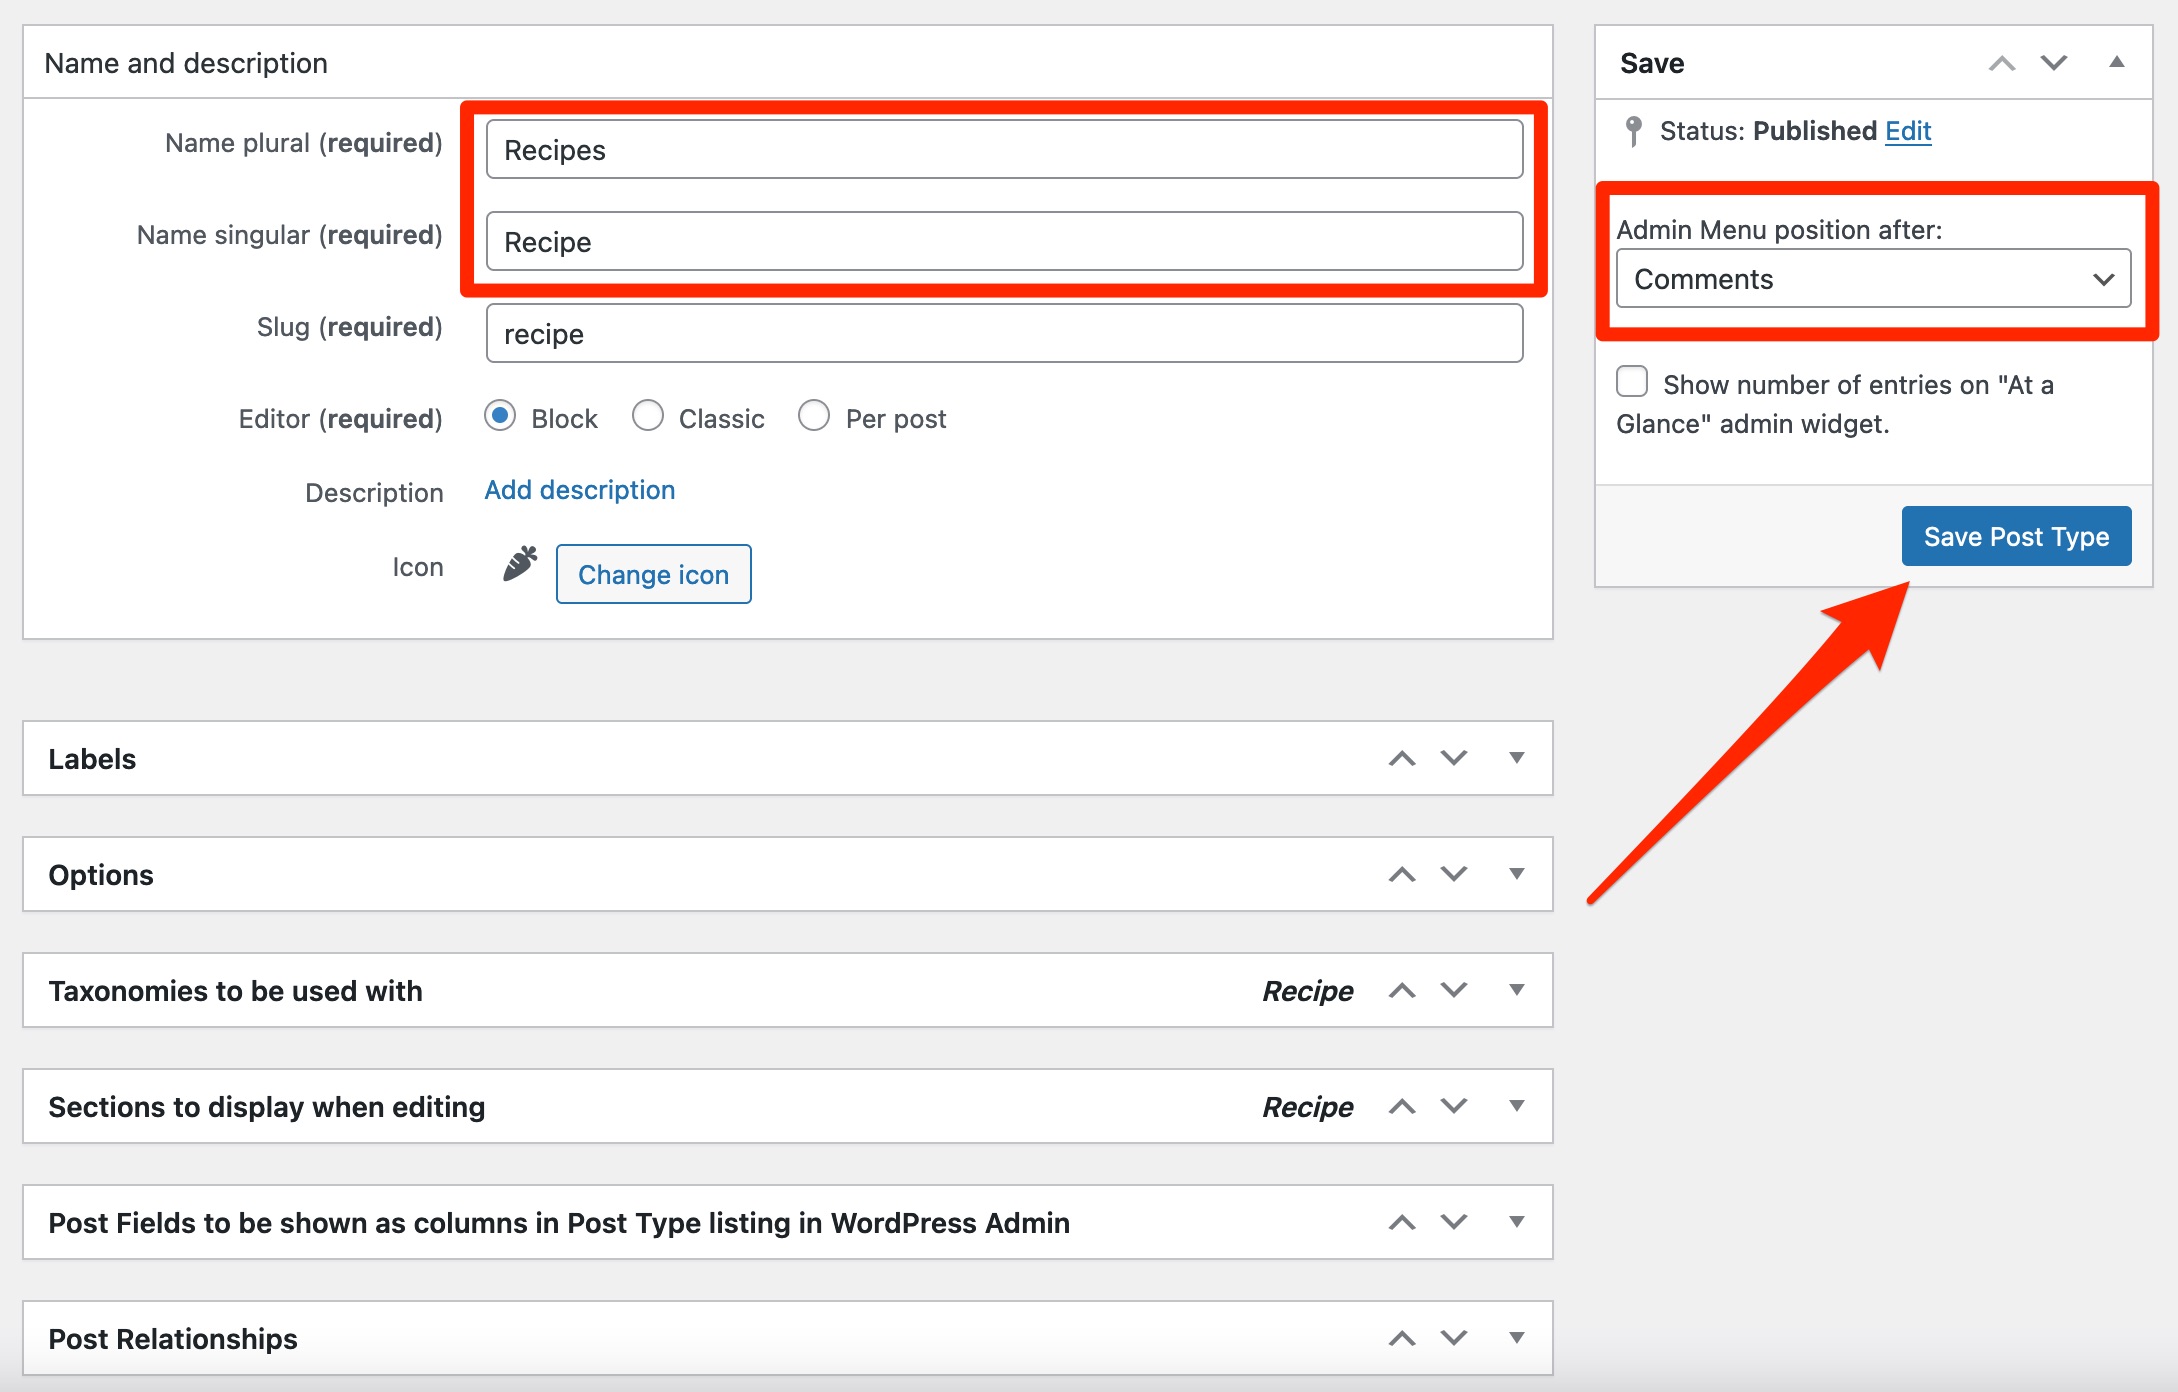
In the box called “Name and Description”, enter the name of the post type in both singular and plural. For the example, I’ll create a custom post type called “Recipe,” with an associated icon.
You can also choose its location in your administration menu, in the “Apply” box.
It is also possible to make adjustments to the labels and taxonomies to be applied to your new custom post type in the following boxes. For now, you can leave it as is.
Click “Save Post Type” to create your CPT.
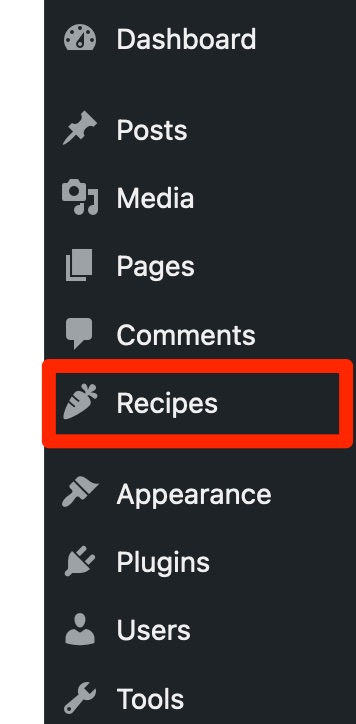
This CPT will now be found in your administration interface, below the “Comments” CPT.
How to create a custom field
The next logical step is to add custom fields to your “Recipes” post type to include key information for each recipe you publish.
To do this, you can either go to Toolset > Custom Fields, or go through your dashboard.
On your dashboard, you will find your new “Recipes” post type. Simply click on “Add custom fields”:

A highlighted window will then display the different types of custom fields you can incorporate. For our “Recipe” custom post type, for example, we could add a custom field to indicate the preparation time.
Select the “Number” field to do this:
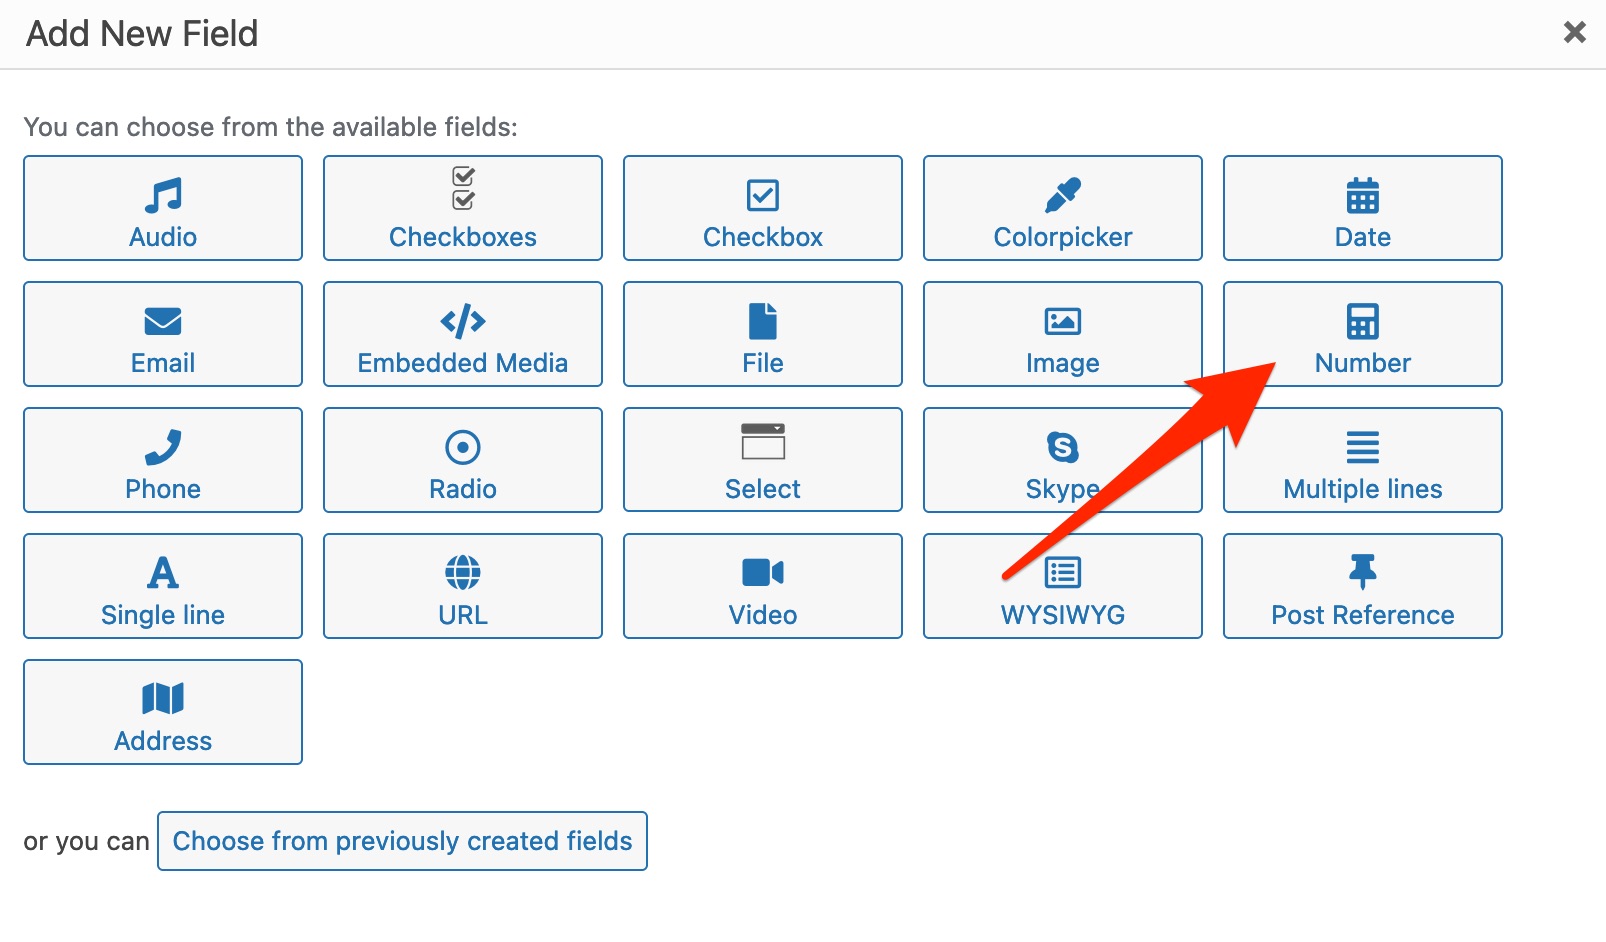
Then enter the name of the field (“Preparation”). For the rest, you can leave the default settings. Remember to click on “Required” next to “Validation” if you want the preparation time to be entered on each of your recipes.
Finish by clicking on the “Add New Field” button to add other fields (e.g. a front page image for each of your recipes).

When you have finished adding your fields, save the group of fields at the top right:

Now, as soon as you add a new recipe through the Recipes > Add New menu, your custom fields will appear at the bottom of the WordPress content editor:

How to create a taxonomy with Toolset
Finally, I’d like to create a taxonomy for our “Recipes” custom post type.
This will allow us to categorize our recipes according to their difficulty. To do this, go to Toolset > Taxonomies > Add new.
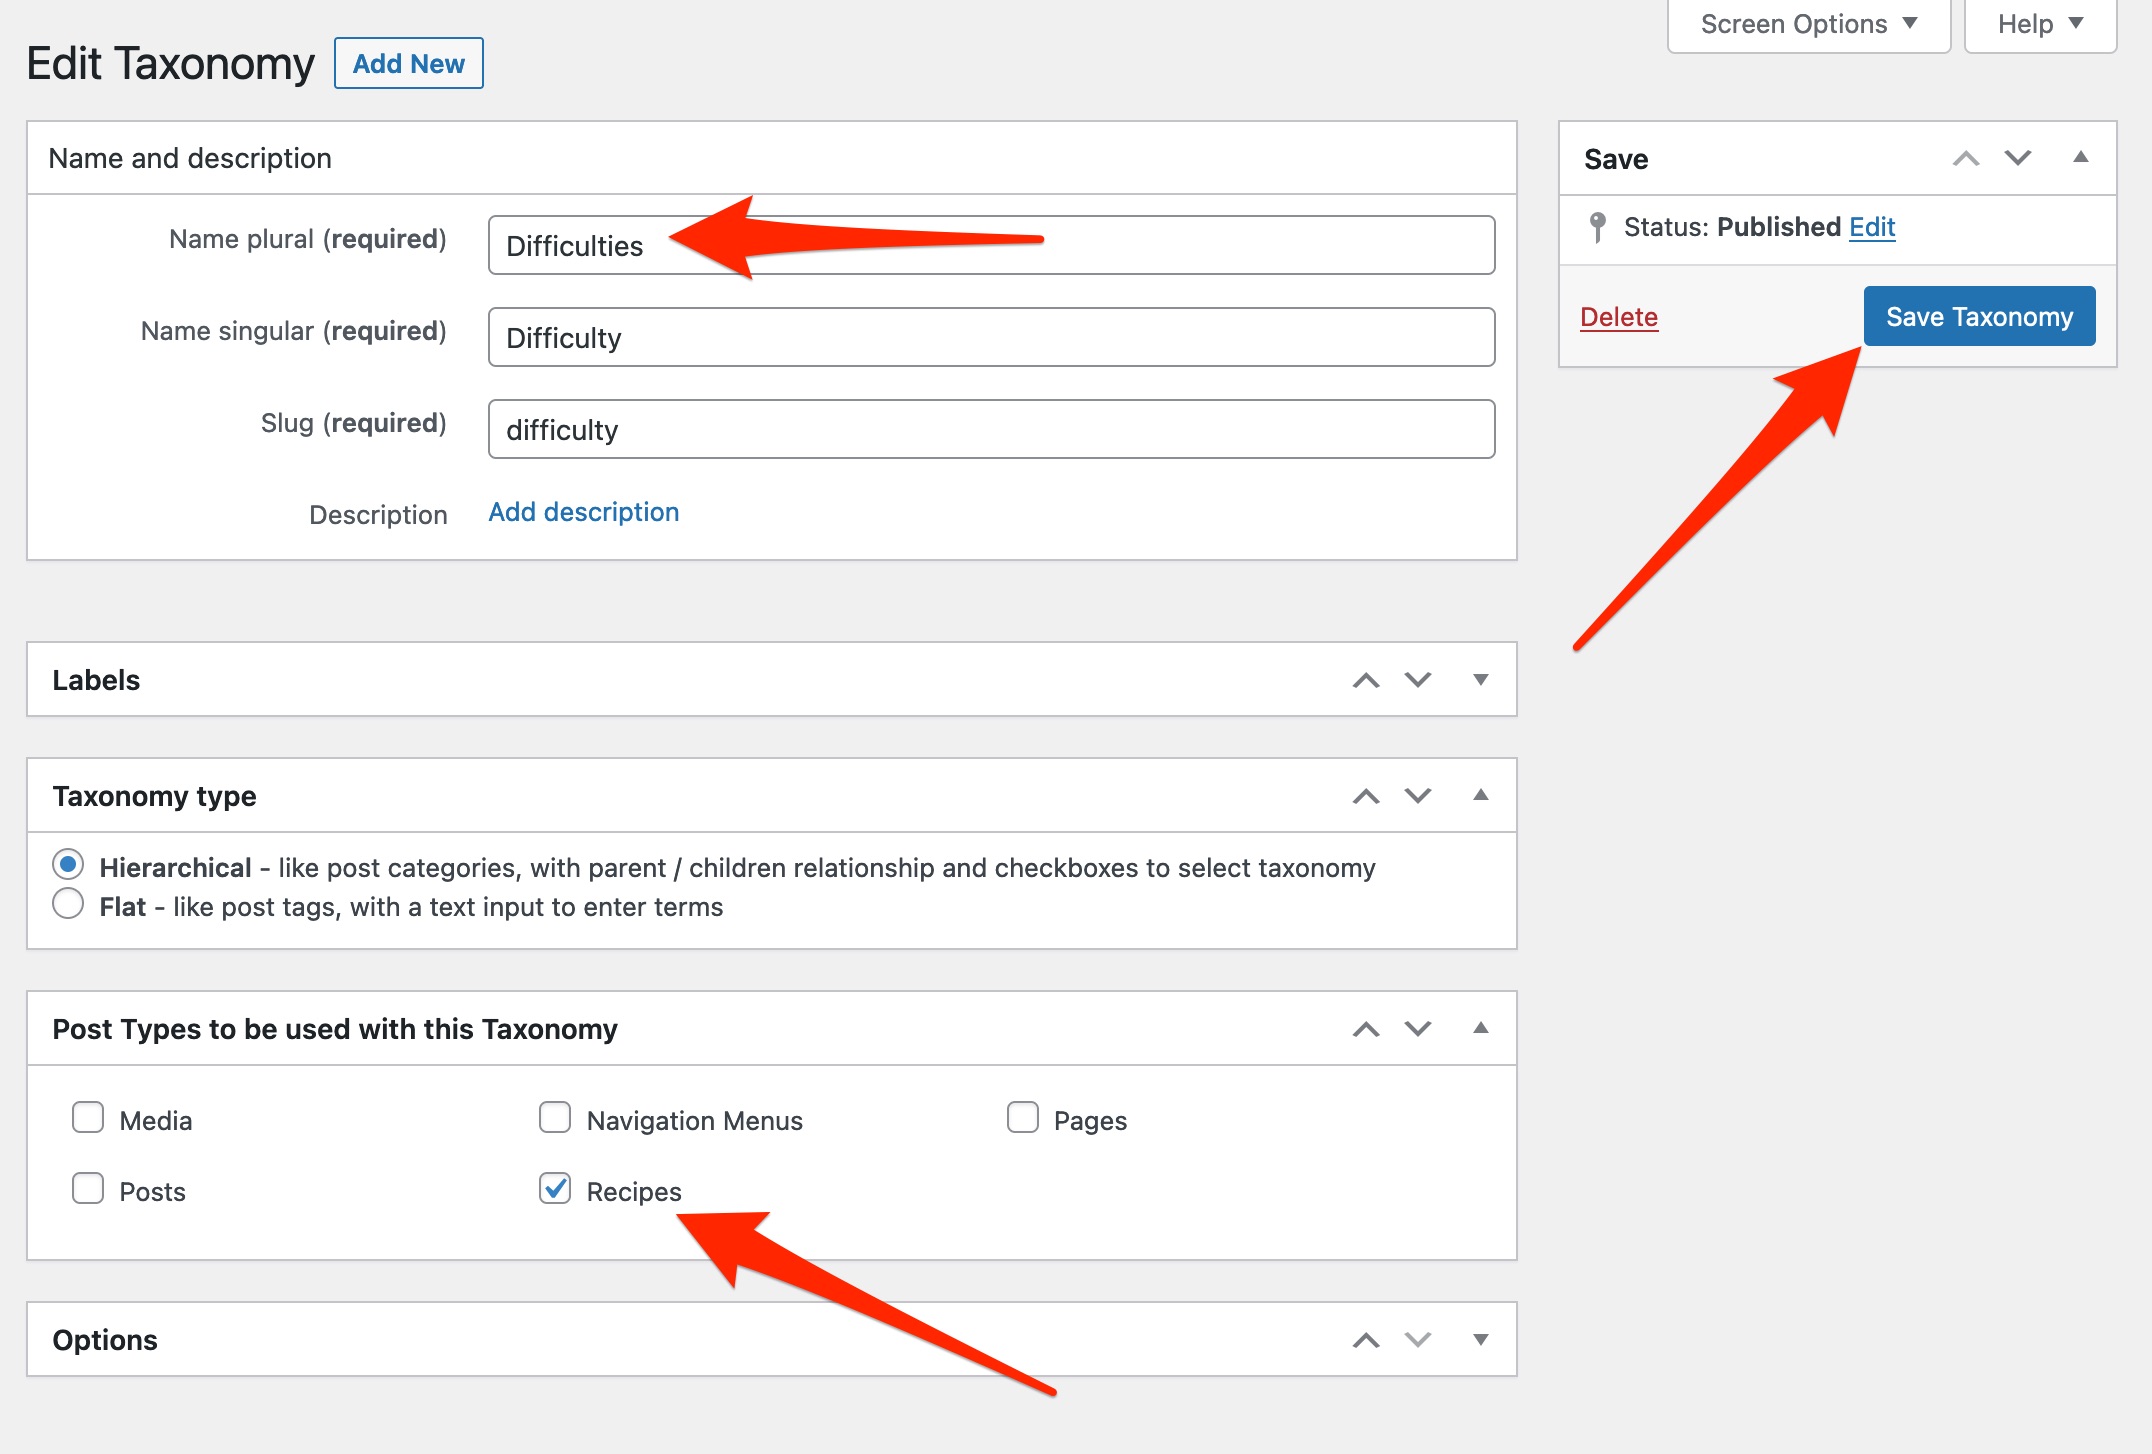
Enter the name of the taxonomy (singular and plural). For the example, I choose the “Difficulty” taxonomy.
Then choose a taxonomy type (hierarchical or flat) and assign it to your custom post type (in our case, the “Recipe” CPT).
Finish by clicking on the “Save Taxonomy” button:
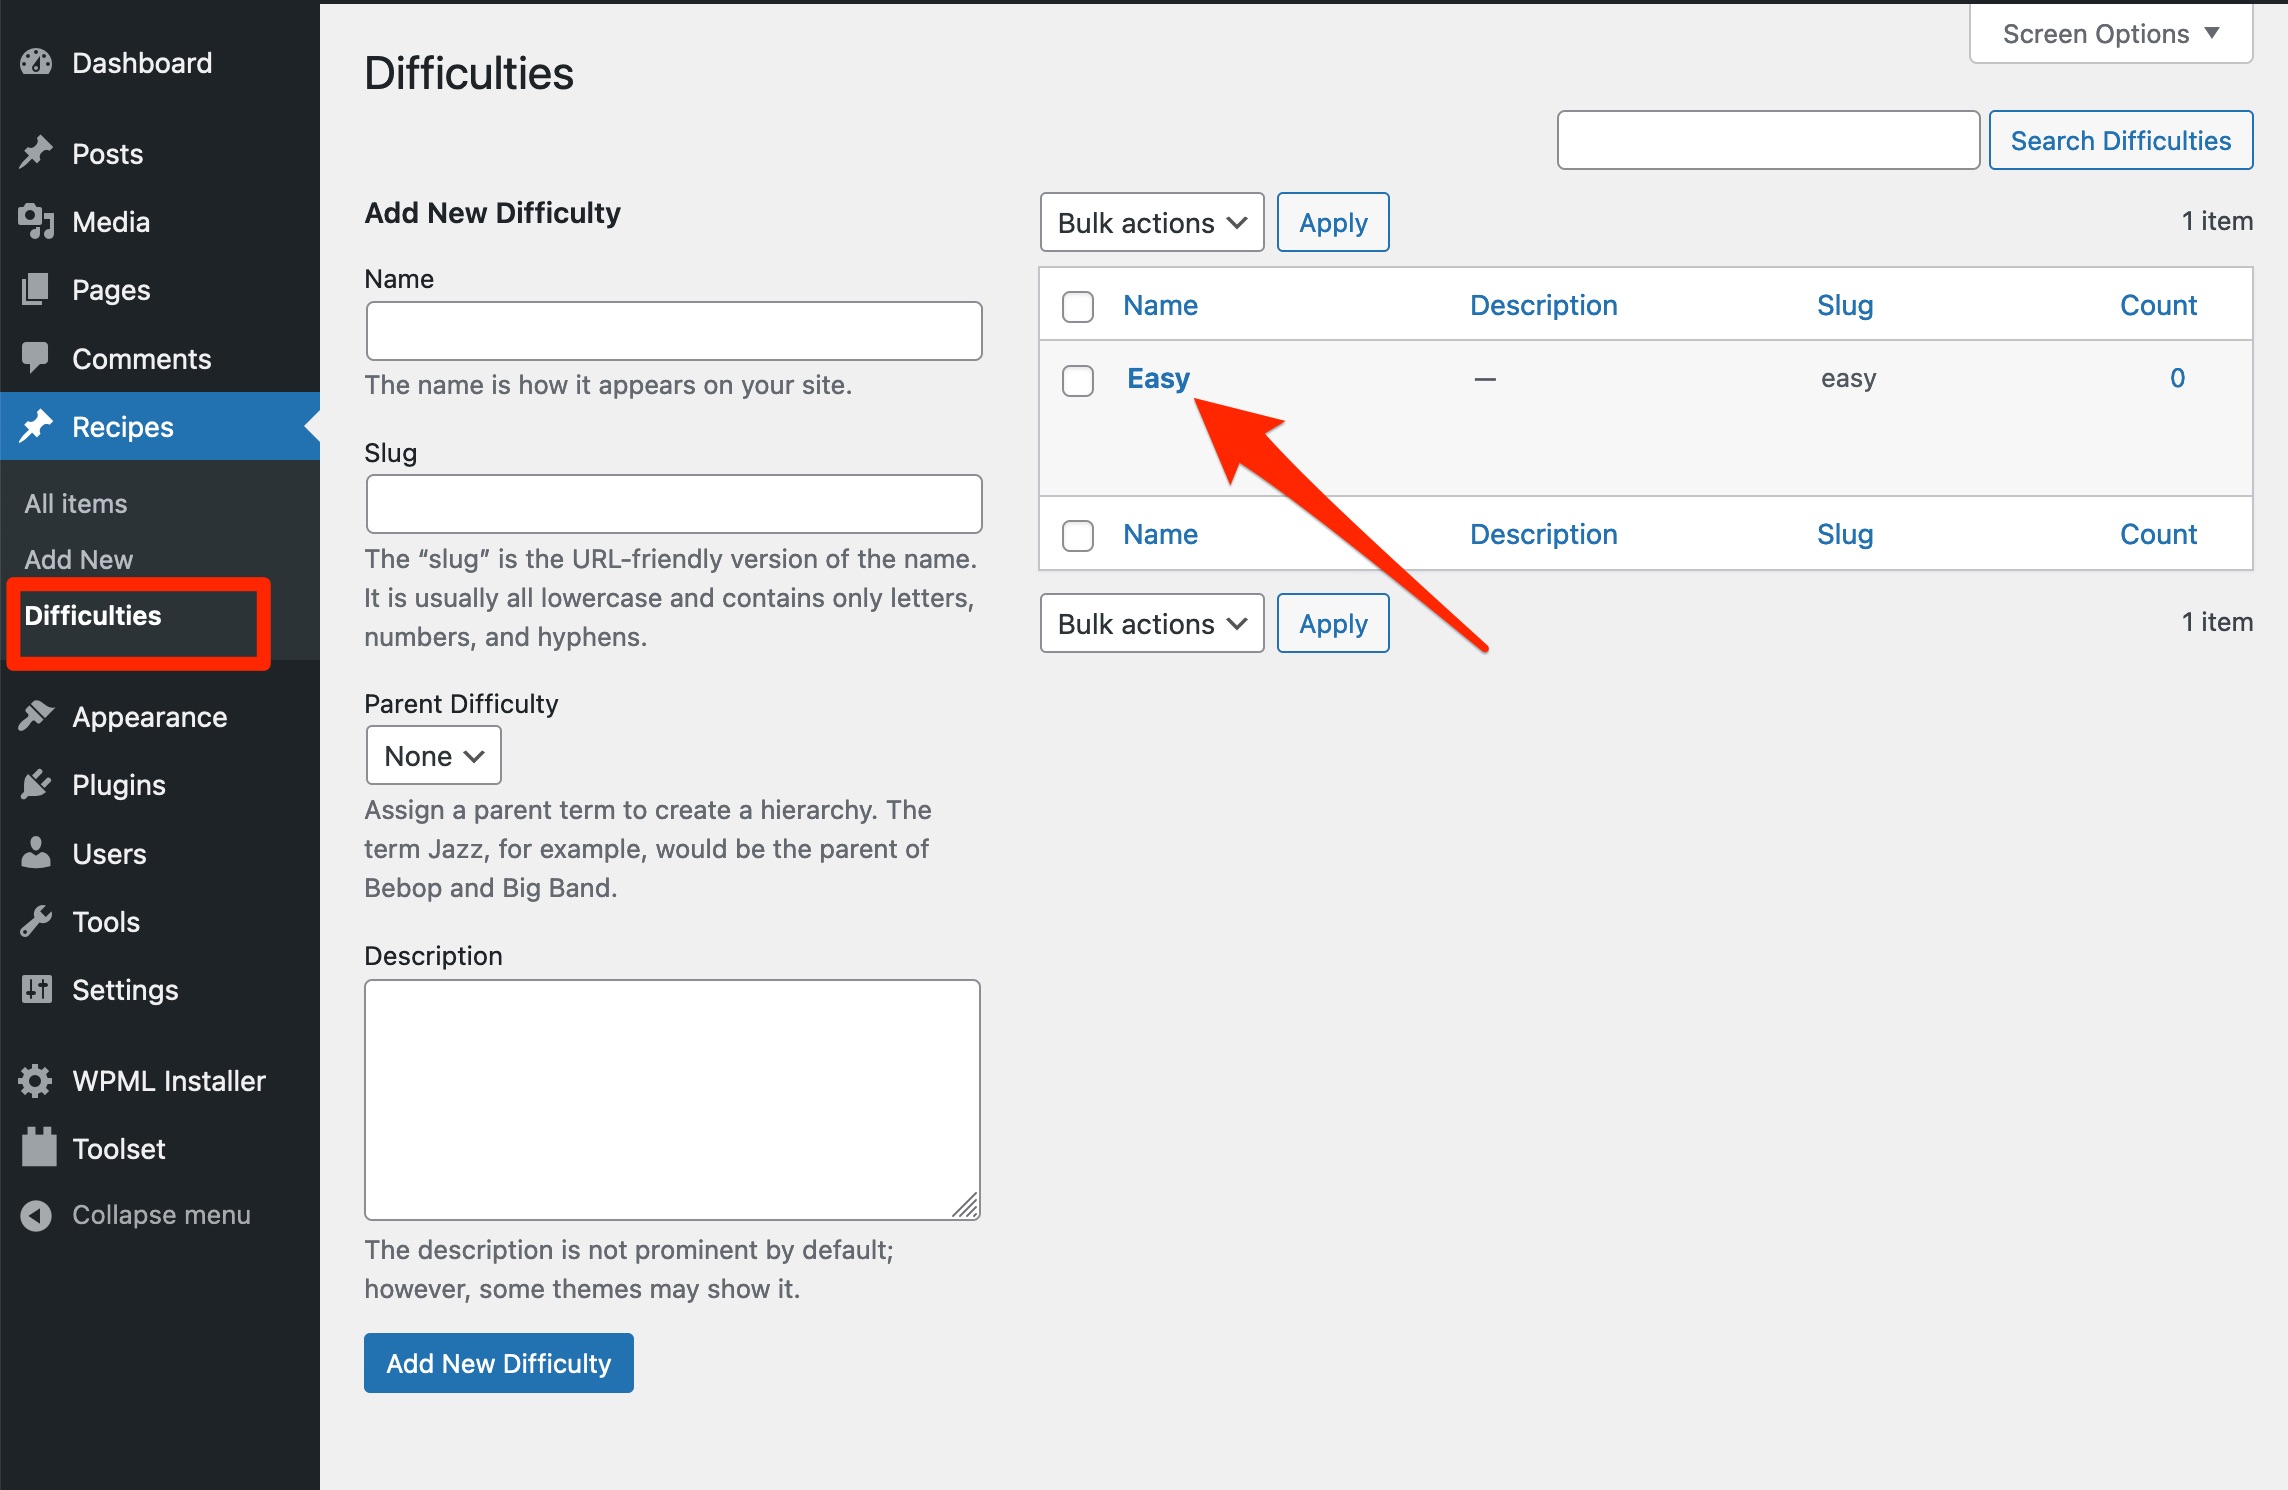
Your new taxonomy appears in your “Recipes” custom post type. All you have to do is add the difficulty of your choice (e.g. easy, intermediate, expert), as you would for the categories of your posts:
And that’s it for one of the major features — adding custom post types — offered by Toolset.
Let’s continue the tour of this plugin with a look at Toolset’s other options. As you will see, you can do lots of creative things with it.
The other features of Toolset
Toolset blocks to customize the design and display dynamic content
The Toolset toolbox offers around 20 blocks for the content editor, similar to those offered by specialized plugins such as Spectra, Kadence Blocks, and Stackable.
You’ll first notice the classic blocks, such as the “Title,” “Button,” “Image,” and “Video” blocks.

Well, classic in appearance anyway, since these blocks have an option to display dynamic information — information that changes from one publication to another — such as fields and other custom content that you may have already created.
This is very useful if you want to display images from a portfolio that have their own custom fields. To understand how it all works in practice, here’s a video presentation:
Dynamic content display is possible for both basic WordPress blocks and Toolset blocks, of course. But this option can also be applied to popular Gutenberg block plugins like Stackable, to name only one.
Finally, note that you can display the blocks of your choice thanks to conditional logic. For example, you can choose to display a title only when a certain condition is met (e.g. based on the user role, date of a publication, etc.).
This is made possible thanks to the “Conditional Logic” block, as you can see:

Powerful forms
With Toolset, you can also create very advanced forms to meet particular needs (using the “Toolset Forms” plugin). Here is a small overview of the types of forms you can create:
- A form to allow your visitors to edit the content of your choice without being connected to your site. In the case of a membership site for example, your visitors could be able to enter the information of their choice, which you can then validate or not after the submission of the form.
- A registration form for your site
- A connection form to your site
- A payment form to submit payment information to your site
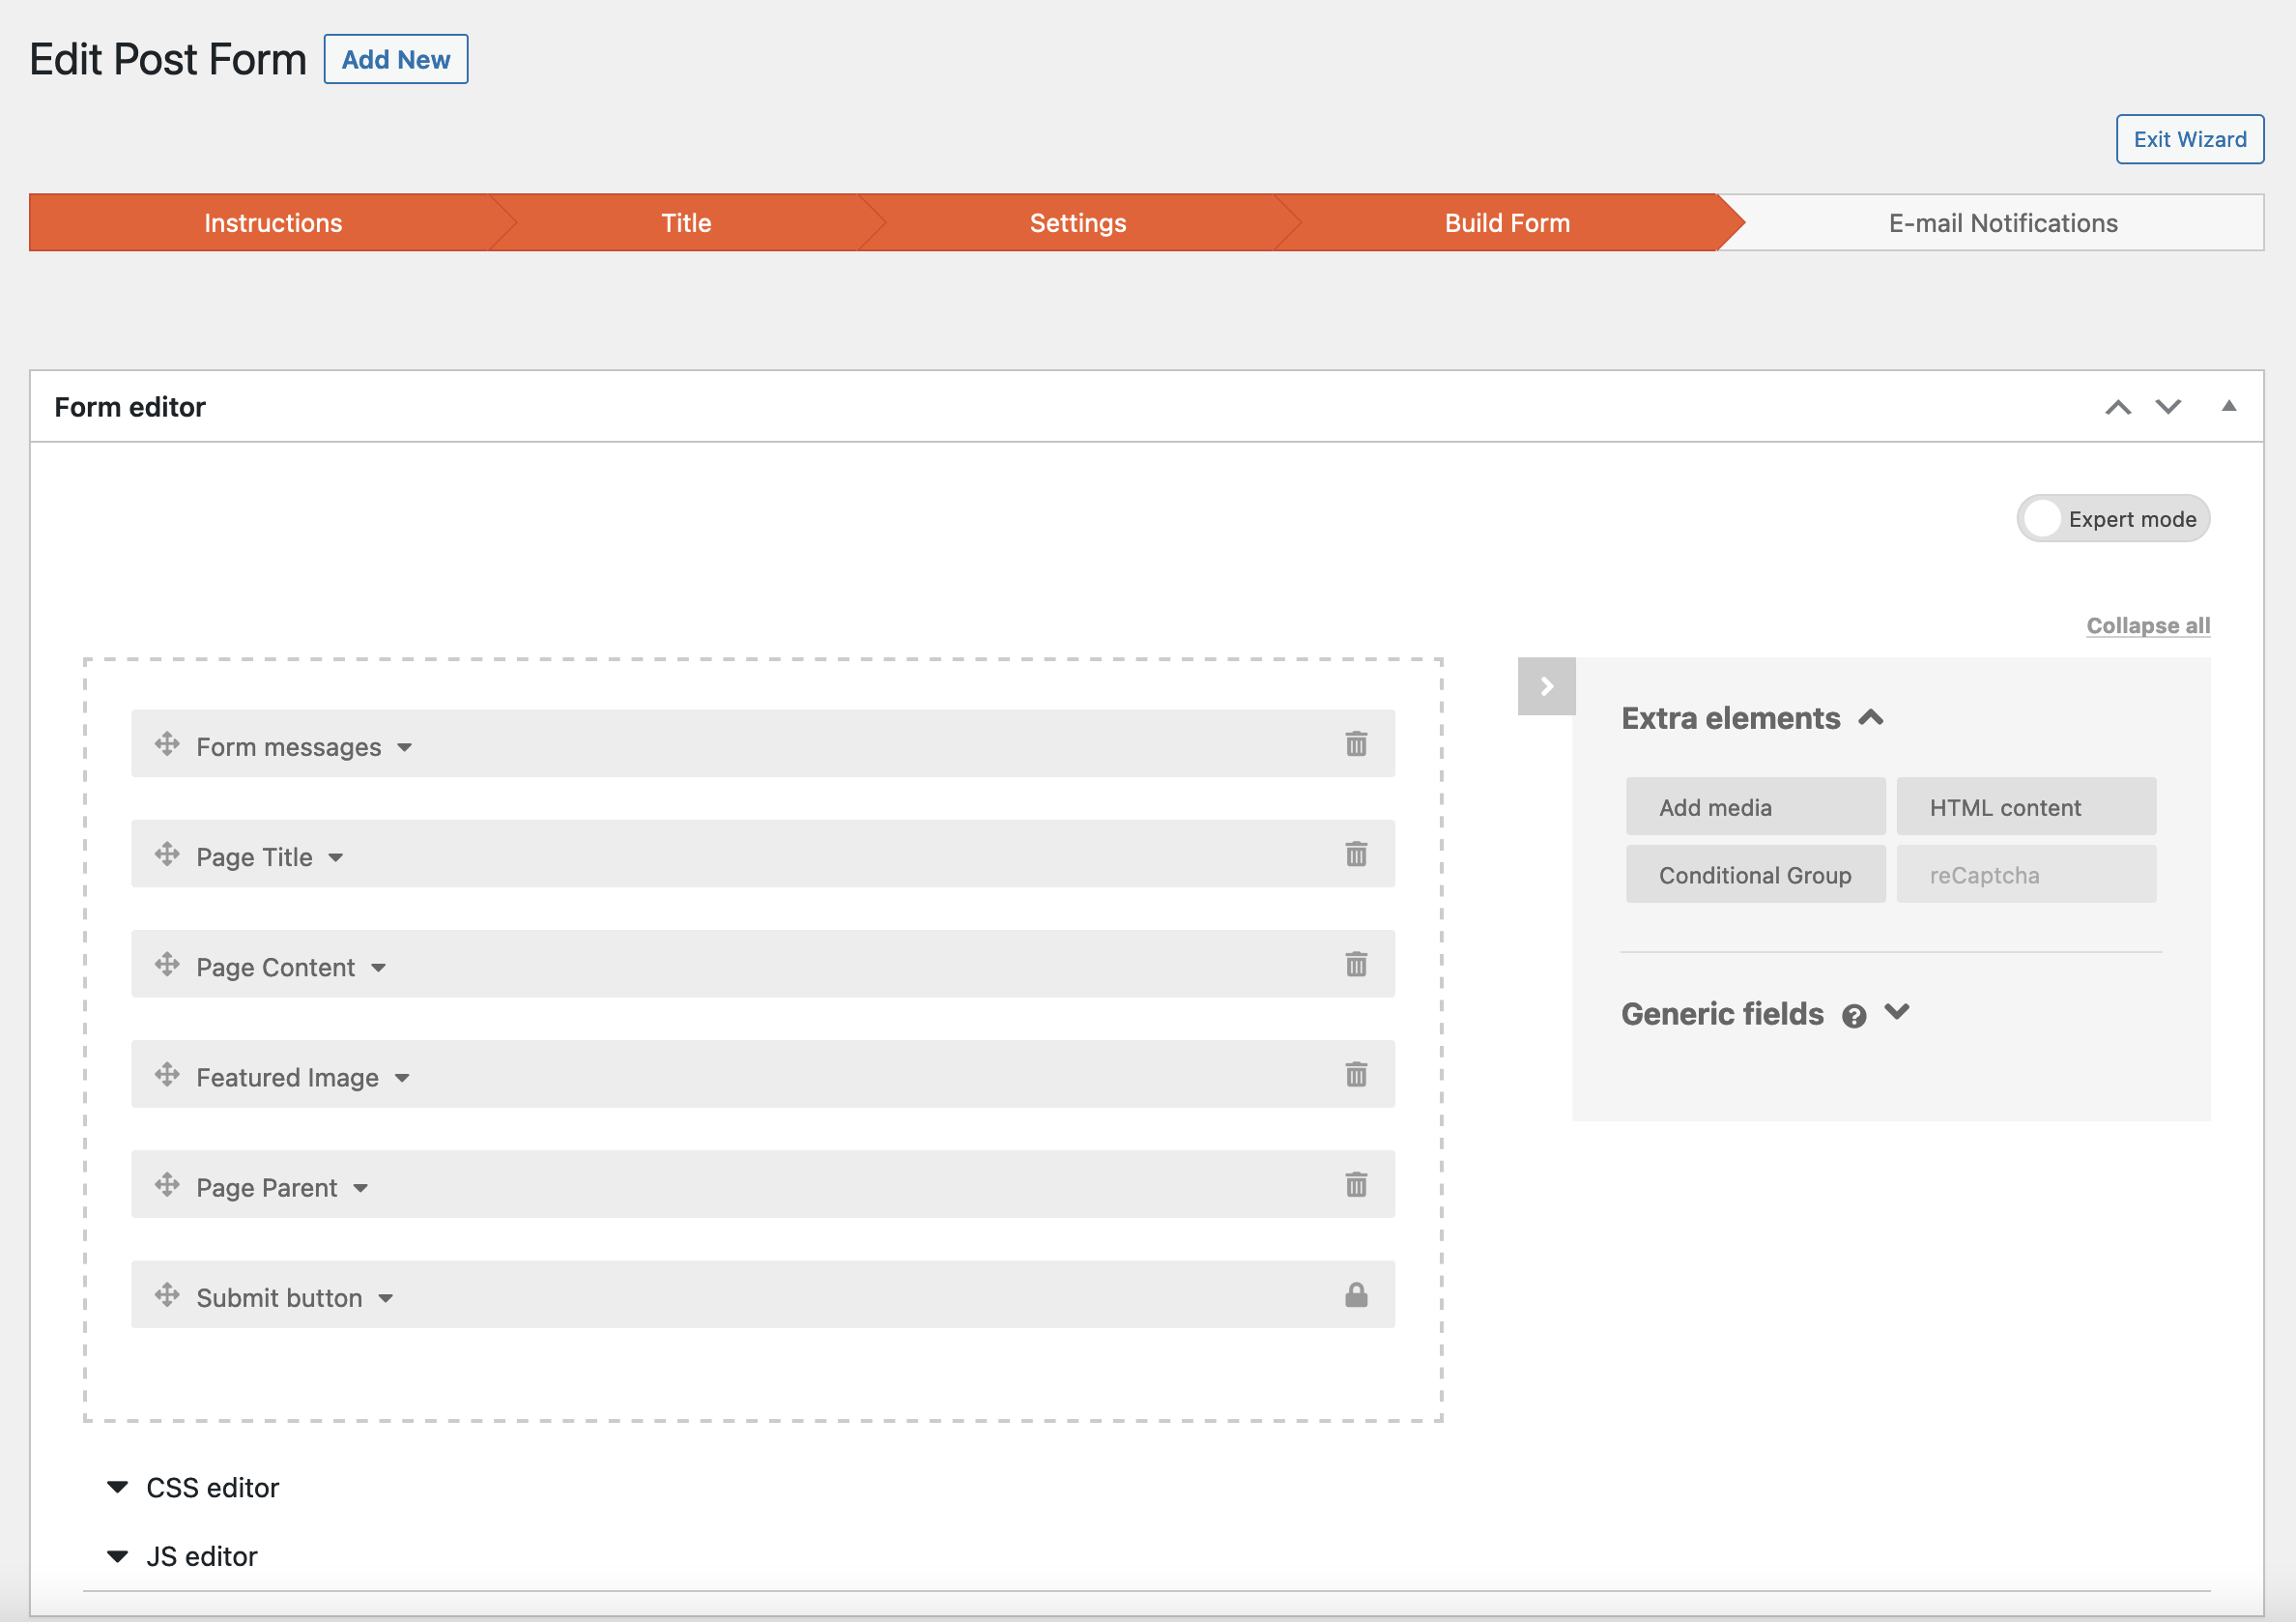
Toolset offers a drag-and-drop form creation interface from which you can also display conditional fields. Each form also benefits from anti-spam protection with Google reCAPTCHA (provided you activate an API key beforehand).
The implementation of access restrictions
Thanks to the “Toolset Access” plugin, you can control which user has access to which type of content on your site. It is also possible to control the capabilities (permissions) of the users of your choice.
Here are a few examples of what you can do through the Toolset > Access Control menu:
- Control which users can view and edit certain fields and custom post types
- Create users and assign them the role of your choice
- Restrict access to certain pages, for example if you want to market paid content
- Grant specific roles and privileges to certain members of your site
- Set the permissions that certain users of your site will have (e.g. edit content, submit images, edit files, etc.)
Creating interactive maps
With Toolset Maps, you can create interactive Google Maps and Microsoft Azure Maps, provided you have an API key for each service (more on Google Maps in this article).
You will be able to add static or dynamic markers and a custom style for your Google Maps, for example on a “Contact” page, or link each map to a specific form created beforehand.
For a more advanced use, it is also possible to display a list of articles linked to an address and a specific marker, thanks to the “View” and “Map” blocks:
Advanced ecommerce options
Finally, if you have a WooCommerce online store, Toolset has several useful features to help you customize your site.
First of all, enable the “Toolset WooCommerce Blocks” plugin, so you can have 12 additional Gutenberg blocks available, including:
- A message after a product is added to the Cart
- Product attributes
- The average rating of a product
- User reviews
- Etc.
It’s possible to go much further in the customization, for example by adding custom fields to your WooCommerce products, or especially by designing a custom product search page containing the filters of your choice, including your custom fields/taxonomies, if needed:

We’ve reached the conclusion: I’m done with the presentation of the major features of Toolset. I should point out that the list of options I covered was not exhaustive. You can imagine a lot of additional uses, because the plugin is ultra-customizable.
If you want to use it on your site, you probably want to know how much it costs. Answer below.
How much does Toolset cost?
Toolset is a premium plugin that offers three licenses whose names indicate their use:
- 1 Site costs €69 (i.e. $75).
- 3 Sites is priced at €149 (i.e. $161).
- Unlimited Sites is priced at €299 (i.e. $325).

The choice of a license depends on the number of sites on which you intend to use it. Support and updates are included in each license, as well as all the features (the different plugins) of the tool.
Note also that you benefit from:
- A discount on the license plan at each annual renewal (about 30% off the initial purchase price)
- A 30-day money-back guarantee
- A free tool to test Toolset, if you wish, which is a good way to see what the plugin has to offer if you are hesitant to adopt it
What are the alternatives to Toolset?
If Toolset doesn’t appeal to you (if it seems complicated to use, for example), but you want to take advantage of the features it offers (e.g. creation of custom post types), don’t panic!
You can find what you’re looking for elsewhere in the WordPress ecosystem, either on the official directory or in specialized stores.
Among the most famous competitors to Toolset, I could mention:
- Advanced Custom Fields (ACF)
- Pods
- Custom Post Type UI
- Meta Box
- WP Grid Builder and FacetWP (to filter your content)
Our final opinion on Toolset
To conclude this article on Toolset, it’s time for a recap of the topics covered, including an analysis of the strengths and weaknesses of the plugin.
Advantages of Toolset
- The plugin facilitates the creation of custom post types, taxonomies, and fields.
- Multiple plugins in one, so you don’t have to install plugins from different developers at the same time. In principle, this reduces the risk of incompatibilities.
- The wide range of options offered (but beware, this is also a drawback in my opinion!).
- The fact that Toolset uses the basic “infrastructure” offered by WordPress: settings offered on the default WP interface and Gutenberg blocks in the content editor.
- The documentation is well designed, with video lessons specific to the type of site you want to create.
Disadvantages
- The handling is not straightforward at the beginning. One navigates among many options, plugins to activate or not, etc.
- The plugin is complex to use for a beginner. Even if you don’t need to code to implement Toolset’s options, you need a good technical background to understand and know what you want to implement.
- Toolset does not offer a free version.
Who should use Toolset?
I would not recommend Toolset to a beginner WordPress user for at least two good reasons:
- He would be likely to pull his hair out when confronted with all the features.
- He would not need all the options offered by the plugin.
After this test, I think that Toolset is primarily aimed at users with a good technical background, i.e. intermediate and advanced profiles.
With this plugin, a developer will save time in designing sites with dynamic content and incorporating his own custom post types.
On the other hand, if you want to launch a static showcase site to present your business, no need to bother with Toolset.
What do you think of this plugin? Do you use it or do you prefer a competing option, perhaps?
Give me your opinion by posting a comment!

Receive the next posts for free and access exclusive resources. More than 20,000 people have done it, why not you?

Continue reading
Articles posted in WordPress PluginsOur review of B2BKing: A WooCommerce plugin built for B2B commerce
“Hi, I need 200 units of this product with fast shipping please”. As an online store owner, receiving this kind of message puts a smile on your face. Answering it, on the other hand, becomes a lot less fun… Basically,…
GTranslate on WordPress: our full review of this tool for creating a multilingual site
“Hello, how are you?” “What do you think of this computer mouse?” For you, everything is easy to understand in these two sentences. For someone living deep in the Shetland Islands or Yucatán, it’s probably a bit more complicated… If…
Air WP Sync: Test and review of this plugin for integrating Airtable into WordPress
Do you use Airtable and WordPress? Then some of your days probably look something like this. In the morning, you update your Airtable database as soon as something changes. In the afternoon, you copy and paste the same data into…