


Leaving the native WordPress interface? Never. Drowning you in a slew of widgets? He wouldn’t dream of it. With this guy, blocks are the guiding light. Create your next WordPress site without leaving the default editor (Gutenberg), without coding, and…
How about talking about foreign languages? Like: “Where is Brian?”, “What is the day today? “or “¿Qué pasa en la casa?”…
Well, it probably makes you laugh, but let’s leave aside those few rudiments of English and Spanish, with which you would still have a hard time making yourself understood in a London pub, or in a Madrid tapas bar.

No, let’s talk about multilingualism. The real one. You are not multilingual? No problem. On the other hand, maybe you’re eager to know how to create a multilingual WordPress site, right?
That’s a good thing. I can tell you that there are several plugins to help you with this task. One of them, 100% made in France, is called Polylang.
No waffle, let’s discover it from A to Z, in this detailed tutorial.
Ready to go? ¡Vamos!
Overview
- What is Polylang ?
- Why is a multilingual site interesting?
- How to install Polylang on WordPress: the Setup Wizard
- Polylang settings menus
- How to translate content into another language?
- How to create a menu by language?
- How to translate your media?
- How does Polylang integrate with page builders?
- Polylang and WooCommerce: how does it work?
- How much does Polylang cost?
- Our opinion on Polylang
Check out our extensive guide to learn how to create a WordPress website.

What is Polylang ?
Polylang is a freemium plugin to create a bilingual or multilingual WordPress website. It is possible to add an unlimited number of languages and to translate the contents of your site (articles, pages, categories, tags, widgets, menus, custom post types, taxonomies, URLs, etc.) either manually or with a complete translation management system.
A French plugin….
Polylang claims more than 600,000 active installations, which makes it one of the most famous multilingual plugins in the WordPress (WP) ecosystem, just like WPML or TranslatePress.
And you know what? Polylang was created by the French Frederic Demarle in 2011, at the time “to share some English articles on his personal blog “, as we can read on the WordPress.tv website.
In the meantime, the plugin has evolved a lot. Its development and maintenance are provided since 2016 by the company WP Syntex, co-founded by the same Frederic Demarle.
Currently, you can use two versions of Polylang:
- A free version is accessible via your WordPress administration interface, or as a download from the official WP directory.
- A paid version, called Polylang Pro, is available from €99/year (± $118).
This tutorial focuses on the Pro version of Polylang, which has more features than the free version. However, the tutorial we propose in this article will be useful even if you use the free version. The interface is exactly the same, only some settings are not accessible.
In addition, Polylang offers two other related products:
- Polylang for WooCommerce plugin (from €99/year), which allows you to create a multilingual WooCommerce store.
- Polylang Business Pack, which includes the Polylang Pro and Polylang for WooCommerce plugins at a reduced price (from €139/year).
… That relies on WordPress native tools
Over the years, Polylang has managed to build an excellent reputation among its users, who give it a very nice 4.7/5 on the official directory.
Among their feedback, we can mention the “practicality” of the plugin, the “simplicity” and the “ease of use”.
By using Polylang, you find yourself in known and conquered territory. The plugin is integrated into the WordPress administration interface, which makes it easy to learn.
On the technical side, Polylang is known for using clean code, and uses the WordPress taxonomy system to localize your content.
Furthermore, the multilingual plugin states on its presentation page that it “does not use additional tables (Editor’s note: within your database) and does not rely on shortcodes, which are time-consuming to take into account”.
The result? The impact on your site’s loading speed is minimal. Thank you Polylang!
Before moving on to the settings of the plugin, let’s stop for a moment to consider the advantages of creating a multilingual site.
Why is a multilingual site interesting?
Before going any further, a few quick reminders to make things clear.
A bilingual or multilingual site makes its content accessible to its visitors in several languages. When a visitor arrives on the site in question, he can choose the language of his choice.
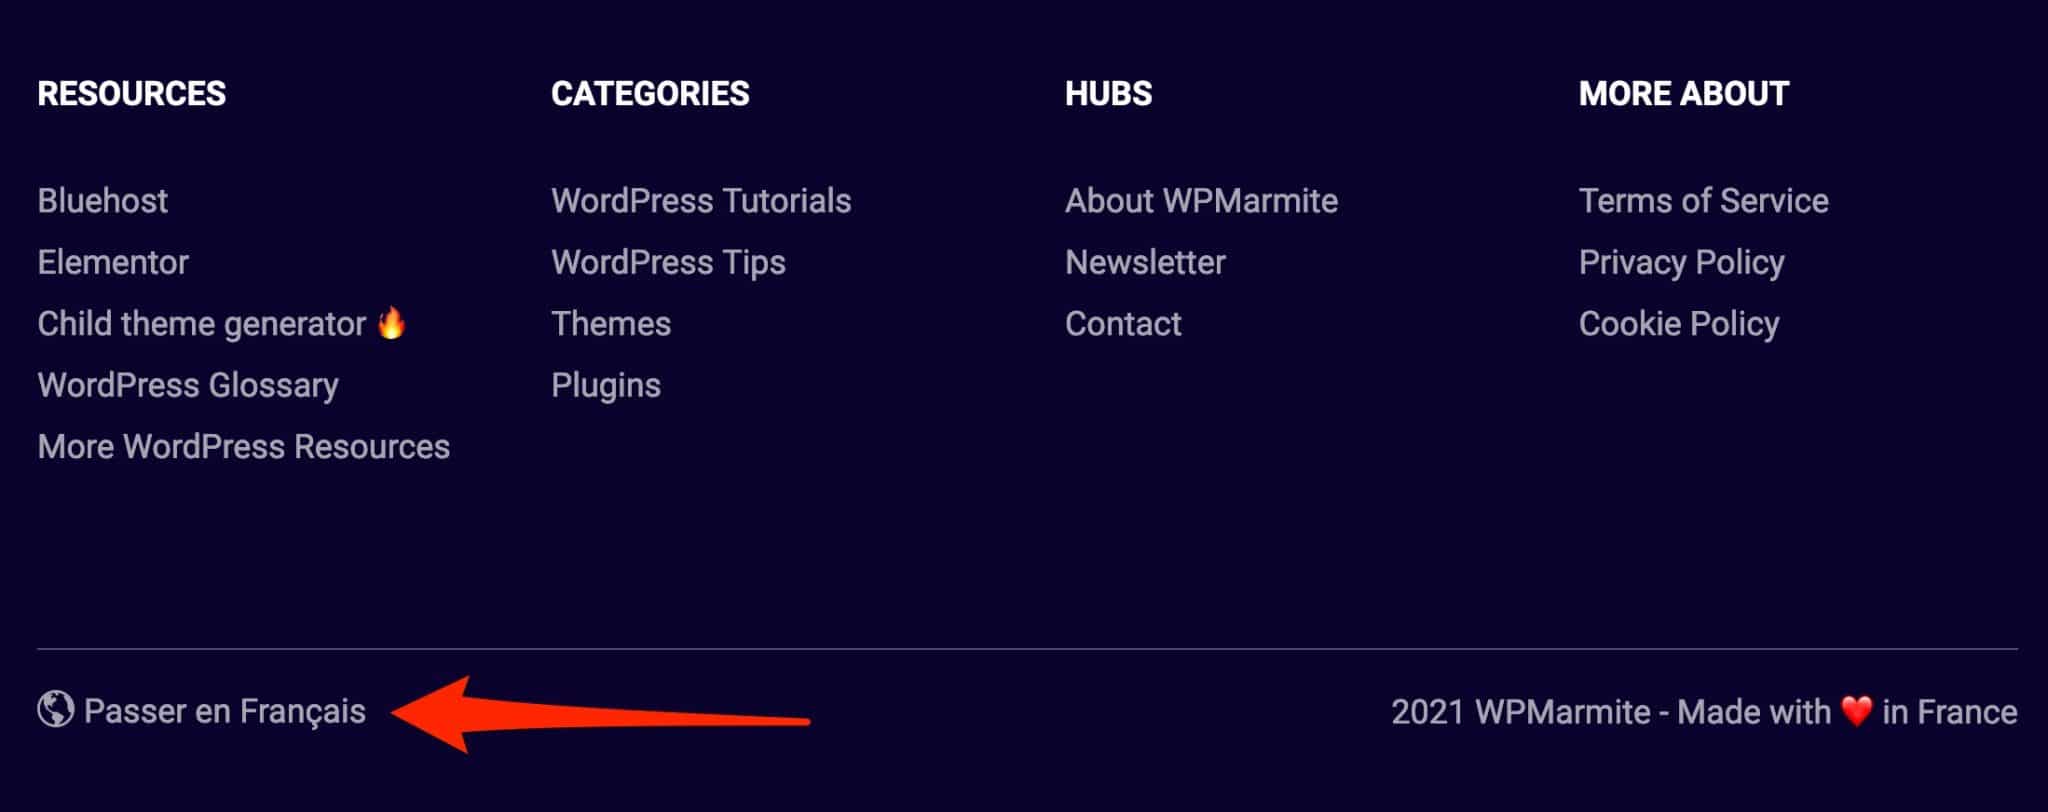
Most of the time, this is done with the help of a language switcher, which takes the form of a flag, or a link to be clicked to switch from one language to another, as proposed by WPMarmite in its footer for example:
To understand all the subtleties of a multilingual site, read the post the Team wrote on the WPMarmite blog.
Although it looks attractive, aesthetic and professional, a multilingual site is not for everyone. Don’t set it up just to look pretty. 😉
You will need it in the following cases, in particular:
- If you want to develop your brand’s presence in a foreign country and reach a wider audience.
- If your audience speaks a language other than the language used on your site so far.
If your audience is only English-speaking and you don’t plan to expand internationally, there’s no need to bother transforming your WordPress site into a multilingual site.
Otherwise, note that creating a multilingual site has several advantages:
- By reaching a wider audience, you have more chances to make sales, if you have an ecommerce store.
- Your site becomes more professional and accessible: it becomes readable and understandable by a larger number of people.
- You increase your chances of attracting more traffic to your site and improve your SEO.
- You stand out from the competition by offering a feature that they may not have implemented on their site yet.
All this appeals to you and, above all, fits your needs and the characteristics of your online business? Find out right now how Polylang will help you make your WordPress site multilingual.
How to install Polylang on WordPress: the Setup Wizard
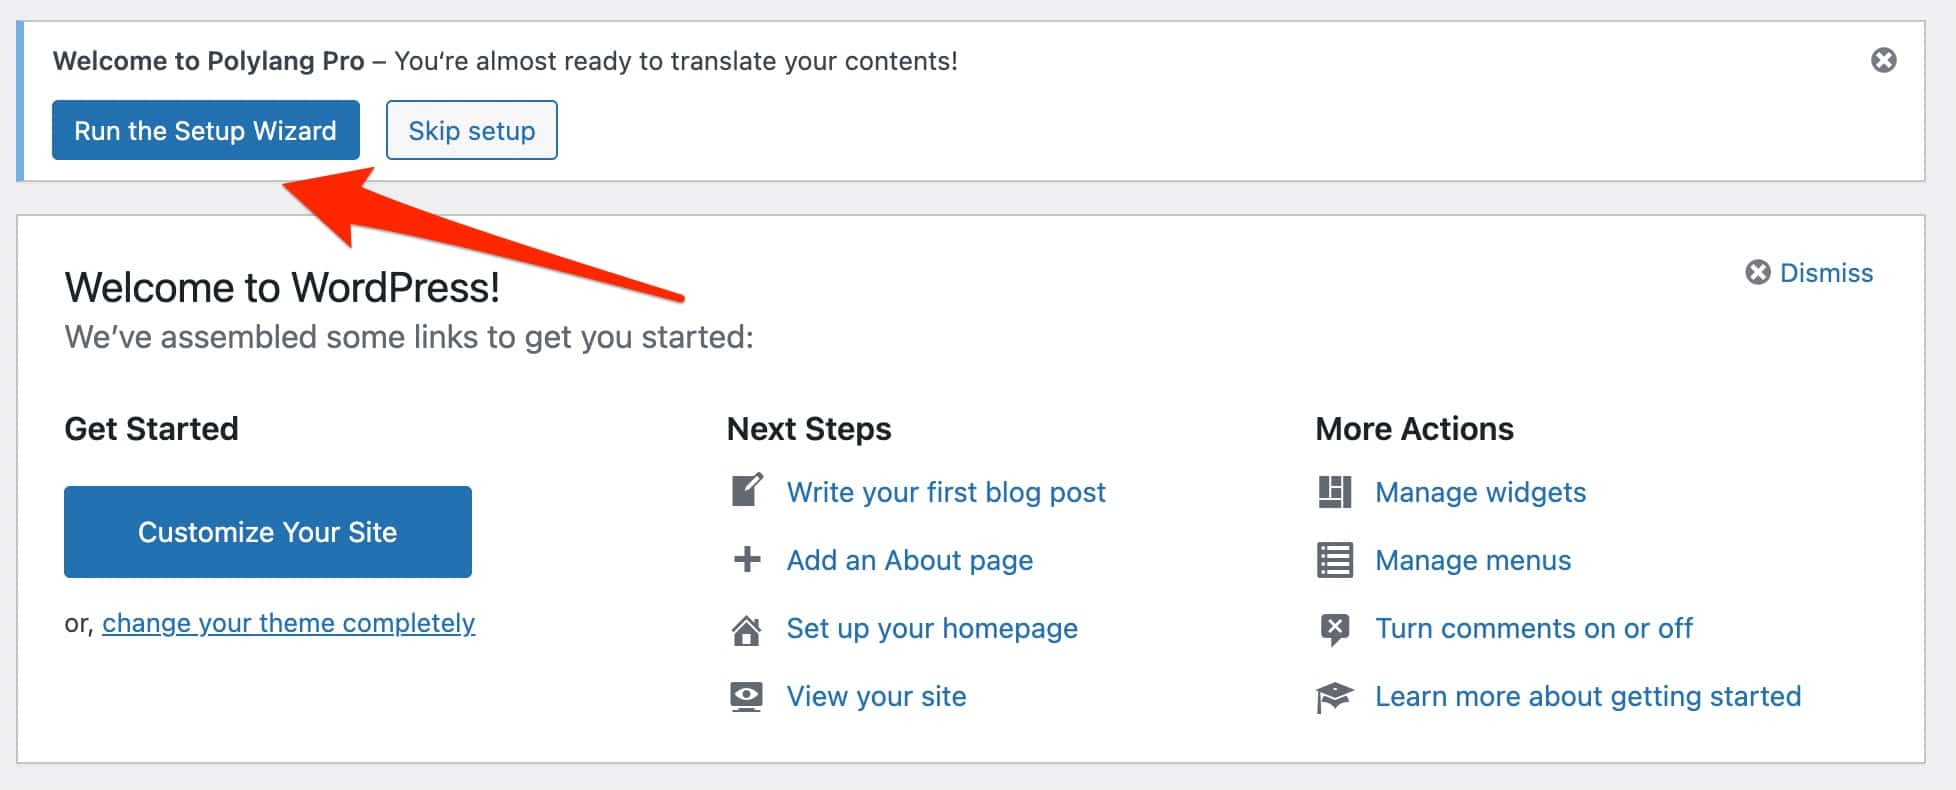
Once you have purchased Polylang Pro, activate it on your WordPress site.
Once this action is done, the plugin suggests you to launch a Setup Wizard, which is divided into 6 steps.
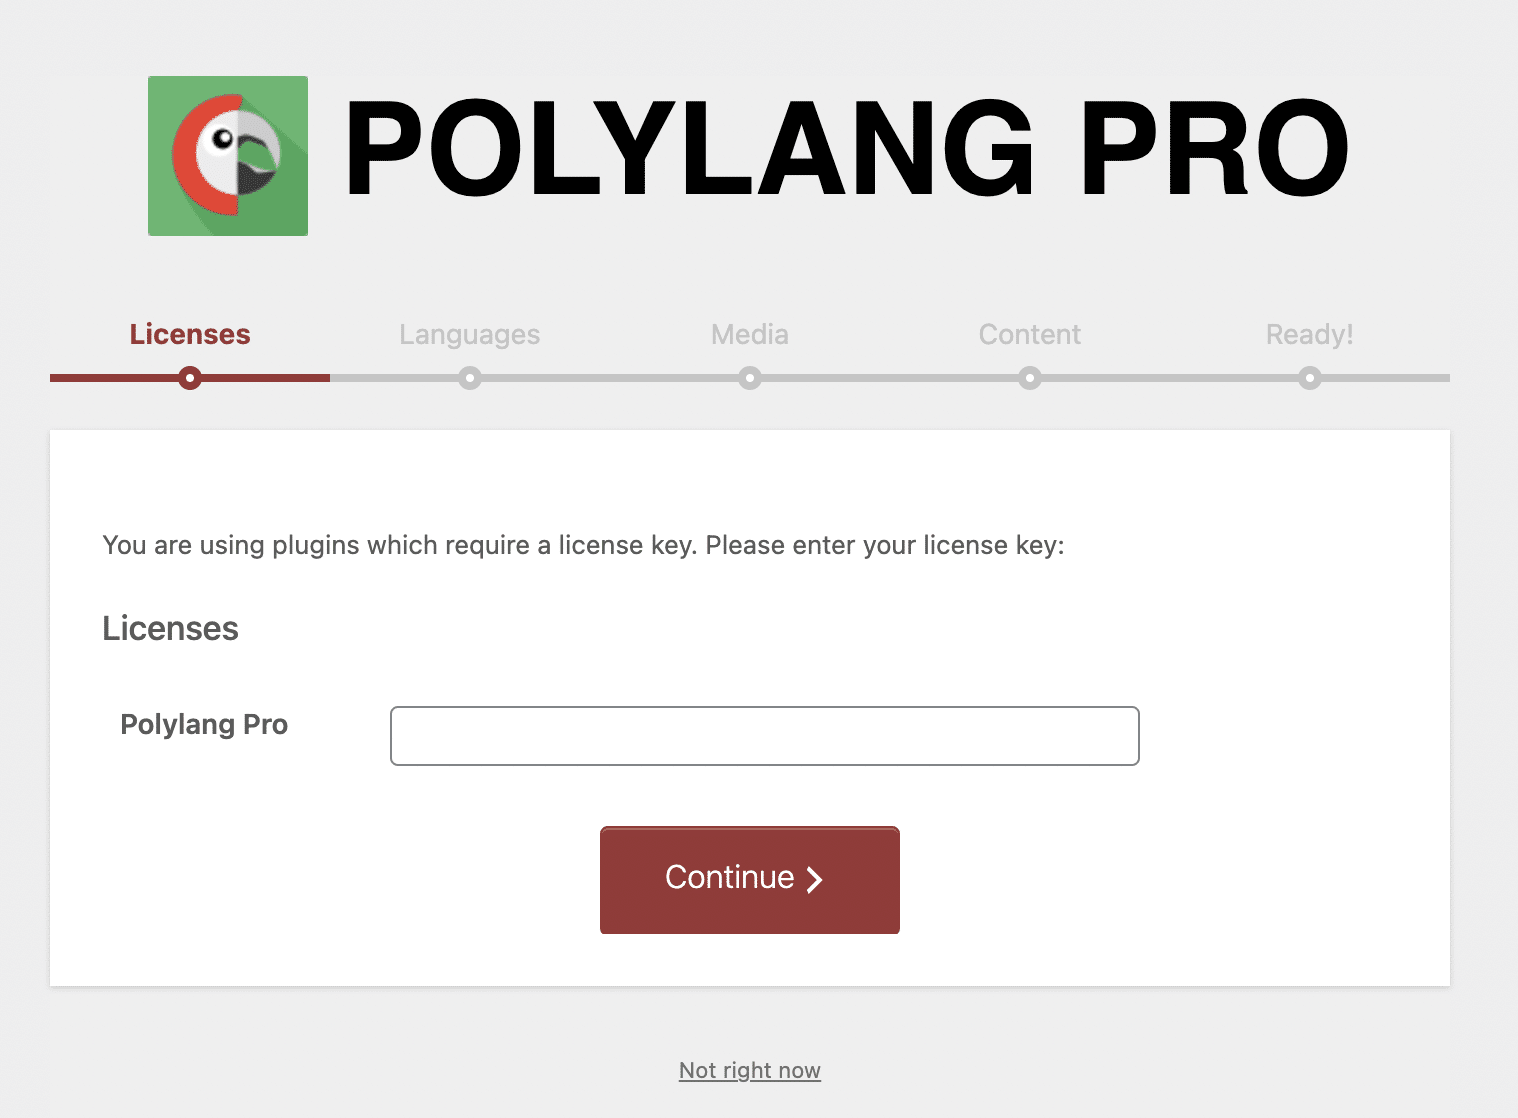
Step 1: Enter your license key
To start, Polylang Pro asks you to enter your license key, available on your account (section “Account”) of the Polylang website.
Enter it to benefit from automatic updates of the plugin.
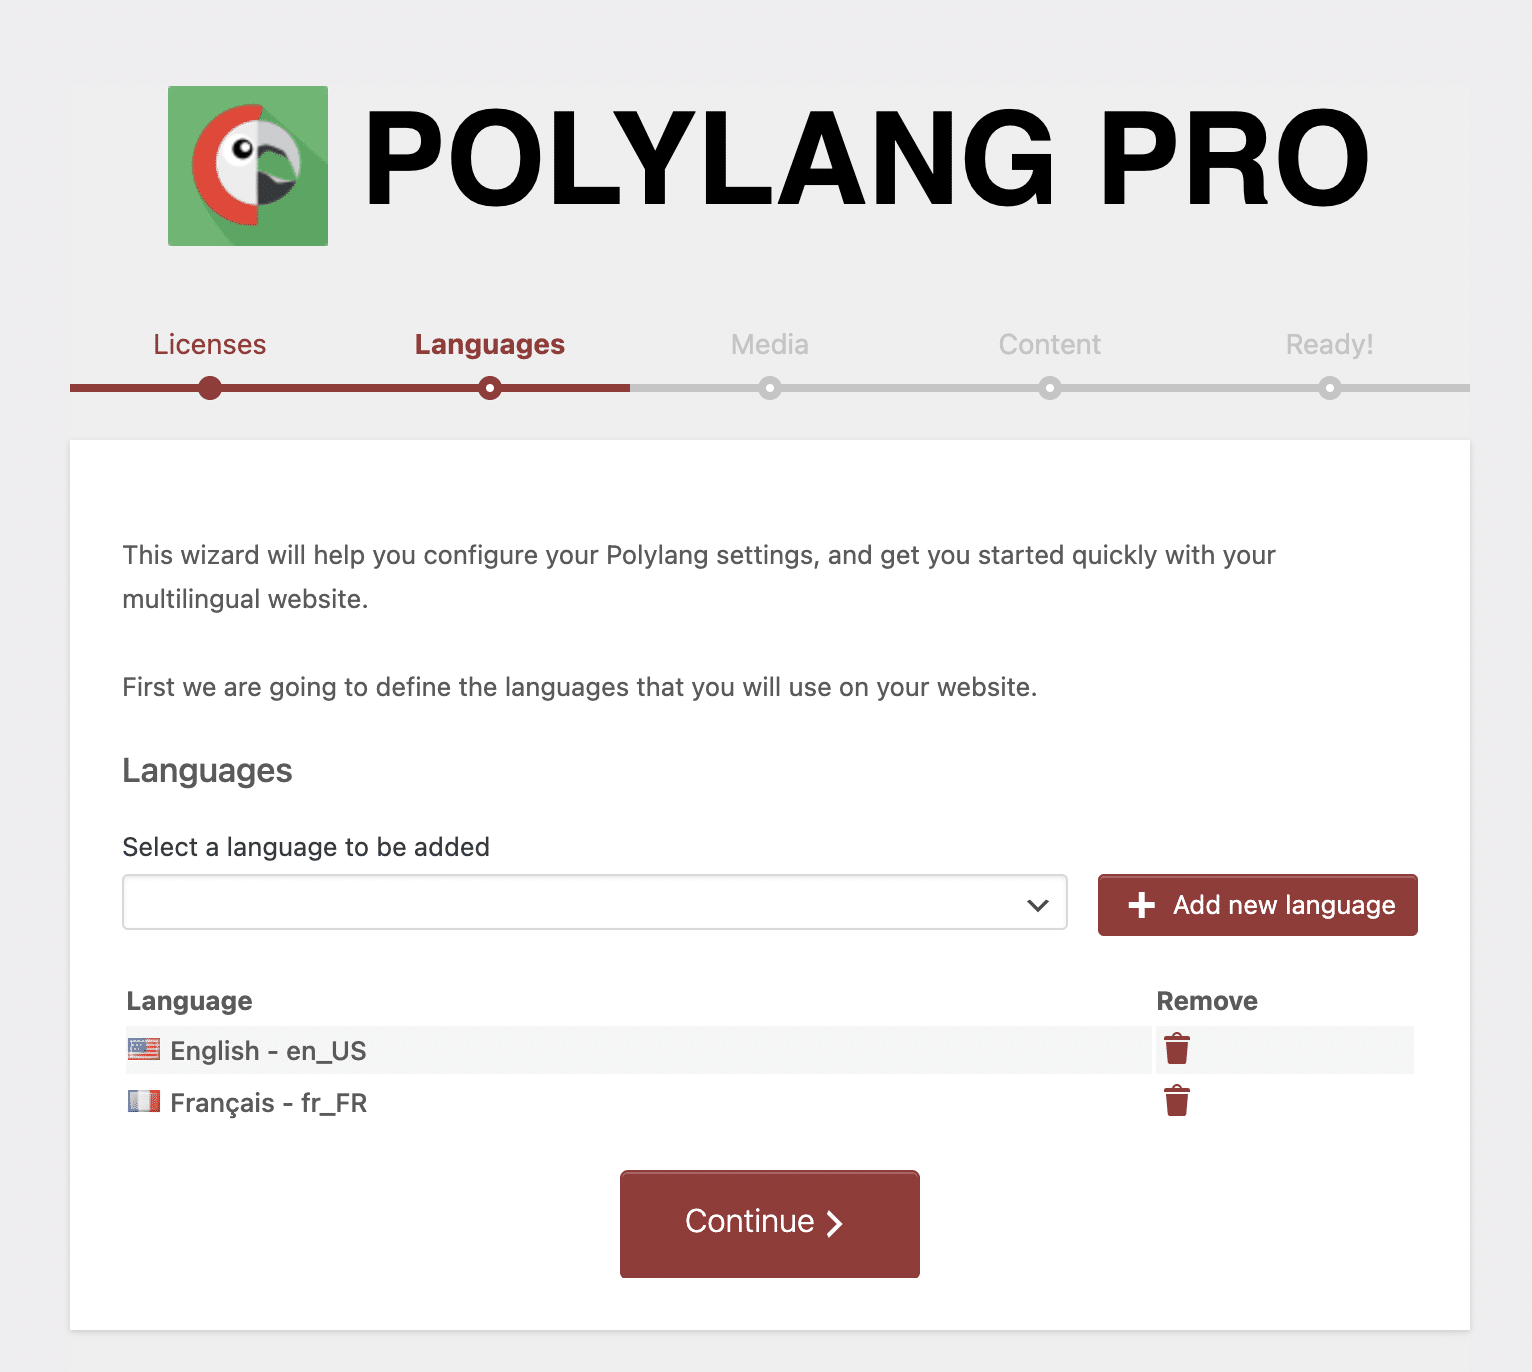
Step 2: Define the language(s) of your website
In which language will your website be available? Now it’s up to you to define it by choosing at least one language, among the hundred proposed by Polylang.
You will find the most popular languages like English, German, Spanish or Chinese. Including their variations, like British or American English, or Colombian and Castilian Spanish.
Yes, we do not use exactly the same word, even if we speak the same language. Go and have a chat with a Quebecer, you’ll see. 😉 Tabarnak.
The less spoken languages are not forgotten. If you wish, you can propose your site in Galician, Latvian, Icelandic and even Occitan.
Note: the first language you add will become the default language of your multilingual site (you can change this later, of course).
For the purpose of this test, I chose American English (en_US) and French (fr_FR).
Step 3: Translate the media
During this third step, Polylang suggests you “translate the texts attached to your media such as the title, the alternative text, the caption or the description”.
By media, we mean the files placed in your Media Library (images, videos, etc.)
The option is enabled by default, it’s up to you to decide if you need it or not. If you don’t need it (e.g. you use two different images for an article translated into two languages), uncheck the option.

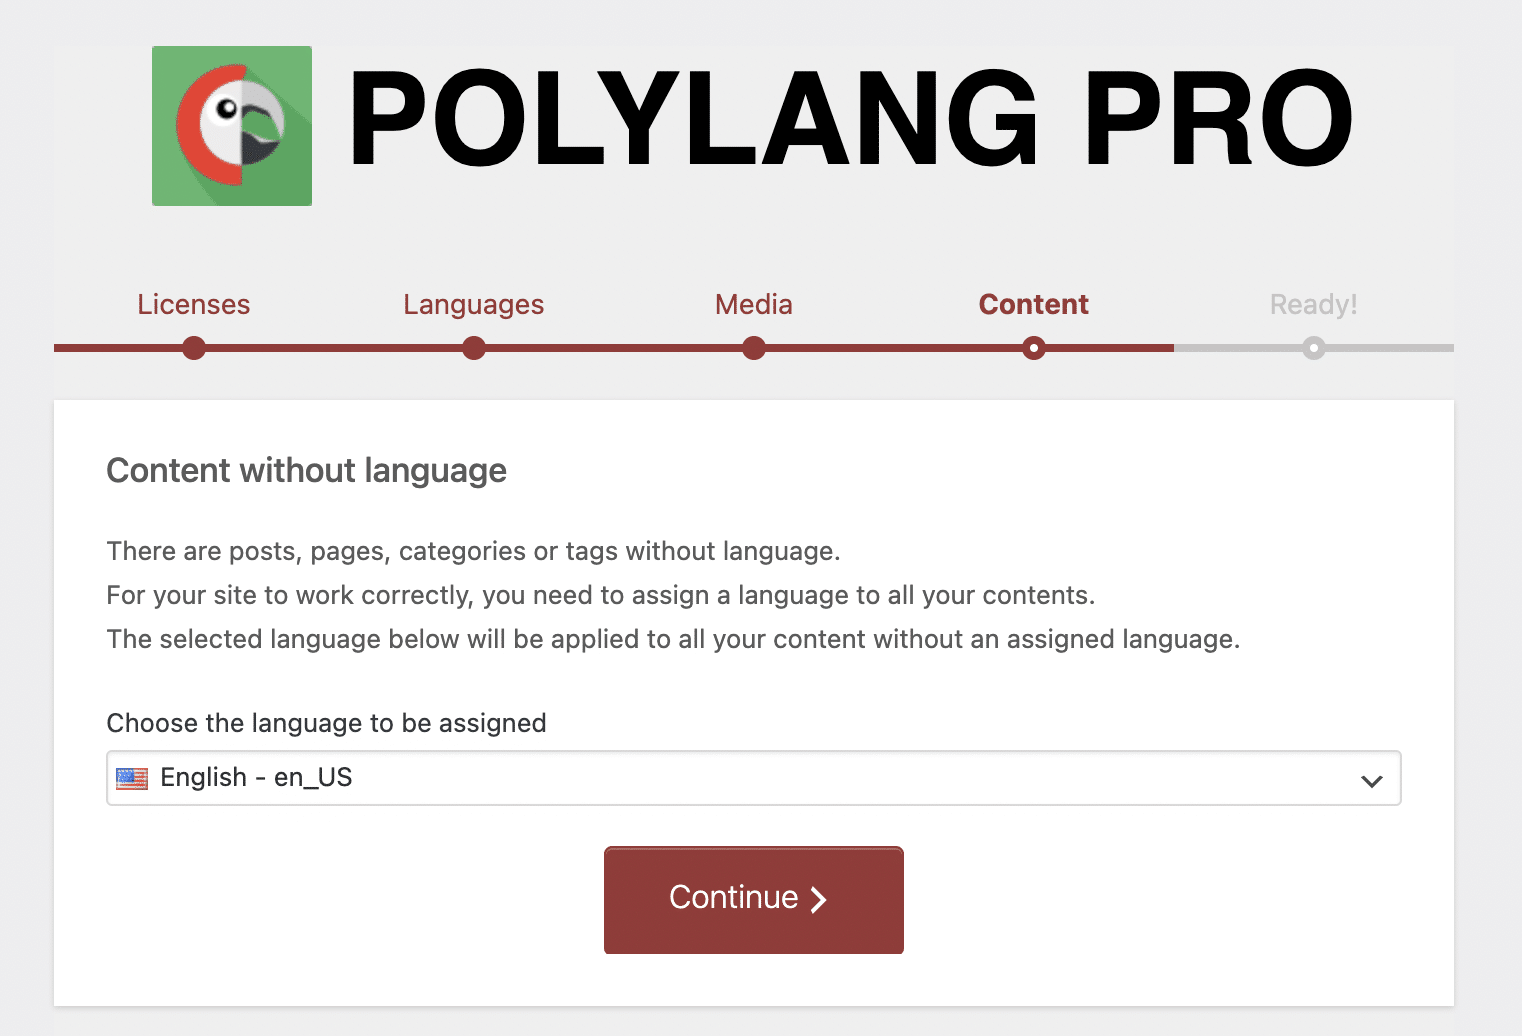
Step 4: Assign a language for all your content
For the moment, all the content available on your site does not have a language assigned to it. You must therefore assign a default language to them, which will be the one you selected first in step 2 (American English, in my case).
Step 5: Translation of the homepage
Second to last step proposed by the Setup Wizard: the translation of your homepage.
Polylang will only offer you this option if you have previously defined a static homepage in the Settings > Reading WordPress menu. This is not my case in this test, which is why you don’t see this step in the screenshots.
Step 6: You’re ready to translate!
You have configured all the settings required for Polylang to work properly.
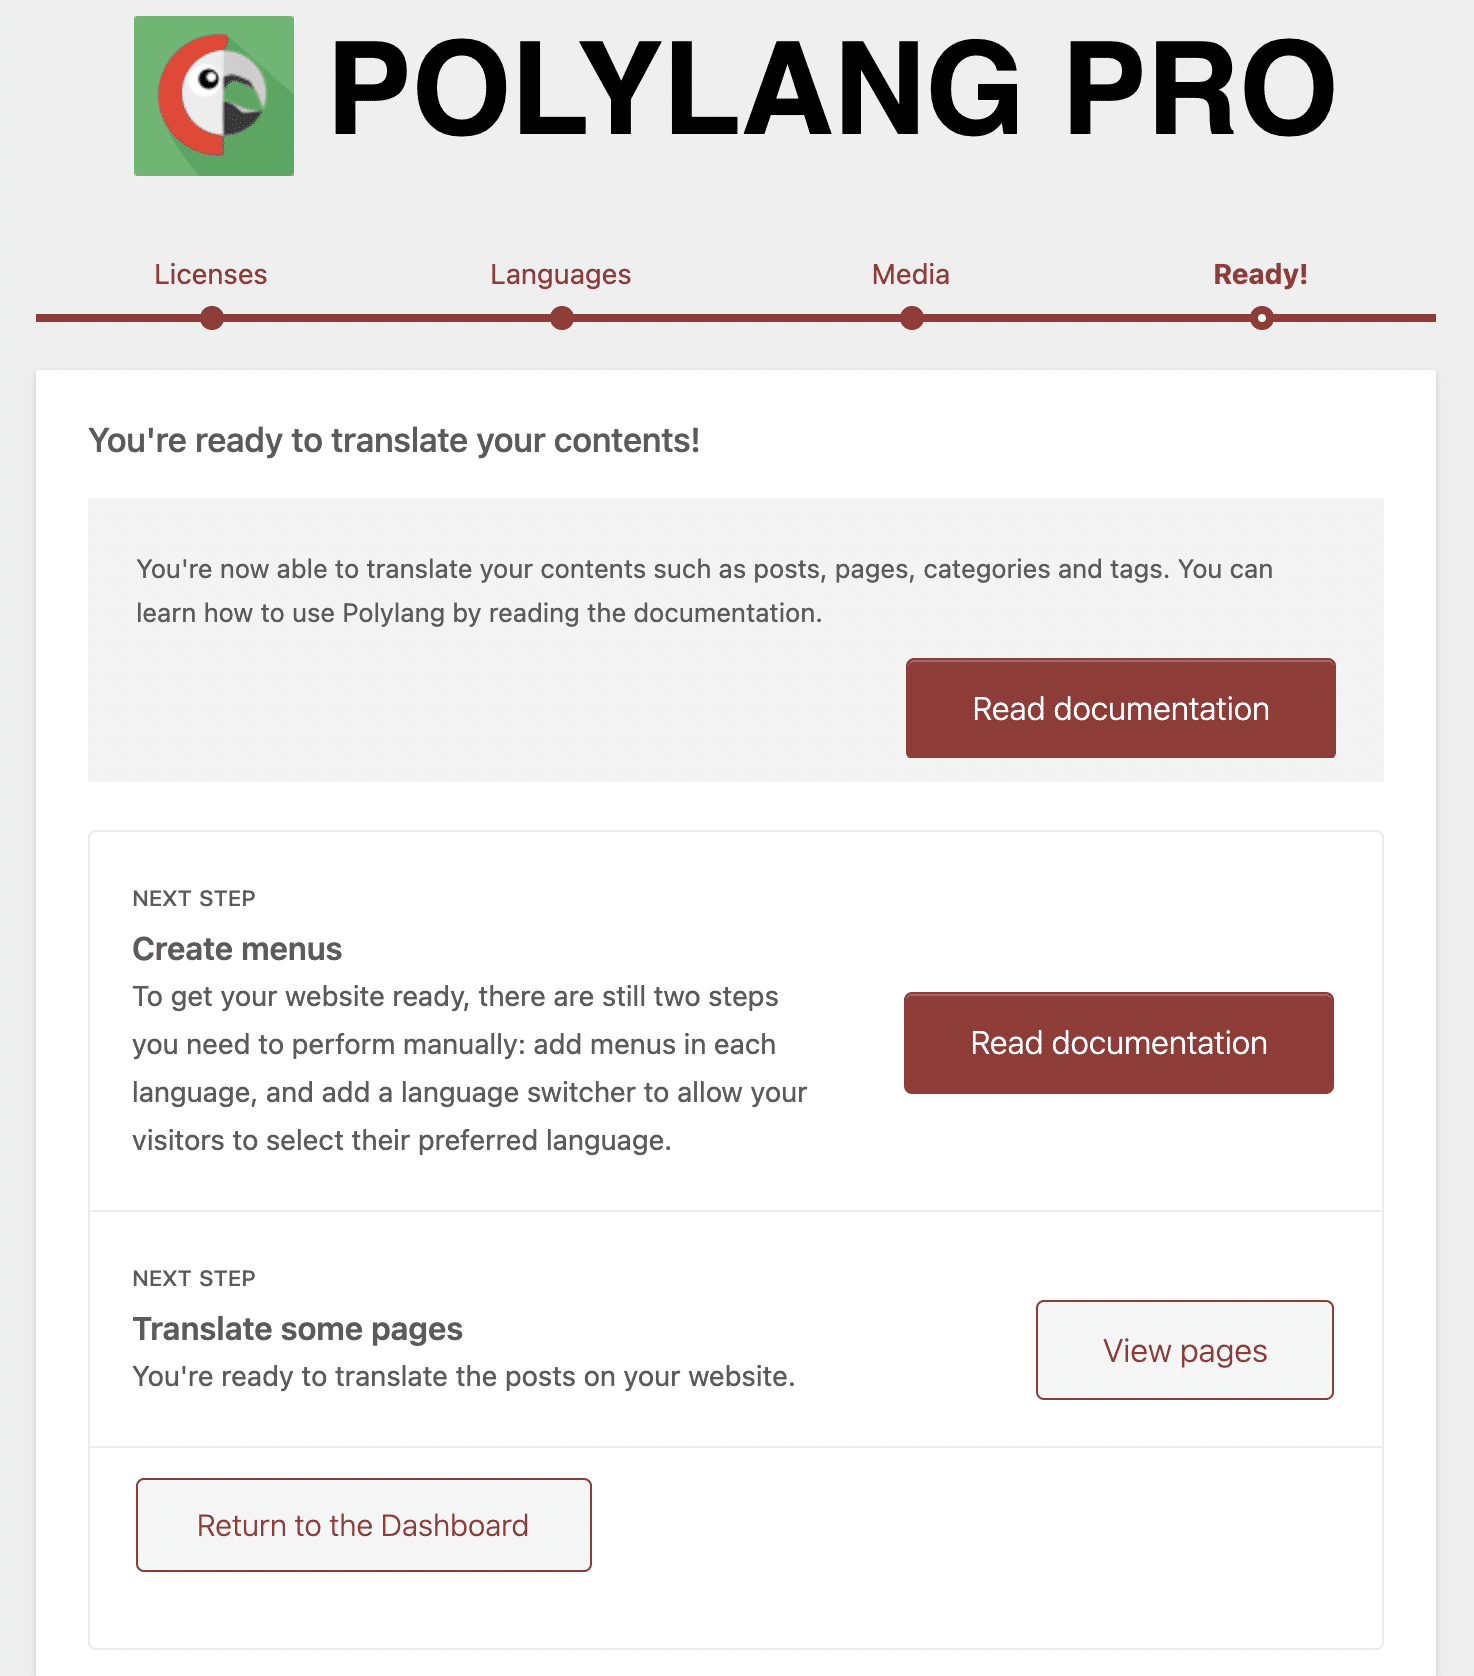
At this point, Polylang offers you several options:
- Read its documentation. Well designed and visual with many screenshots.
- Create menus.
- Translate the pages of your site.
- Return to your dashboard. I choose this option to continue to show you the different settings. Follow me.

Polylang settings menus
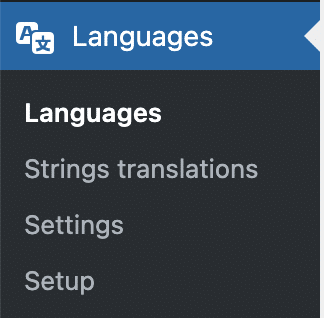
Polylang has a clean interface composed of 4 menus:
- Languages
- Strings translations
- Settings
- Setup (which links to the Setup Wizard)
The Languages menu
The “Languages” menu allows you to add a language and to modify some settings.
On the left side of the screen, you can for example change its name, the writing direction of the language (Polylang also supports RTL language scripts, i.e. writing from right to left), or the position of the language in the list of languages (at the level of the switch on the visible interface of the site).
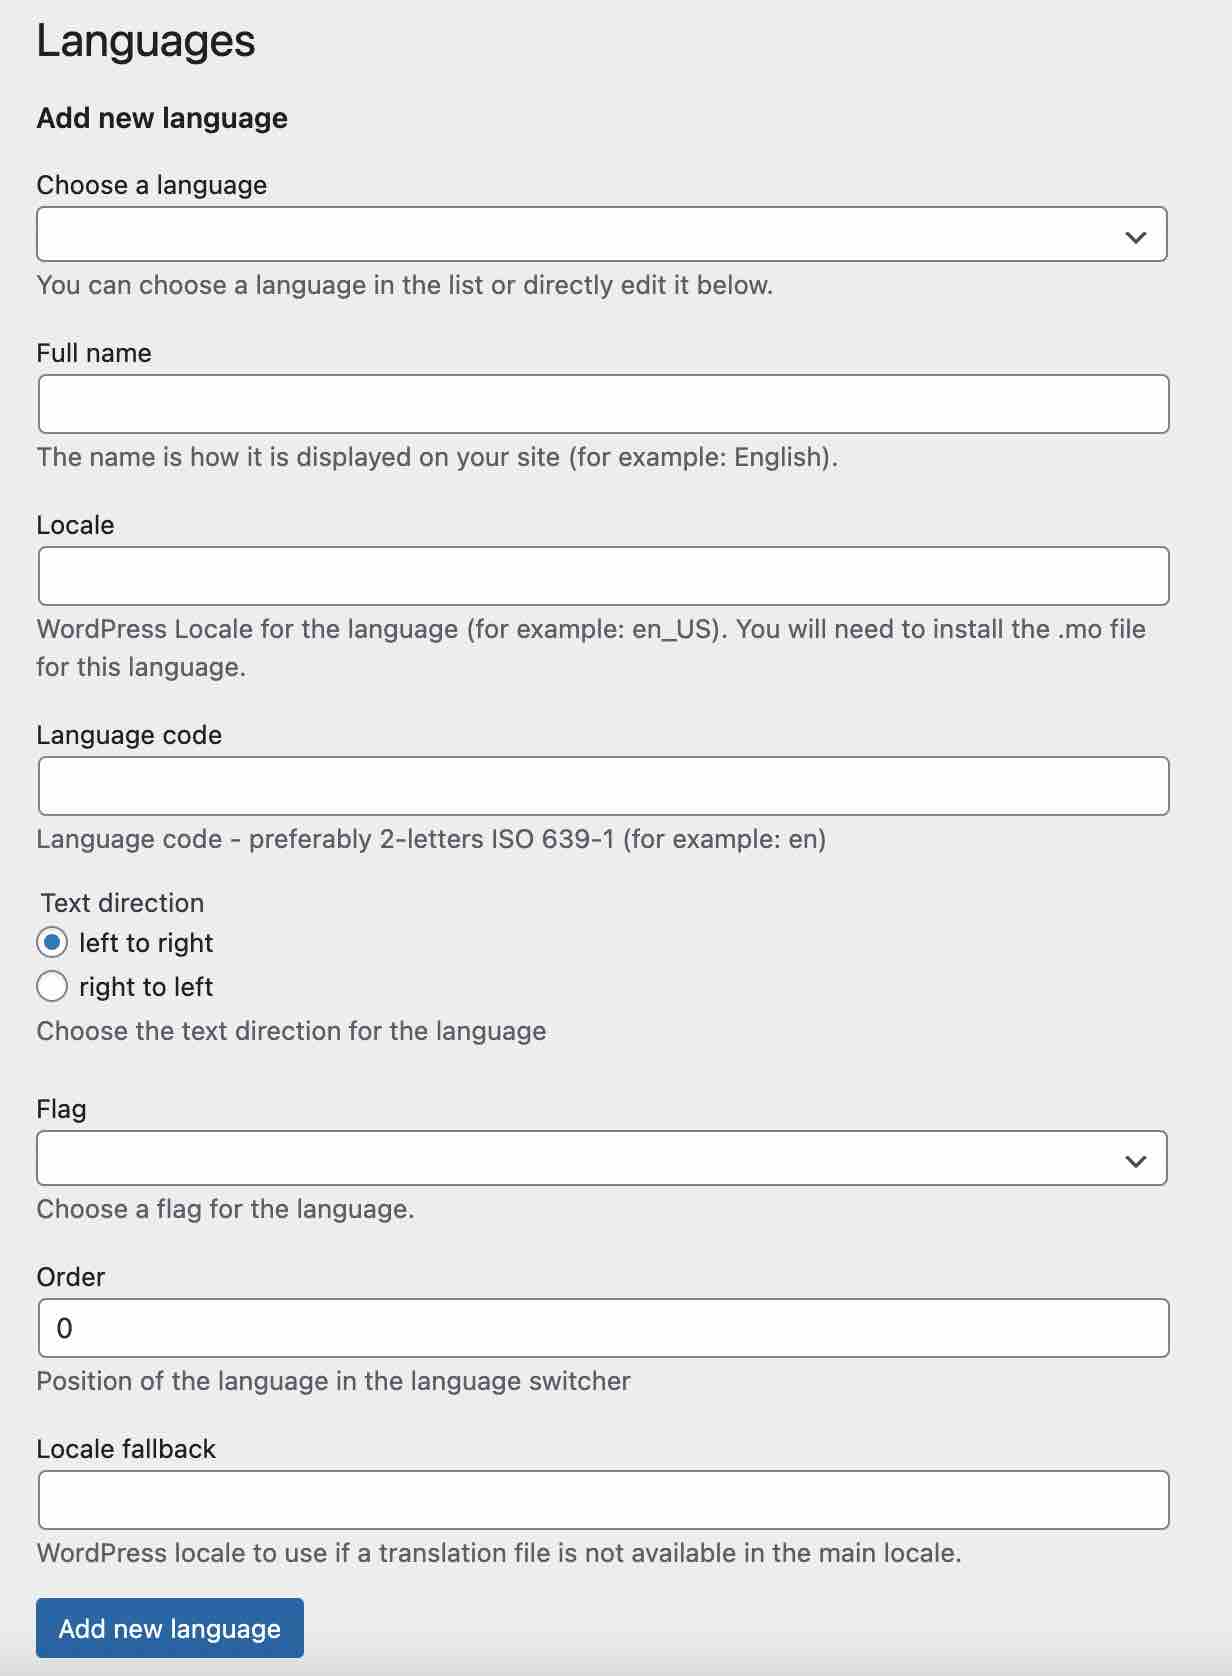
And let’s not forget the flag. Polylang offers one flag per language. If it does not suit you, you can also add the flag of your choice in JPG or PNG format.
For the procedure to follow, check out this page of the documentation.
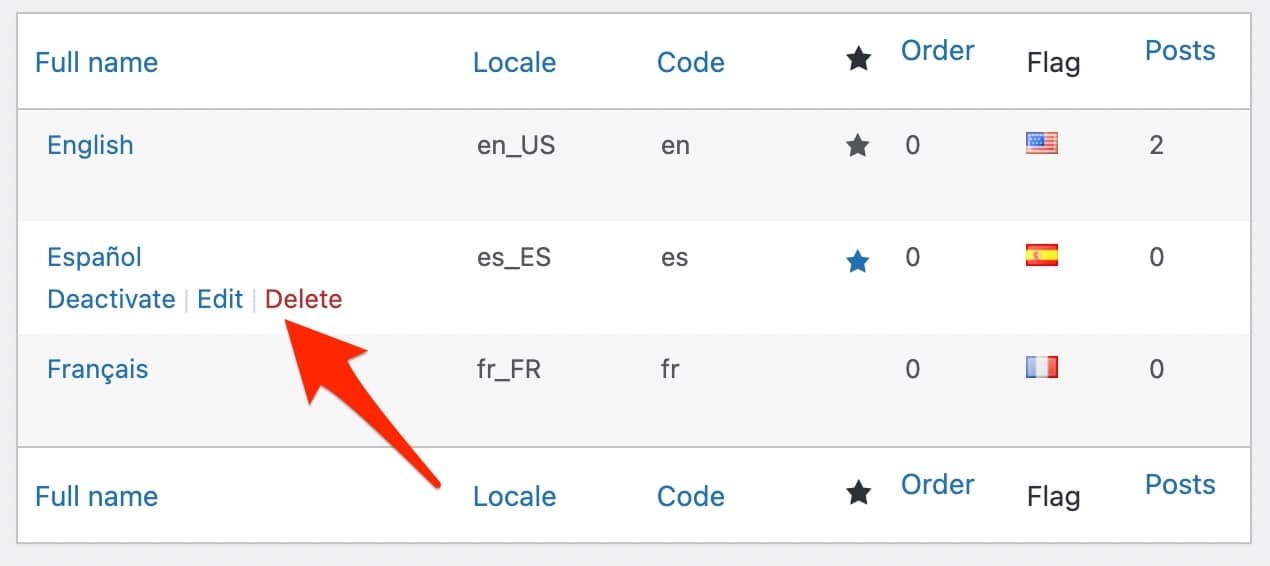
On the right side of the Languages menu of Polylang, you can see the languages used on your multilingual site (in my case: English, Spanish, French).
A star indicates the default language. You can easily change it by clicking on the star that appears on the mouse over the default language column.
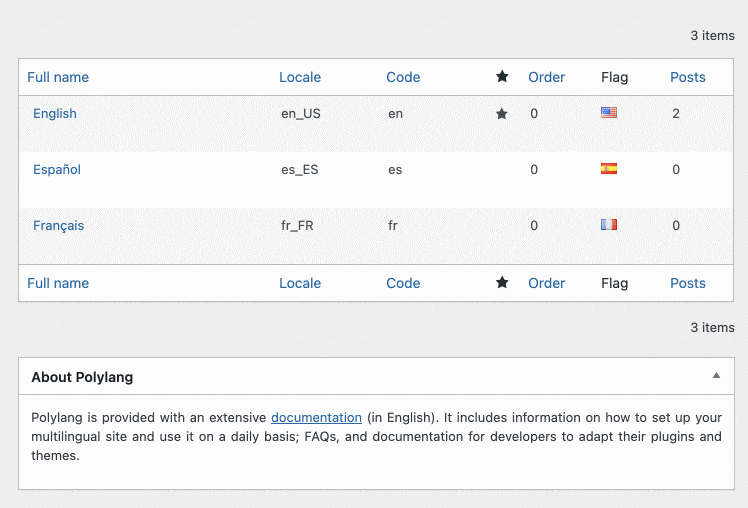
Quick options also allow you to deactivate a language (it will no longer be visible to your visitors on the visible interface of your site), to modify it or to delete it.
The Strings Translations menu
In this second menu, Polylang offers you the possibility to translate strings.
These strings can come from your theme, your plugins, your widgets, your menus, etc.
In short, Polylang will list here the strings it has detected, and you will have to translate them manually. Because yes, translating a site is not only limited to the content of your pages and articles, otherwise it would be too simple. 😉
There are also a lot of small texts that are lying around. Translating them will make your site much more professional.
An example? Pay attention to the date format, which is not the same depending on the country you are targeting. For example, in France, we use the dd/mm/yyyy format (day, month, year). In the United States, the rule is mm-dd-yyyy (month, day, year).
To confuse you further, the PHP language – with which WordPress is written – uses its own formatting characters to generate a date in the specified format (explained here).

How to translate your URL slugs?
The Strings Translations menu also allows you to filter your strings, using their slug for example. Slug that you can translate, which is a good idea and a good practice to adopt.
As a reminder, a slug is the unique identifier of a publication. You find it at the end of a URL. For example, on the URL of this article (wpmarmite.com/en/polylang/), the slug is polylang.
To translate them, simply fill in the box associated with them with the word of your choice:
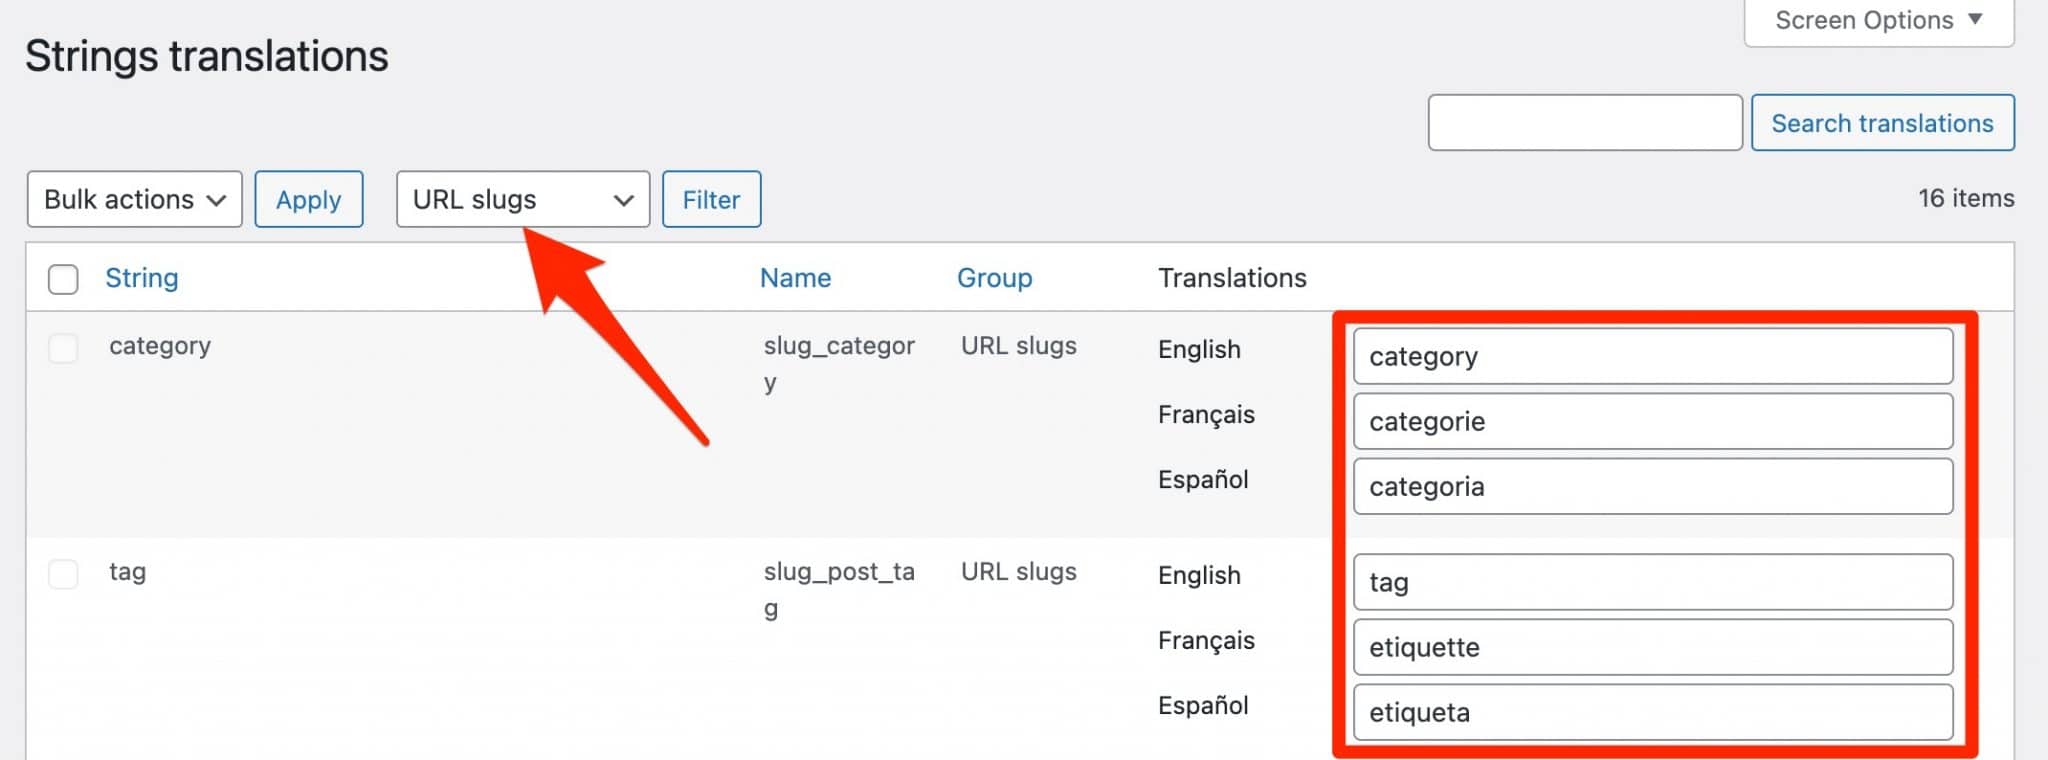
Once you save your changes, your URLs will look like this:
- /en/category/security
- /fr/categorie/securite
Everything is good for you? Then let’s go to the Settings menu.
The Settings menu
In Settings, you will find additional options to manage the translation of your media, detect the browser language (depending on the language preferences of your visitor’s browser, he will be redirected to such or such version of your site), or determine the appearance of your URLs.
Concerning this last point, you have several options available for your URL structures:
- The language is determined by the name of the directory (example: mysite.com/en/ and mysite.com/fr/).
- The language is determined by the name of the subdomain (example: en.mysite.com and fr.mysite.com).
- The language is determined by different domain names (example: mysite.com and mysite.fr).
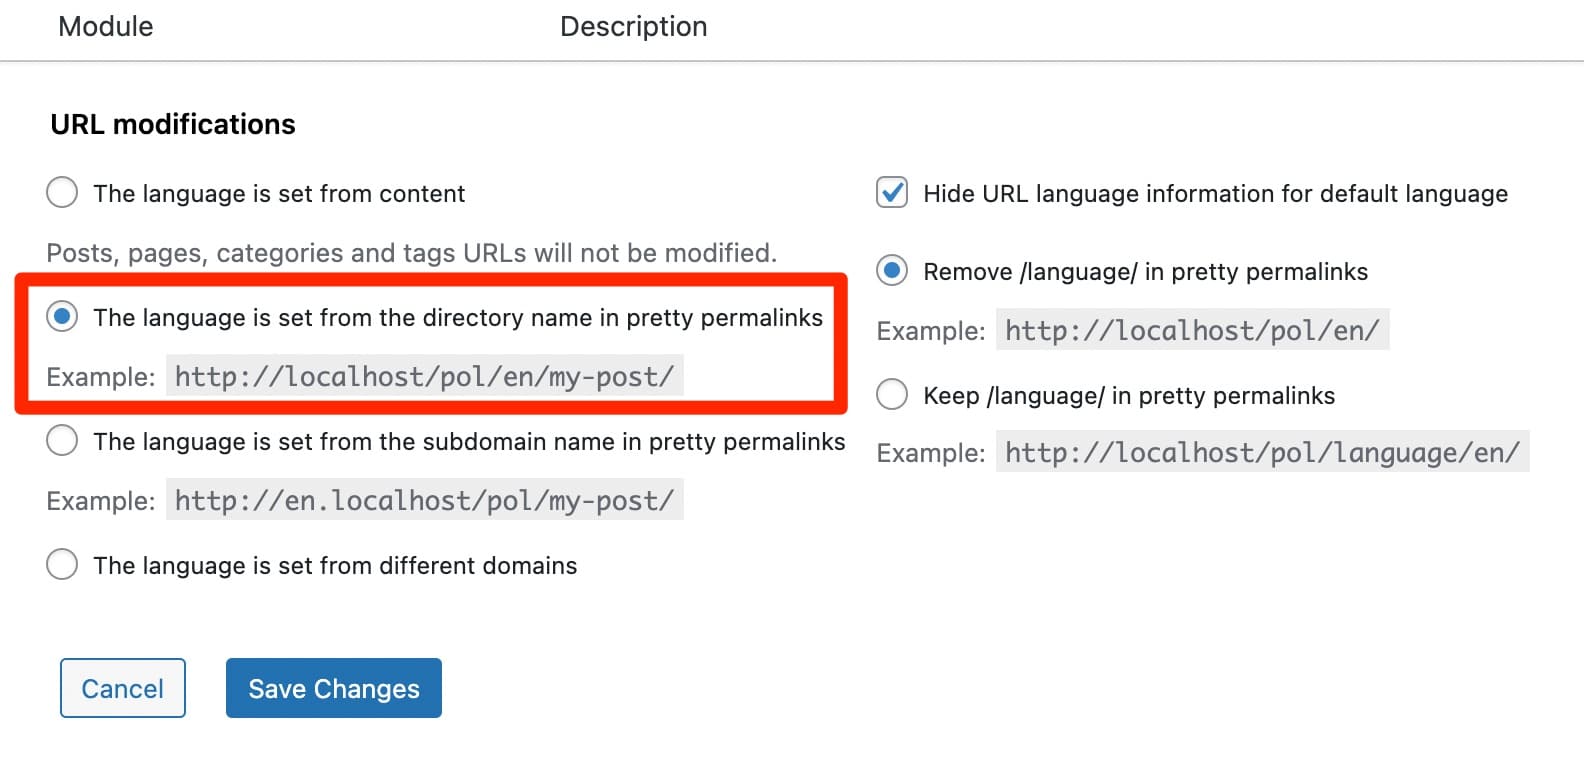
The choice of a particular structure depends on your project and your needs. In the English version of WPMarmite, which is presented in this format: https://wpmarmite.com/en/, Alex has for example chosen to start with a URL structure determined by the name of the directory, keeping the name of the main domain with a language slash.
After the presentation of the settings allowed by Polylang, let’s make several stops on well identified practical cases, which concern particularly the translation of your contents. I guess you’re interested in this, aren’t you?
How to translate content into another language?
Let’s start with the basics: translating a post on your WordPress site or blog.
Go to the menu Posts > All Posts to find your current posts. On the screenshot below, you can see that I have two on my blog:
- One article in English (Hello world!).
- One article in French (Bonjour tout le monde !).
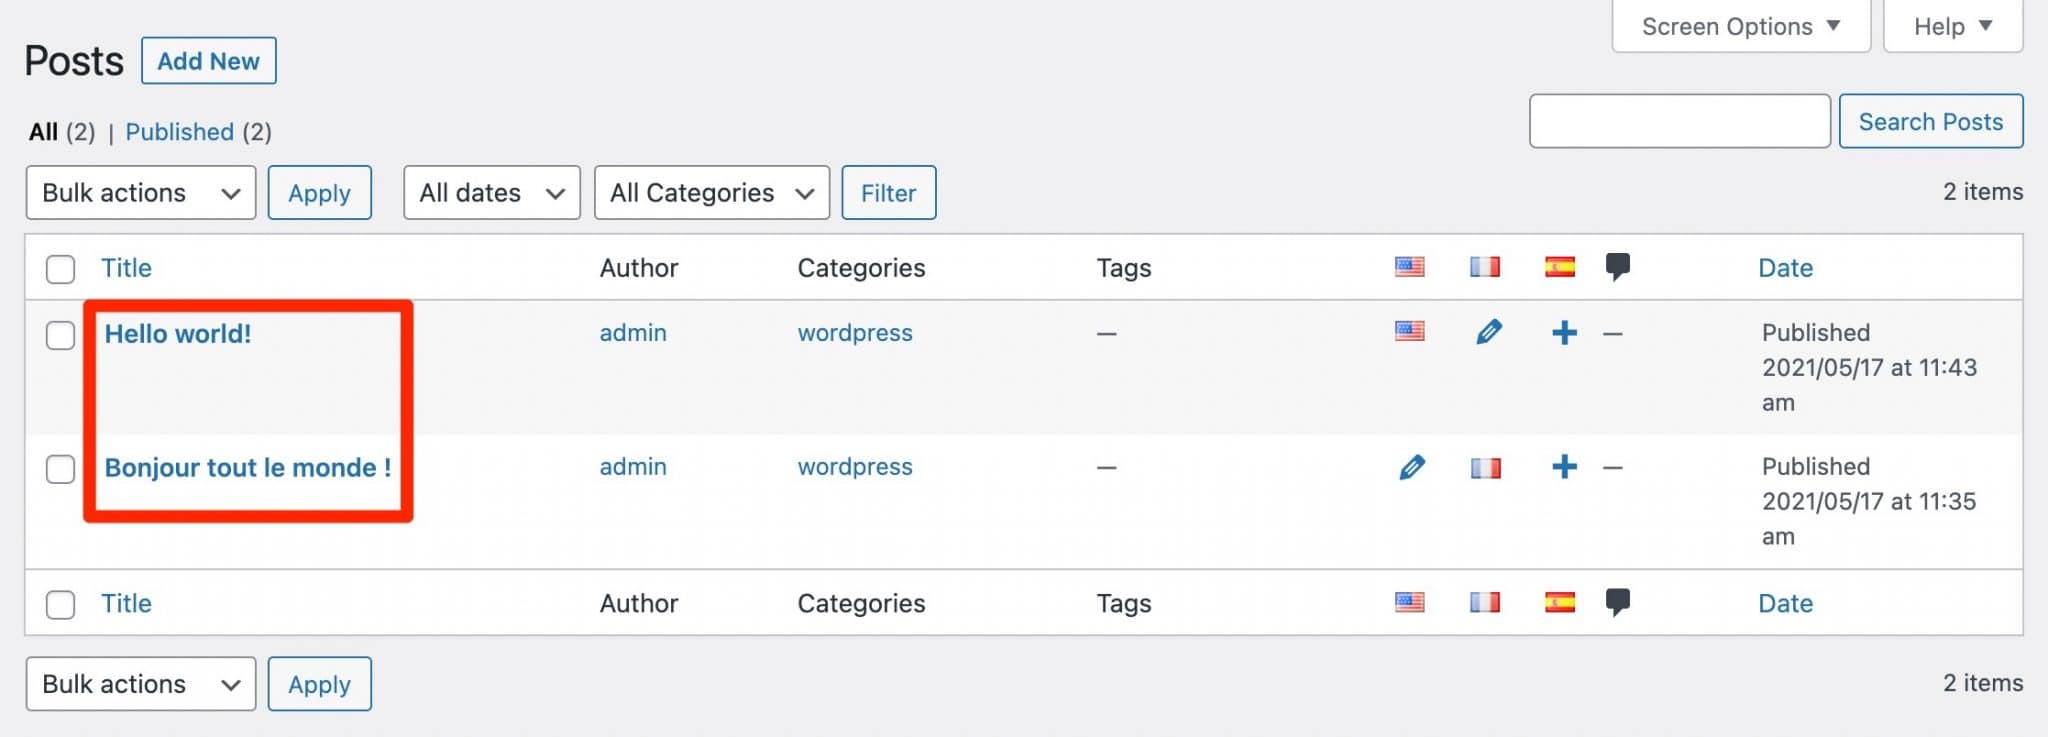
If you look at the little icons, you can see that there are several of them, each with a different meaning:
- The “flag” icon indicates that a page is available in this or that language. If you click on it, you can edit it.
- The “pencil” icon indicates that a translation exists. You can modify it by clicking on it.
- The “+” icon allows you to add a new translation. In our case, we are asked to include a Spanish translation, since it does not exist at the moment.
The principle is the same for adding a new article. You choose the language of your choice at the beginning, then you can integrate the translations in the languages of your choice by clicking on the + icon. And the procedure is the same for pages, custom content types, categories and tags.
How to automatically translate your content?
In the above cases, we are talking about manual translation. Now, what if you want to automate the translation process, to go faster?
You can use the free Lingotek Translation plugin, which only works with Polylang.
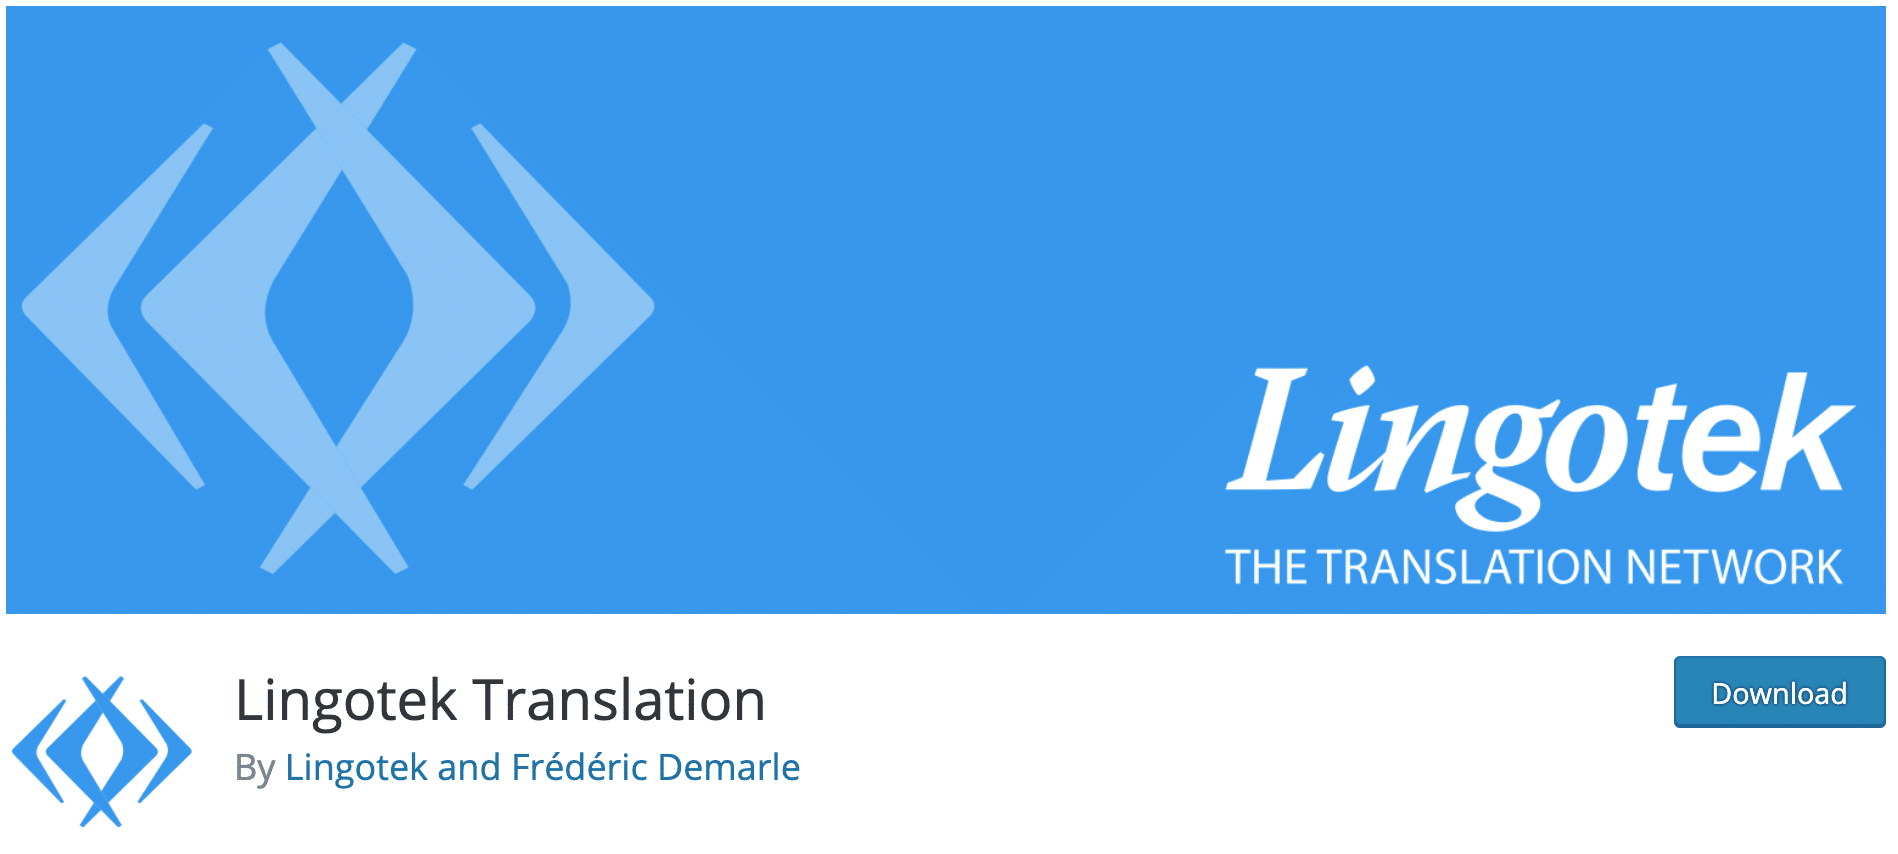
It allows you to do two things:
- Translate your content automatically. This can save you a lot of time, but be aware that the translations are not perfect (it’s still a machine). You will have to read carefully what is proposed to you.
Another remark: the description page of the plugin specifies that the automatic translation service is free up to 100,000 characters (letters + spaces). - Use the services of a professional translator. But in this case, it will be charged. 😉
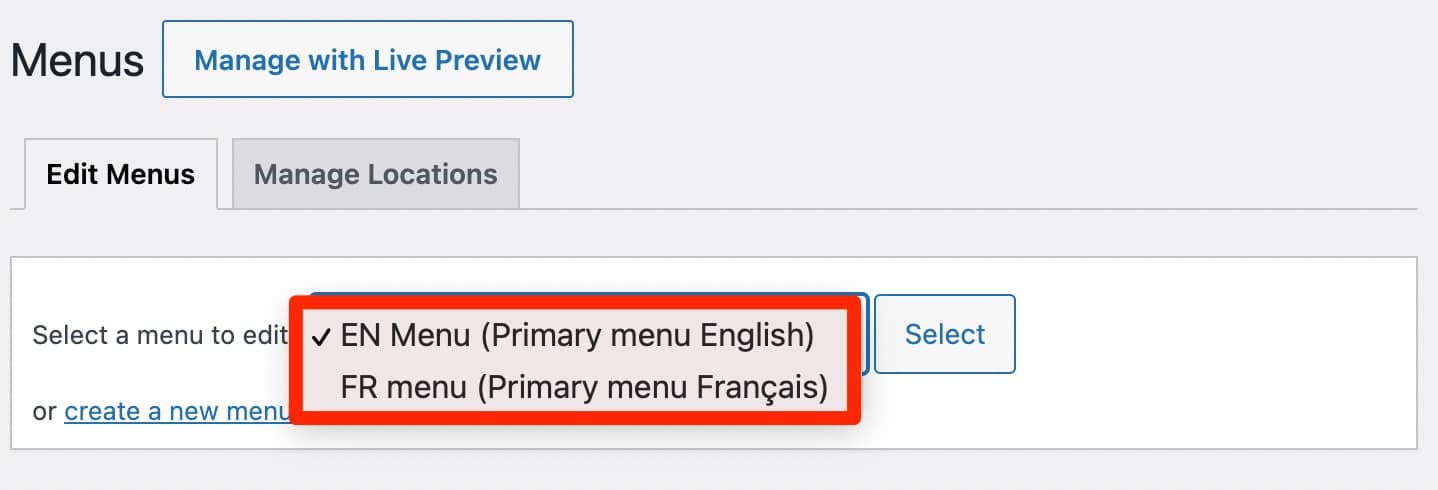
How to create a menu by language?
Let’s talk about the menu. To start, you need to create a menu per language, assign it a location and save it.
You can then switch and edit the menu by selecting it from the drop-down list:
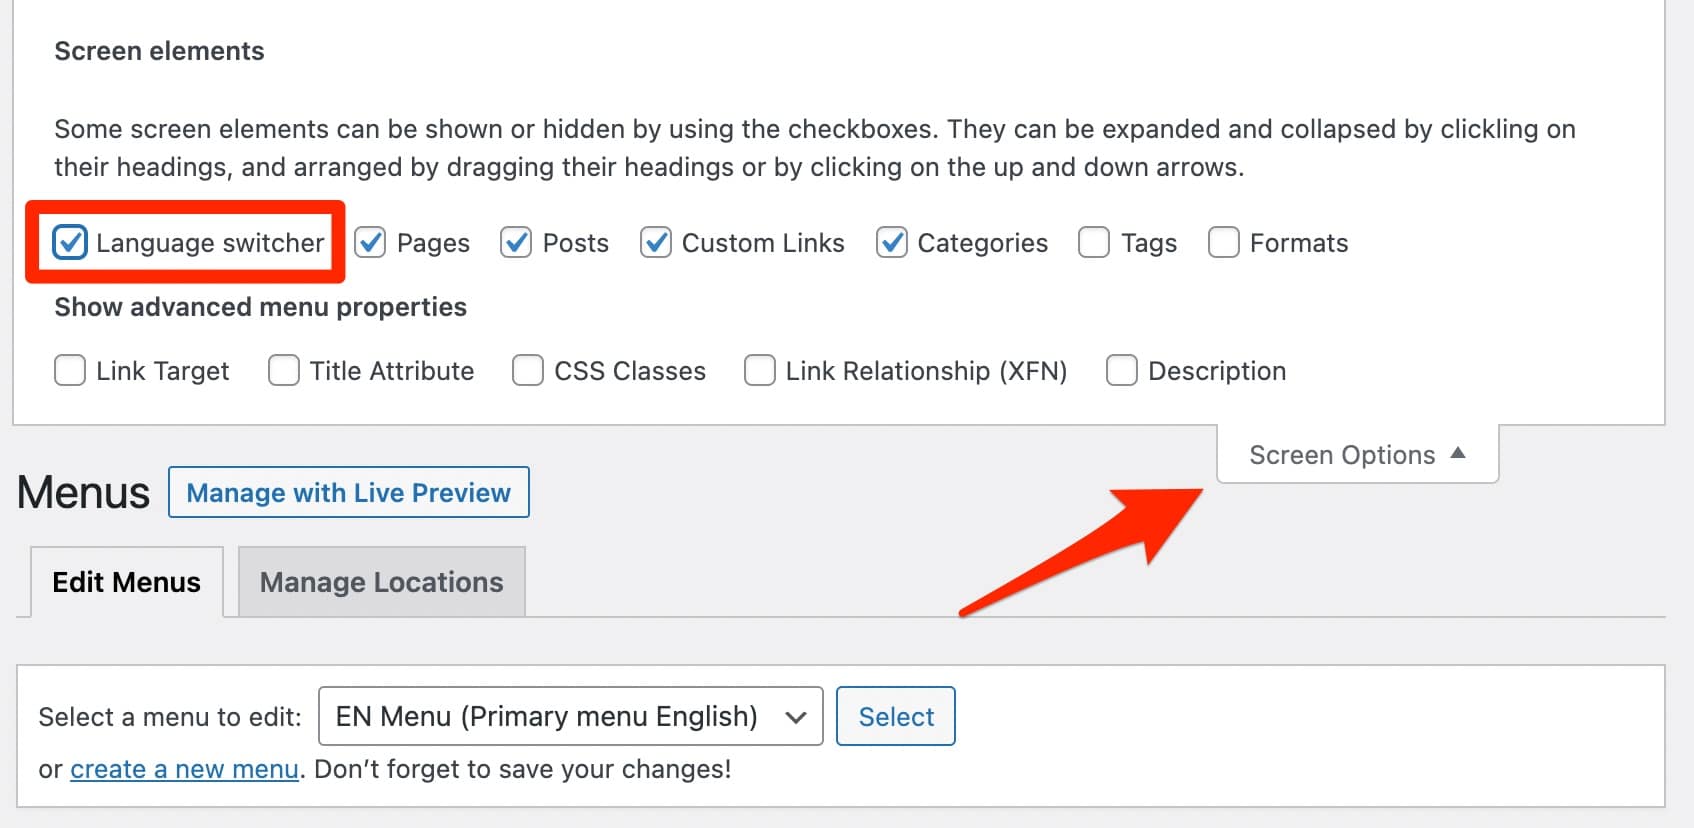
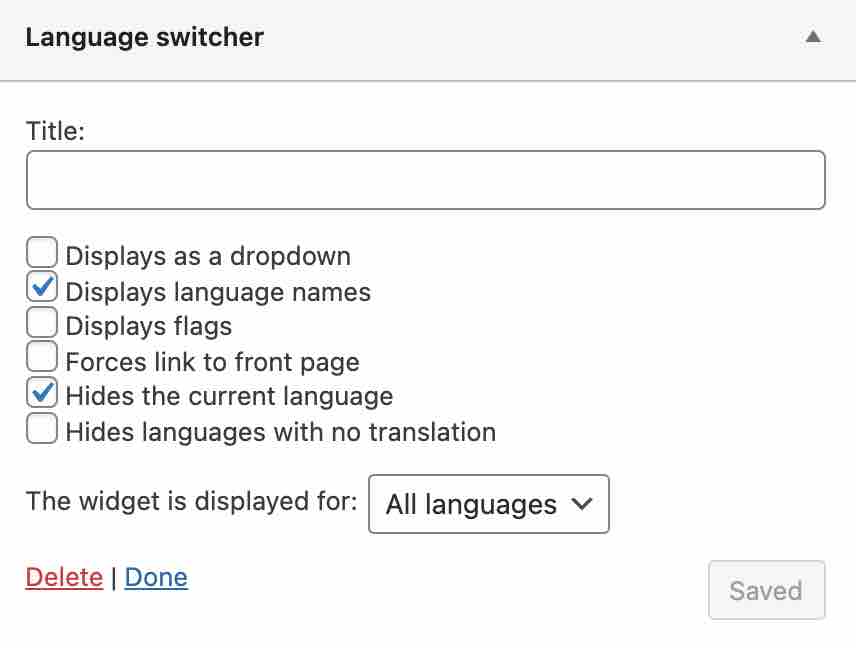
Once you’ve added the items of your choice to your menu, you can add a language switcher. If you don’t see this option, enable it by checking the “Language switcher” box in the “Screen Options”.
Once this is done, you will be presented with several choices:
- Show languages as a drop-down list.
- Display the name of the languages.
- Display the flags.
- Hide the current language, etc.
It’s up to you to see what suits you best. Personally, I like the flags, I think they speak for themselves and make it easier to understand.
But in use, they are not necessarily a good practice, because a Colombian will not necessarily click on a Spanish flag. The same goes for a Portuguese on the Brazilian flag.
It’s better to start with the name of the language.
On the other hand, I also find it useful to hide the current language. This means that when someone visits the French version of my site, he is only offered the name of the English language to switch to the English version (and vice versa).
On the picture below, you will see that a simple click on the language name allows to switch from one version to another. Each language has its own custom menu.

How to manage the translation of widgets?
After the articles and menus, let’s move on to the widgets. If you go to Appearance > Widgets, you will see that you can display the widget(s) of your choice in all languages, or in a specific language:
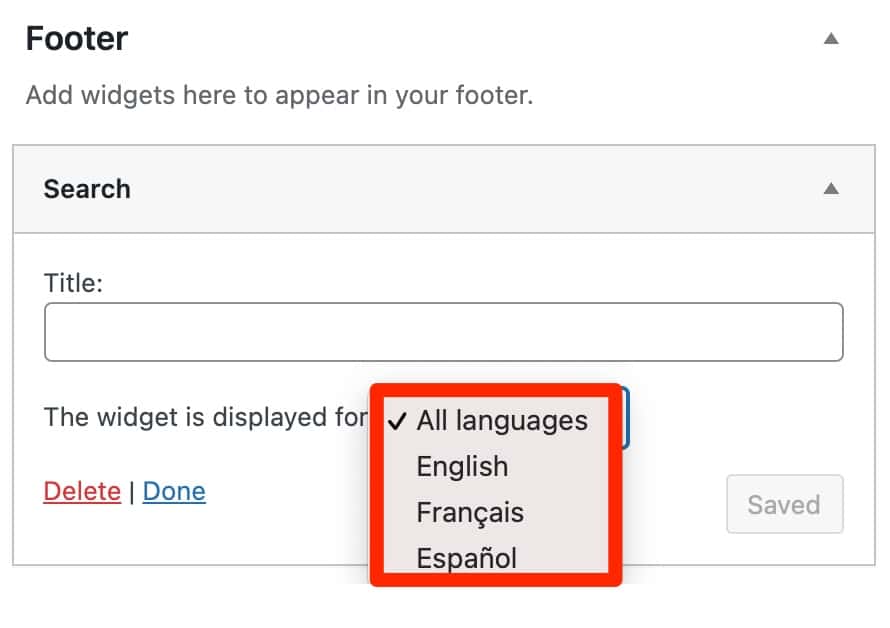
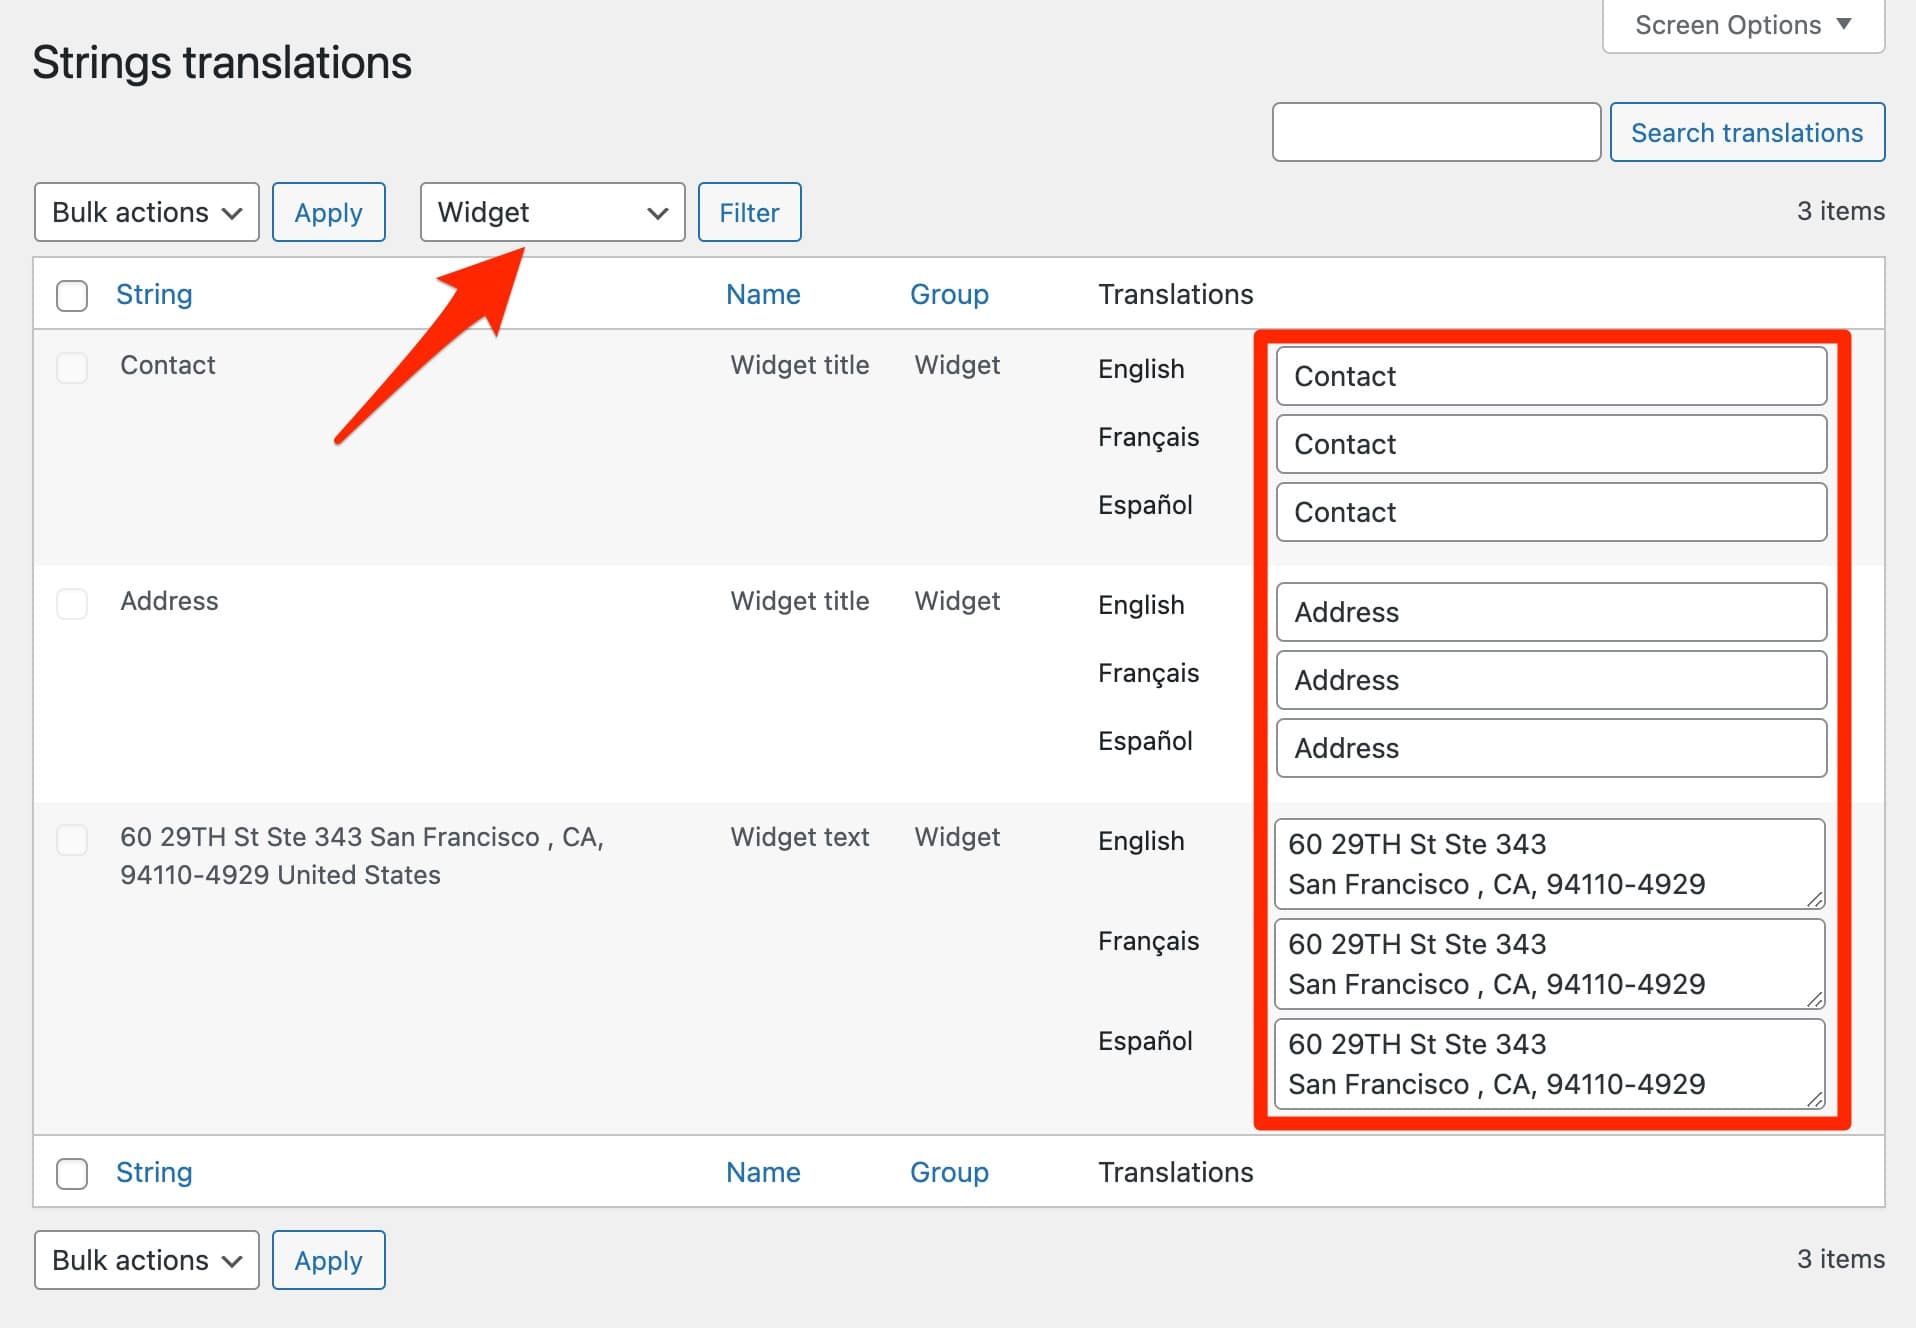
If you choose “All languages”, you can translate the widget title and content in the “Strings translations” menu. Filter by wigdet, then edit the texts of your choice:
How to display a language switcher in a widget?
When I told you about menu translation, you discovered with a big smile – I know – that it was possible to add a language switcher, to allow your visitors to switch from one language to another on your site.
You can also offer them this choice in a widget. To do so, drag and drop the “Language switcher” widget in one of the areas provided for this purpose by your theme, and choose the settings of your choice.
For this test, I used the native Twenty Twenty One theme, which offers only one widget area, allowing to display items only in my footer.
But depending on your theme, you will be able to add widgets in a sidebar, for example.
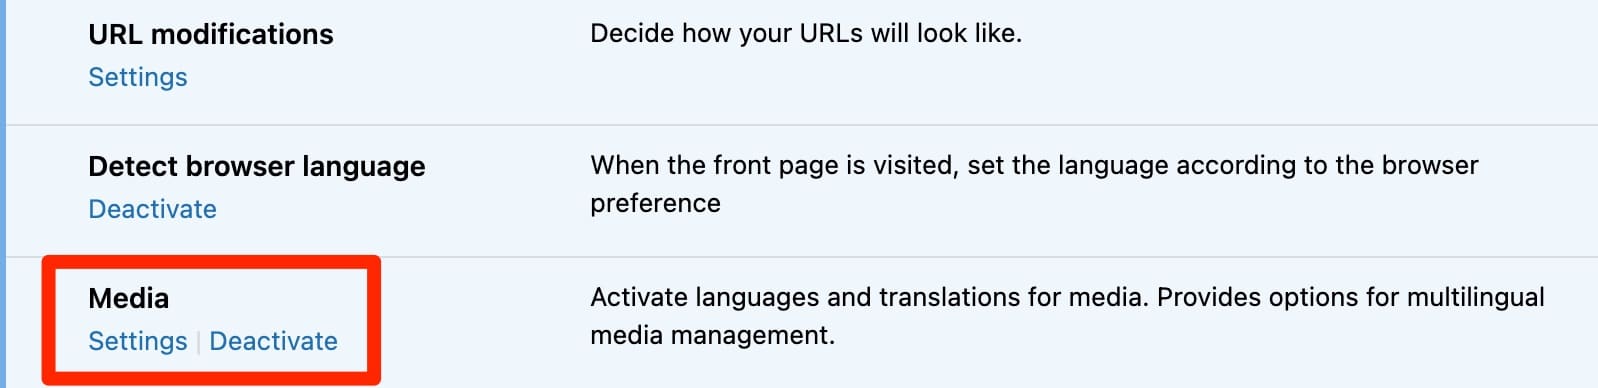
How to translate your media?
If you want to translate the metadata of your media (title, alt tag, description), first check that the “Media” module is activated in the Polylang settings:
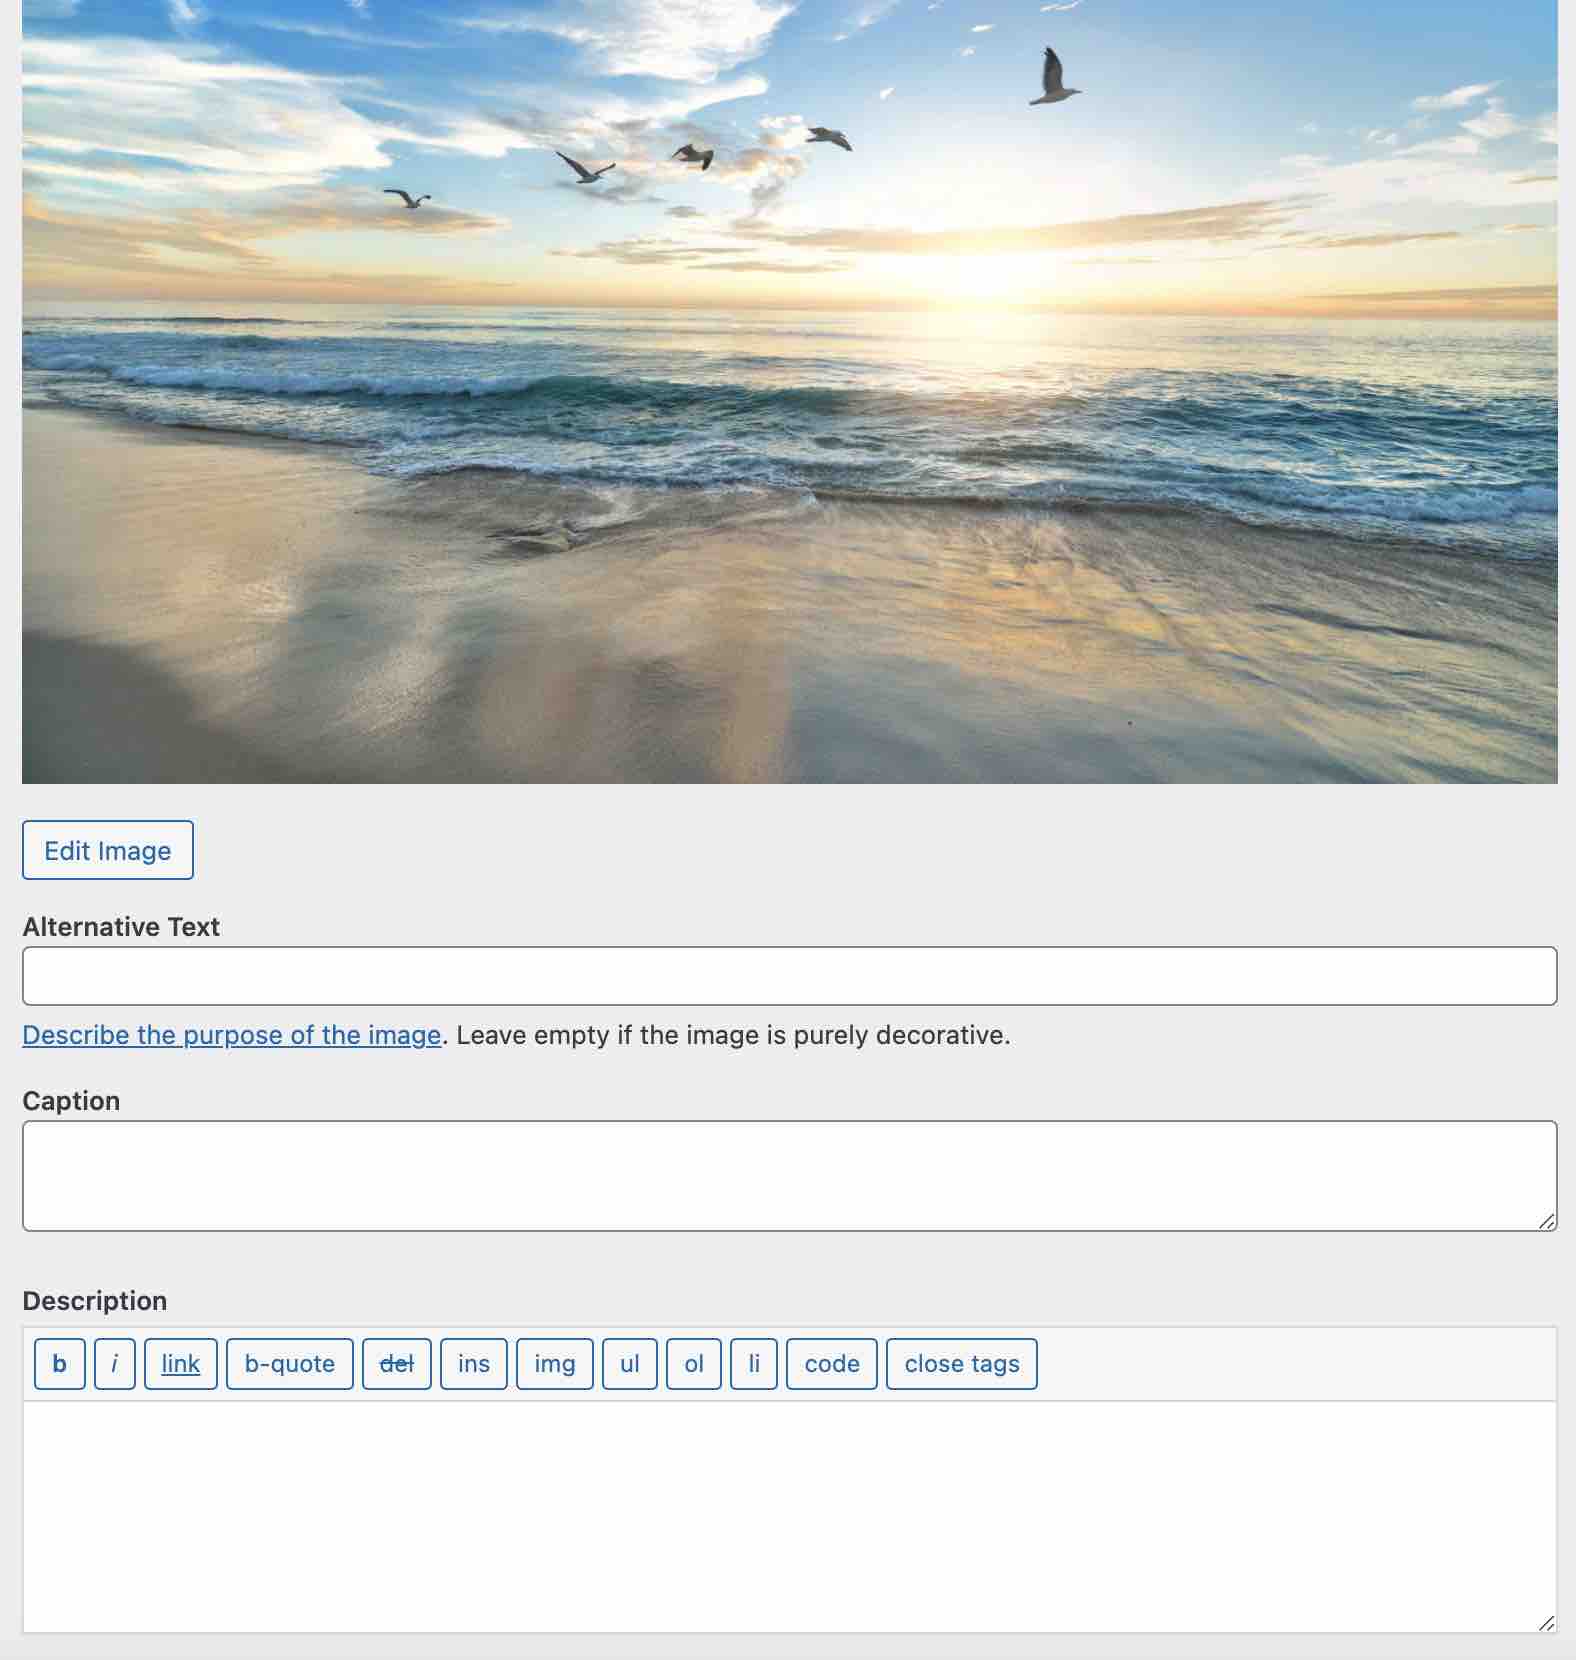
Then, go to your Media Library and translate the media you are interested in using the icons presented previously (“pencil”, “+” and “flag”). At the bottom of each image, you can easily fill in an alternative text, a caption and a description.
Between the translation of posts, menus, widgets and now media, you have a much more complete overview of the Polylang plugin on WordPress.
How does Polylang integrate with page builders?
For the purposes of this test, you may have noticed that I used the native WordPress content editor to show you the process of translating posts, for example.
But you may also be using a page builder to create… your pages, in fact.
A page builder is a tool that allows you to create rich and complex layouts for your content, without touching a single line of code, especially through the use of ready-made templates. Editing is often done in drag and drop and in real time. We present 10 of them in detail on the blog.
So, you might be wondering if Polylang works with them, right? I can’t give you a firm and definitive answer for each of them.
To find out more, let’s focus on two of the most famous of them: Elementor (more than 5 million active installations on the official directory) and the Divi Builder (nearly 800,000 premium customers).
Polylang and Elementor
The translation of pages created with Elementor works on the same principle as with the content editor.
You choose the page to translate in the language of your choice, except that instead of using the content editor, you switch to Elementor by clicking on the “Edit with Elementor” button.

Once on the page builder interface, all you have to do is translate the content on the page. And that’s it.
Apart from that? There is a handy plugin, Polylang Connect for Elementor, which allows you to display pages generated by the Elementor Pro Theme Builder automatically in the right language.
Polylang and Divi
After Elementor, there’s another page builder that can’t be ignored: the Divi Builder. It also allows you to translate all the content you want. For detailed instructions, go to this post we’ve written with the support of the Divi Community team.
Still here? So far, we’ve focused on translating a showcase site. What about a WooCommerce store? If you’re wondering, the answer is in the next part.
Polylang and WooCommerce: how does it work?
You want to make your WooCommerce store bilingual or multilingual? Polylang has thought of you by pulling out of its hat its Polylang for WooCommerce plugin.
This plugin works in conjunction with WooCommerce AND Polylang (free or Pro version).
Here is what it allows you to do:
- Translate products, categories, tags and global attributes of your online store.
- Duplicate a product and its translations in 1 click.
- Send default WooCommerce emails in the language of your customers.
- Synchronize categories, labels, shipping classes, attributes, images, galleries and inventory between product translations.
The Polylang for WooCommerce plugin also offers integration with several famous plugins in the WooCommerce ecosystem, such as WooCommerce Subscriptions (affiliate link), Product Bundles, WooCommerce Bookings (affiliate link), Table Rate Shipping and Dynamic Pricing.
If you are interested in Polylang Pro and you have a WooCommerce store, it may be worthwhile to get a dedicated package.
I’ll tell you more in the pricing section below.
How much does Polylang cost?
Polylang is a freemium plugin, which means that you can already take advantage of its free version to create a multilingual site.
If you want to take advantage of more advanced features, you will have to opt for Polylang Pro. Prices vary according to the number of sites you want to use Polylang Pro on:
- €99 for one site
- €198 for 3 sites
- €297 for 5 sites
- €495 for 25 sites
Not sure if the Pro version will be useful for you? Polylang offers this enlightening comparison:

You can notice that Polylang Pro offers, compared to the free version, support from the developer team, integration with the ACF Pro plugin, and of course more advanced technical options:
- You can translate slugs in URLs.
- You can duplicate your content in the languages of your choice.
- It is possible to activate or deactivate languages, etc.
In concrete terms, we can say that the free version is suitable for a lot of uses, especially if you are a beginner. Don’t hesitate to test it to see if it suits you. If you find it has some limitations, switch to its more complete Pro package.
Besides that, Polylang offers at the same price a dedicated plugin for WooCommerce (Polylang for WooCommerce).
Not to mention its famous Polylang Business Pack. This is a pack that includes two plugins: Polylang Pro and Polylang for WooCommerce at the advantageous price of €139 for use on 1 site (compared to €198 if you take the two plugins separately).
And the competition, in all this?
How does Polylang compare to the competition? One of its main challengers is the giant WPML. Without making a price comparison between Polylang and WPML, which would be inappropriate, we can already notice that WPML’s business model is different.
It is only available in a premium version, at rates that are certainly more advantageous than those offered by Polylang Pro (from $29/year to manage a multilingual blog).
On the other hand, as Nicolas points out in the article “How to make a multilingual site with WordPress” on WPMarmite, Polylang’s interface is cleaner than WPML’s.
On the other hand, unlike Polylang, WPML creates many custom tables in your database and its settings pages are less easy to handle than those of Polylang.
Polylang or WPML, you can’t choose? If you are already using WPML and wish to switch to Polylang, you should know that Polylang offers the WPML to Polylang plugin to migrate a site using WPML.
Our opinion on Polylang
Polylang is an efficient plugin to turn your WordPress into a multilingual site. Throughout this tutorial, you have learned how to set it up, while discovering how to translate the essential elements of your site (posts, pages, widgets, menus, slugs, etc.).
Personally, I would recommend this plugin for several reasons:
- Its integration with WordPress is successful and the settings menus are not too complex, which will suit beginners.
- It handles multilingual content properly, using the WordPress taxonomy system to localize your content.
- Its free version, already well supplied, allows to do a lot of things. To go further, you can decide at any time to upgrade to the Pro version, if you feel stuck.
Even if simplicity – in the good sense of the word – is the order of the day with this plugin, keep in mind that a learning curve will be necessary to fully understand all the workings of Polylang.
Download the Polylang plugin:
From now on, the floor is yours. Do you use this plugin? Tell us your feedback in the comments.

Receive the next posts for free and access exclusive resources. More than 20,000 people have done it, why not you?
Register

Hi, I really liked this article since I am looking for a plugin of this type for my ecommerce.What I would like to know is if you like the performance of Polylang, how fast is it, how does it work in its backend? store translations in databases or flat files?
I was testing translatepress and I didn’t like the time it takes to load the translations and considering that I have an e-commerce with many products and a lot of text, I’m looking for something fast
Hello, Polylang is the faster multilingual plugin. It stores the translation in the database.