“Are you looking for trouble?” You’ve heard the expression.
It can be used in a number of situations, for example, during a little tiff with a friend, a colleague, or a neighbor who’s a bit too noisy.

On WordPress, on the other hand, if you’re looking for something — even trouble — you won’t always find it. I won’t say never, but it’s often the case.
It has to be said that the default search functionality has several glaring limitations. That’s why it’s a good idea to enhance it with a plugin. One of the most famous of these is SearchWP.
Highly comprehensive and acclaimed by its users, it’s well worth the detour. In this post, we provide a detailed test and review.
At the end of your reading, you’ll know the benefits and limitations of this plugin, how to configure it… and whether it’s right for you.
Overview
- What is SearchWP?
- What are the features of this plugin?
- How do I install the SearchWP plugin?
- How do I customize WordPress’ native search form with SearchWP?
- How do I create a search form from scratch?
- What addons does SearchWP offer?
- How much does SearchWP cost?
- What are the alternatives?
- Our final opinion on SearchWP
What is SearchWP?
SearchWP overview

SearchWP is a freemium WordPress plugin that enhances the search results returned by your WP site to your visitors.
The plugin, which boasts over 30,000 users, automatically integrates with WordPress’ default search engine, enhancing it with a host of new features.
Technically, SearchWP works like this: by default, it intercepts native WordPress search queries and replaces native search results with its own.
Launched in 2013 by Jonathan Christopher, SearchWP was acquired in 2021 by Awesome Motive, the company founded by Syed Balkhi that can be found behind multiple products and tools in the WordPress ecosystem:
- The WPBeginner blog
- Plugins such as Smash Balloon, WPForms, MonsterInsights, WPMail SMTP, All in One SEO, SeedProd, etc.
If you’d like to get a quick preview of this plugin’s dashboard, here’s a SearchWP demo to whet your appetite. (Some menus have changed since it was first published, but the overall picture remains fairly similar.)
And don’t worry: we’re also going to dive into all the settings and other menus right after.
Why should you use this search plugin?
Before we show you what’s under the hood of SearchWP, let’s clarify one important point.
What’s the point of using and paying for SearchWP if your site already has a search bar?
Good question! The answer is simple: because the native search functionality offered by WordPress is very limited.
Case in point? It only filters post and page content. The default search won’t be able to return results related to custom content types, taxonomies, or even custom product attributes from your WooCommerce store.
If you have a small showcase site or blog with a few pages and posts, native search will be sufficient. On the other hand, if your site or eCommerce store hosts a lot of content, you’ll quickly be limited… and frustrate your visitors.
With a high-performance, precise, and even filterable search function — which is possible with SearchWP — you’ll enhance your user experience and decrease your bounce rate.
And, best of all, you’ll increase your chances of improving conversions. Sounds great, right?
A conversion is a specific action you want your users to perform, such as purchasing a product, downloading a file, filling out a form or a quote, etc.

What are the features of this plugin?
Now you know why you should use a plugin like SearchWP to overcome the shortcomings of native WordPress search. Let’s find out why this plugin is one of the most effective for improving WordPress search:
- SearchWP is capable of indexing all content on your WordPress site: posts, pages, custom content types created with third-party plugins (Advanced Custom Fields, Meta Box, Toolset, and Pods), taxonomies (categories and tags), comments, media, documents uploaded to your Media Library (PDF, .txt, .docx, etc.), custom tables from your database, and shortcodes.
- It can be used without coding, and is functional as soon as it is activated.
- It automatically integrates with the search form and results template offered by any WordPress theme. It’s also compatible with the most popular page builders on the market (Elementor, Divi Builder, Beaver Builder, etc.).
- This WordPress search plugin also integrates with WooCommerce, the most popular eCommerce plugin in the official WordPress directory.
- Its interface is intuitive and not overloaded.
- An unlimited number of search engines can be configured, each with its own settings.
- The tool is highly customizable. For example, you can choose to include/exclude certain data returned by your search results, or set logical conditions (display articles according to ID, publication date, taxonomy, etc.).
- SearchWP is expandable, thanks to a number of add-ons that I’ll introduce later in this article.
- You have access to statistical data on the searches carried out by your visitors, in order to understand what they want to find on your site, with the possibility of readjusting it later on your side.
At this point, you’re probably keen to see how SearchWP works “in real life.” Good news: in the next section, you’ll find out how to activate it on your WordPress site.
How do I install the SearchWP plugin?
Basic installation
To begin with, download the zip file of the plugin from your customer area, in the “Login” section of the plugin’s official website.
Then go to the dashboard of your WordPress site, in the Plugins > Add New > Upload Plugin menu.
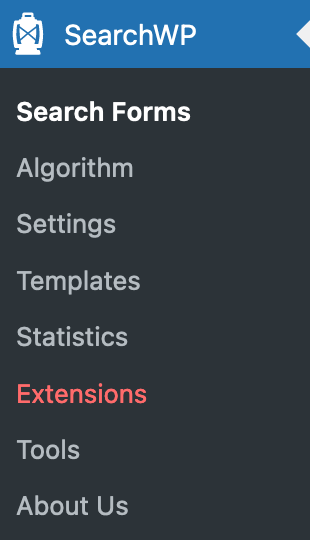
Once the plugin has been activated, you’ll have a new menu in your sidebar, logically named “SearchWP”:
Go to the “Settings” menu to enter your license key (you’ll find that too in your account on the SearchWP website):
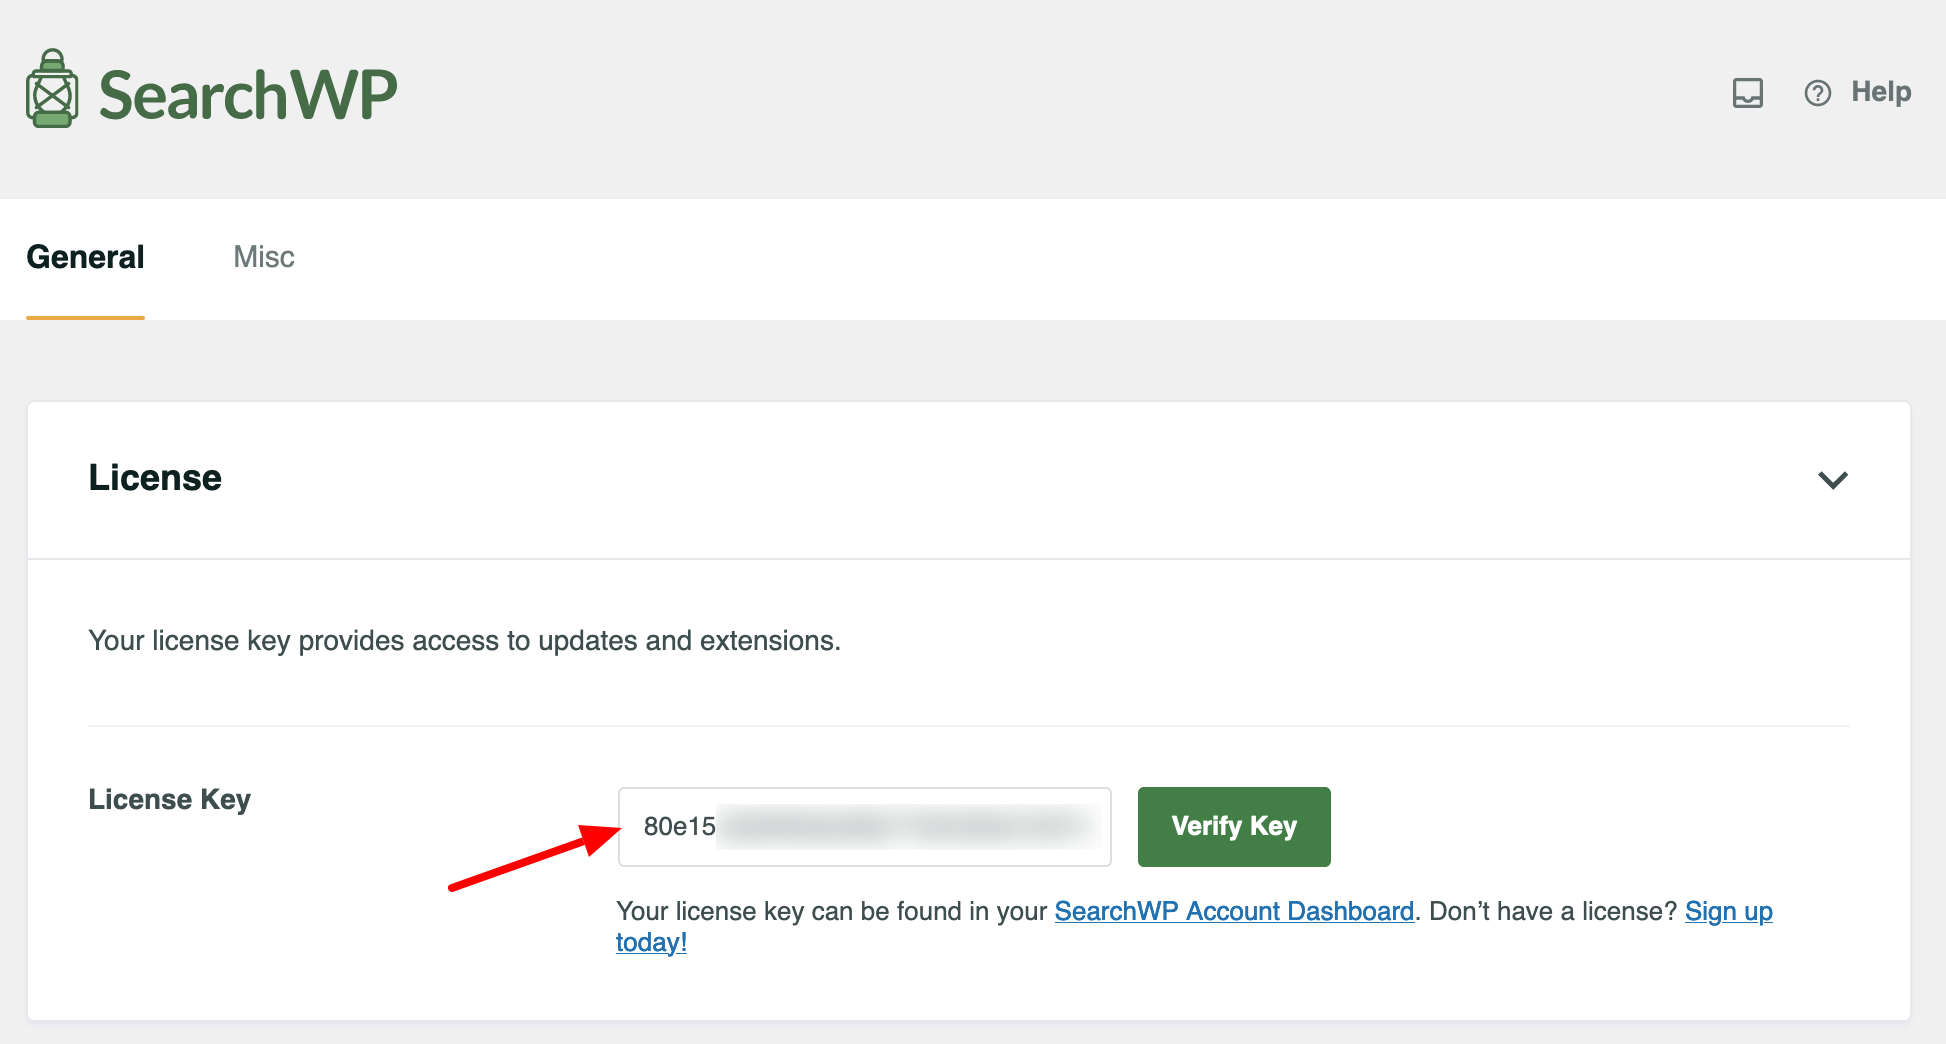
Click on the “Verify Key” button to take advantage of future features included in plugin updates, as well as its addons.
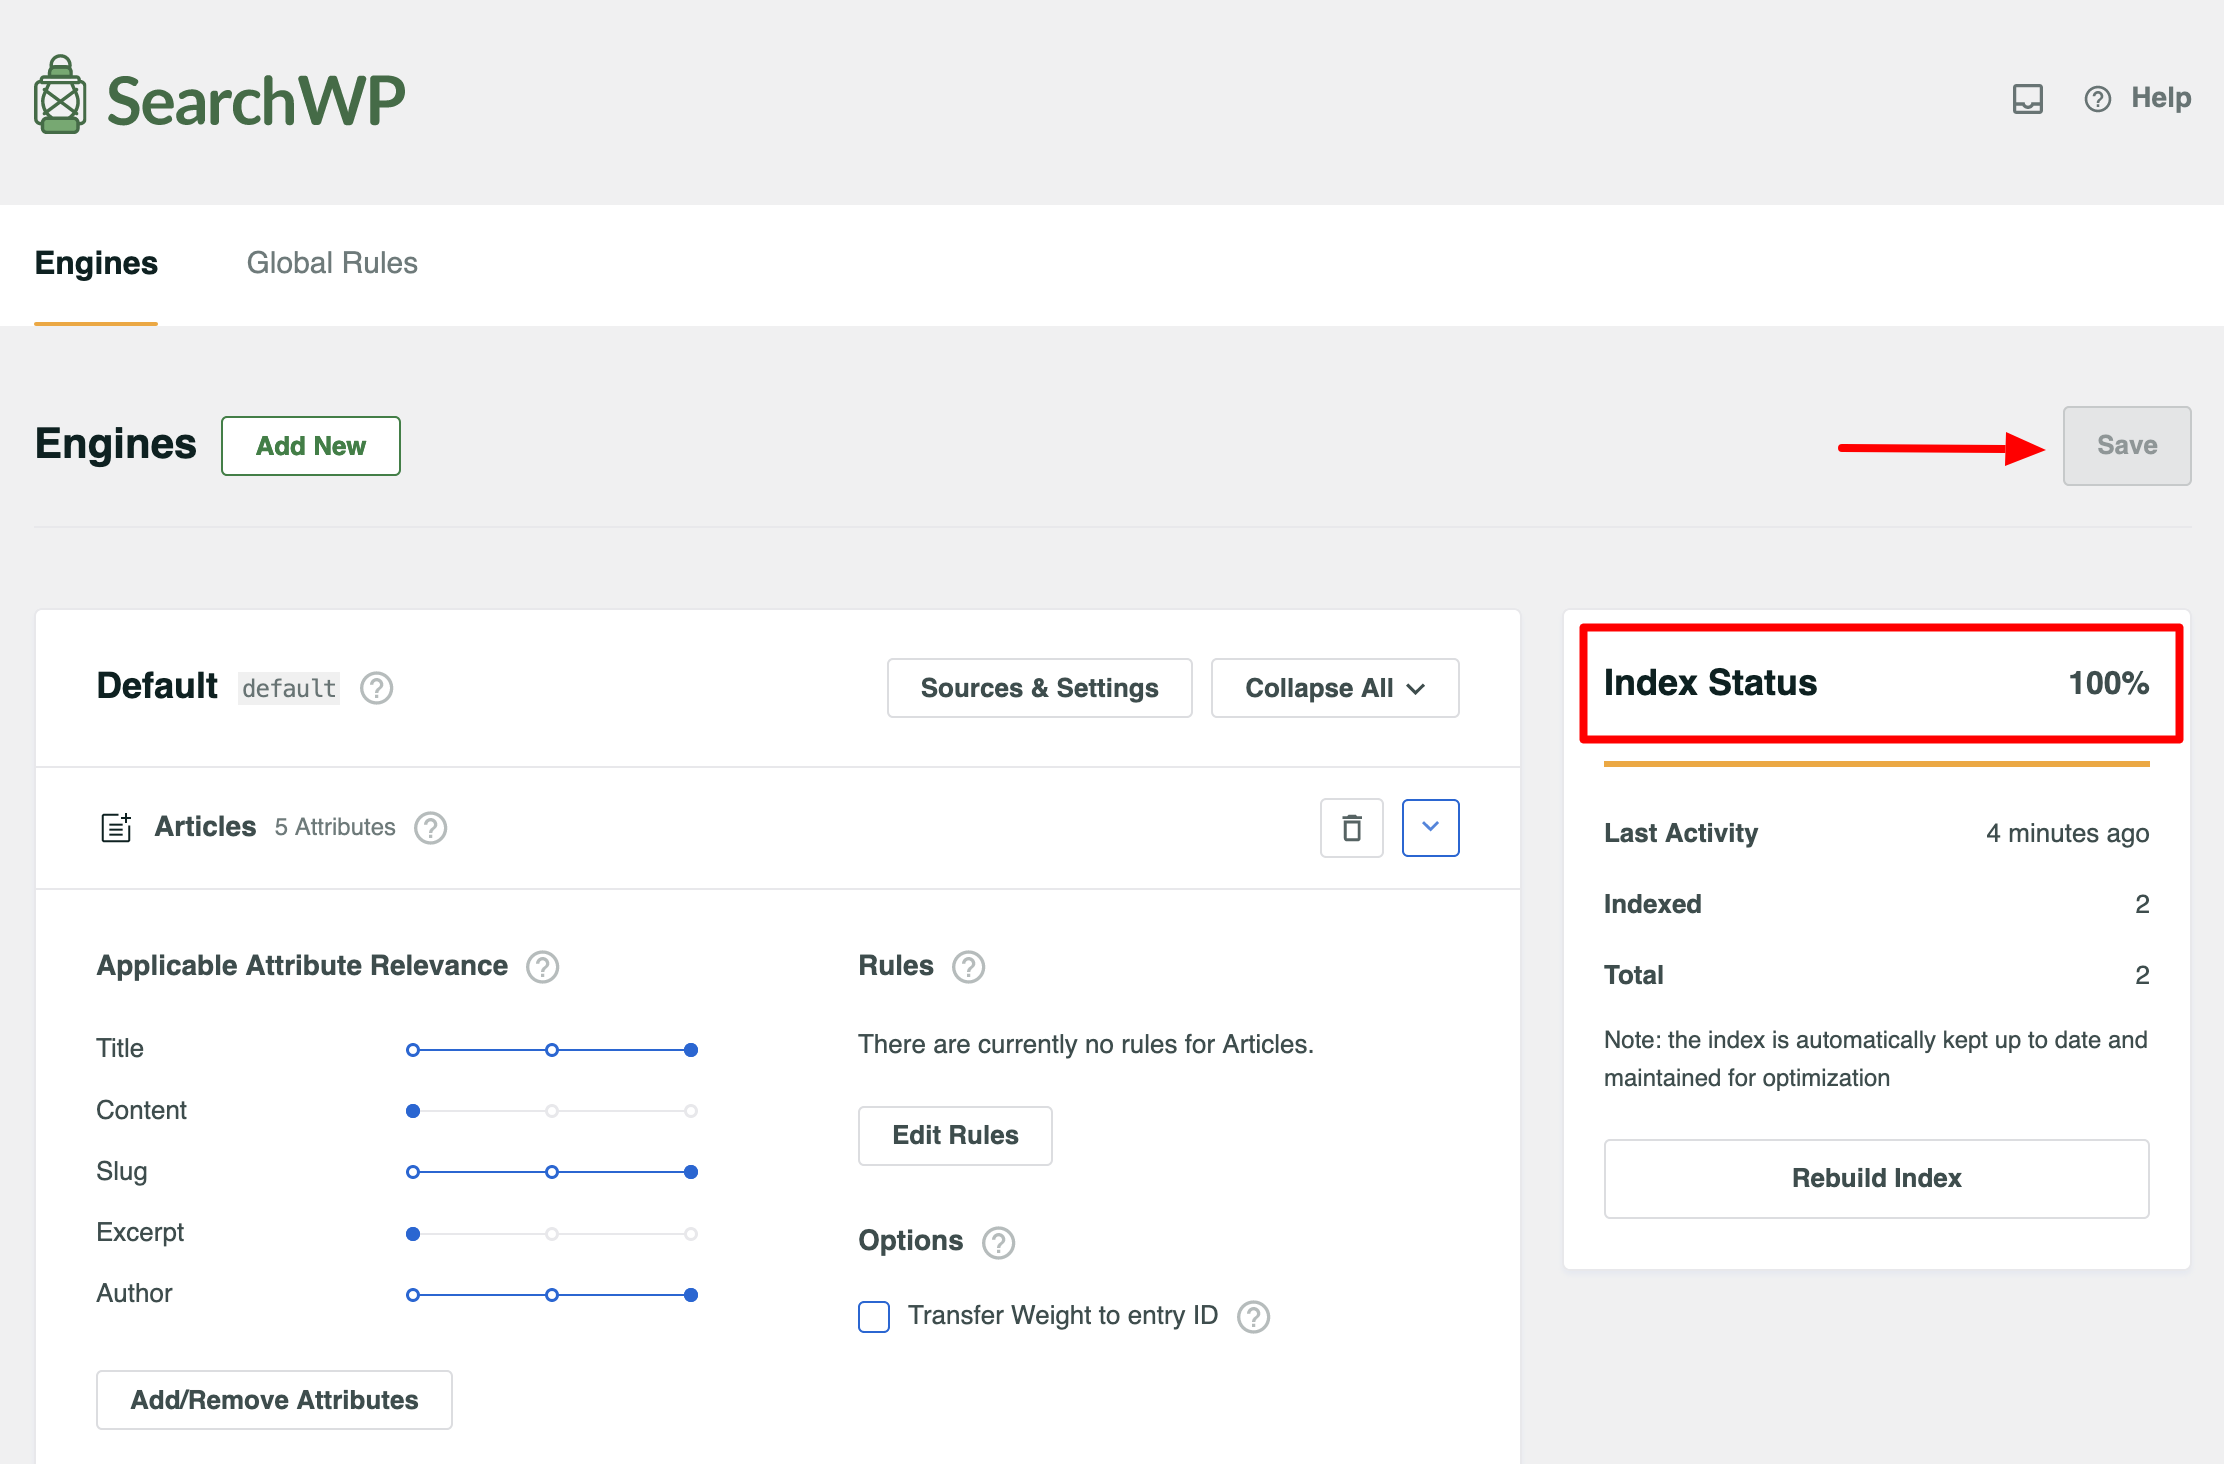
Are you tracking with me? Great! The good news is that SearchWP automatically indexes the content of your site. All you have to do is click on the “Save” button in the SearchWP > Algorithm > Engines menu:
Of course, you can also fine-tune your settings using the various functions on offer. I’ll come back to this shortly.
But first, let me help you solve a problem you might be facing: how do you use SearchWP if your theme doesn’t include a search form?
How do you add a search bar if your theme doesn’t offer one?
I assure you, this is a rare occurrence. By default, most of the well-known themes in the official directory — Astra, GeneratePress, Neve, and Kadence, for example — offer a built-in search function.
If you don’t, here’s how to get started.
Case no. 1: You’re using a classic theme
Are you using a classic theme, i.e. one that doesn’t rely on blocks and can’t be customized via the WordPress Site Editor (e.g. Astra)?
If so, you can:
- Add the “Search” block in the widget area of your choice. Astra, for example, suggests doing so in the sidebar. Depending on your theme, you’ll have more or fewer widget zones.
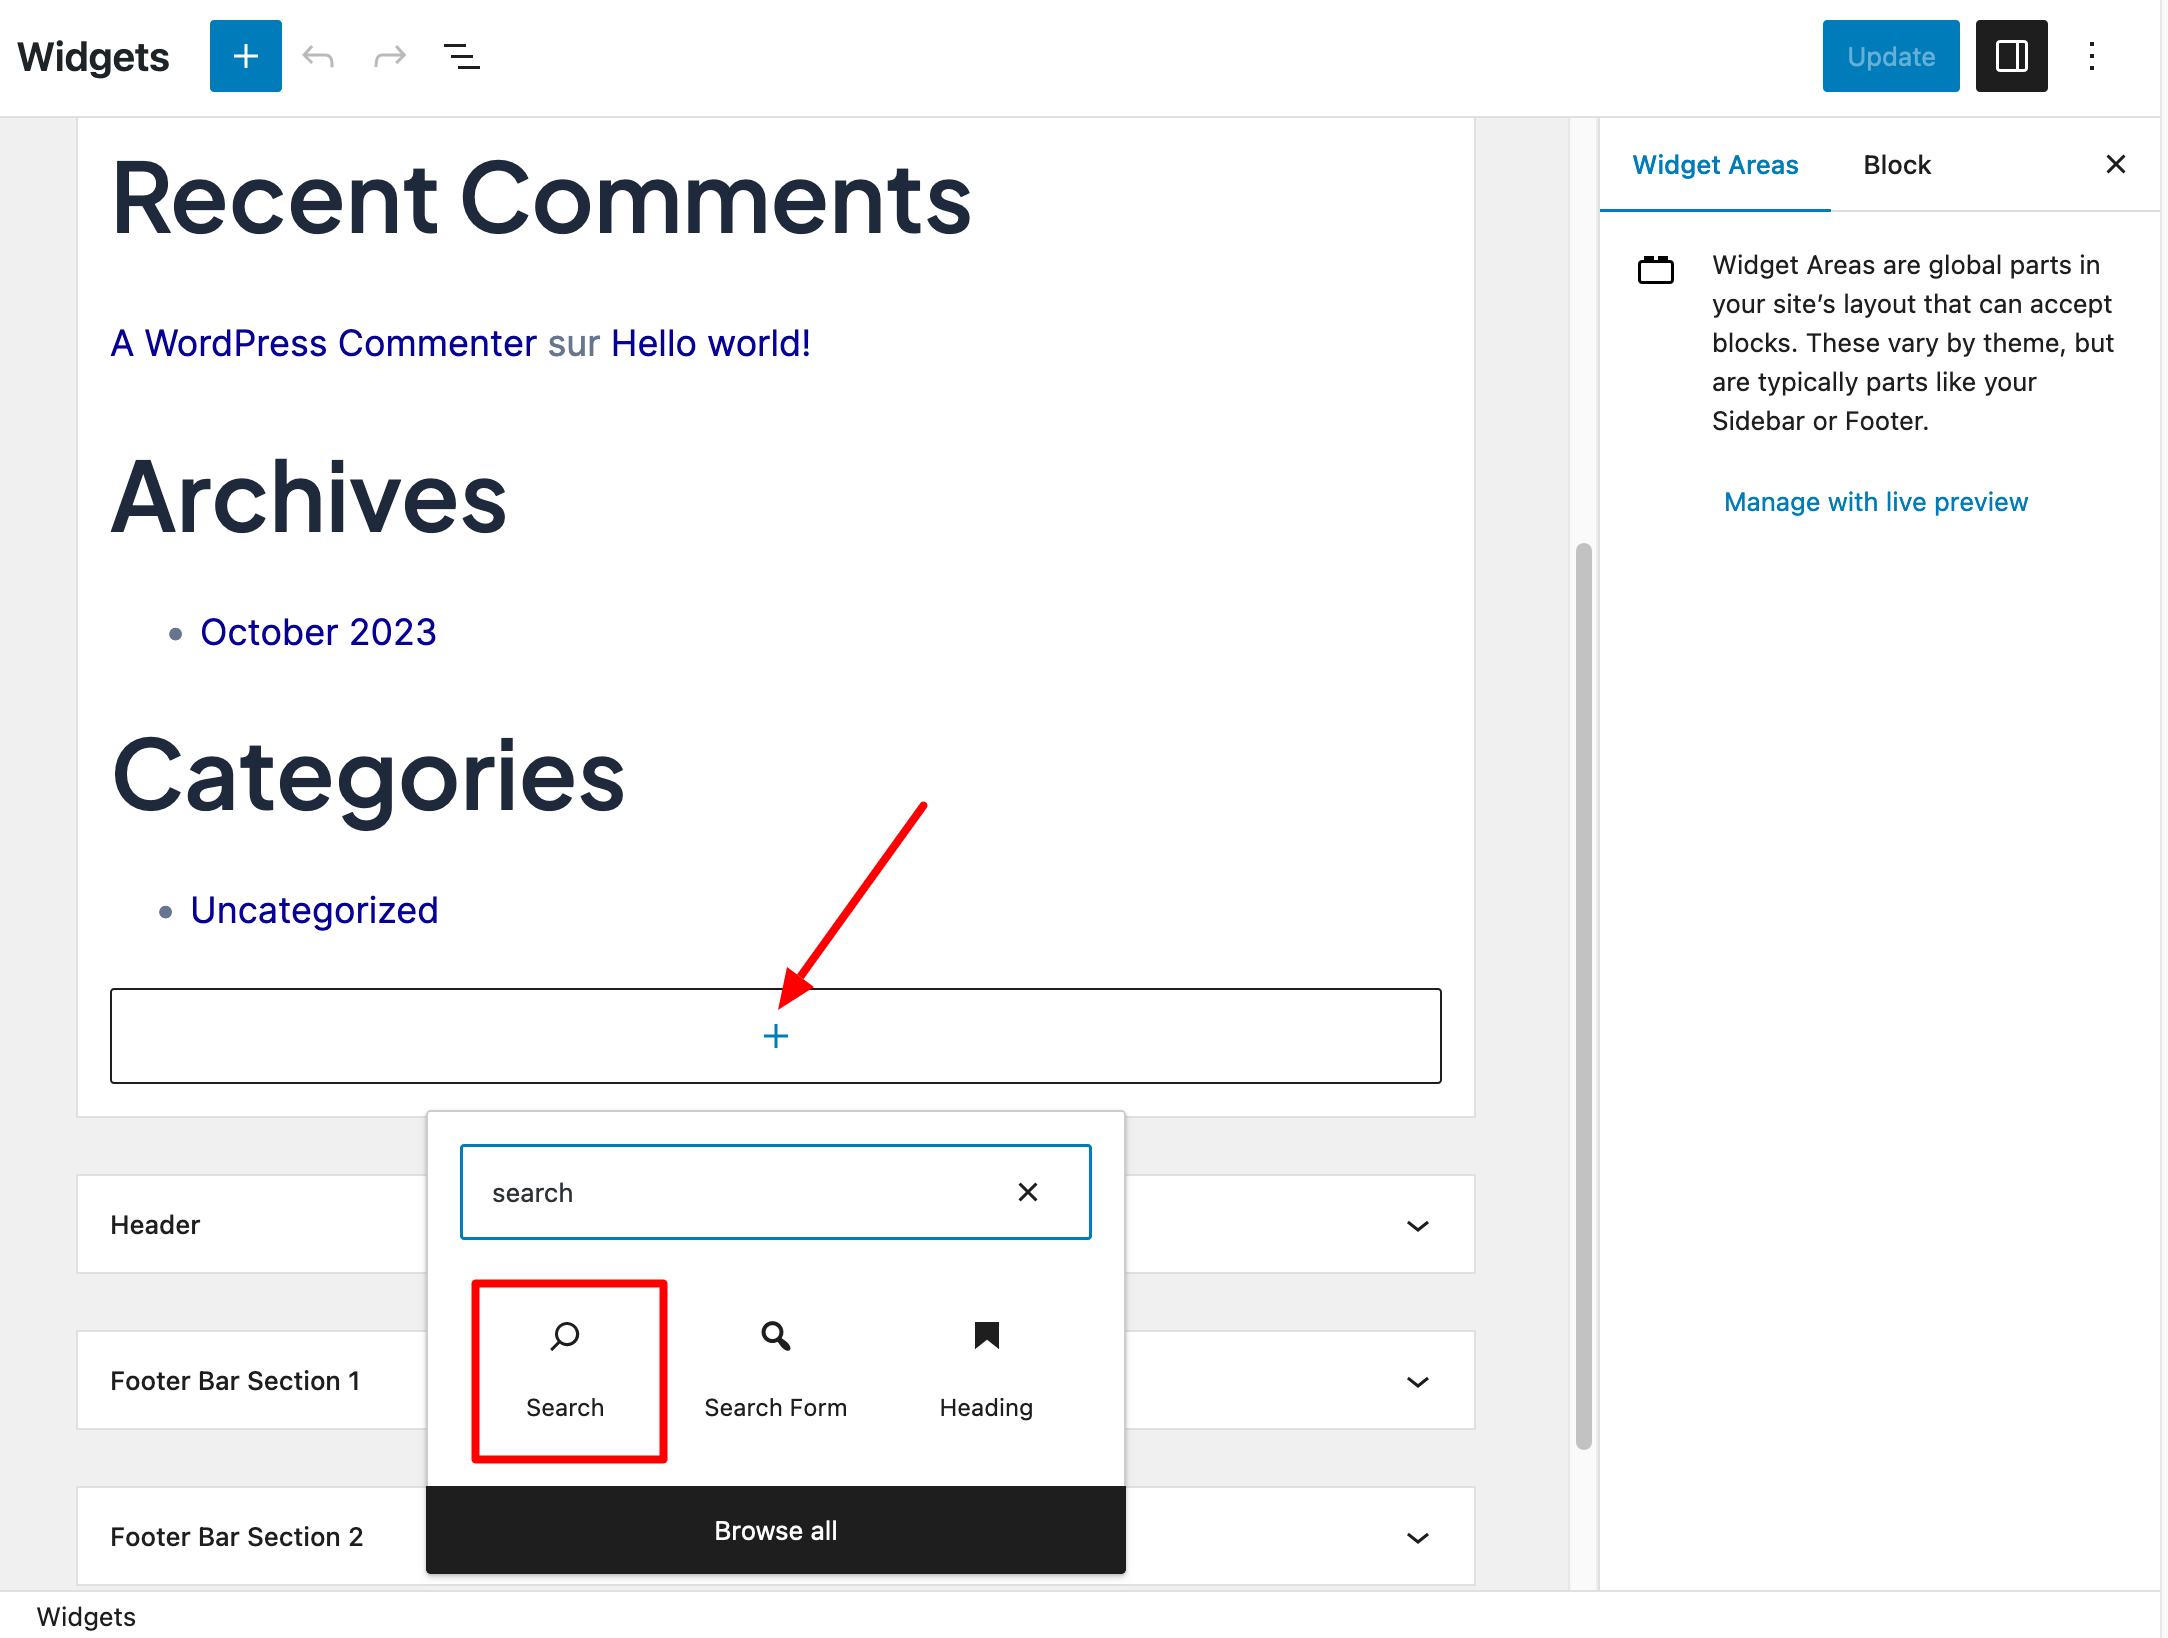
- Integrate the “Search” block on your home page, following the same principle.
Case no. 2: You’ve activated SearchWP on a block-based theme
Let’s move on to Case 2: you’re using a block-based theme (e.g. the native Twenty Twenty-Three theme).
In this case, customization is carried out via the WordPress Site Editor (menu Appearance > Editor).
Click on the template to which you’d like to add your search form.
Select the area where you’d like to integrate your search bar, such as the header, then add the “Search” block:
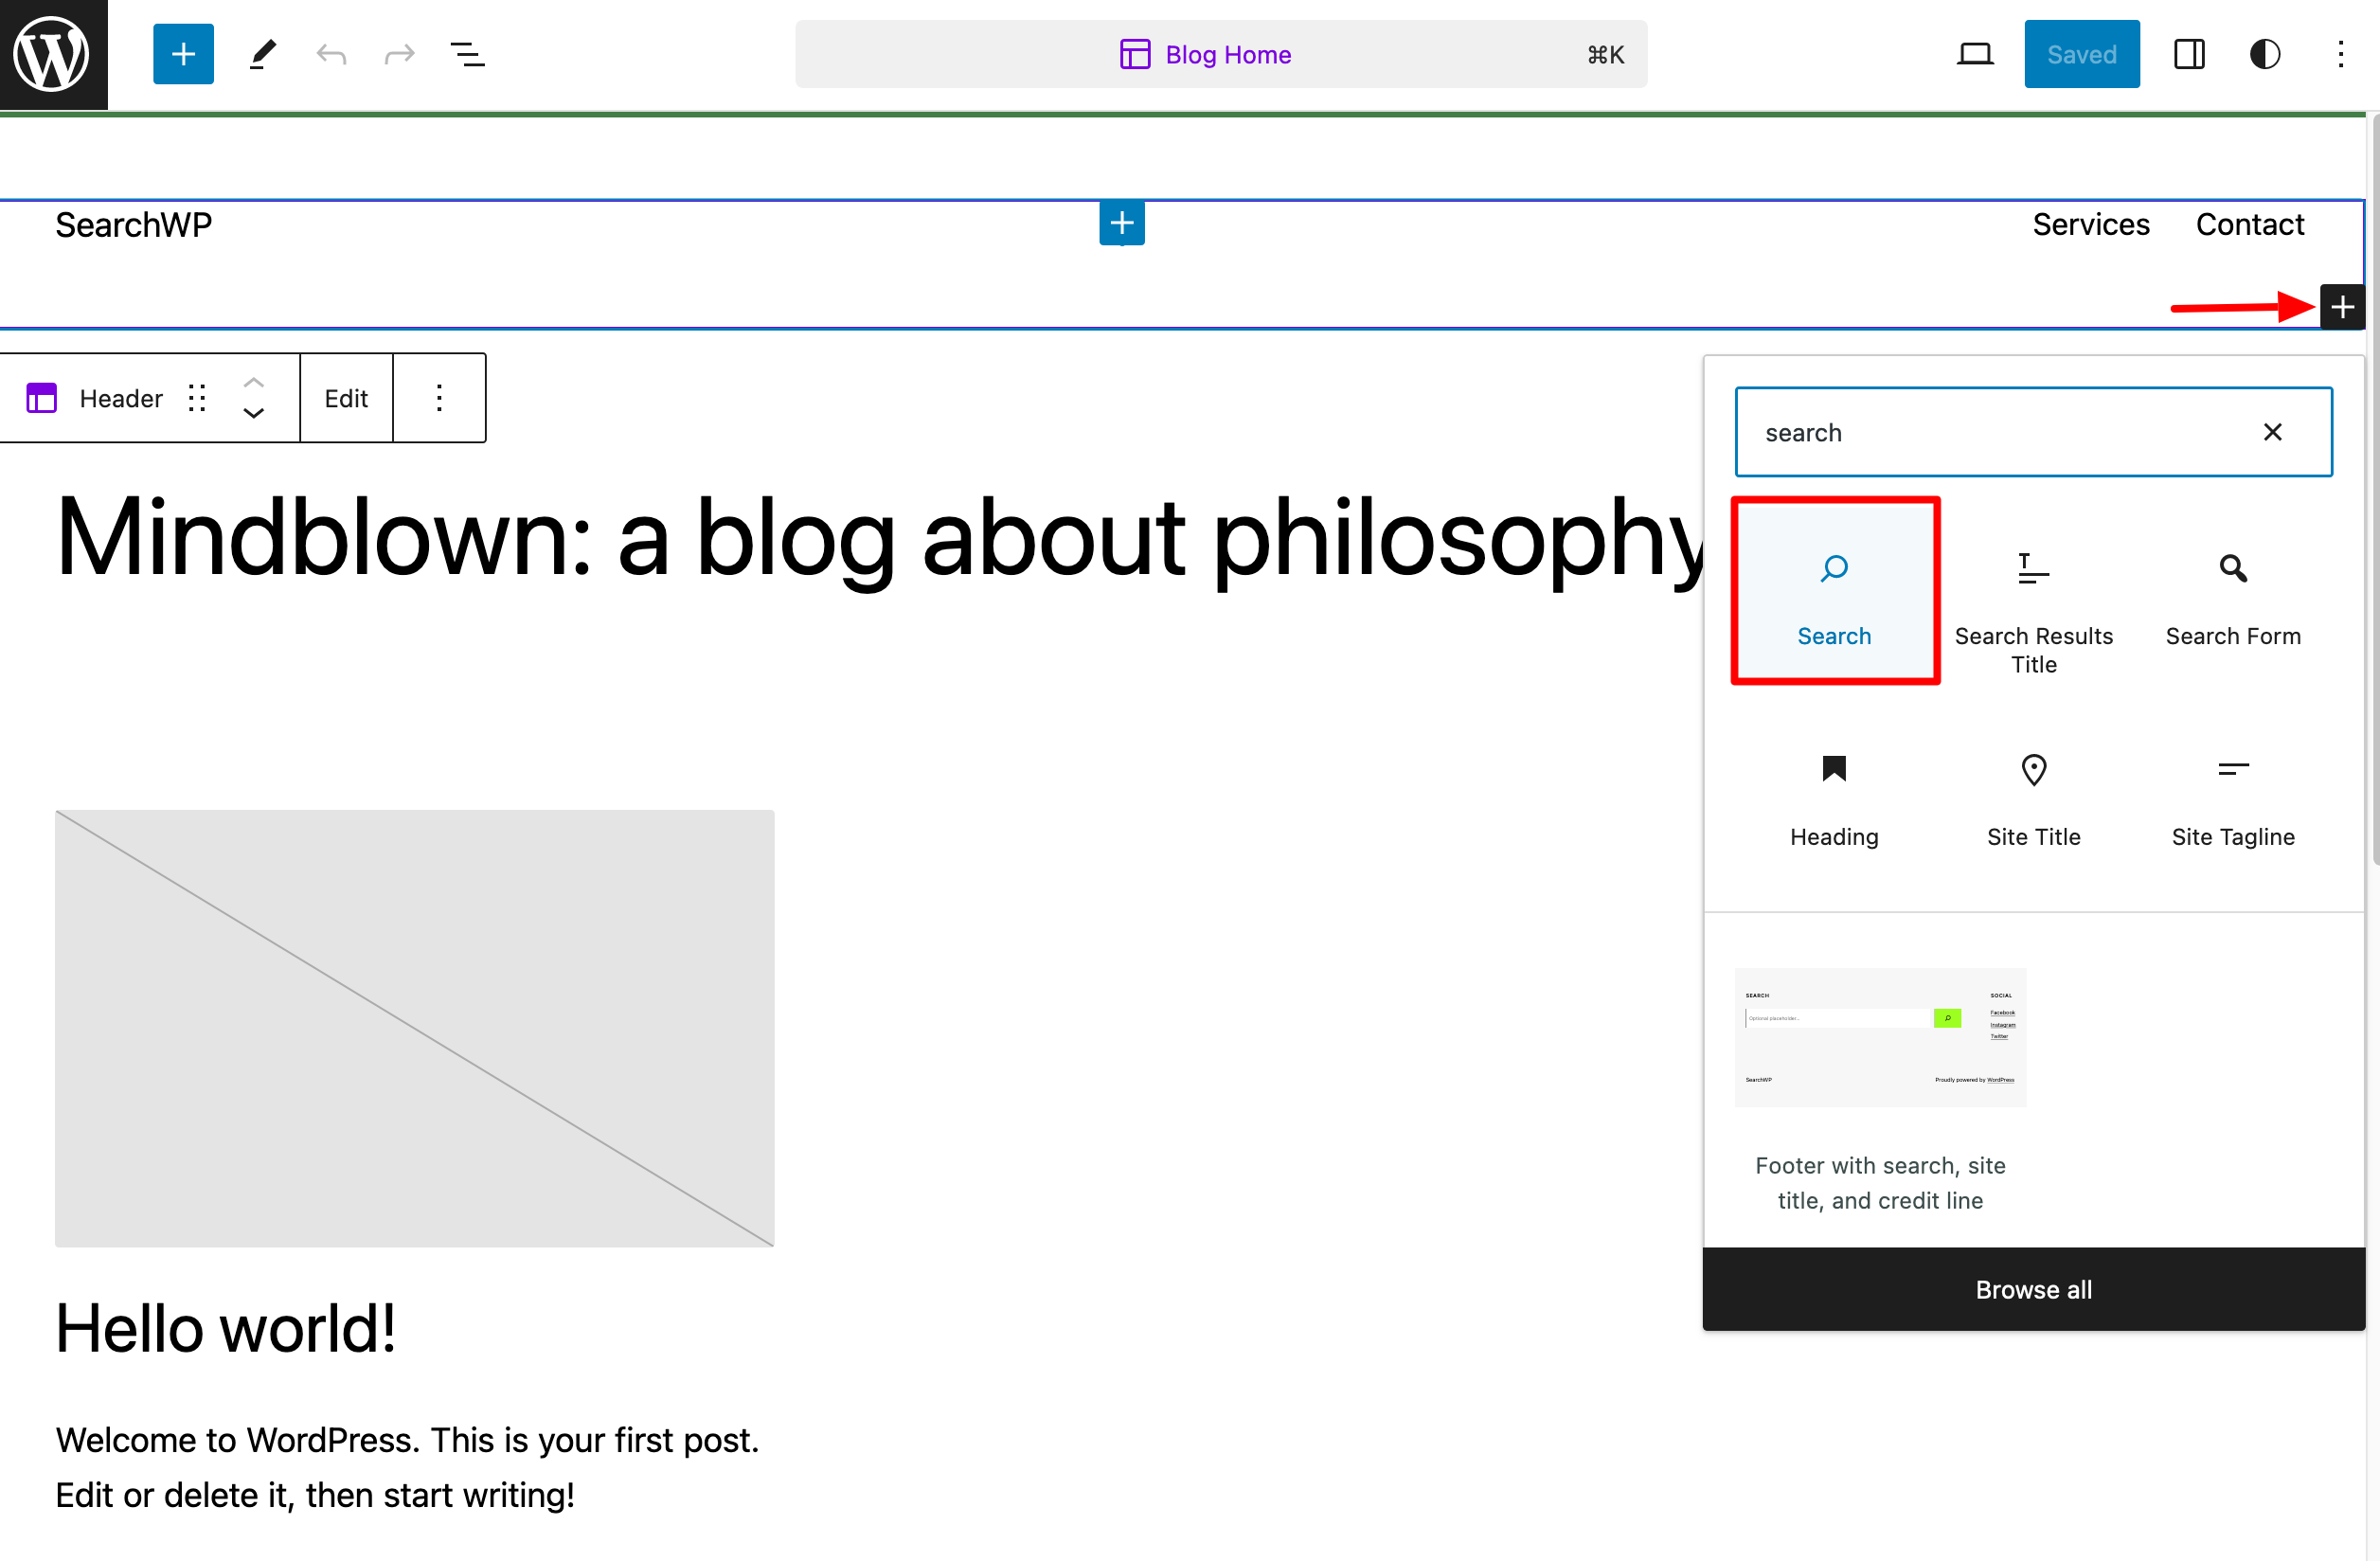
And that’s it, bravo! With this problem behind you, let’s move on to configuring the search plugin.
The Site Editor is a tool that’s still in the middle of being developed and refined. If you want to achieve professional layouts, it requires solid technical knowledge, both in terms of templating and web design. That’s why we don’t recommend it for WordPress beginners. If your aim is to create pages and an entire site without coding, turn to a page builder instead.
How do I customize WordPress’ native search form with SearchWP?
Step 1: Set up the search form engine
Search configuration starts in the “Engines” tab of the SearchWP > Algorithm menu.
This is where you choose the elements that will be considered when returning a search result for a visitor attempting to find content on your site.
By default, the plugin suggests that you configure the engine that will be used for native searches on WordPress.
On my test site, you can see that 3 types of content are taken into account in the search:
- Posts
- Pages
- Media files
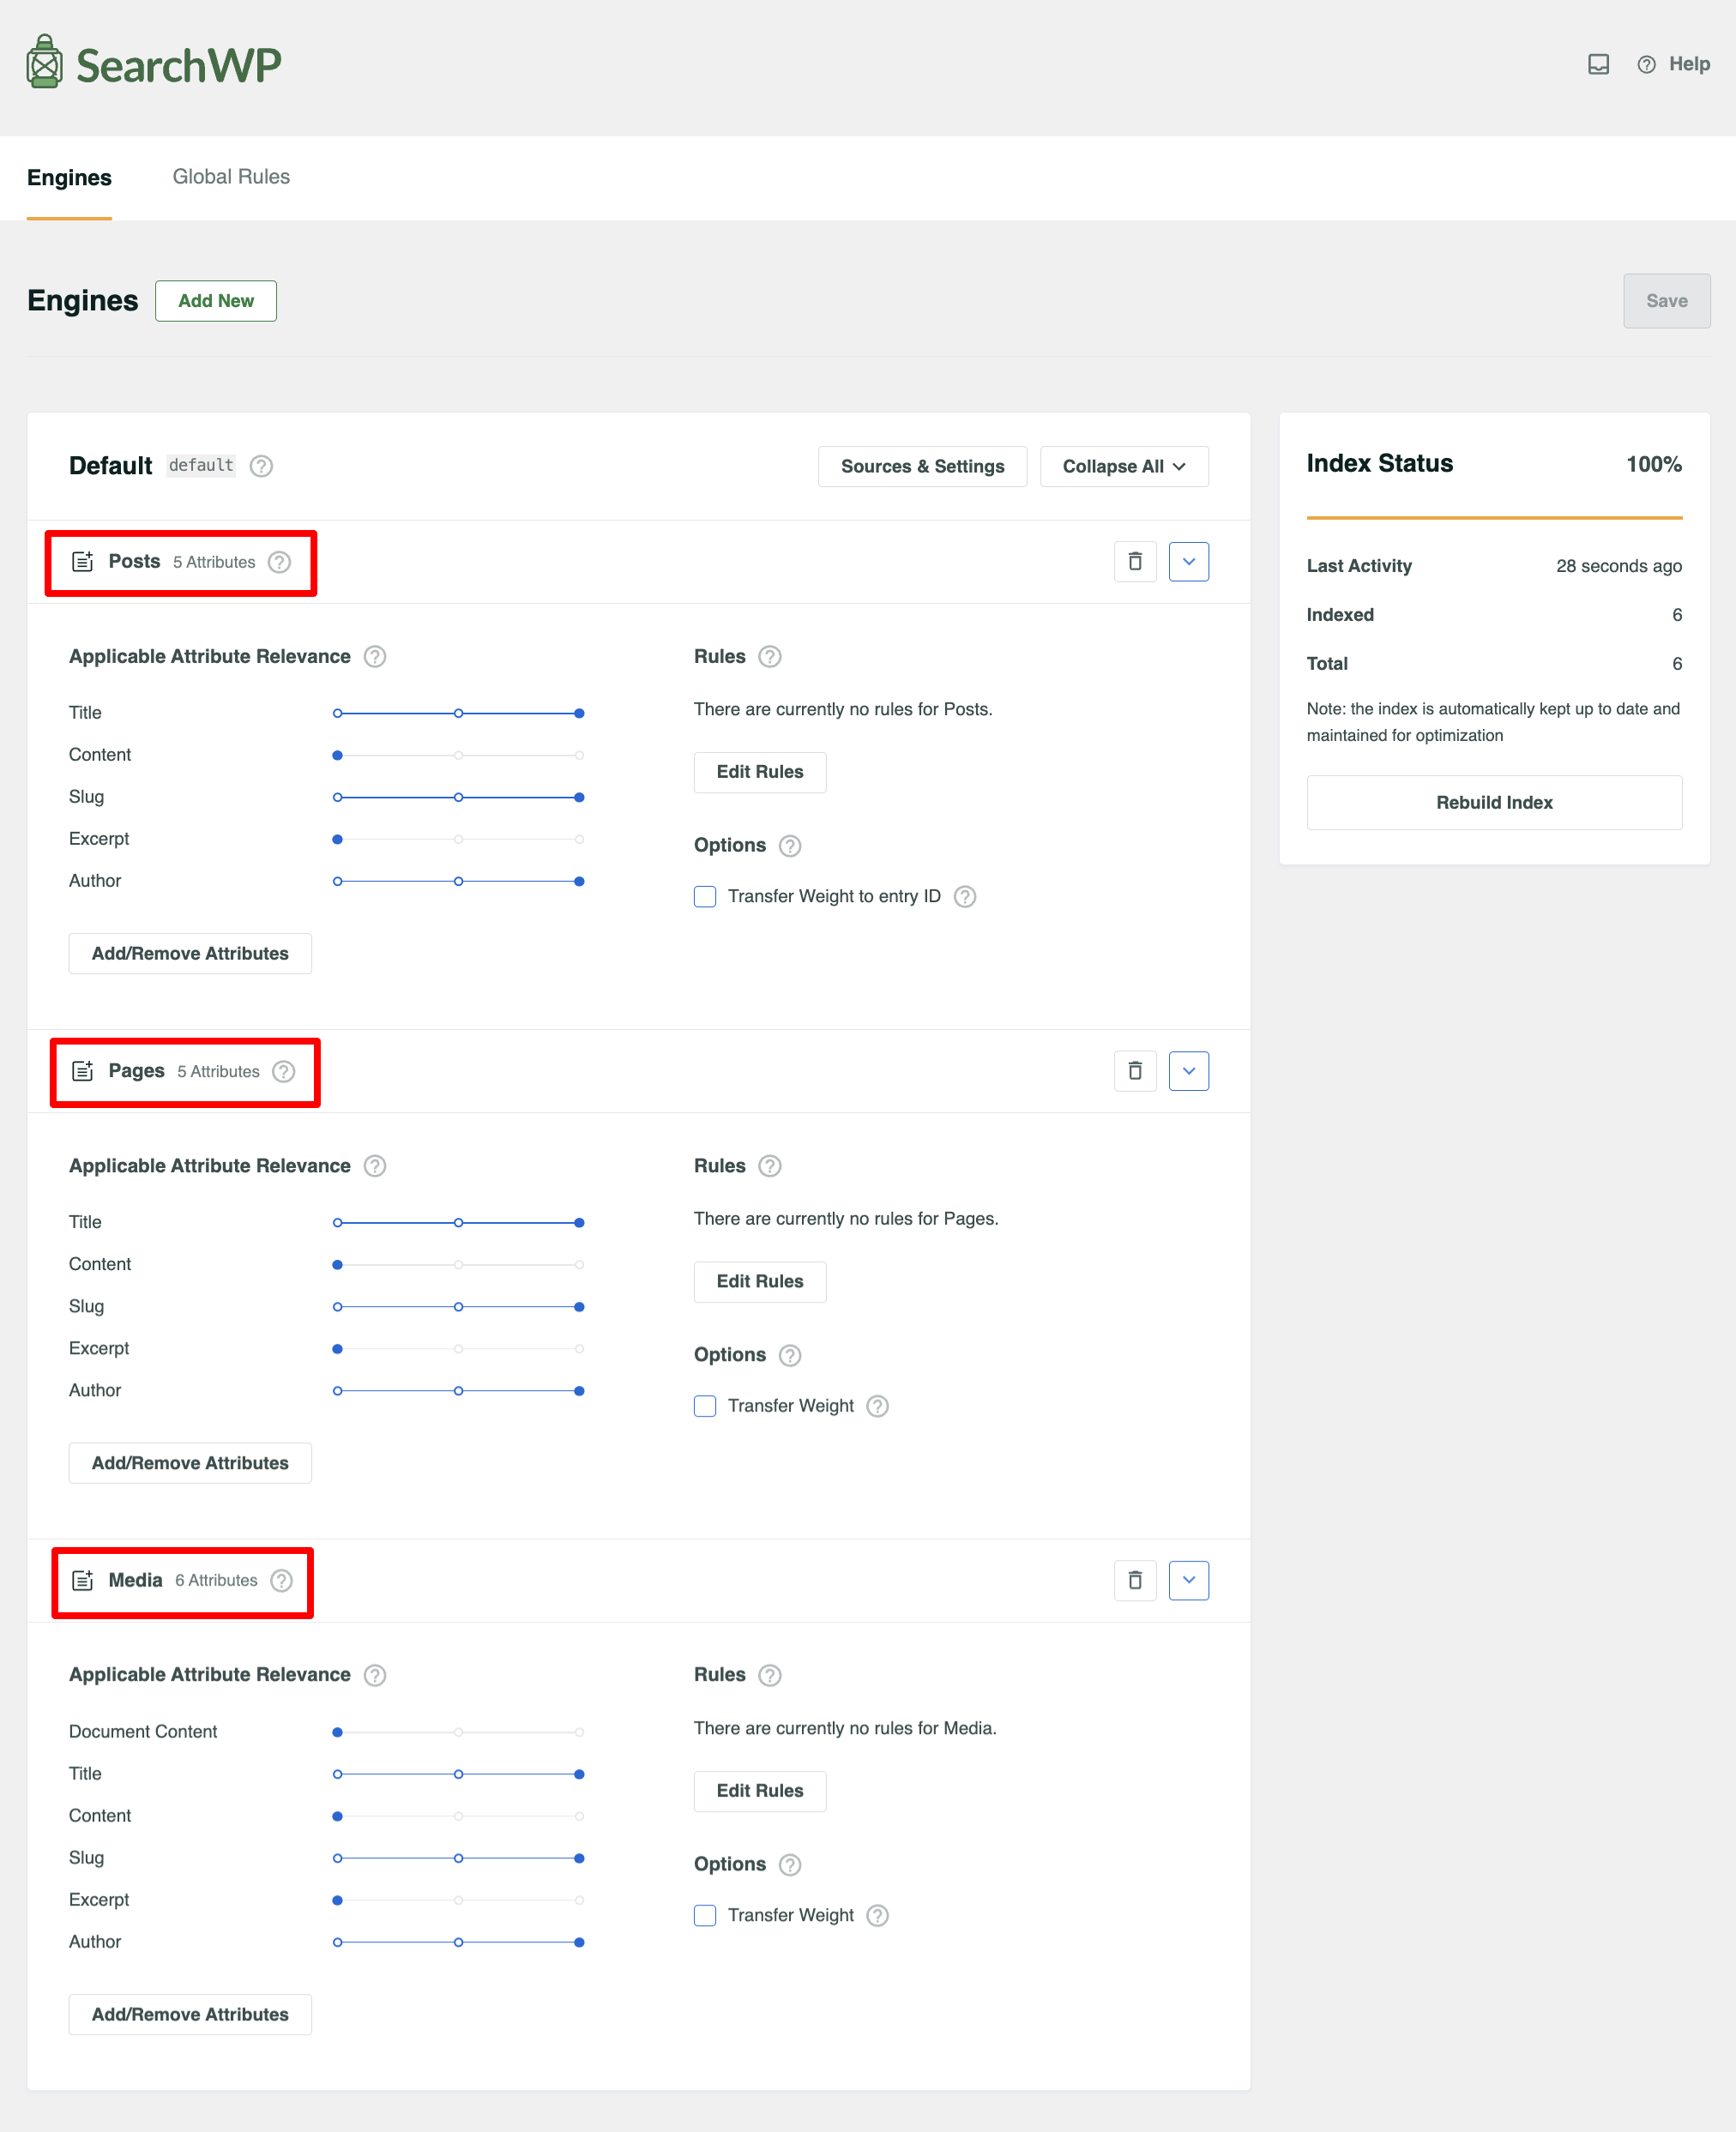
Source settings
To begin, click on the “Sources & Settings” button.
For your information, a source is a type of indexable content present on your site.
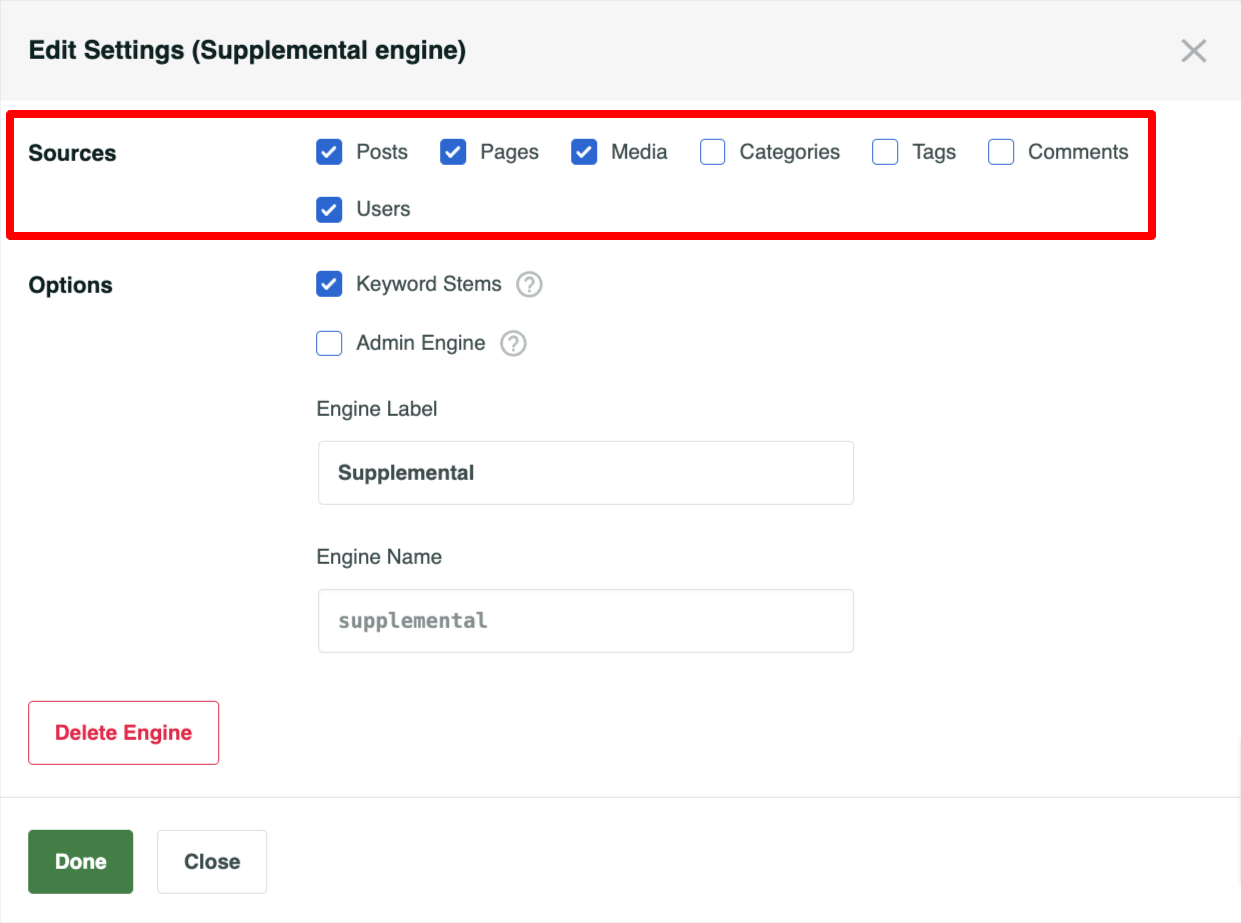
A pop-up window will be highlighted. You can then:
- Select the sources of your choice: articles, pages, media files, comments, etc. By default, native search doesn’t allow you to include categories and tags, for example (these options are grayed out). I’ll show you how to overcome this problem below.
- Whether or not to apply the following options. By checking “keyword stems,” the search will display results similar to the word searched for, even if its exact occurrence is not found. “Admin Engine” allows you to define whether this engine will be used when a particular source is searched.
Click on the “Done” button when you’re finished:

Setting SearchWP engine attributes
Each source (post, page, and media file) then has its own attributes. For an post, for example, these include:
- Title
- Content
- Slug
- Article excerpt
- Author’s name
You can add/remove attributes by clicking on the “Add/Remove Attributes” button. Then assign each of them its own relevance weight by adjusting the slider next to each attribute.
The further you move the slider to the right, the more weight the search algorithm will give to the attribute in question:
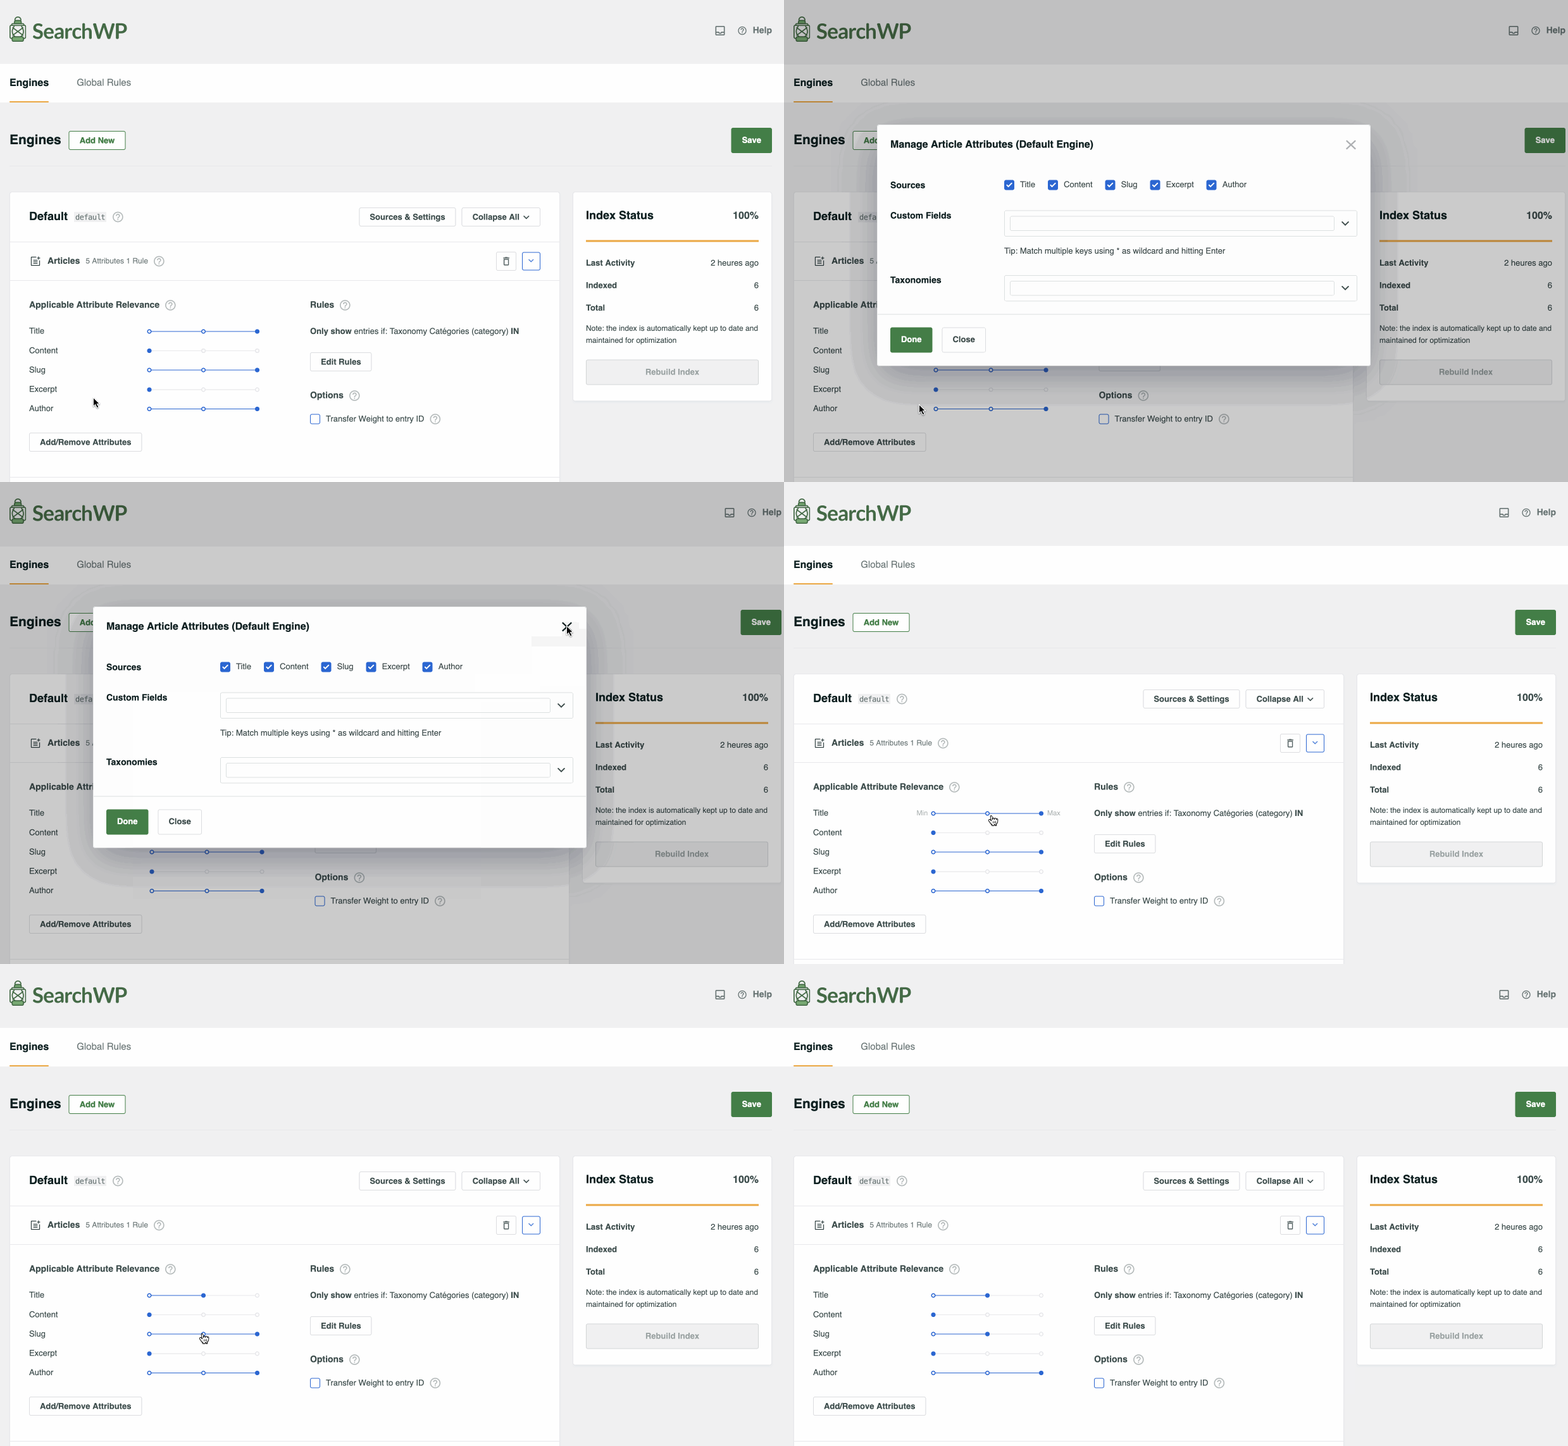
Rule settings by source
Next, you can set display rules for each source, based on conditional logic (if such and such a rule is defined, such and such a thing will be displayed or not).
To do this, click on the “Edit Rules” button. You can then define what should (or shouldn’t) be returned as a result. The following restrictions can be applied, for example:
- Exclude entries from a certain category
- Display only entries published within the last 6 months
- Limit media to a particular file type
- Etc.
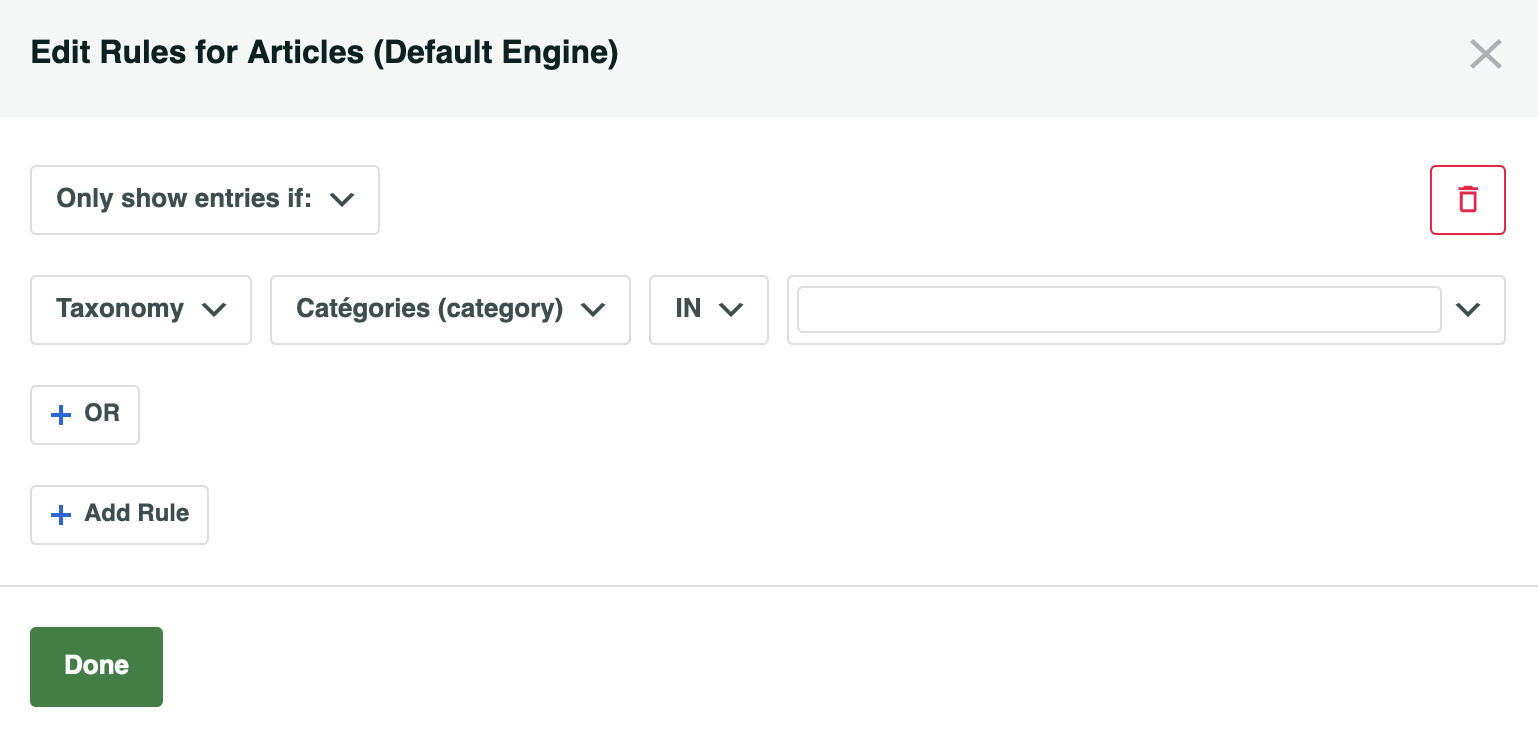
Do this for each source (pages, media files, etc.) of your search engine. Finally, remember to save your settings globally.
Setting up an additional engine
If you want to go further, one of the main benefits of SearchWP is that you can create an unlimited number of search engines.
As you’ve seen, native search doesn’t allow you to take into account custom content types created with ACF, or taxonomies used on your WooCommerce store.
If you want to index more content, create an additional engine by clicking on the “Add New” button:

This time, you’ll see that you can integrate categories, tags, and even users.
Thanks to conditional logic rules, you can even configure highly targeted search engines that:
- You display on specific pages (e.g., a search engine for your home page only).
- You can configure to display very specific results (e.g. display only post titles on your Blog page).
The possibilities are almost limitless, so don’t miss out!
Step 2: Configure global rules
Have you set up your main search engine and/or additional search engines? Fine-tune them with global settings (SearchWP menu > Algorithm > Global Rules).
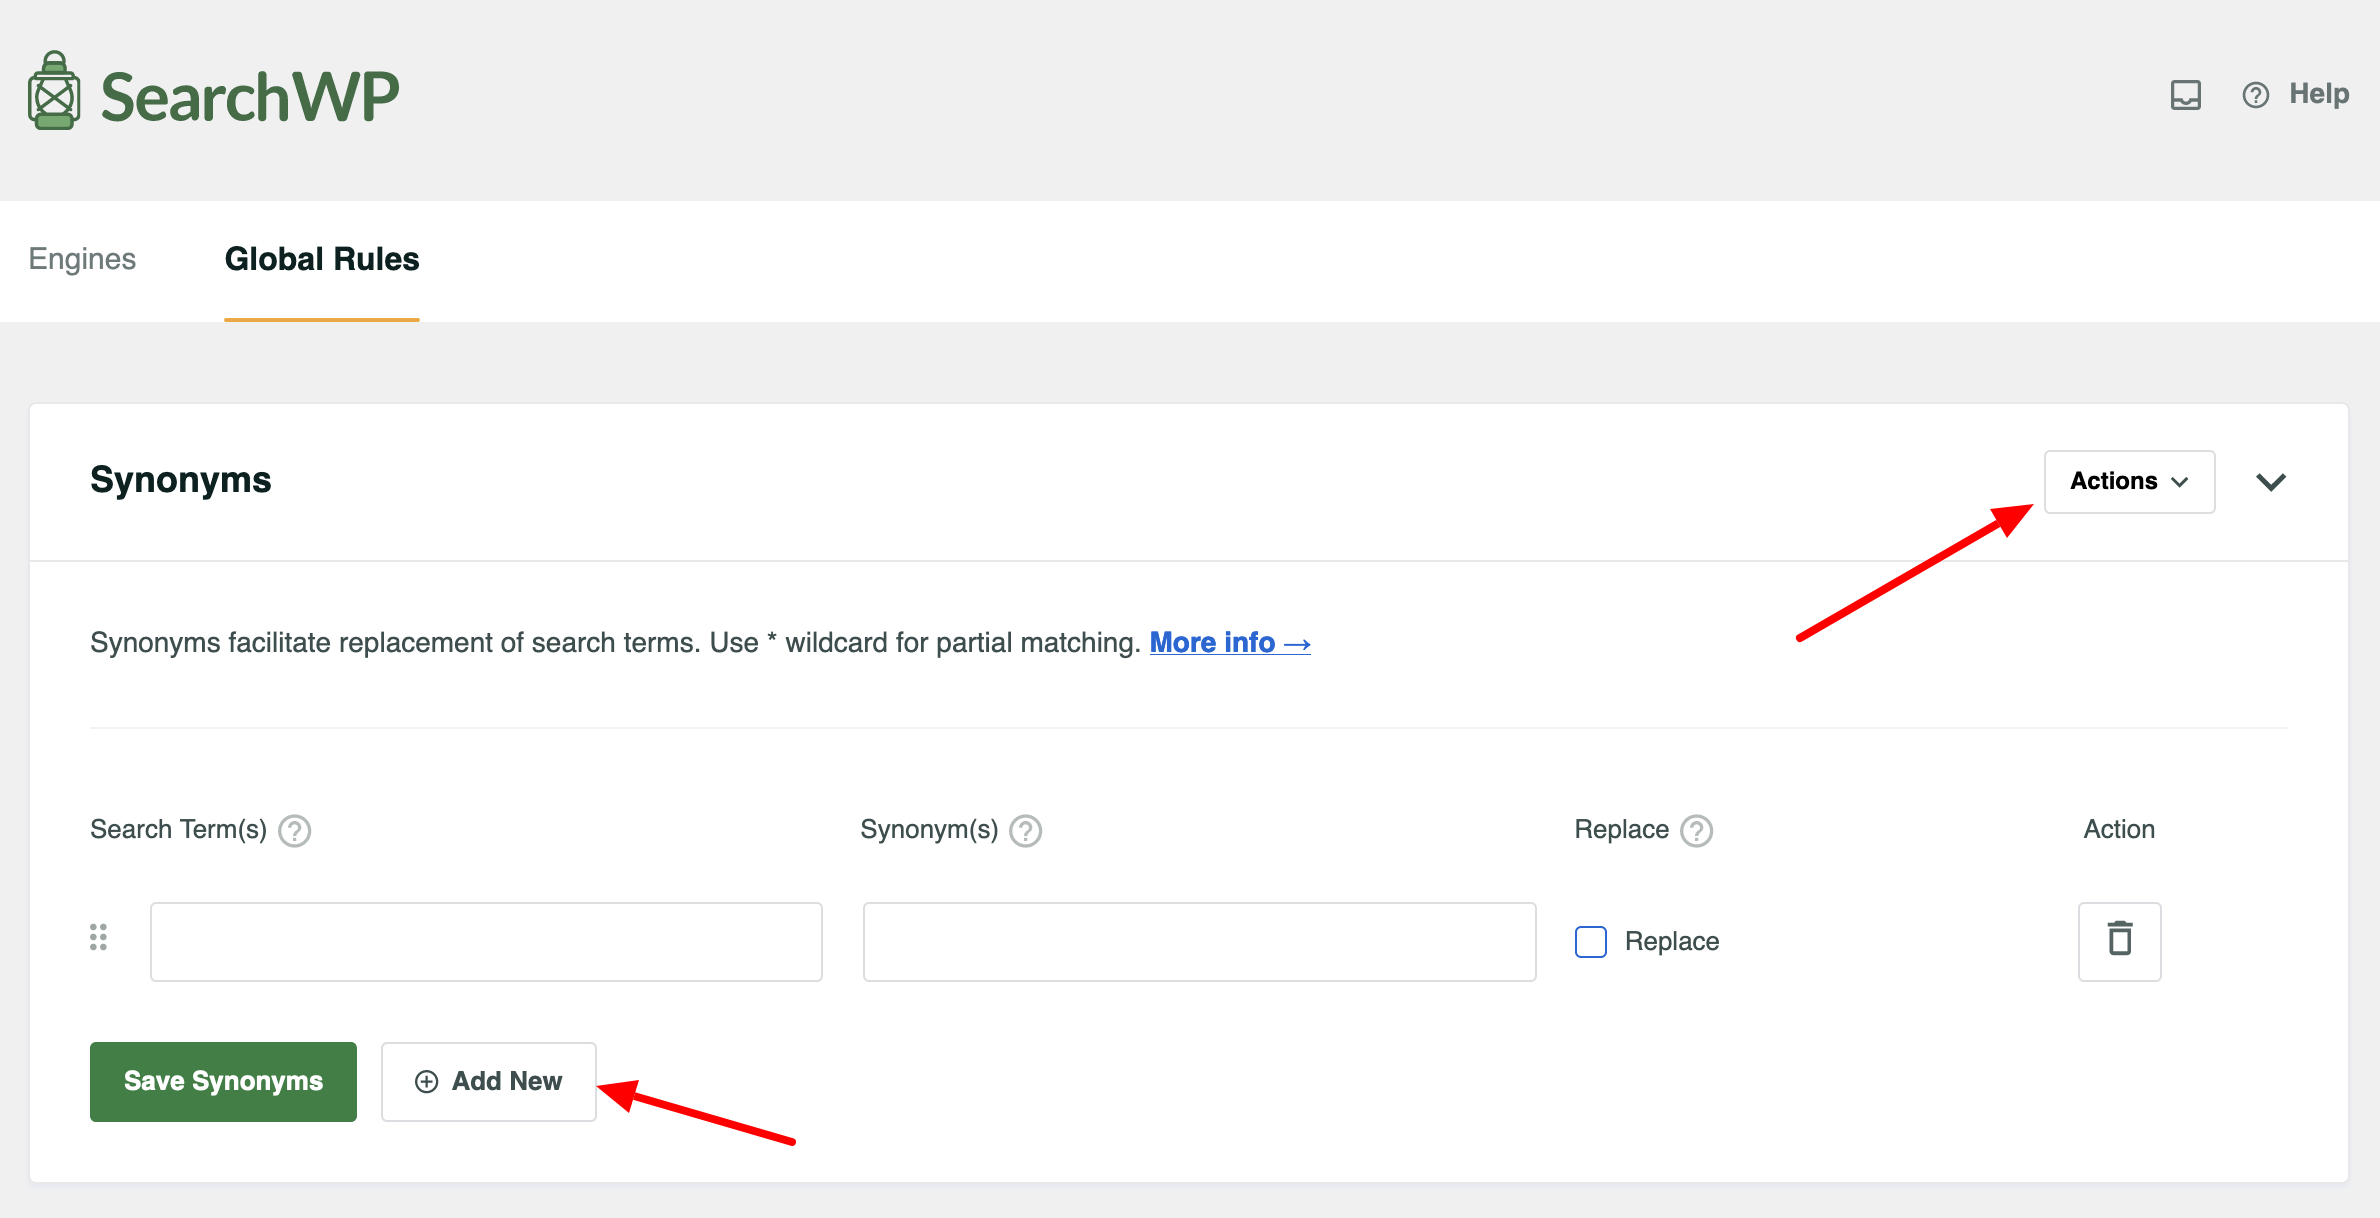
Two inserts are available:
- “Synonyms” allows you to add synonyms to certain words that don’t return search results (or results with little relevance). A glance at your search statistics will tell you more about this.
- “Stopwords” are words that are ignored by the search engine. SearchWP includes a substantial list by default.
You can add the synonyms and stopwords of your choice by clicking on the “Add New” button in each insert.
The “Actions” button gives you access to additional options for each insert (e.g. alphabetical sorting for stopwords):
Step 3: Add further settings
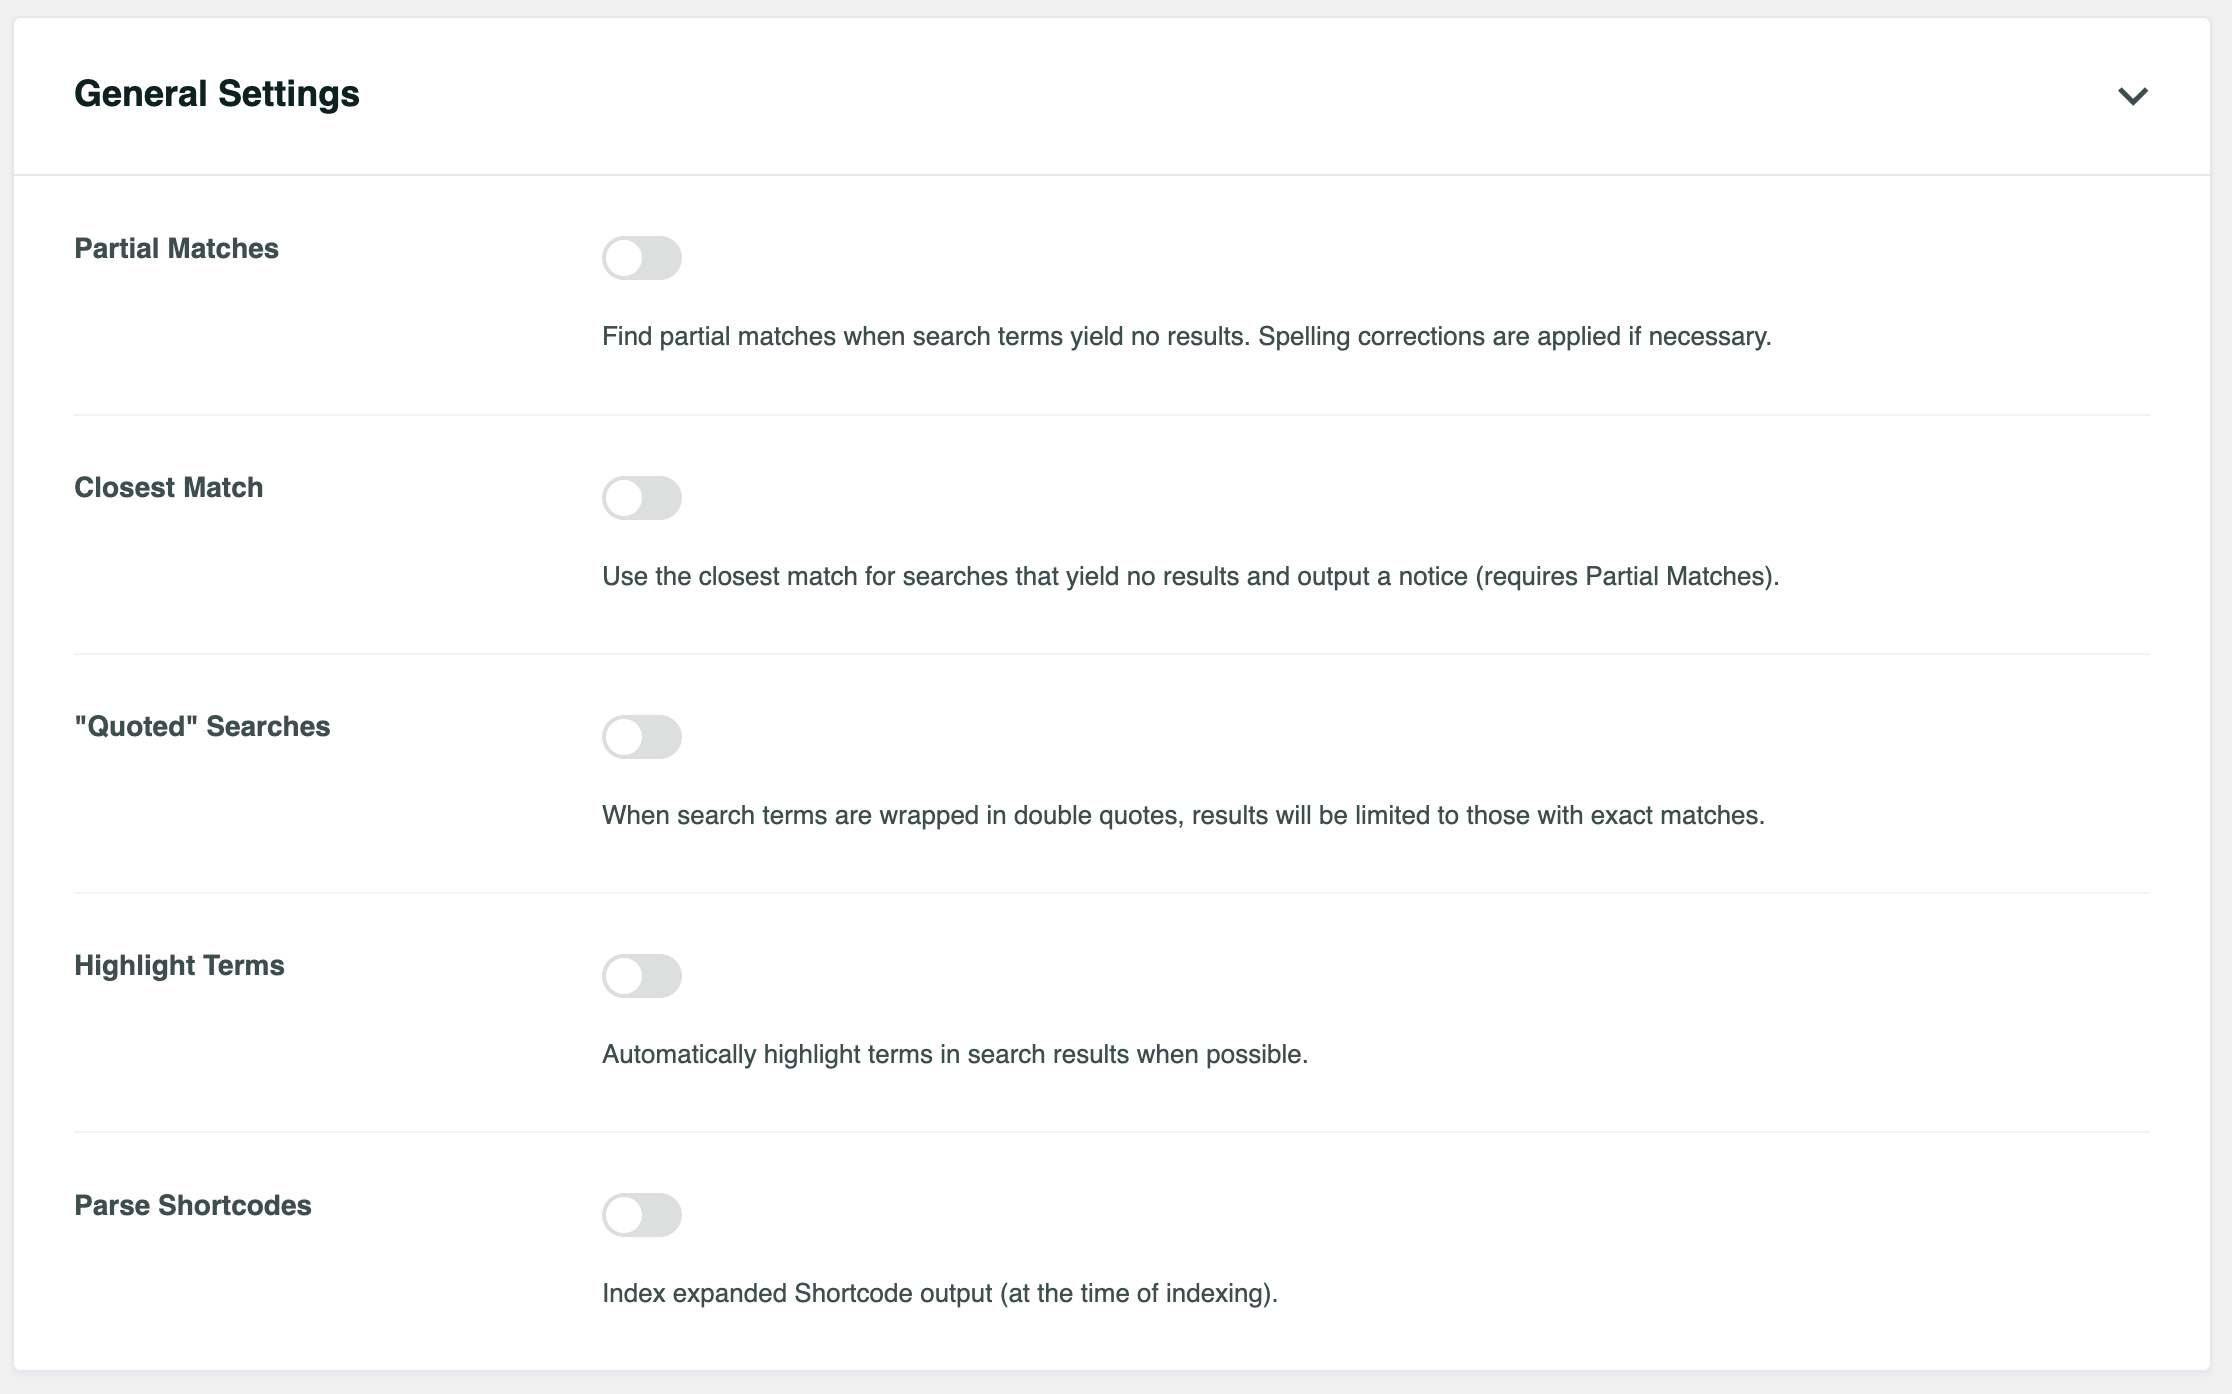
If you wish — and I recommend you take a closer look — you can also configure additional settings by going to SearchWP > Settings > General.
Under “General Settings,” you can instruct the search engine to:
- Find partial matches when search terms return no results (“Partial Matches”)
- Automatically highlight terms in search results where possible (“Highlight Terms”)
Step 4: Customize the visual appearance of the search results page
So far, so good. Your search form settings should now be well advanced. But there’s more to come.
SearchWP gives you the option of customizing the appearance of your search results page by going to SearchWP > Templates.
The settings page has two main inserts:
- “Choose a theme” offers 6 templates for displaying your search results. You can preview their appearance in real time:

- “Custom Styling” lets you customize the style of your search results page. For example, you can change the layout (List or Grid), the colors and font of the button, or the type of icon to indicate pagination.
So much for customizing the search results page. And you know what, there’s more. ^^ SearchWP even lets you design your own search form using several types of ready-to-use layouts.
Let me show you how.
How do I create a search form from scratch?
Would you like to design a more advanced search form than the one offered by your theme, but don’t know how to code? SearchWP makes it possible.
Go to SearchWP > Search Forms, create a form from scratch, and add it wherever you like in your content. In detail, here’s what you can do.
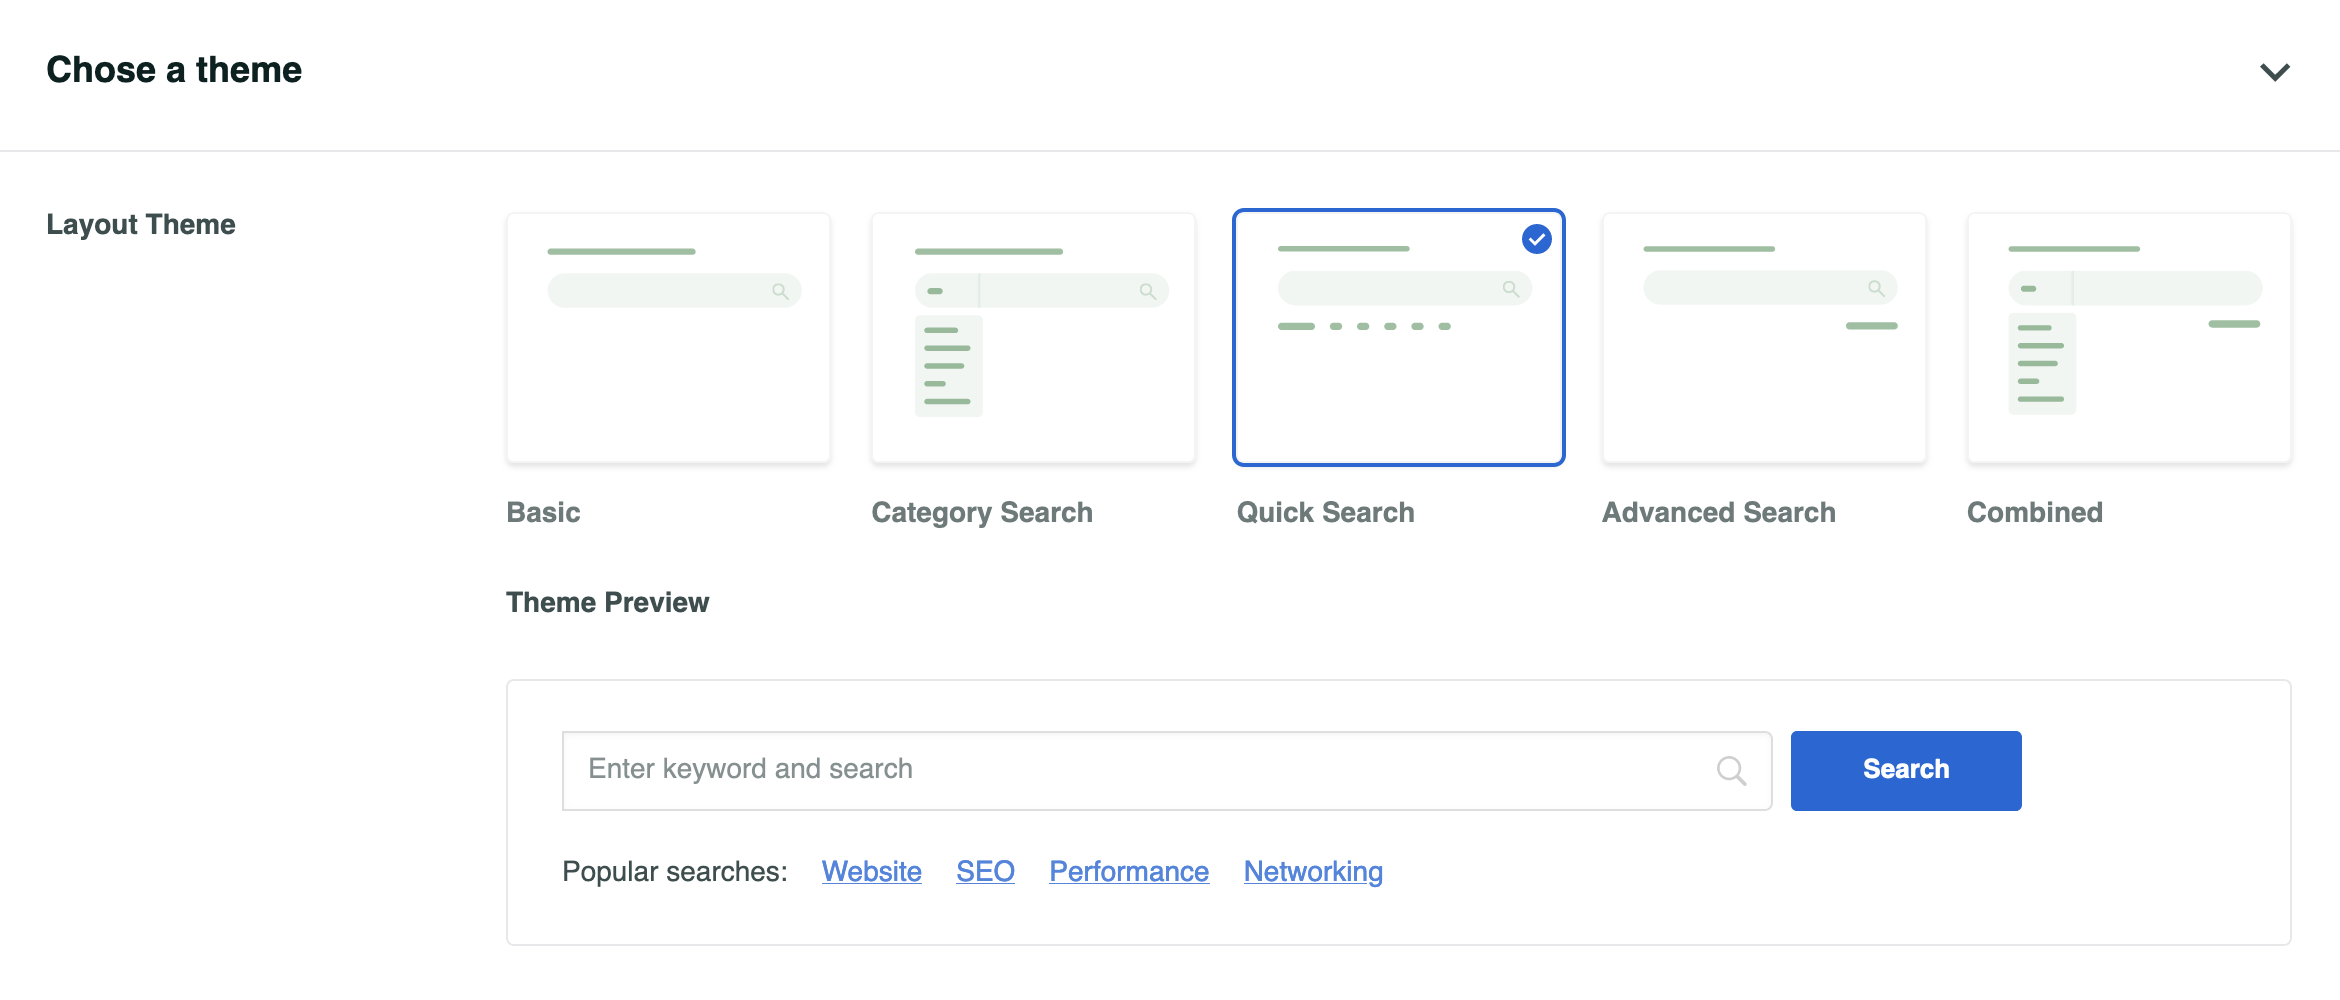
Step 1: Choose a theme
First, choose from 5 different layouts:
- “Basic”: A classic search form.
- “Category Search”: A search form based on your site’s categories.
- “Quick Search”: A quick search form, with links to popular searches displayed for quick access.
- “Advanced Search”: To set up a search based on certain filters.
- “Combined”: A search form with filters and a quick search bar.
Step 2: Customize the style
When it comes to form style settings, the first thing you’ll be able to do is adjust the color, size, font, border, and type of search bar to be used (rectangle, rounded, or underlined).
This is also where you choose, for example:
- The type of sources to be displayed (posts, pages, media, etc.)
- Any advanced search filters
- The engine and the results page to be displayed
If you’re used to working with a large number of custom content types on your site, you can easily imagine creating a search form that only returns search results related to your custom post types to your visitors.
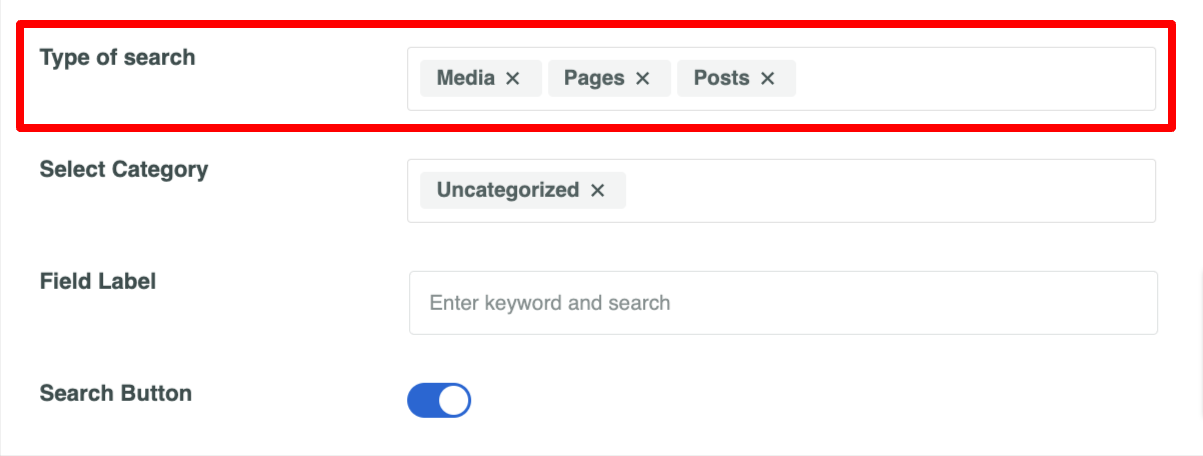
To do this, add the custom post types of your choice in the “Type of search” section, then delete the content types you’re not interested in (below: “Media,” “Pages,” and “Posts”):
Once you’ve customized your settings, save everything, then add your search form wherever you like in your content.
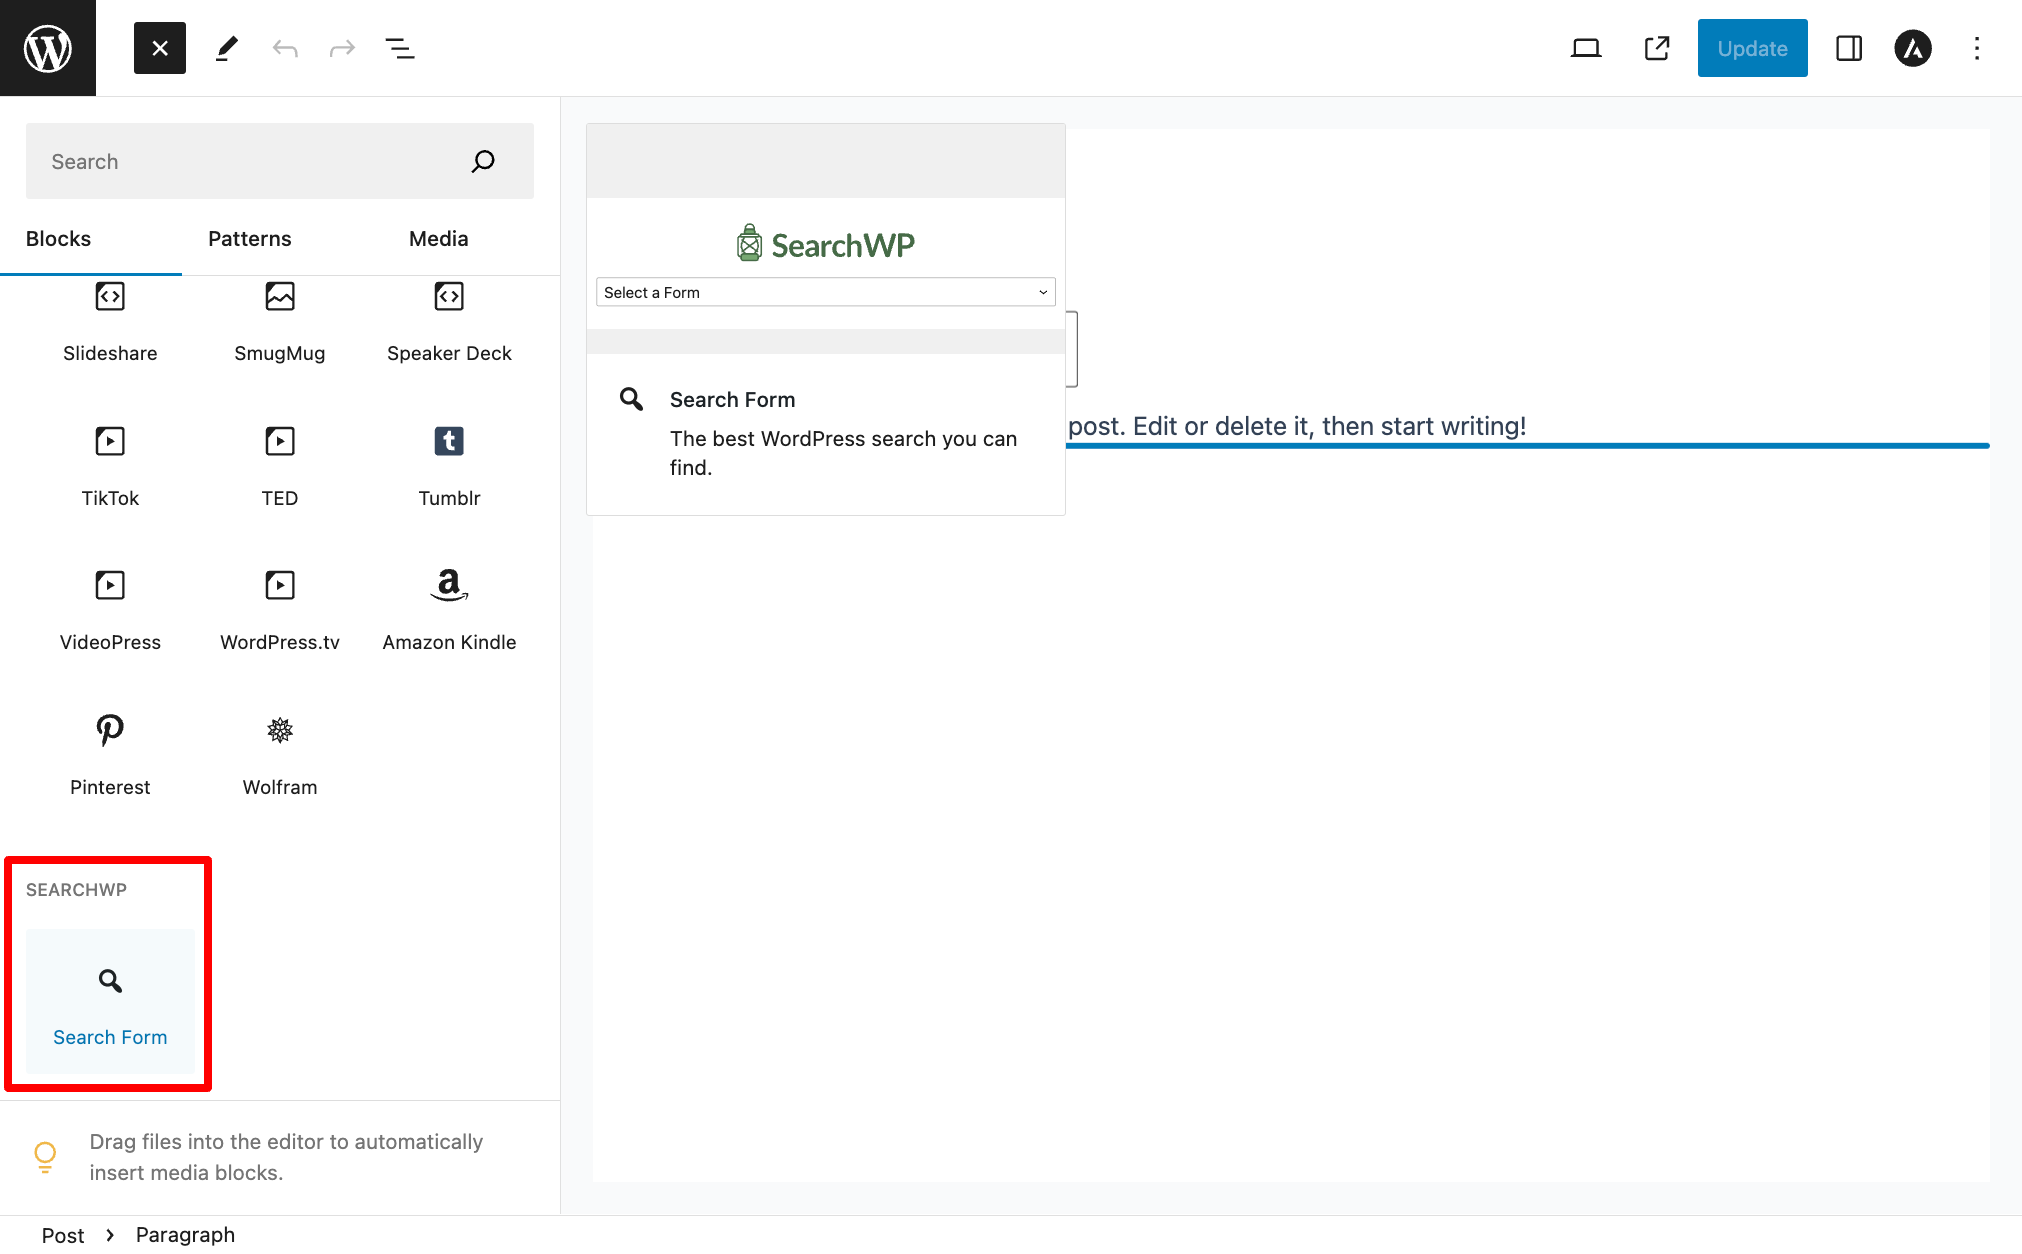
For example, if you want to add it to a blog post, edit the corresponding post and simply add the block called “Search Form” to your content:
If you wish, a SearchWP form can also be integrated into your content in the form of a shortcode that takes this form: [searchwp_form id="1"].
It’s less intuitive than the dedicated Search Form block, but it works too. Simply add your SearchWP shortcode inside the “Short Code” block.
What addons does SearchWP offer?
As you’ve just seen, there are plenty of creative possibilities with SearchWP.
So as not to overload the plugin, its creators have chosen to make 32 addons available to their users to further extend the functionality of their basic plugin.
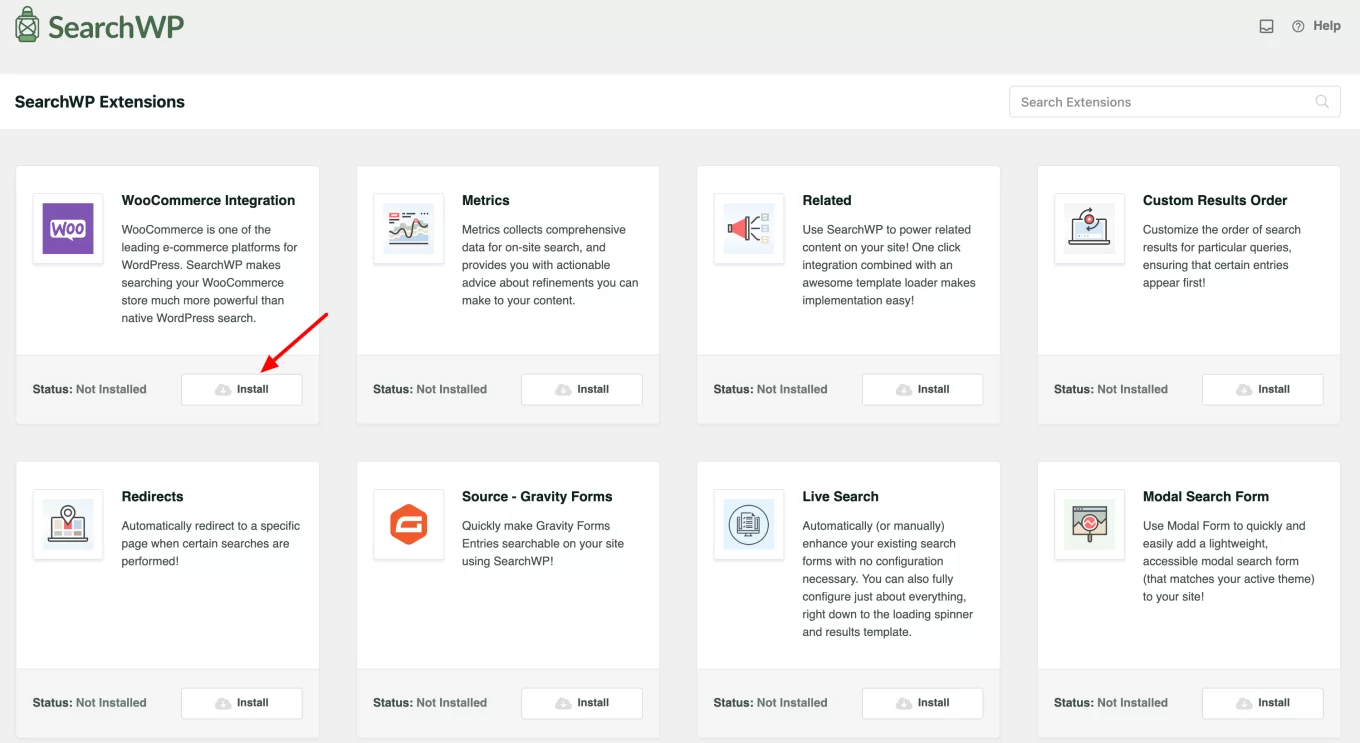
These addons are available in the SearchWP > Extensions menu. They can all be installed from your WordPress dashboard, by clicking on the “Install” button:
Here’s an example of what you can do with some of these addons:
- Access advanced search functionality on WooCommerce through the eCommerce plugin integration (“WooCommerce Integration”)
- Display related searches (“Related”)
- Redirect to a specific page after a specific query (“Redirects”)
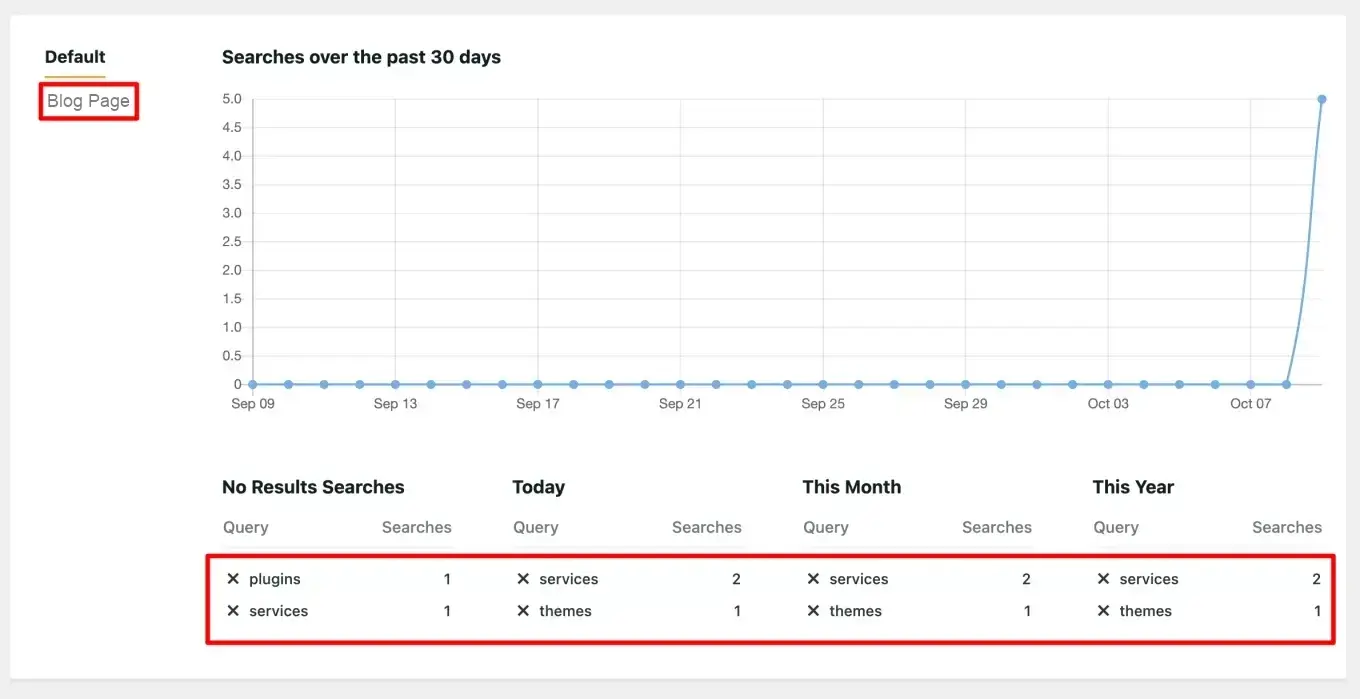
- Display detailed search-related statistics on your WordPress site (“Statistics”). For example, you can see below that I had fun searching for the following terms via the search form on my test site: “plugins,” “services,” and “themes”. The search engine I had set up is called “Blog Page”:
Note that alongside SearchWP premium, there’s also a free plugin called SearchWP Live Ajax Search. This activates AJAX search on your site (and that’s all there is to it) and doesn’t need SearchWP premium to work.

How much does SearchWP cost?
If you’ve read this article carefully from the beginning, you’ll know that SearchWP doesn’t come in a free version. If you’d like to purchase the plugin, 3 premium licenses are available:
- “Standard”: $99/year for use on one site.
- “Pro”: $199/year for use on up to 3 sites.
- “Agency”: $399/year for use on an unlimited number of sites.

Each license comes with a 14-day money-back guarantee, so you can test the plugin without taking any risks.
When it comes to pricing, there’s one detail to be aware of: only the “Agency” license includes all the options offered by the plugin.
If you’re interested in purchasing the plugin, you’ll need to pay close attention to the features included in the license you’re interested in.
For example, if you need WooCommerce integration to personalize your online store search even further, the “Standard” license won’t be enough.
What are the alternatives?
Do the prices shown above exceed your budget for this plugin? Or maybe you simply don’t want to spend any money at all on improving the search on your WordPress site?
You have every right to do so. To help you find the perfect solution, we’ve tested several free or freemium search plugins in this article. Among them, you’ll find:
- Relevanssi
- Ivory Search
- FiboSearch (for WooCommerce)
However, none of them come close to the level of customization offered by SearchWP’s settings.
Relevanssi, for example, is one of its most serious competitors, but it will often be much slower to return search results than SearchWP, especially if your hosting server isn’t up to the task.
In fact, Relevanssi’s creator, Mikko Saari, makes no secret of the fact. He makes it clear that his plugin requires a lot of storage space at the database level.
He doesn’t recommend the use of his plugin if your hosting provider’s settings don’t provide enough space to store all the tables in your database.
Something to bear in mind when making your choice.
Our final opinion on SearchWP
Powerful, but also with some limitations
Having thoroughly explored this search plugin, it’s time to move on to the conclusion of this SearchWP review.
All in all, I think SearchWP is an excellent plugin for improving search on your WordPress site. It perfectly overcomes the limitations of native search on WordPress.
It’s very powerful and allows you to take search customization to the extreme, with options that are often not offered by its competitors.
However, I do find a few limitations:
- It’s not easy to configure. A learning curve is required to understand how it works, as well as a quick look at its documentation. For example, it’s not so easy to understand the difference between an engine and a form, or where and how to apply a particular setting.
- Its price is high. All the more so as the “Standard” package doesn’t include all the options and can only be used on one site. If you want to activate the plugin on different customer sites at the same time, you’ll need to budget accordingly.
SearchWP: For whom?
With the above in mind, I’d recommend this plugin primarily for:
- Knowledgeable, technical users, who will be delighted by its advanced features.
- Users with a lot of content and/or products on their site. For a simple blog hosting a few articles, there’s no need to bother with this plugin, however powerful it may be. An alternative like Ivory Search will suffice here.
- Those with a sufficient budget to invest in the plugin.
What do you think? Are you already a firm believer in this plugin, or do you plan to adopt it after reading these lines?
Tell us what you think in the comments.

Receive the next posts for free and access exclusive resources. More than 20,000 people have done it, why not you?


Continue reading
Articles posted in WordPress PluginsSpectra: Dive into this page builder that’s integrated into the WordPress editor
Leaving the native WordPress interface? Never. Drowning you in a slew of widgets? He wouldn’t dream of it. With this guy, blocks are the guiding light. Create your next WordPress site without leaving the default editor (Gutenberg), without coding, and…
WP Rocket: We went over this plugin with a fine-tooth comb [2024 Review]
It took me a while, but I finally found it. Yes, I found someone who dared to criticize the WP Rocket plugin sharply. What a nerve! This reader of an American site specializing in WordPress, says that this plugin has…
Yoast SEO: a guide to set up the best SEO plugin for WordPress
With more than 620 million downloads at the time of writing, Yoast SEO is one of the 10 most downloaded plugins of all time. Officially, it’s installed on websites in order to optimize their SEO (Search Engine Optimization). Put another…