

“Hello, how are you?” “What do you think of this computer mouse?” For you, everything is easy to understand in these two sentences. For someone living deep in the Shetland Islands or Yucatán, it’s probably a bit more complicated… If…
Selling online with WordPress?
Of course, it’s possible!
And I’m not talking about inserting Paypal purchase buttons.
Nothing of the kind. It is possible to build quality e-shops thanks to WooCommerce.

In this step-by-step guide, I will teach you how to install and launch one of the most popular e-commerce solutions in the world (and the most-used on WordPress).
I will also give you tips and advice to choose the right theme, the right plugins, and how to optimize your online store.
At the end, you’ll know my opinion as an experienced WooCommerce user, and I’ll even recommend a house-made alternative, in case the famous e-commerce plugin doesn’t suit your needs. 😉
OK, time for our tour of the whole store!
Overview
- What is WooCommerce?
- Why choose WooCommerce?
- How to install WooCommerce on your site
- How to set up your WooCommerce store
- Starting up your online store
- Which supplementary WooCommerce plugins should you install to go further?
- Which WordPress theme should you choose for your WooCommerce website?
- How much does WooCommerce cost?
- What do customers say about WooCommerce?
- What are the alternatives to WooCommerce?
- Our final opinion on WooCommerce
- FAQ about WooCommerce
This tutorial and review of WooCommerce was last updated in October 2024.
This post contains affiliate links. This means that WPMarmite will receive a commission if you purchase one of the tools (plugin, theme, etc.) we recommend after clicking on one of our links. This enables WPMarmite to remunerate the research and writing work of the blog’s content creators. But we’re honest: if a product isn’t worth it, we say so (or we don’t tell you about it). Find out more about transparency in our publishing policy.
What is WooCommerce?
WooCommerce is a plugin that enables you to transform your WordPress website into an online store. As its prefix “Woo” suggests, it was developed and launched by the WooThemes store in 2011, before being acquired in 2015 by Automattic, the company that mostly contributes to WordPress.org.
With more than 7M+ active installations, WooCommerce is the most popular ecommerce plugin on WordPress. It is used on 93.7% of WordPress ecommerce sites.
A global e-commerce giant, but eroding market share in the United States
And while statistics vary according to source, it’s also one of the most widely used solutions in the world for setting up an e-commerce site:
- According to Statista, WooCommerce is the world’s leading e-commerce software platform, with 38.74% market share (2023 stats).
- According to W3Techs, WooCommerce is used by almost 10% of websites using a CMS (Content Management System). By way of comparison, WordPress powers 43.2% of sites using a CMS at the time of writing.
- BuiltWith reports that the e-commerce plugin is used by 1% of the Top 1 million sites (in terms of traffic received). This puts it behind Shopify, which has a 25% market share.
In all, some 6.3 million sites worldwide are said to run on WooCommerce (BuiltWith):

This is a figure that has been growing steadily for several years, but which needs to be put into perspective in certain respects.
Even if it remains dominant in many areas, WooCommerce has been losing market share to Shopify for several months now, according to the Top 1 million sites receiving the most traffic.
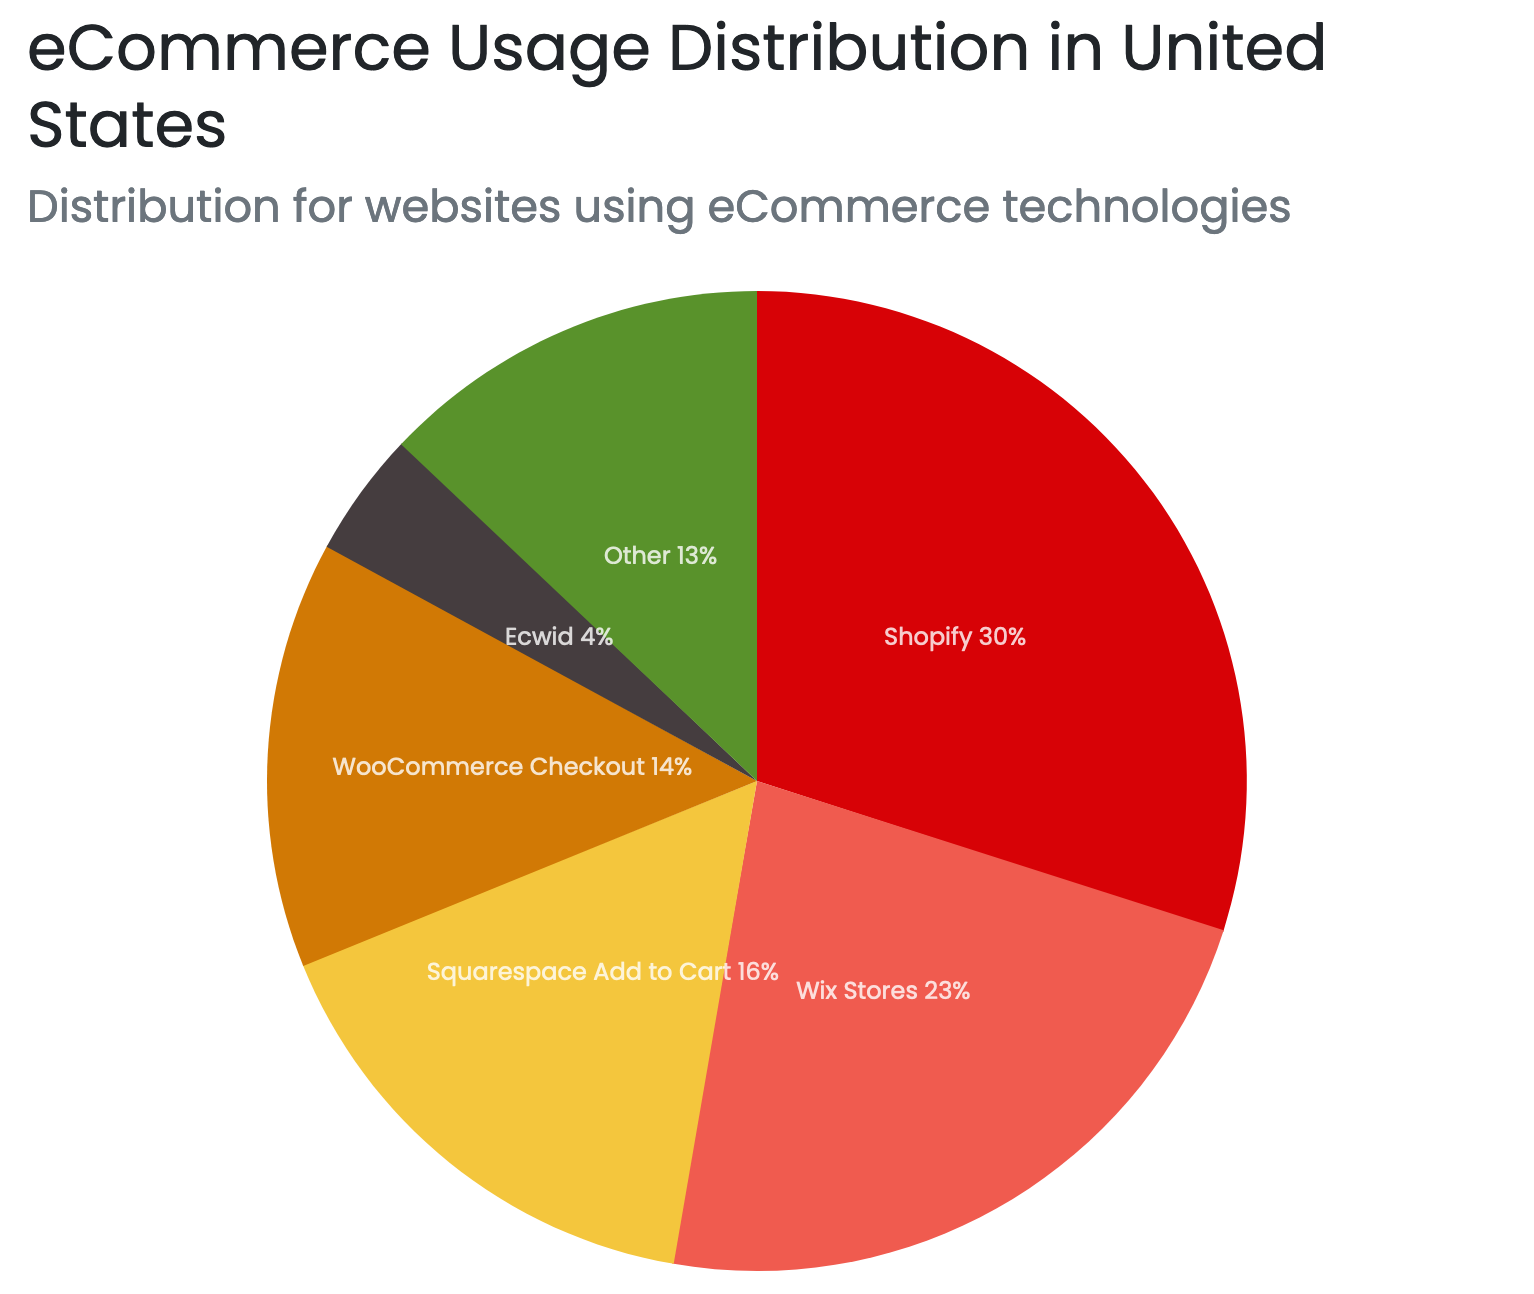
In the United States, WooCommerce’s market share is even in serious decline, according to data from BuiltWith. With 14% market share, the e-commerce plugin is outstripped by Shopify (30%), Wix Stores (23%), and Squarespace (16%):
Why choose WooCommerce?
Despite the increasing significance of competitors like Wix Stores and Shopify, WooCommerce remains a top choice for many reasons.
We have to admit that this flexible plugin has quite a few advantages:
- It will allow you to sell any type of product, whether physical, digital, with subscriptions, with dropshipping, in the US or internationally, etc.
- WooCommerce is free and you can customize it by adding premium plugins — I will come back to this later — in a whole bunch of domains (delivery, payment, invoice, marketing, social networks, etc.).
- It natively integrates the e-commerce options that are essential for running an online store: product sales, payment integration (PayPal, checks, bank transfers), inventory management, delivery, subscriptions and taxes, access to statistics, etc.
- WooCommerce is accessible to beginners, even if you start from scratch. You don’t need to know how to code to make it work. But getting started will require a minimum investment of time on your part, in order to understand how it works and get comfortable with its various menus of settings.
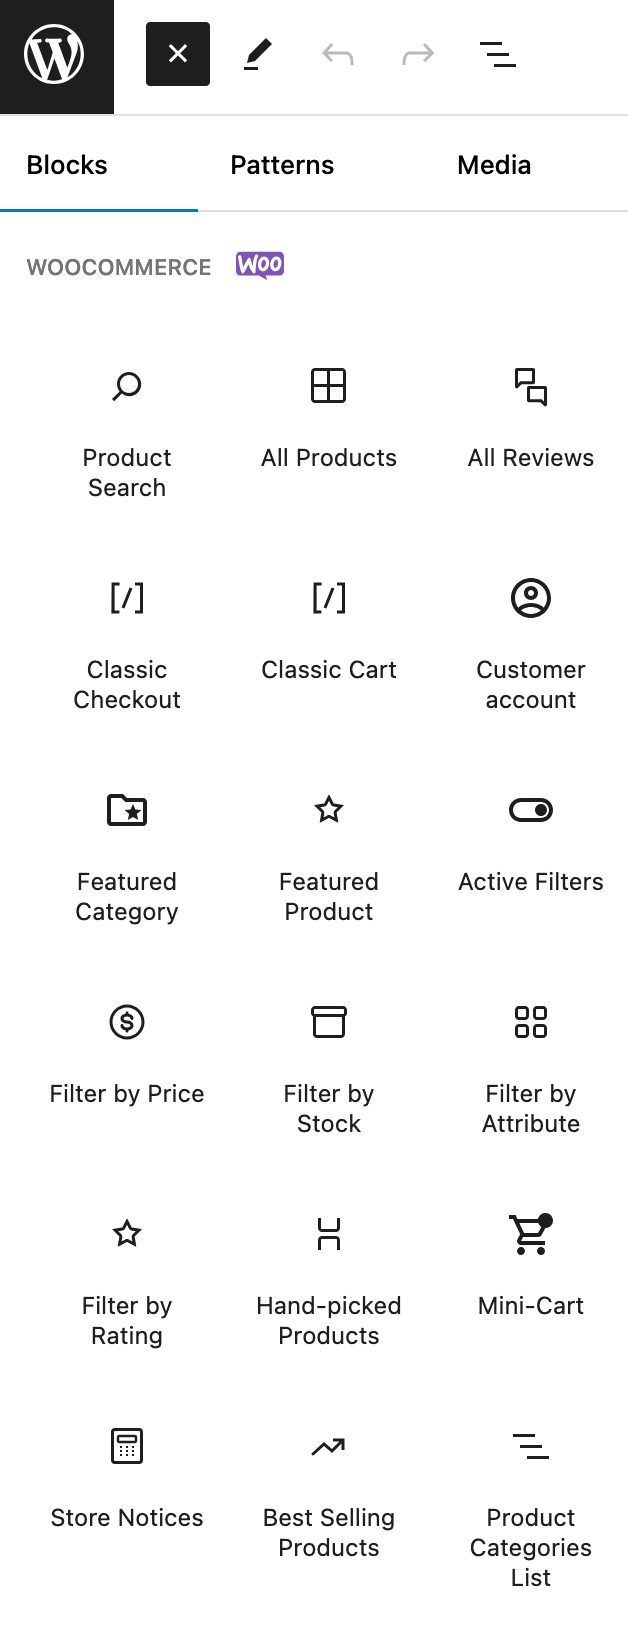
- Almost all themes and page builders are compatible with it, so you don’t necessarily have to change your design if you enable it. In addition, it offers 30 Gutenberg blocks so that you can easily integrate certain data into your content (e.g., best-selling products, sale products, top-rated products, etc.).
- WooCommerce is available in English, both in its public interface and in its administration interface. If required, you can configure it in the language of your choice without coding, thanks to customized translations using the Loco Translate plugin, for example.
- You’ll have access to a huge community of users. Although WooCommerce doesn’t offer direct support, you can get personalized assistance if you subscribe to premium plugins and themes. And chances are you’ll find answers to your questions among the multitude of free resources available on the Internet: YouTube videos, private groups, forums, etc.
- You have full control over all your site parameters, which is not always the case with paid online e-commerce platforms such as Wix.
Now that you have an overview of WooCommerce, keep reading to find out how to set up your online store.
How to install WooCommerce on your site
If you have been paying attention and concentrating since the beginning of this article, you should remember that WooCommerce is a plugin that you add to WordPress. The first doesn’t work without the second.
To simplify, you can think of WooCommerce like an overlay for WordPress. Therefore, in order to activate it, you must have a working WP site.
If you haven’t already done so, you can check our complete guide to creating a WordPress site.
After that aside, let’s go back to WooCommerce.
I don’t know if you’ve already tried to install it, but you should know that it offers many options.
So it won’t be possible to make a step by step tutorial to explain the role of each parameter, like for the Yoast SEO plugin. That would require a whole training course, because there is so much to say.
However, I’ll give you a tour to help you understand:
- How it works
- Where to find the answers to your questions (you’ll see that the help integrated into the plugin is good quality)
If you’ve never installed a plugin on your site before, check out this article.
Once you’ve installed and activated WooCommerce, you’ll be pleasantly surprised to be presented with a wizard to help you with the initial settings.
You don’t have to do it right away and can come back to it later, but if you already know what to do with your store, I advise you to take action right away. It’s done in a few quick steps, so just take a look.
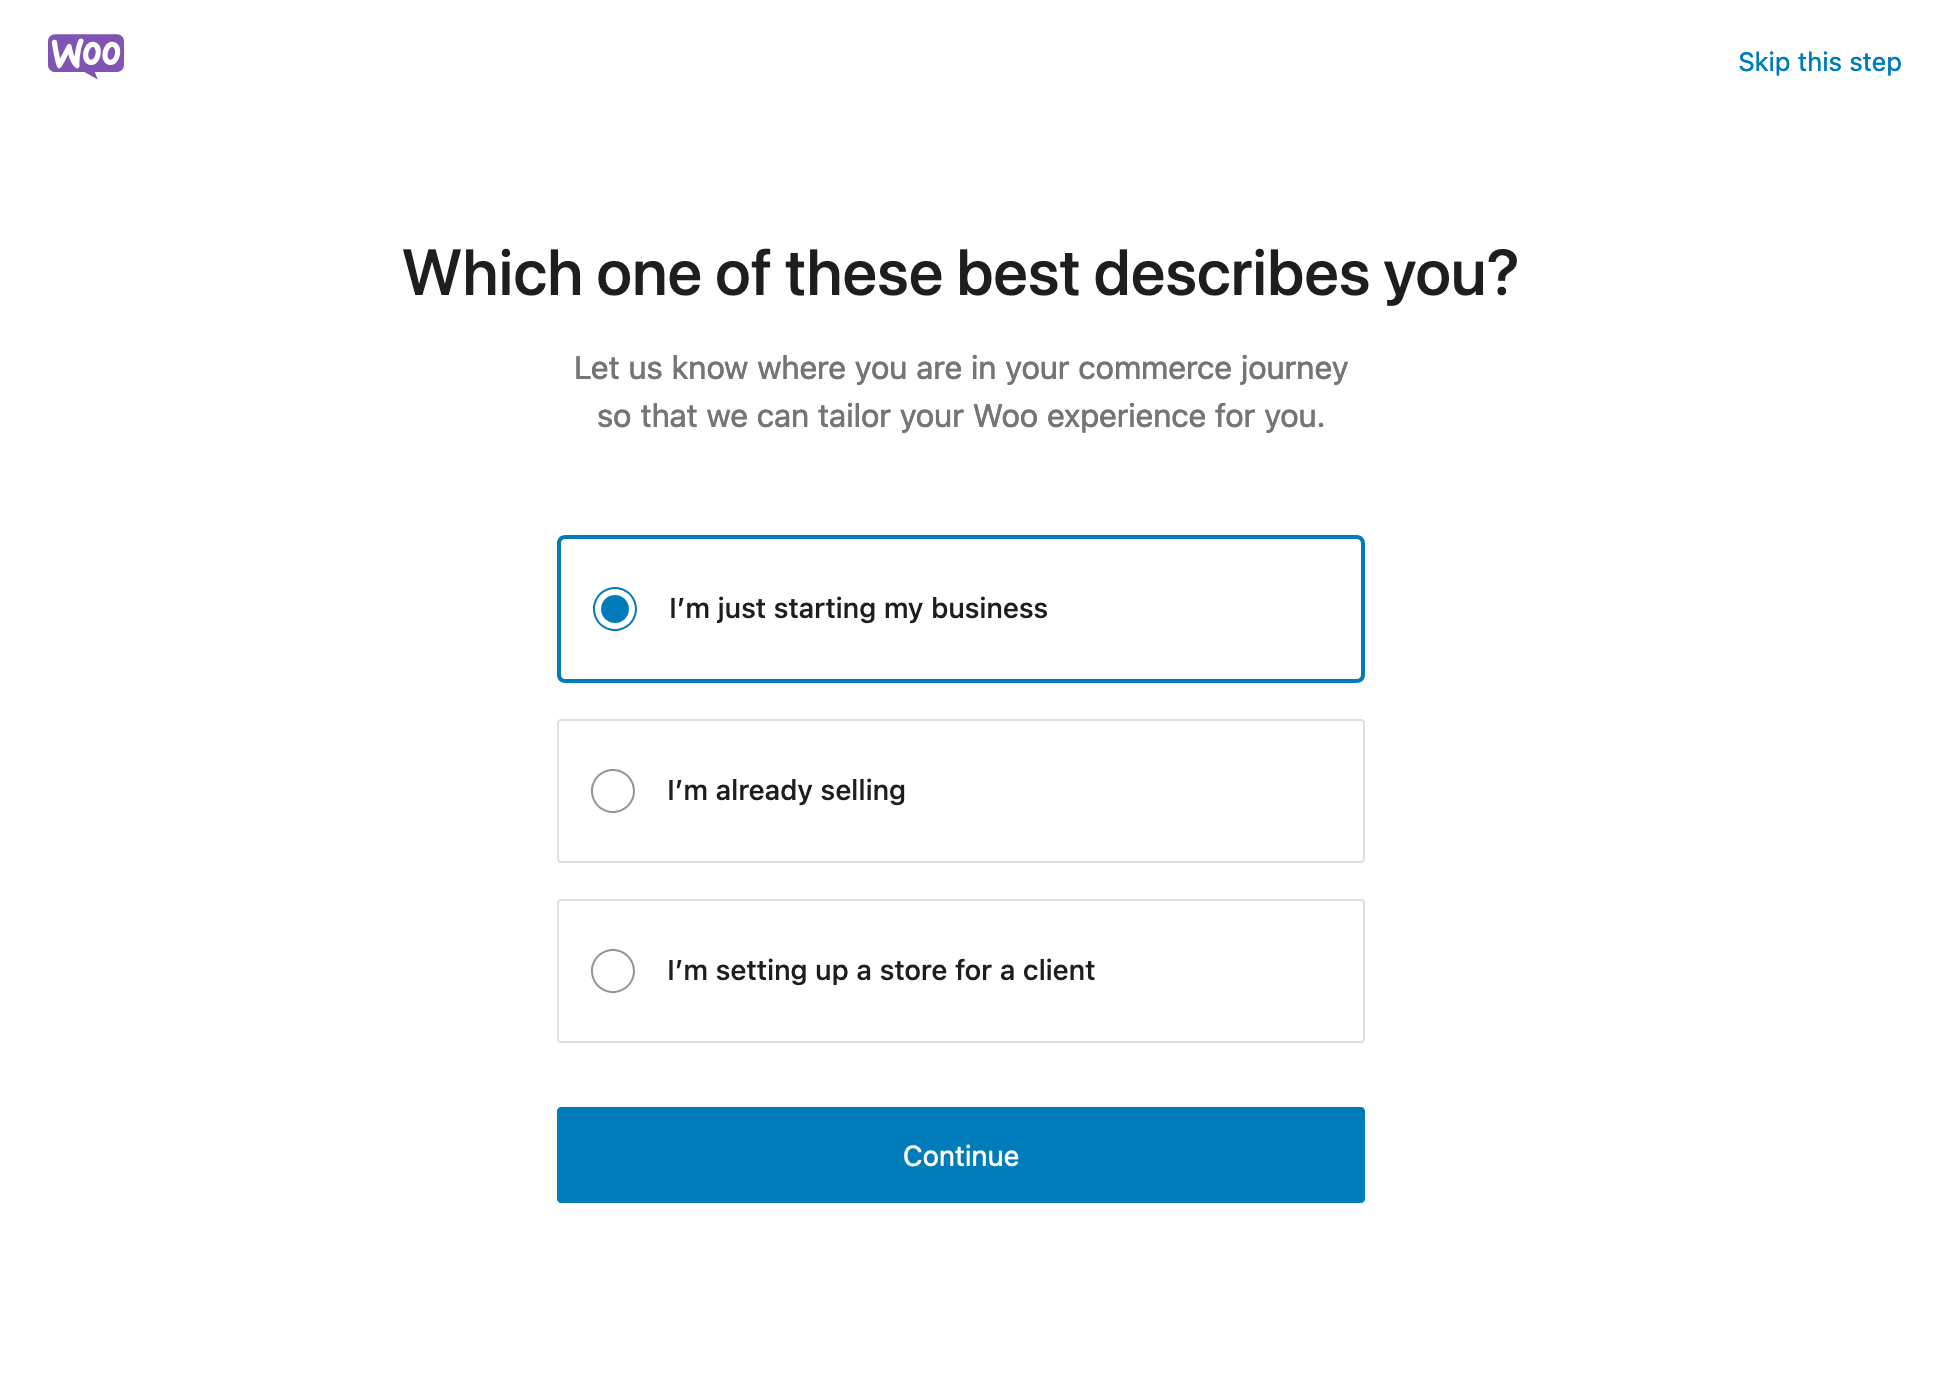
Step 1: Describe your business stage.
To start, you’re asked to choose the stage of business you’re in when you launch your e-shop.
You have three choices:
- I’m just starting my business.
- I’m already selling.
- I’m setting up a store for a customer.
Choose the one that suits you best, and click on the “Continue” button.
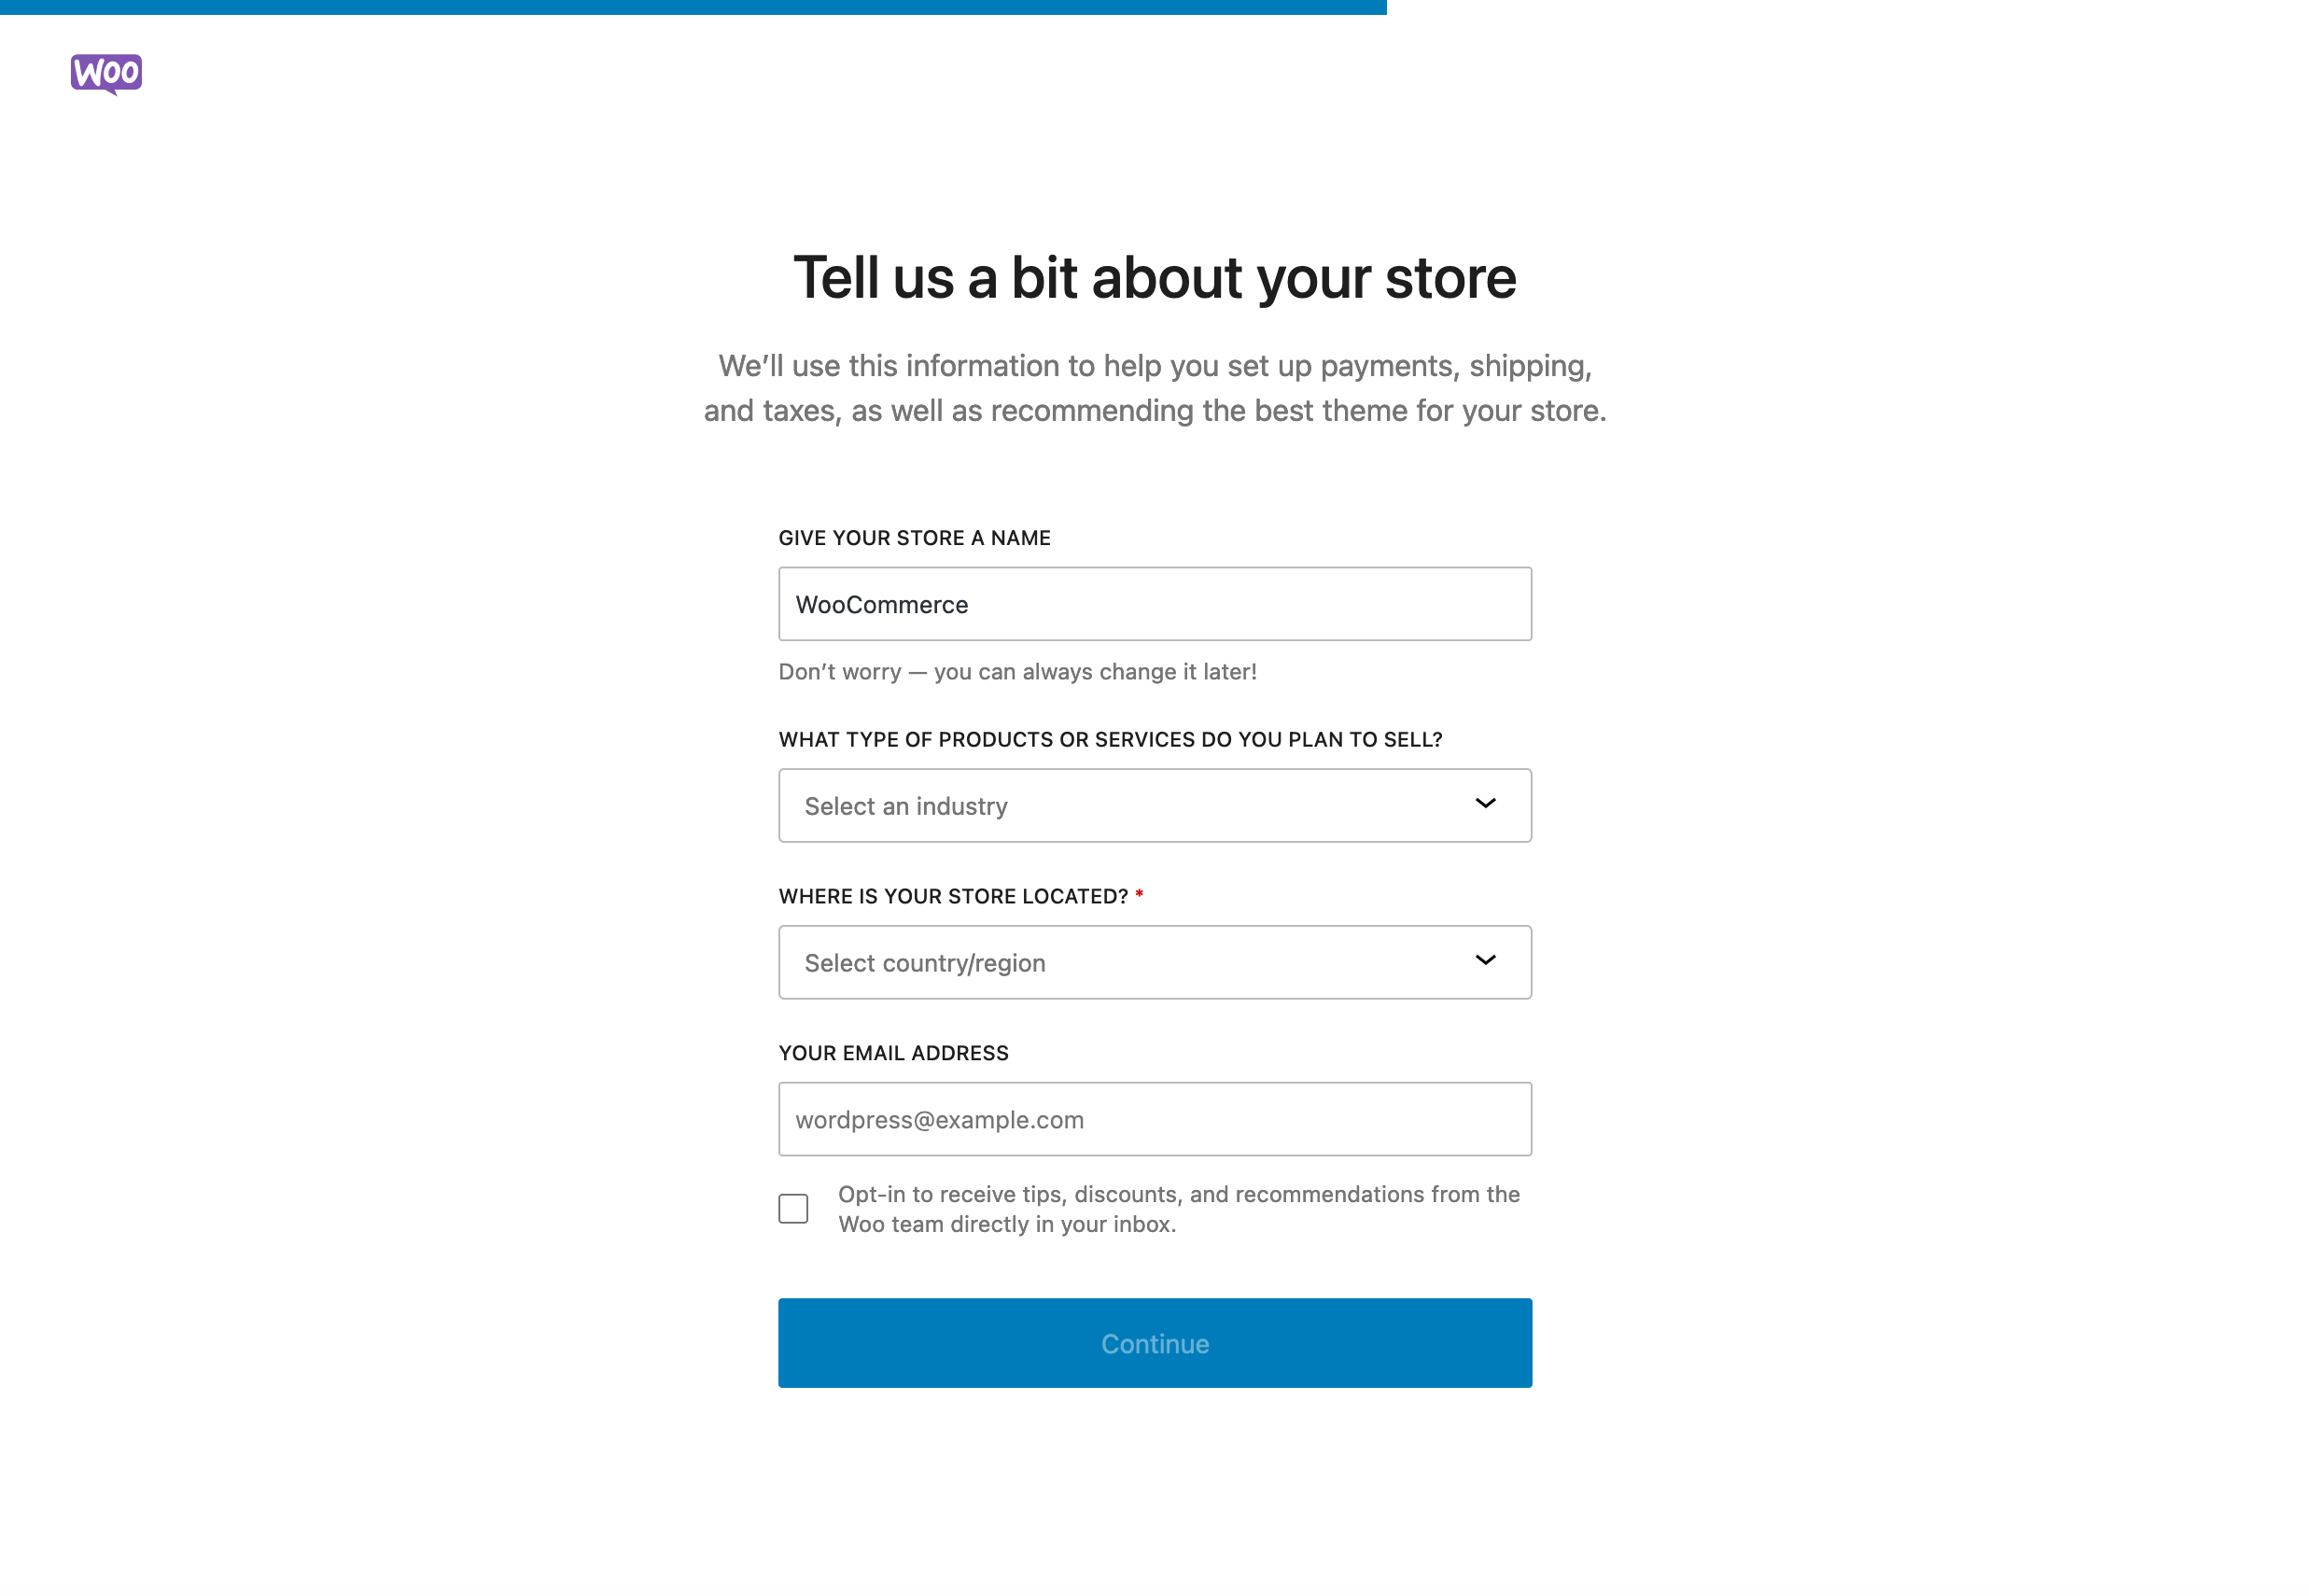
Step 2: Add your store’s details.
Secondly, the configuration wizard asks you to fill in a number of details to “help you set up payments, shipping, and taxes, as well as recommending the best theme for your store.”
Here’s what you need to specify:
- Your store name
- Your industry. You can choose from a dozen suggestions, including: clothing and accessories, food and beverages, electronics and IT, health and beauty, sports and leisure, etc.
- The country where your store is located
- Your email address
Step 3: Activate (or not) certain WooCommerce plugins
Following on from this, the WordPress e-commerce plugin allows you to activate certain free plugins and features on your store:
- WooPayments: A payment solution integrated with WooCommerce to accept and manage all your payments from your dashboard
- Jetpack: To activate security, performance, and marketing functions, as well as benefit from an artificial intelligence (AI)-based assistant to create your content
- Pinterest for WooCommerce: To showcase your products to Pinterest users
- MailPoet: To send automated newsletters and emails (e.g., after a shopping cart abandonment) to your visitors and customers
- Google for WooCommerce: To showcase your store’s products on Google
- WooCommerce Tax: To activate automated taxes
- TikTok for WooCommerce: To create advertising campaigns with TikTok
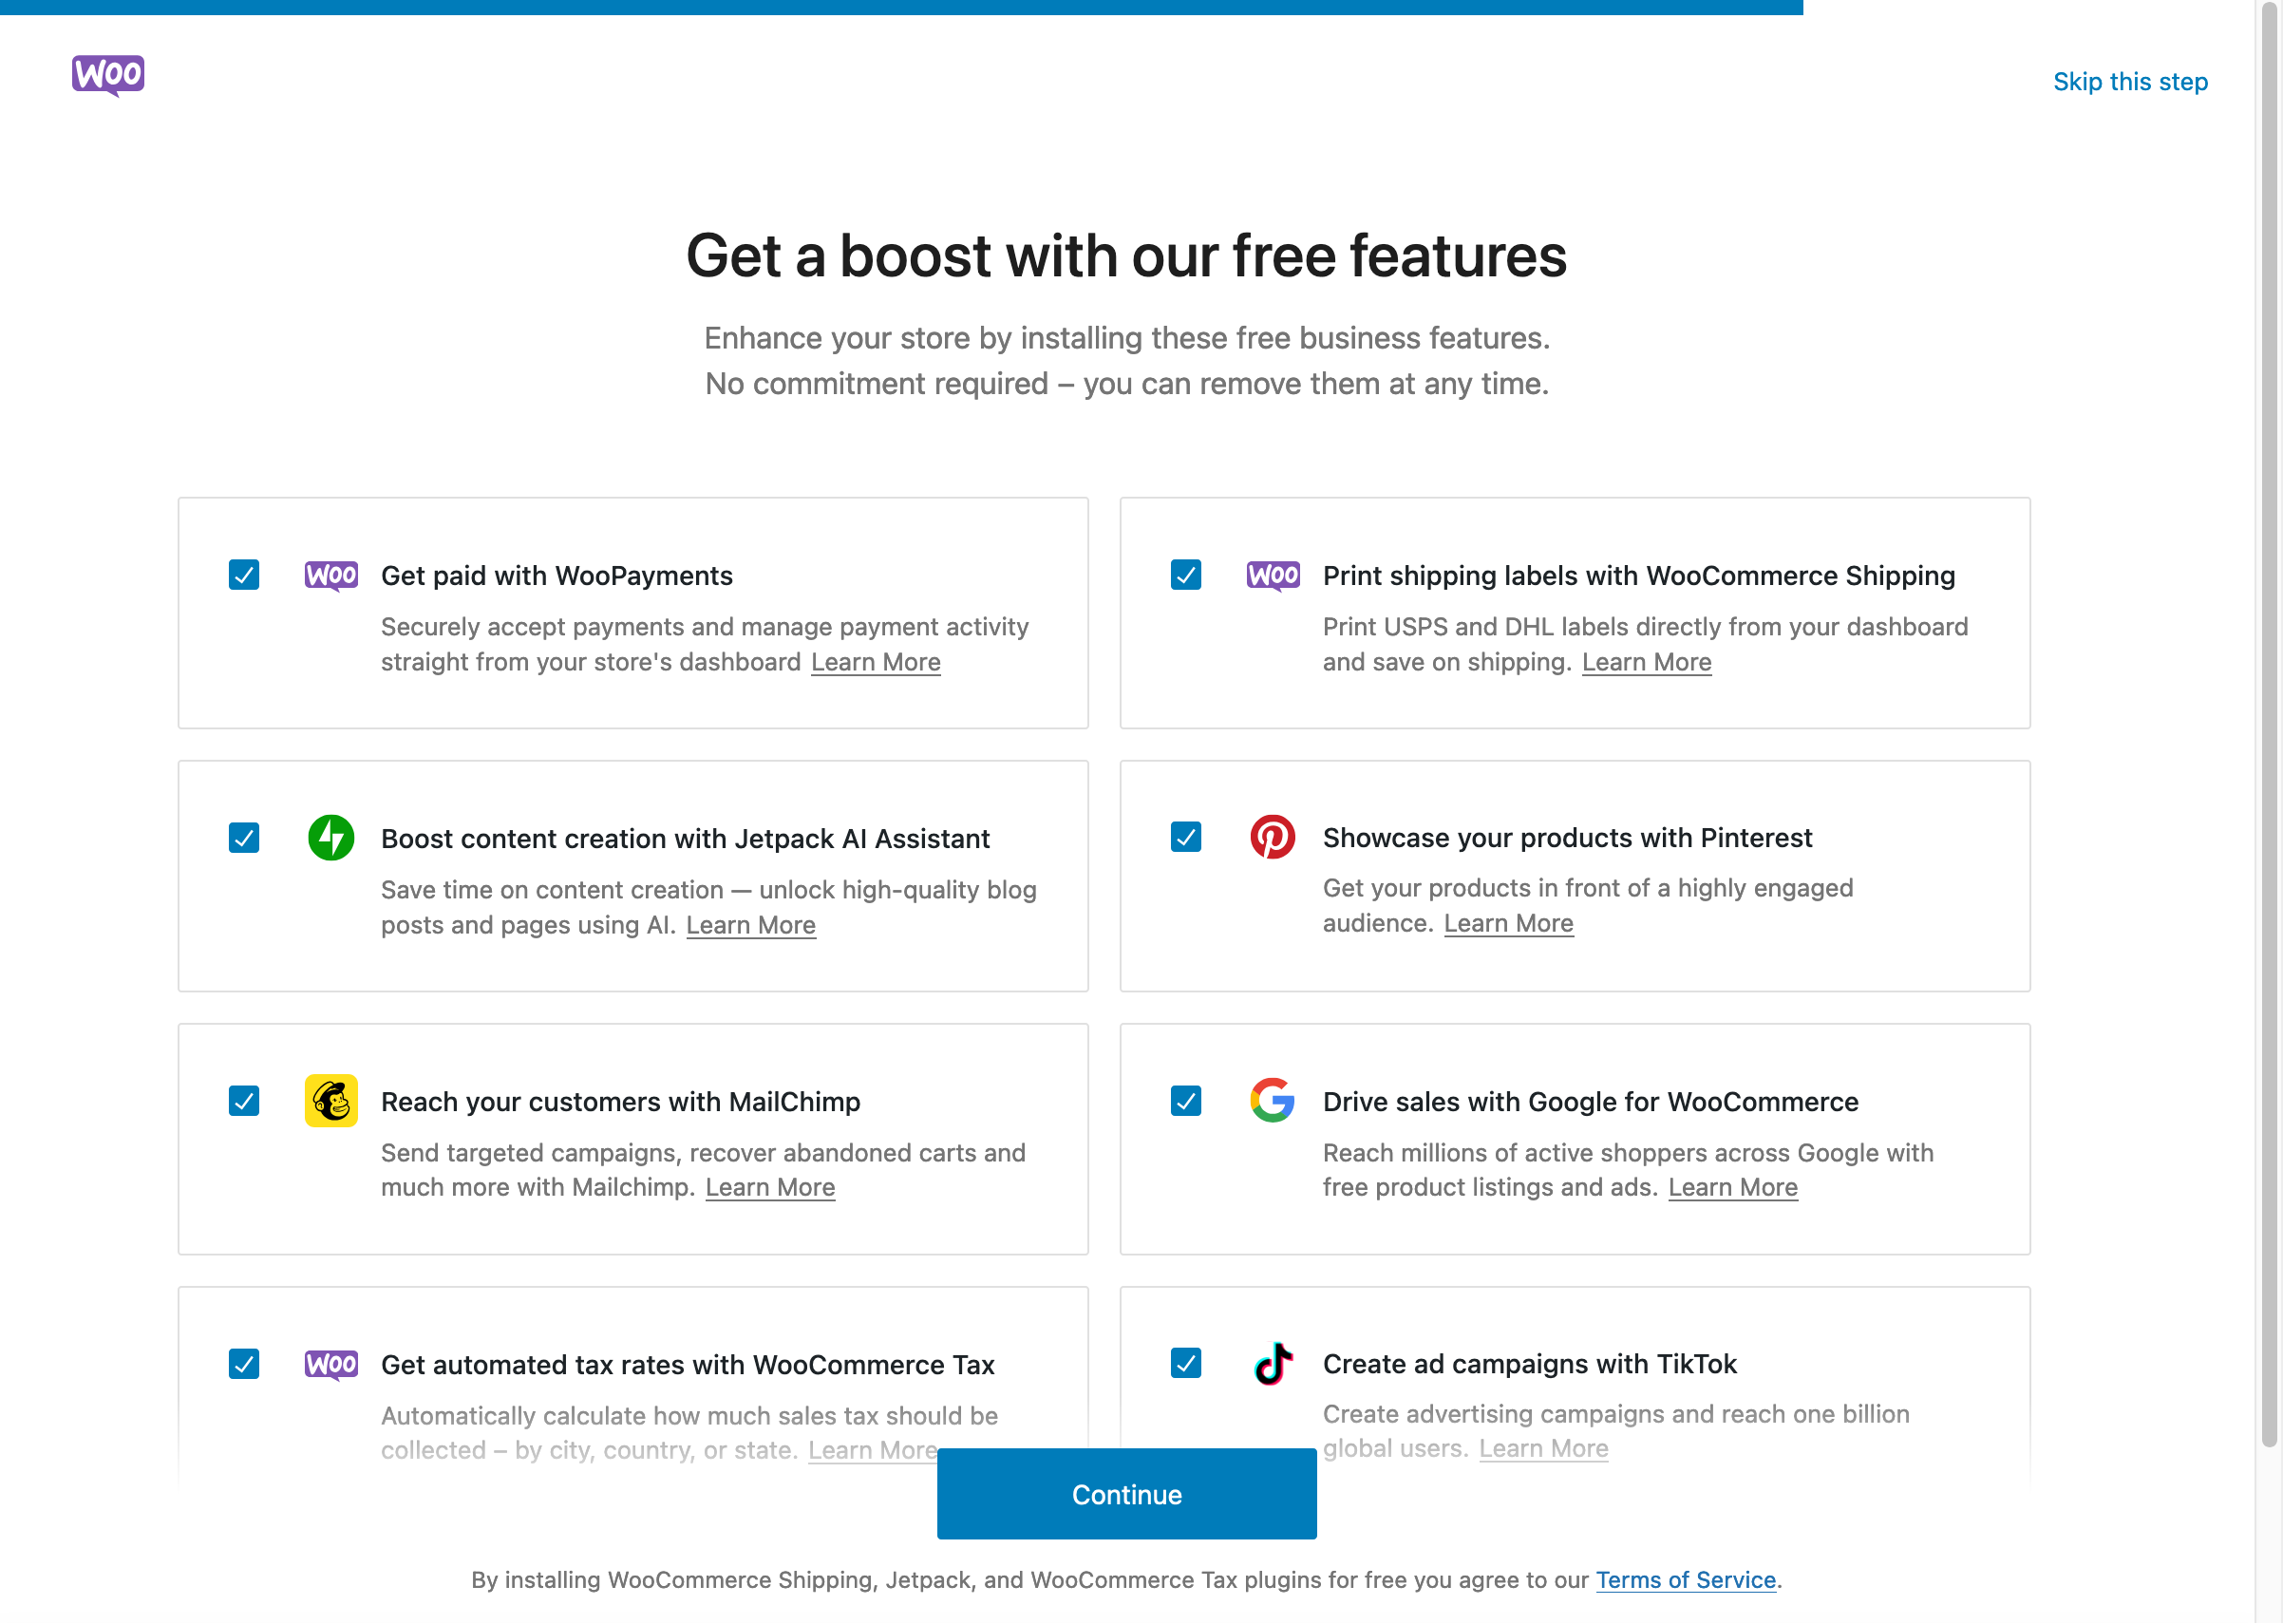
You can activate them manually later, so if you’re not sure whether you need them at the moment, simply uncheck the notch associated with them.
Well, there you have it: you’ve just configured the first basic settings on your WooCommerce store. It’s a good starting point, but as you can imagine, to make it operational and attractive you’re going to have to go much further than these simple little adjustments.
Find out how to configure your store in greater depth right now.
How to set up your WooCommerce store
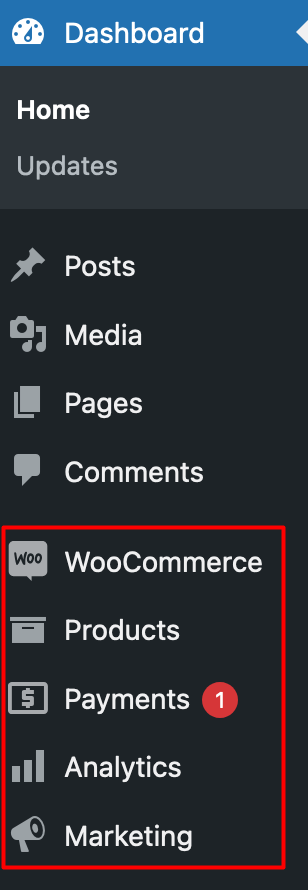
When you activate WooCommerce, you’ll see 5 main menus appear in the left sidebar of your admin interface:
- WooCommerce
- Products
- Payments
- Analytics
- Marketing
An assistant to get started customizing your WooCommerce store
We can’t forget to mention the configuration tool, which takes you by the hand to customize your e-commerce:
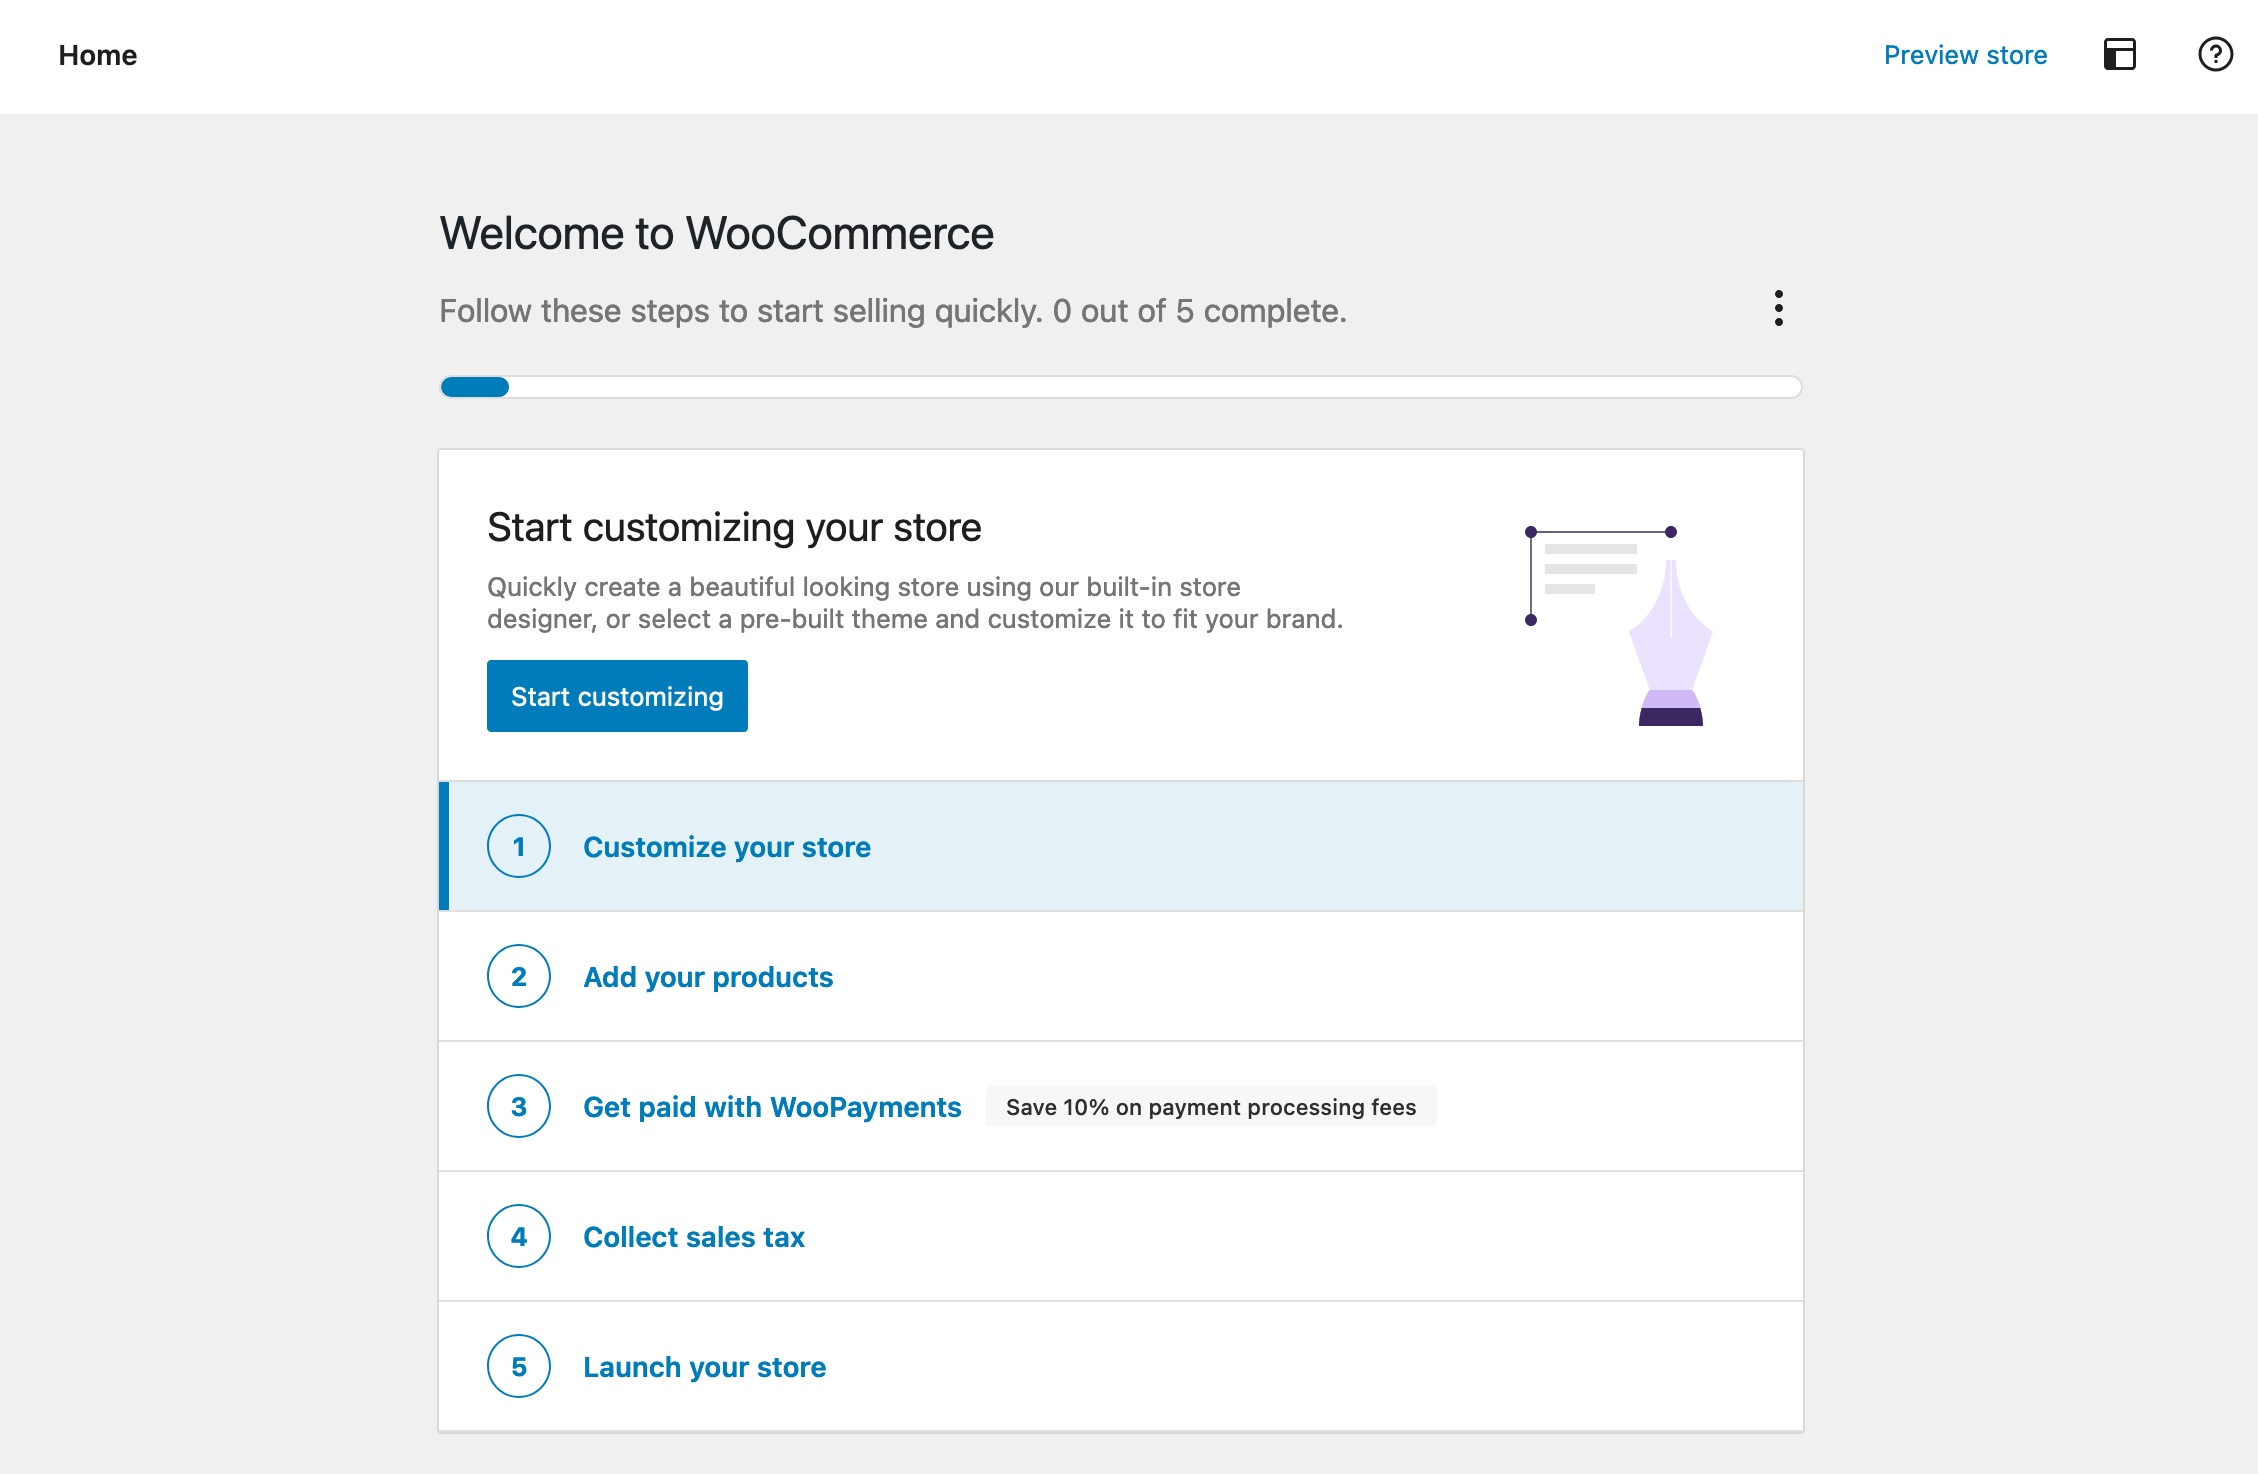
You can for example choose one of the suggested WordPress themes, or you can rely on the integrated store designer offered by WooCommerce:

In a nutshell, the store designer will install a theme for you (Twenty Twenty-Four at the time of publication of the update to our article), and then you can modify the style (logo, layout, colors) and layout (header, home page, footer).
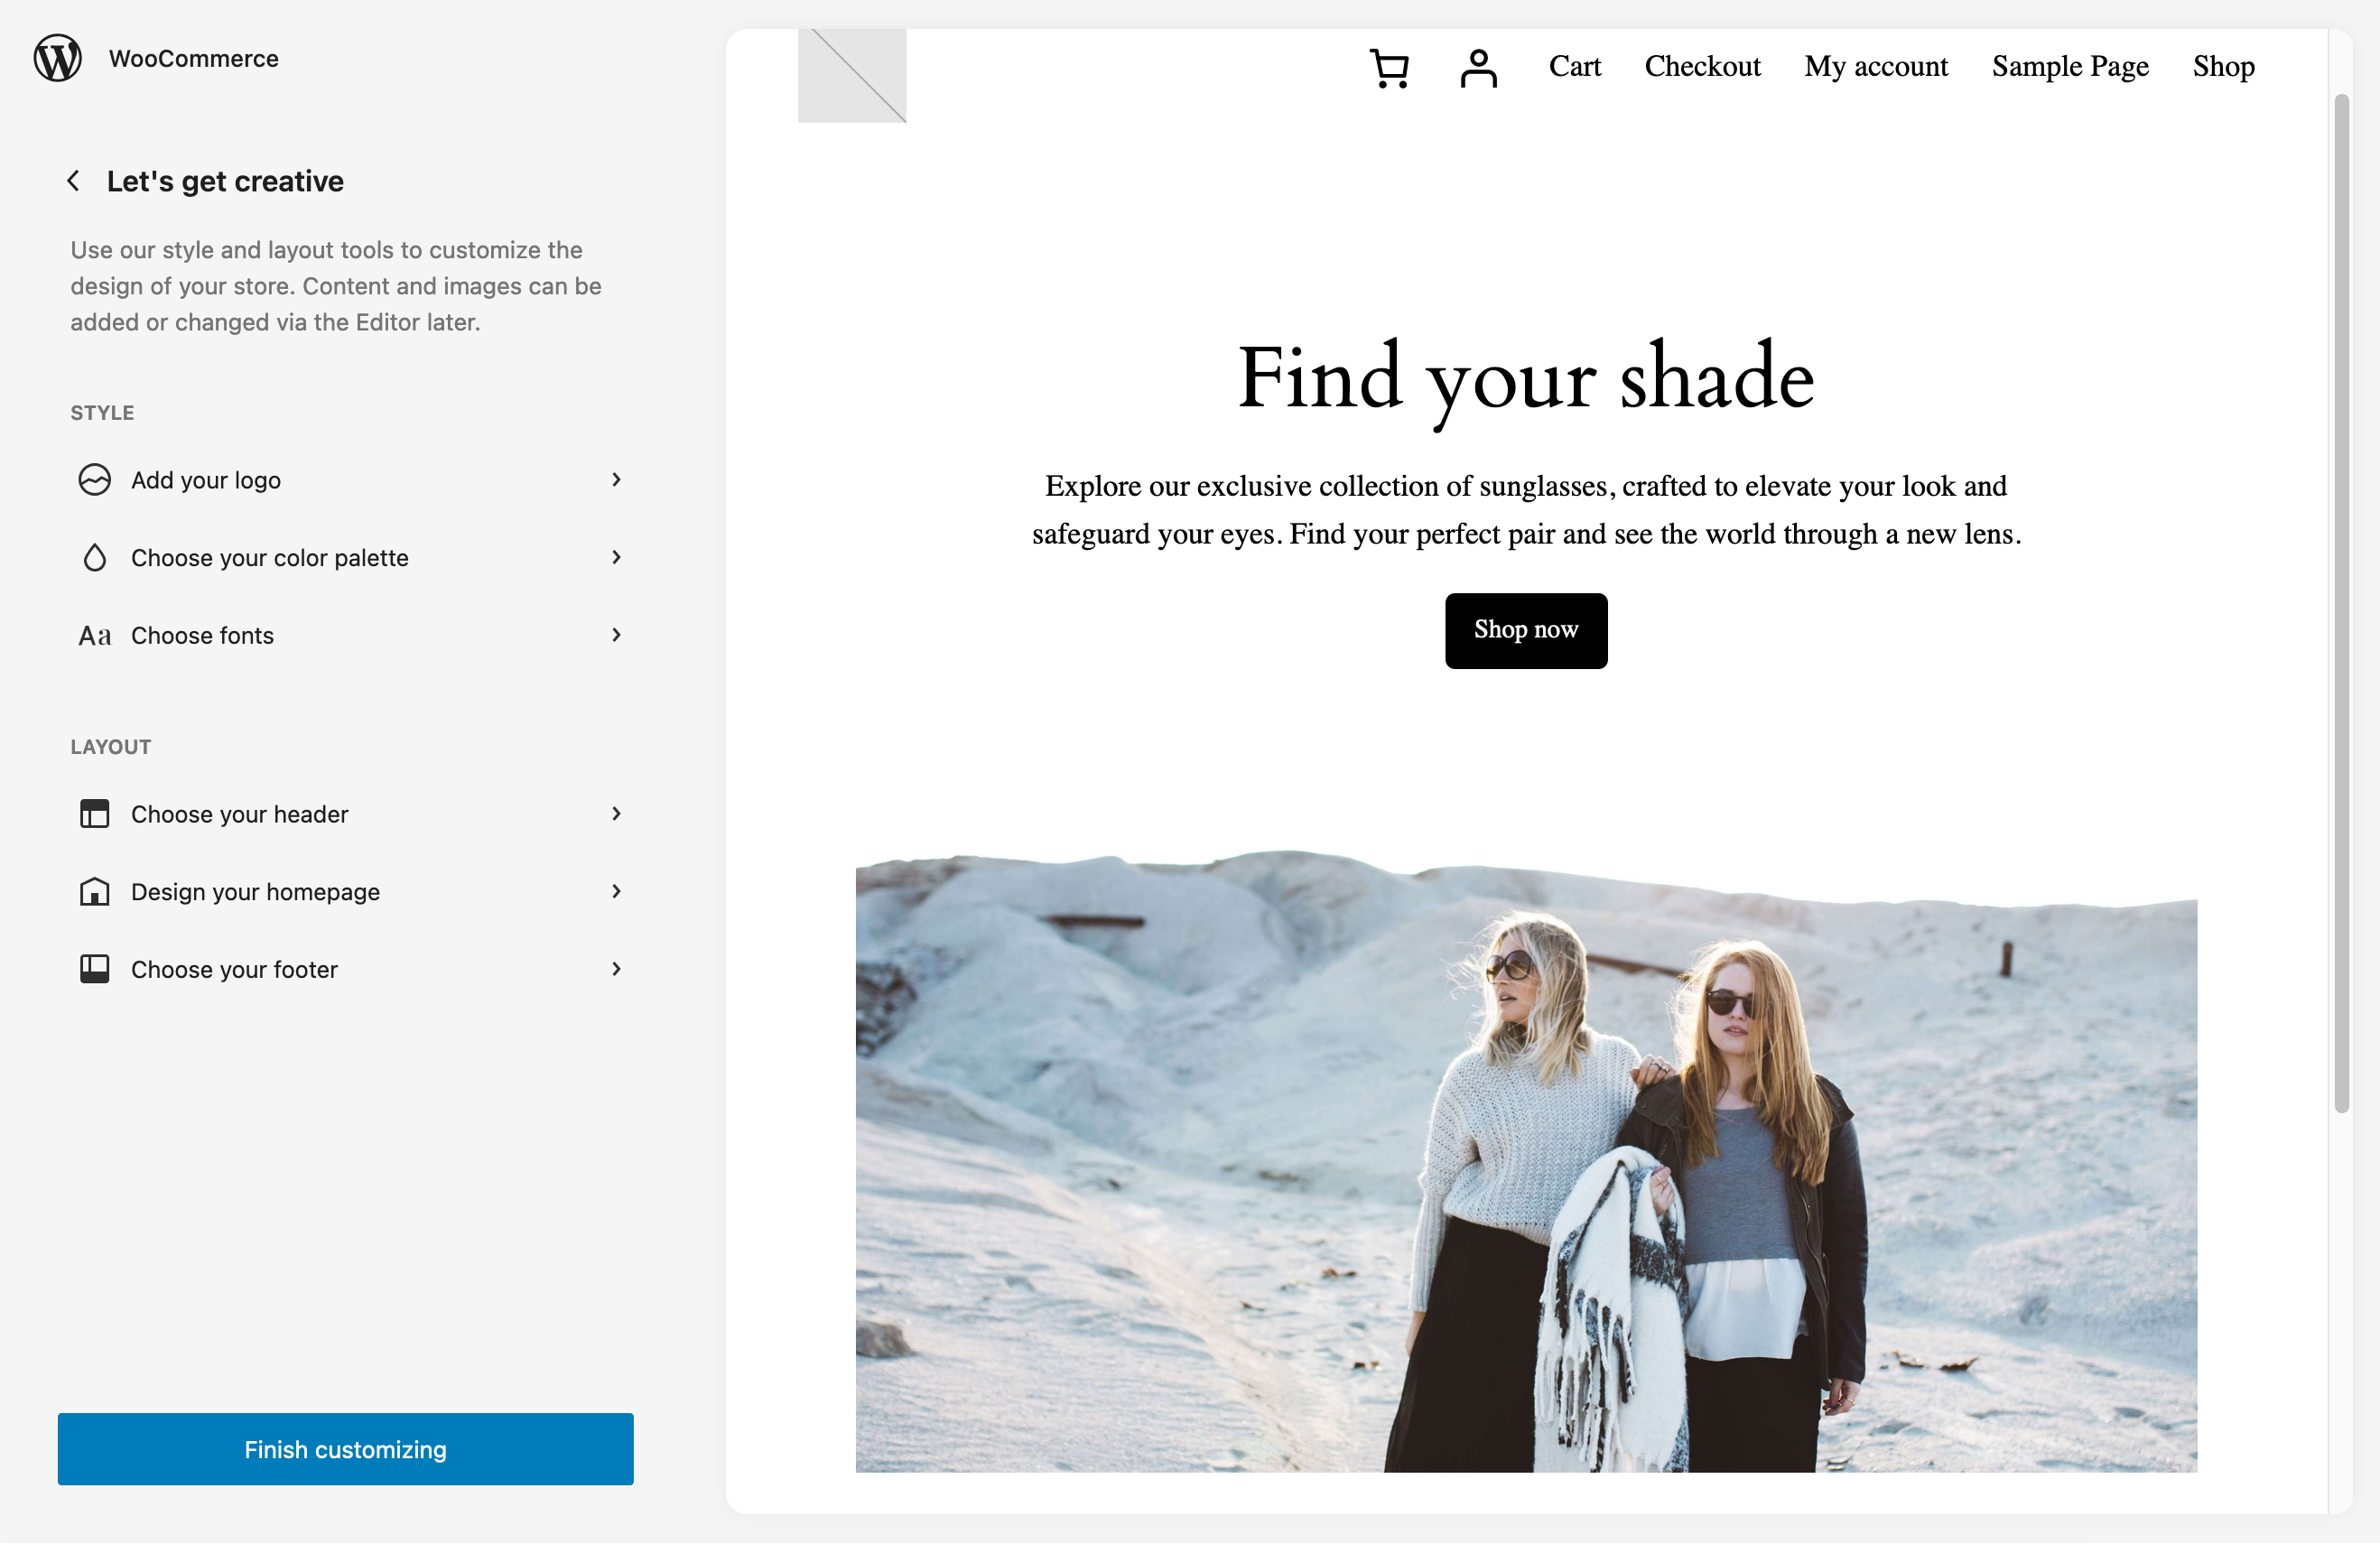
Thanks to the configuration wizard, you’ll have a functional store, but be careful!
- You’ll need to customize it to match your brand identity.
- The store configurator activates a block-based theme. So you need to be comfortable with how the WordPress Site Editor works to get the most out of it (and not tear your hair out). But don’t panic. If you want to change your theme, you can always do so via the Appearance > Themes menu.
For the rest, you can continue by completing the remaining 5 steps:
- Add your products
- Get paid with WooPayments
- Collect sales tax
- Select your delivery options
- Launch the store
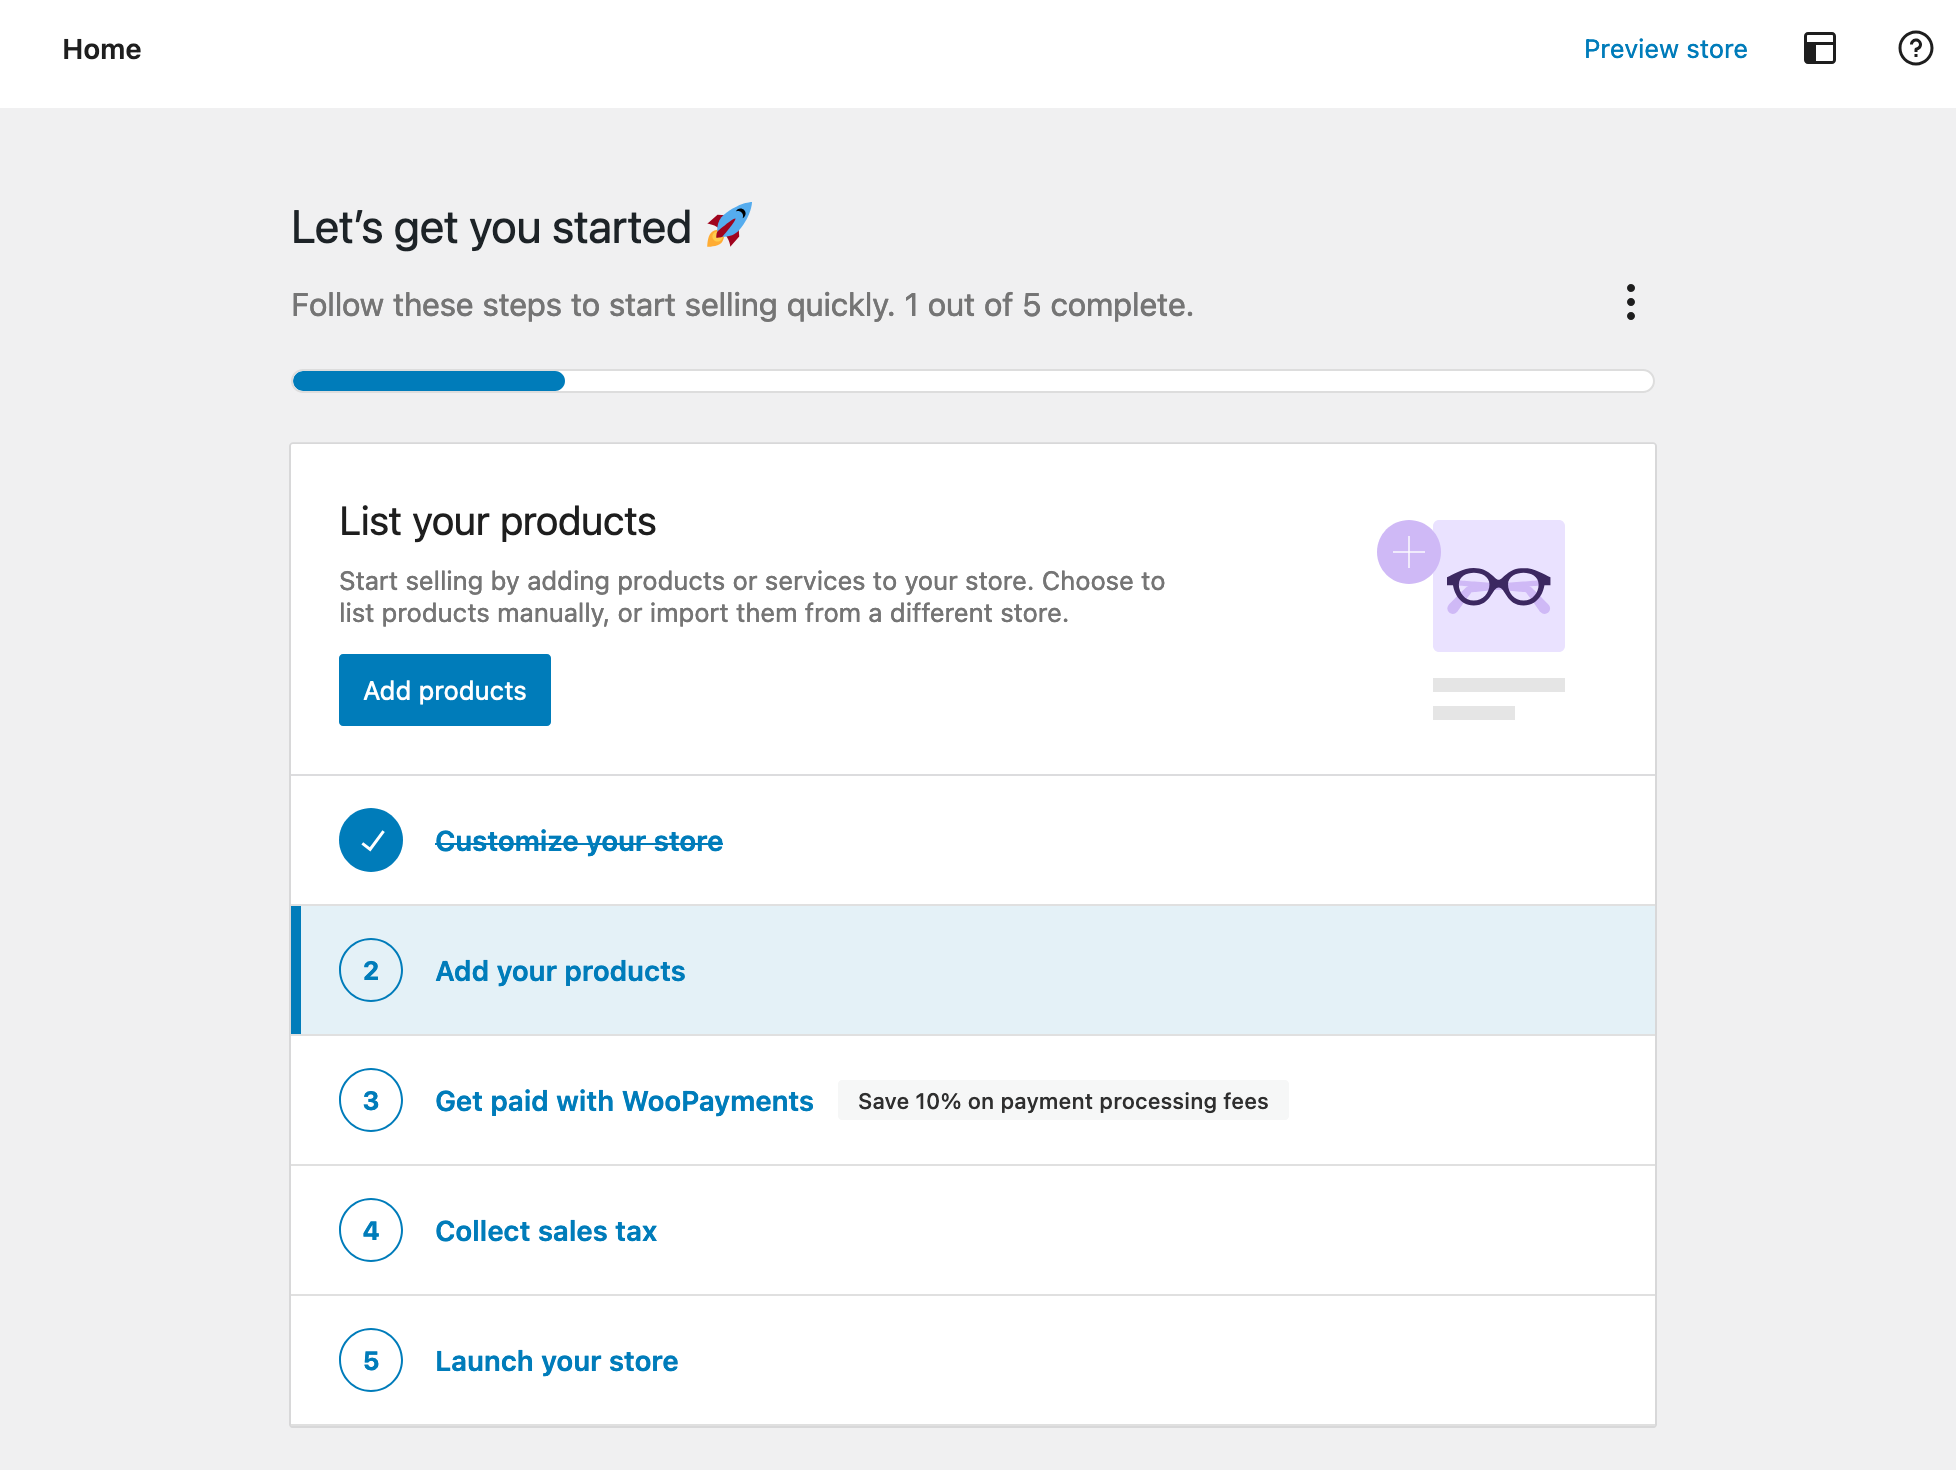
You’ll find almost all these settings in the WooCommerce menu, which we’ll explore below.
The WooCommerce settings menu
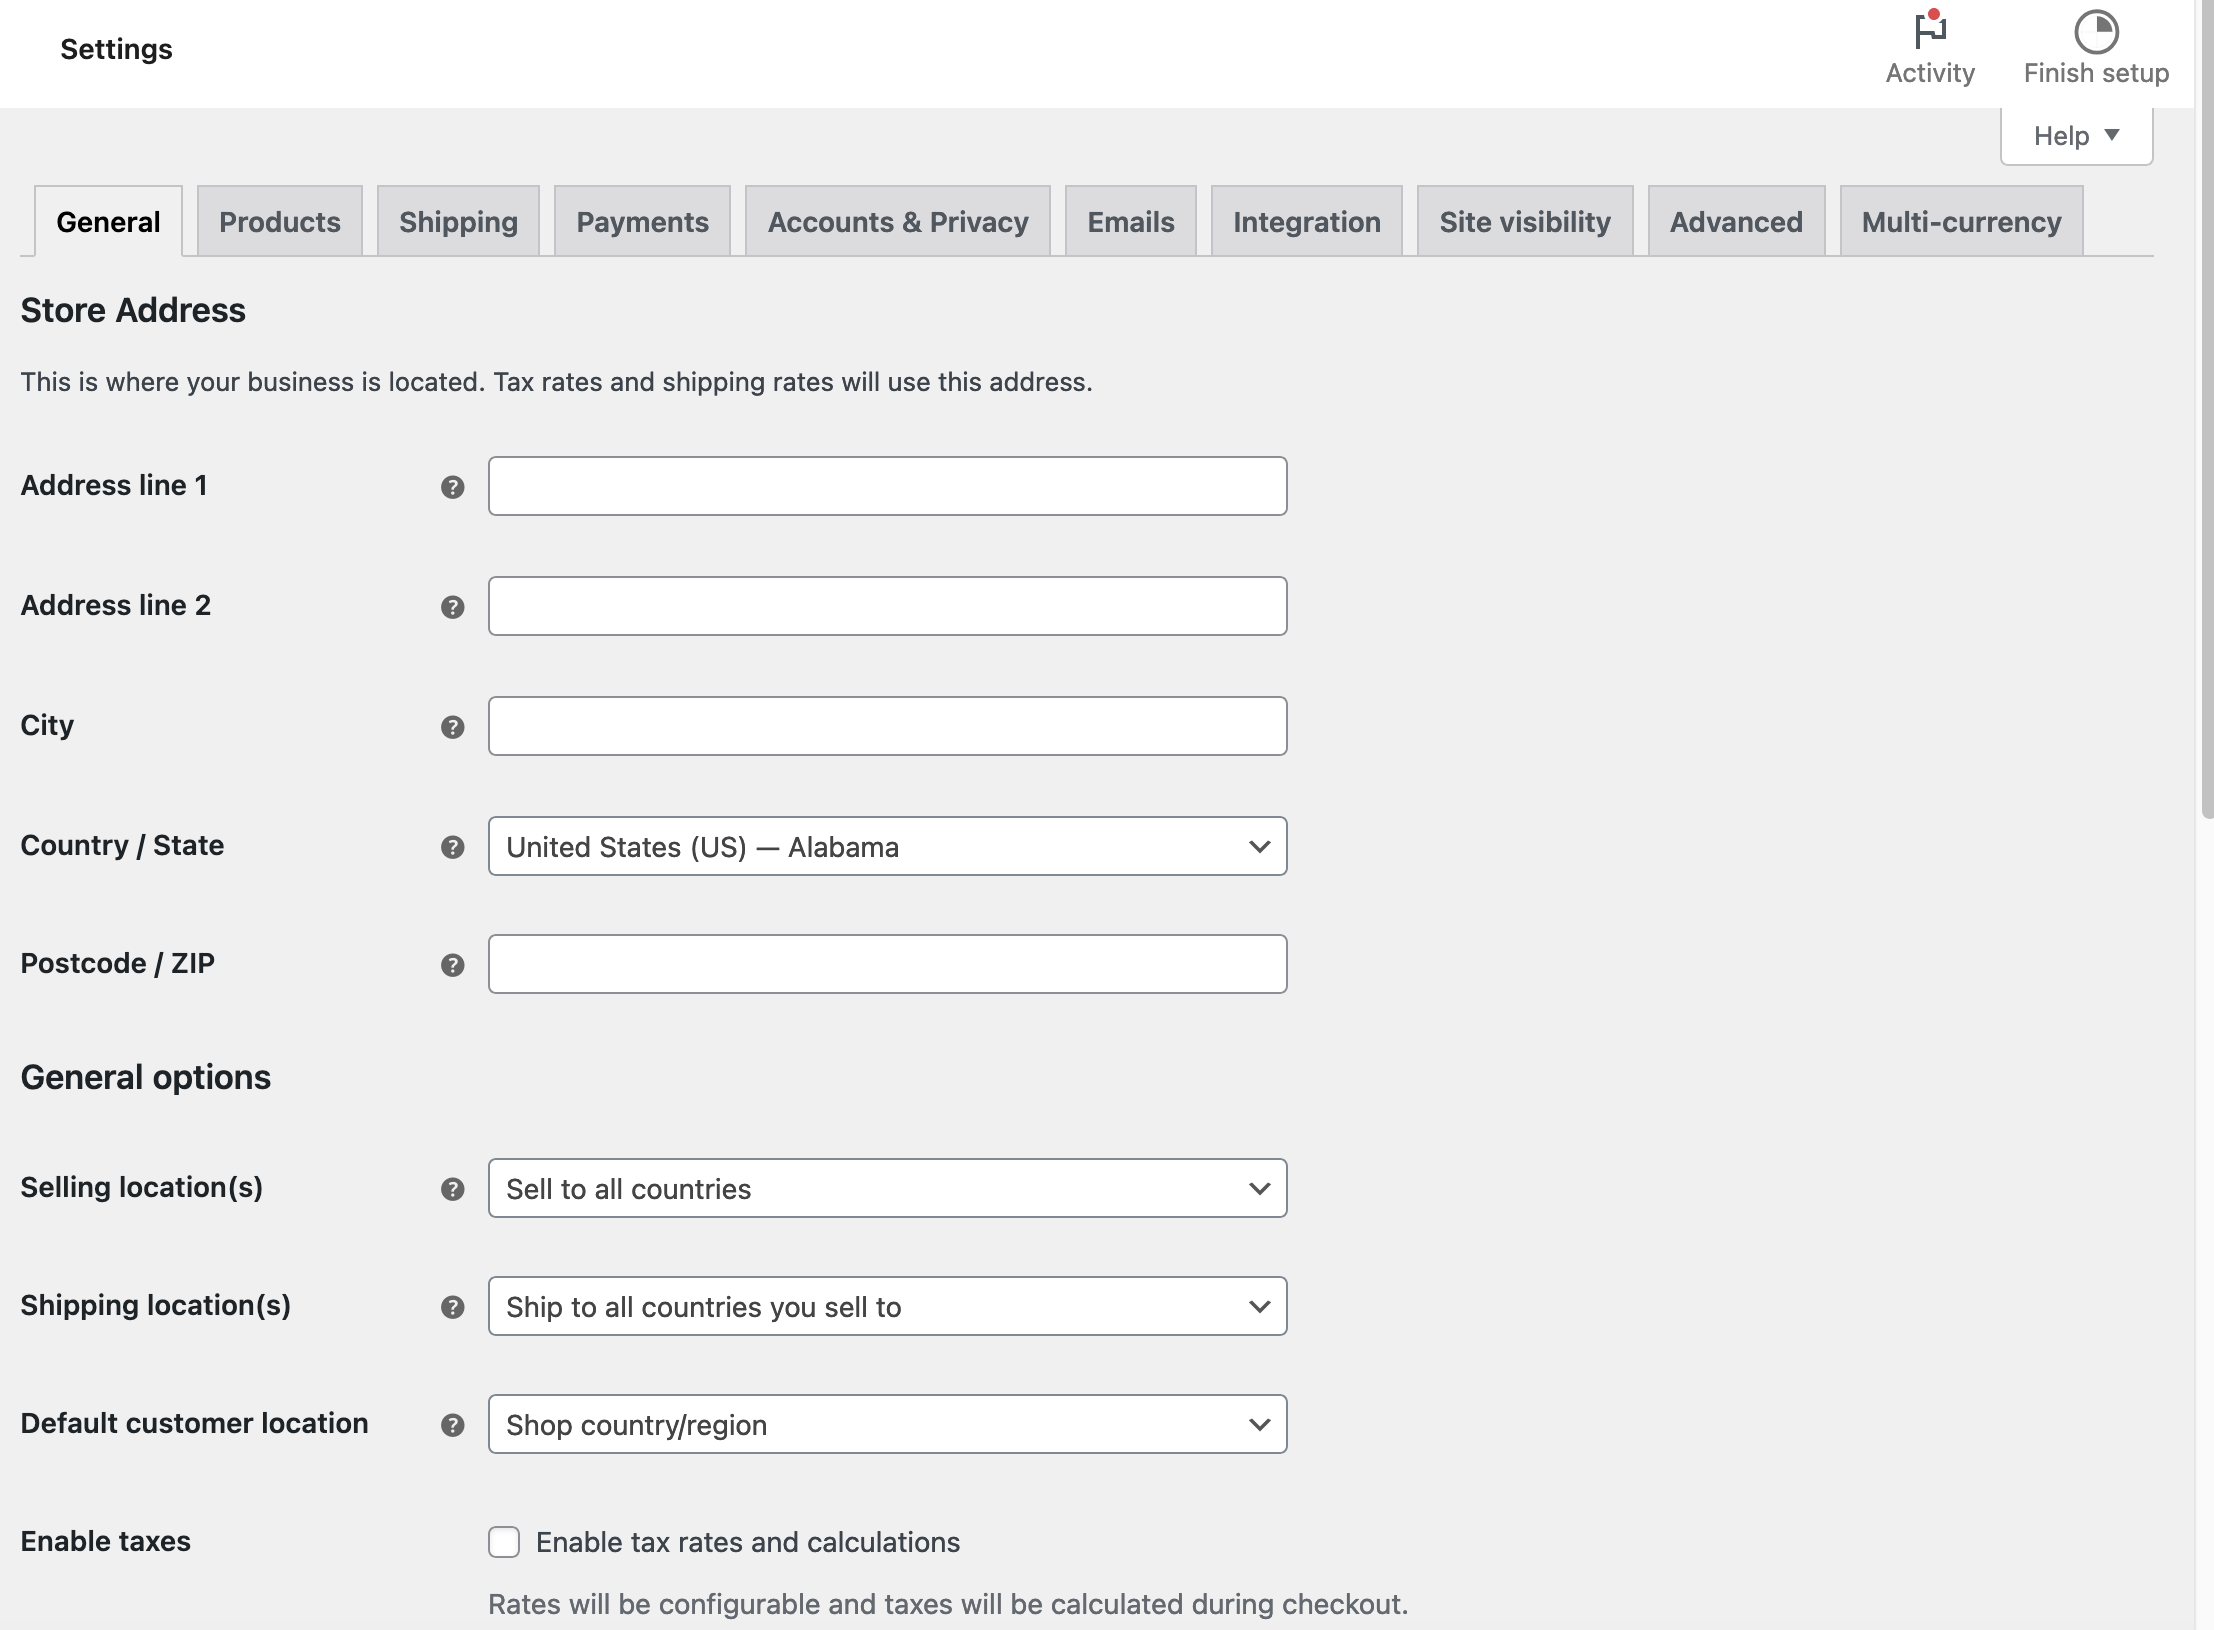
The “Settings” submenu of the WooCommerce menu can be considered the nerve center of your online store. This is where you will be able to configure the plugin as it should be, thanks to the 10 tabs.

The General tab
In this first tab, you will be able to set everything related to the address of your store, the activation of VAT and promo codes, or the currency to use.
The Products tab
This tab will allow you to configure the base page of your store (the one where your products will be displayed), to define the units of weight and dimensions of your products, and to activate certain features such as customer ratings or product reviews.
In addition, it will be possible to make adjustments to your stock, such as being able to hide out-of-stock products from your visitors.
Finally, you can set options related to downloadable products (e.g. allow access only after payment).

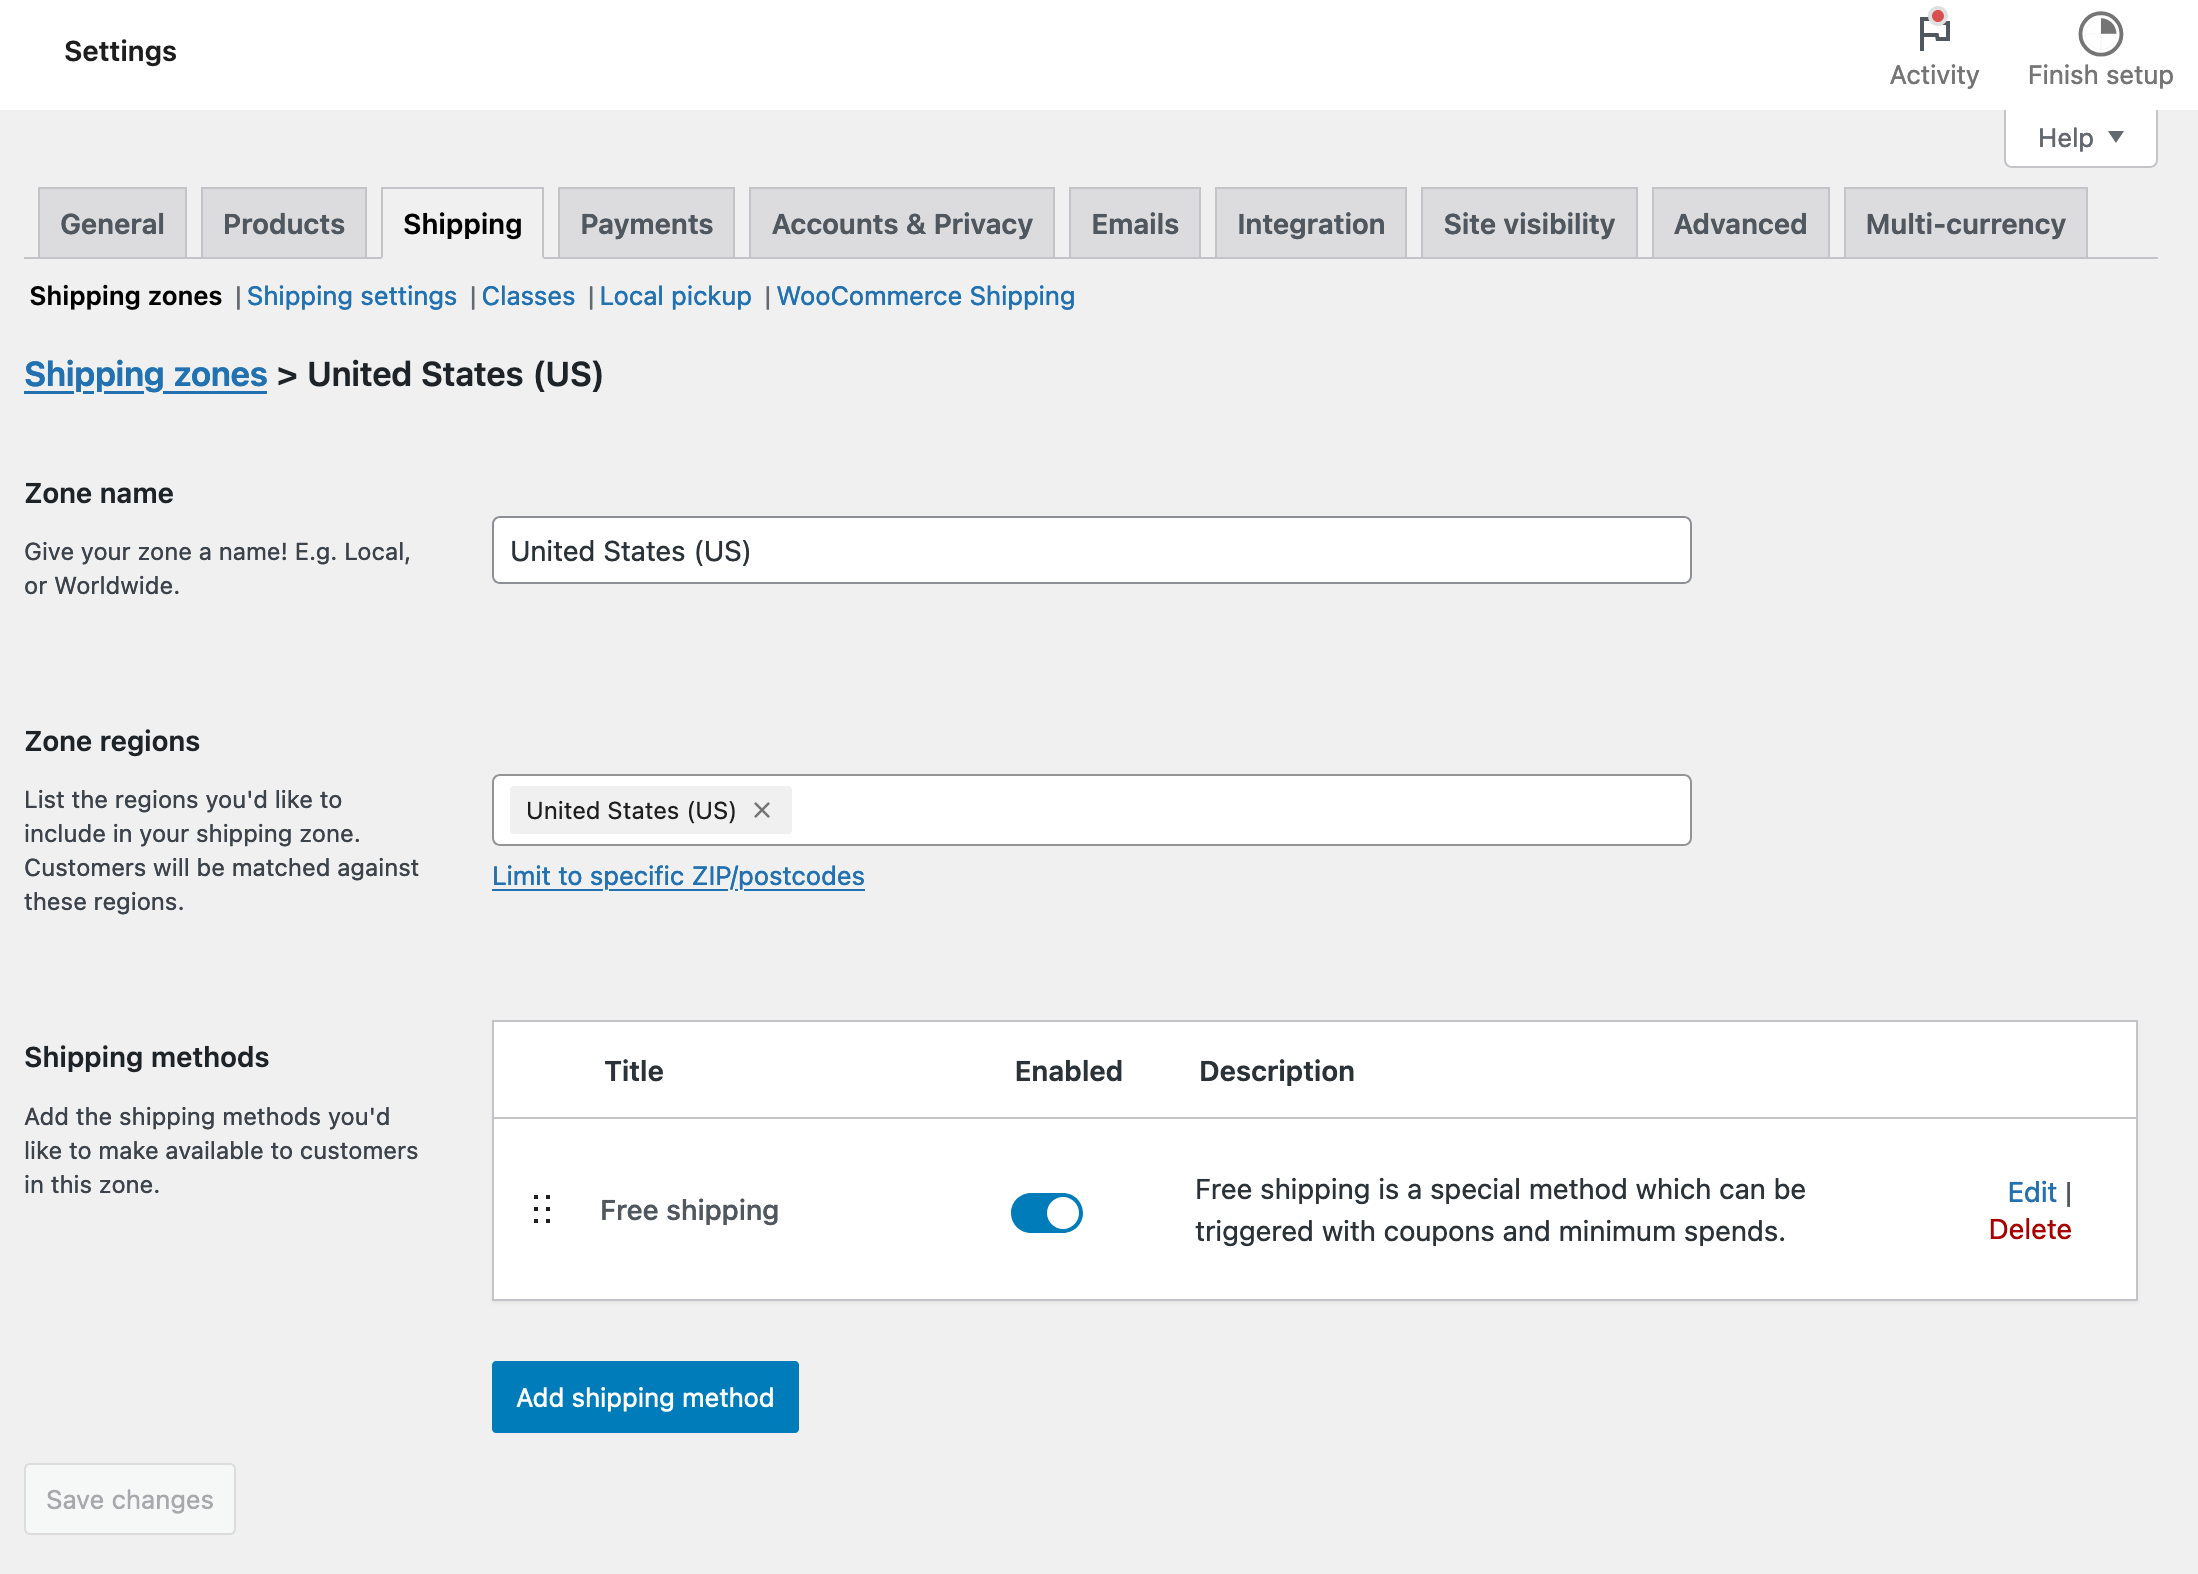
The WooCommerce Shipping tab
To satisfy your customers, you need to configure the delivery of products (otherwise, I don’t have high hopes for your reputation as a merchant!). Here you can specify the shipping zones and methods, as well as the shipping options (fees).
The Payments tab
At present, you can configure the payment methods used on your store. By default, you are offered four:
- WooPayments
- Bank transfer
- Check payments
- Cash on delivery

If these payment solutions don’t meet your business needs, you can activate others later, such as Stripe, using dedicated plugins. We’ll come back to this later.
Note that it is also possible to sort these payment methods to define their display order on the site, using a simple drag and drop.
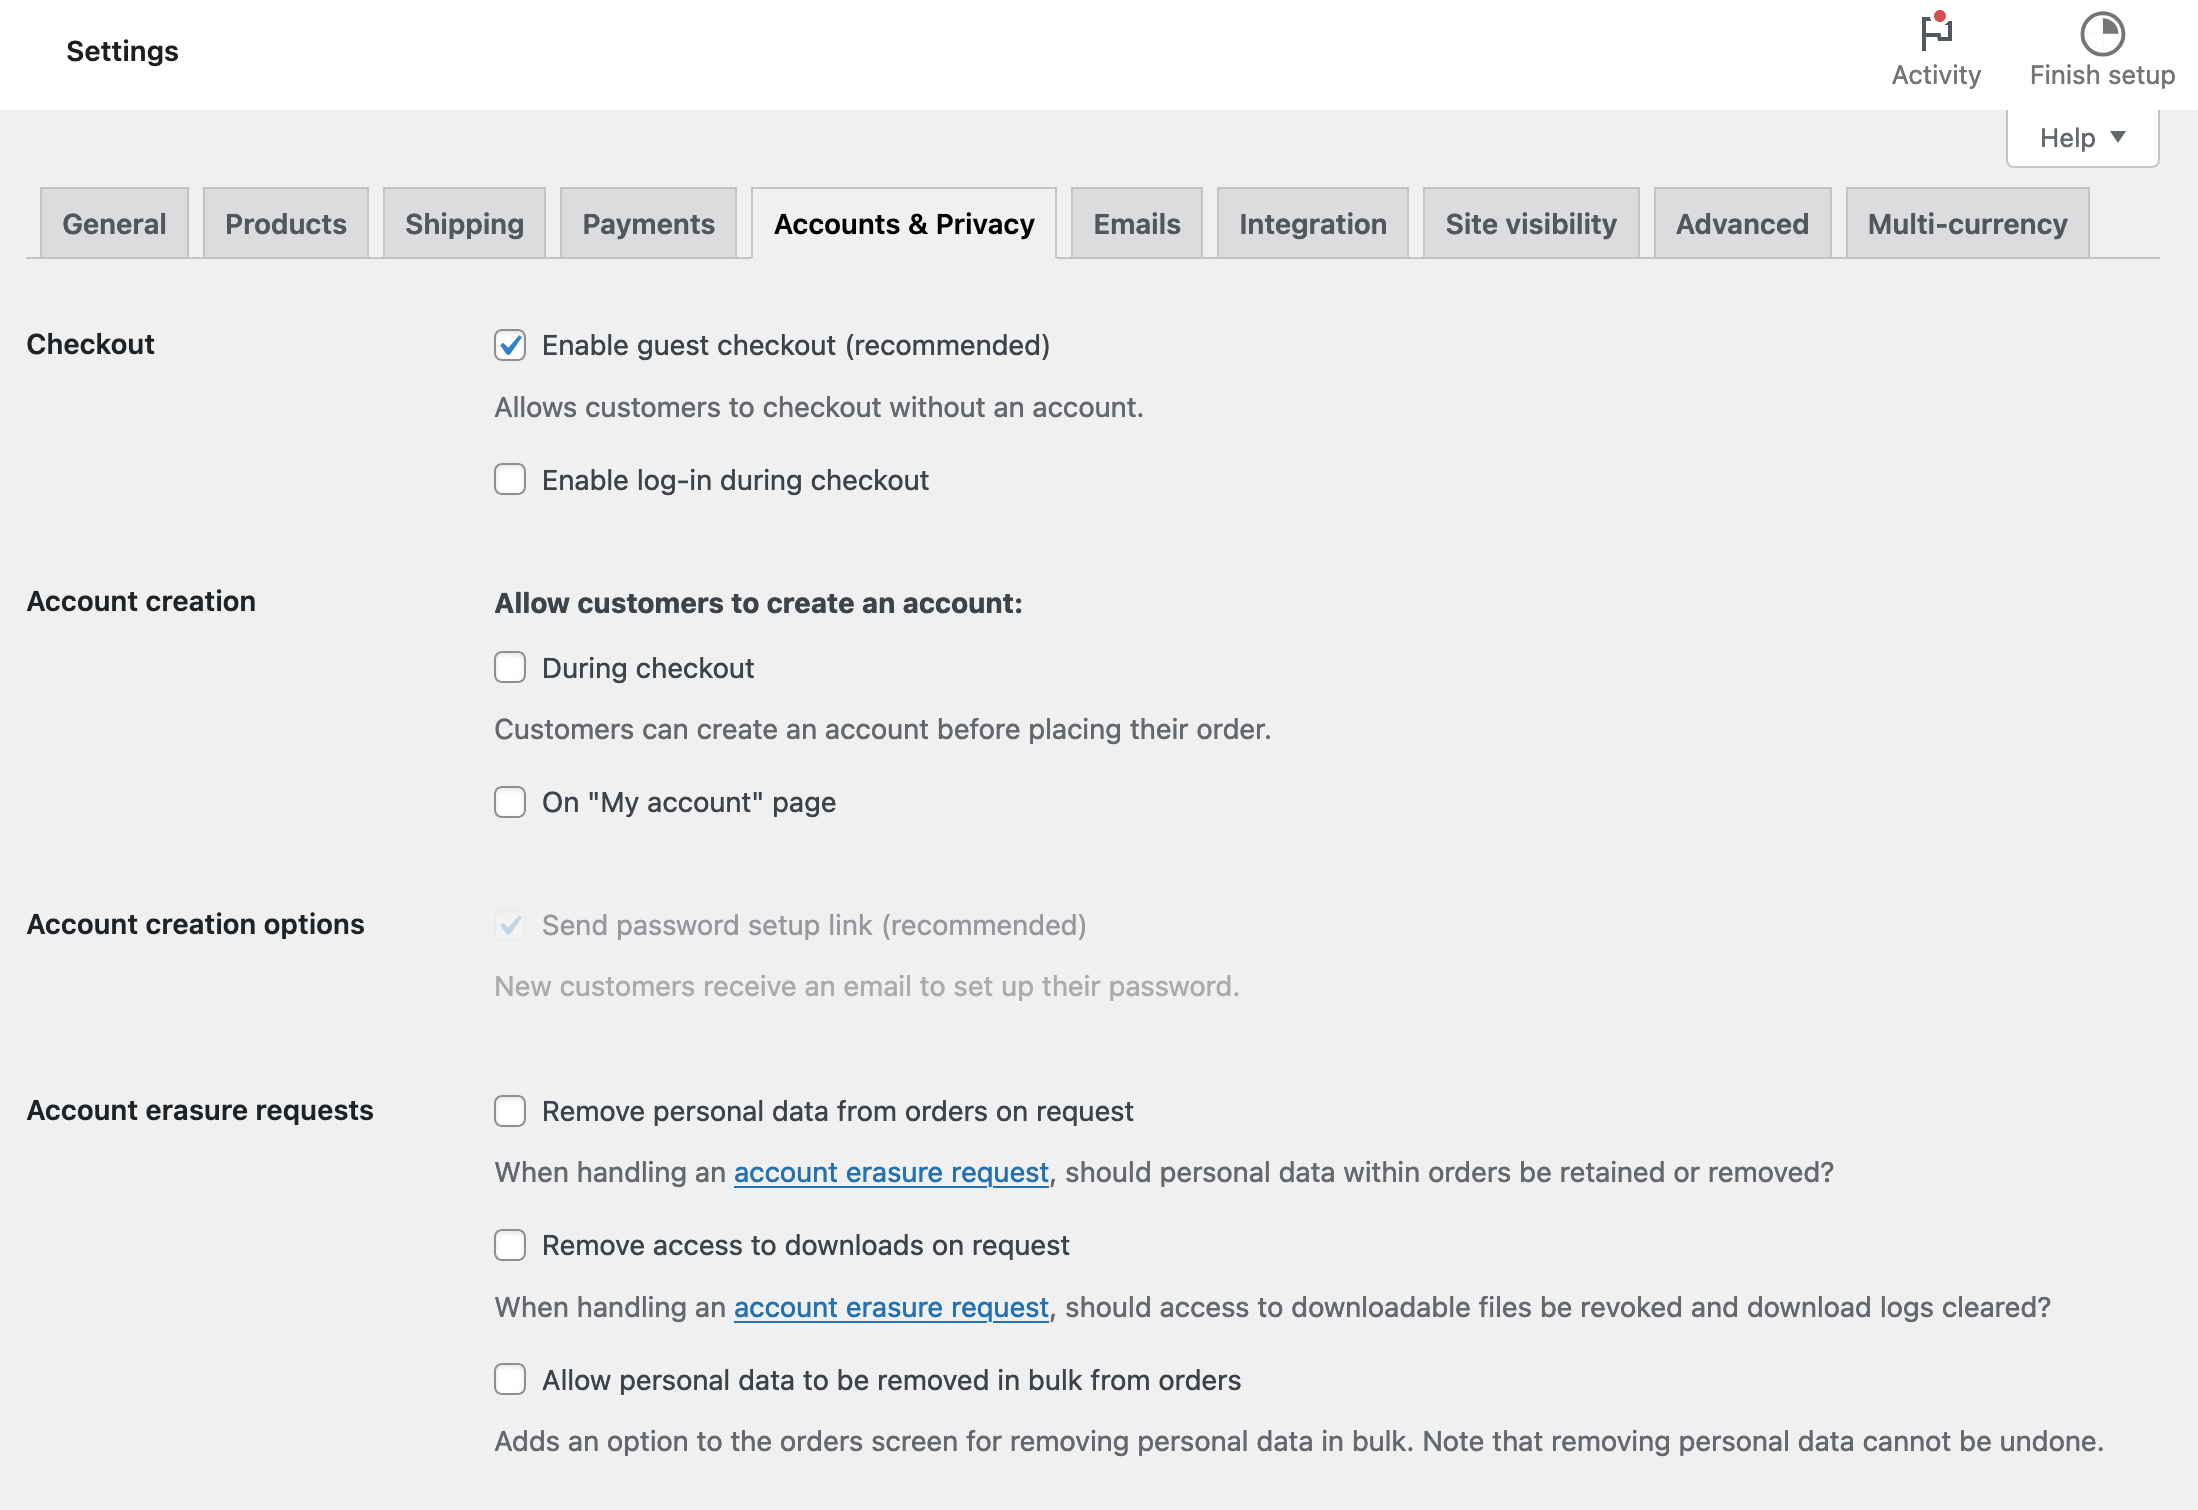
The Account & Privacy tab
This tab allows you to configure the creation of customer accounts but also — and especially — the privacy policy and retention of personal data, to be in compliance with the GDPR (General Data Protection Regulation).
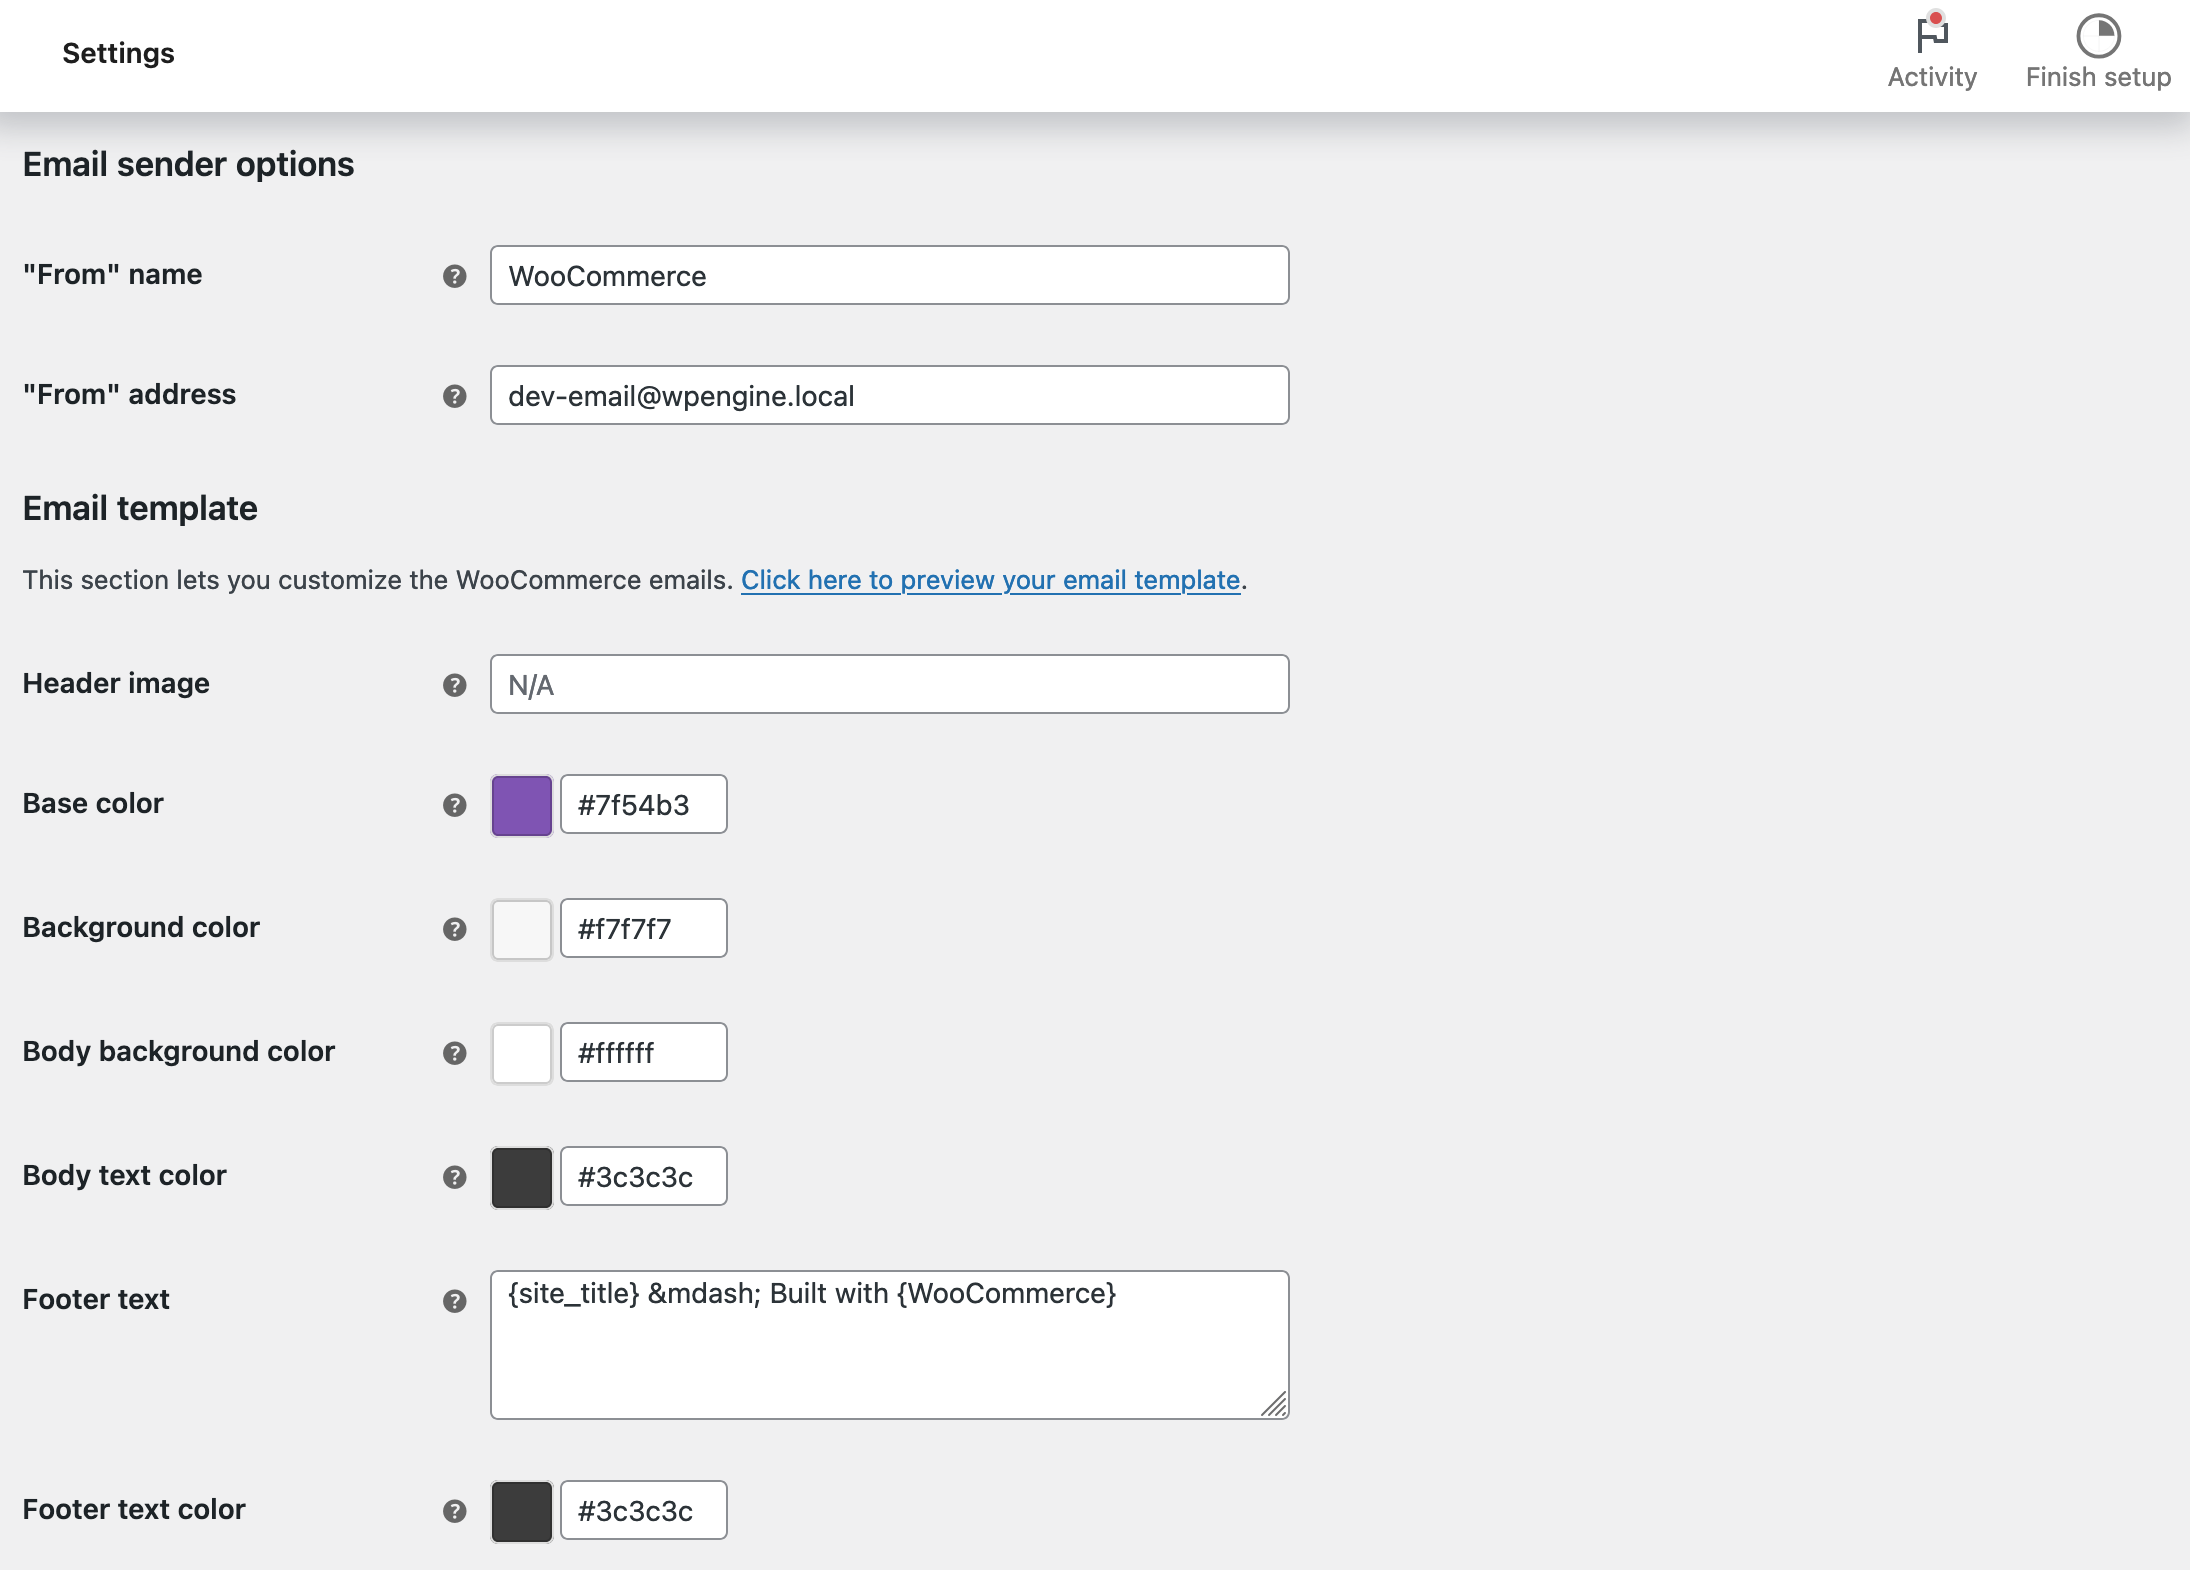
The Emails tab
Following an order, your customer and you will receive emails. It is possible to disable some of them and customize them. However, this is limited to the subject, header, footer, and colors.
You’ll have to go into the code to change their content, or use a dedicated extension like Kadence WooCommerce Email Designer or MailPoet, if you don’t want to get your hands dirty.
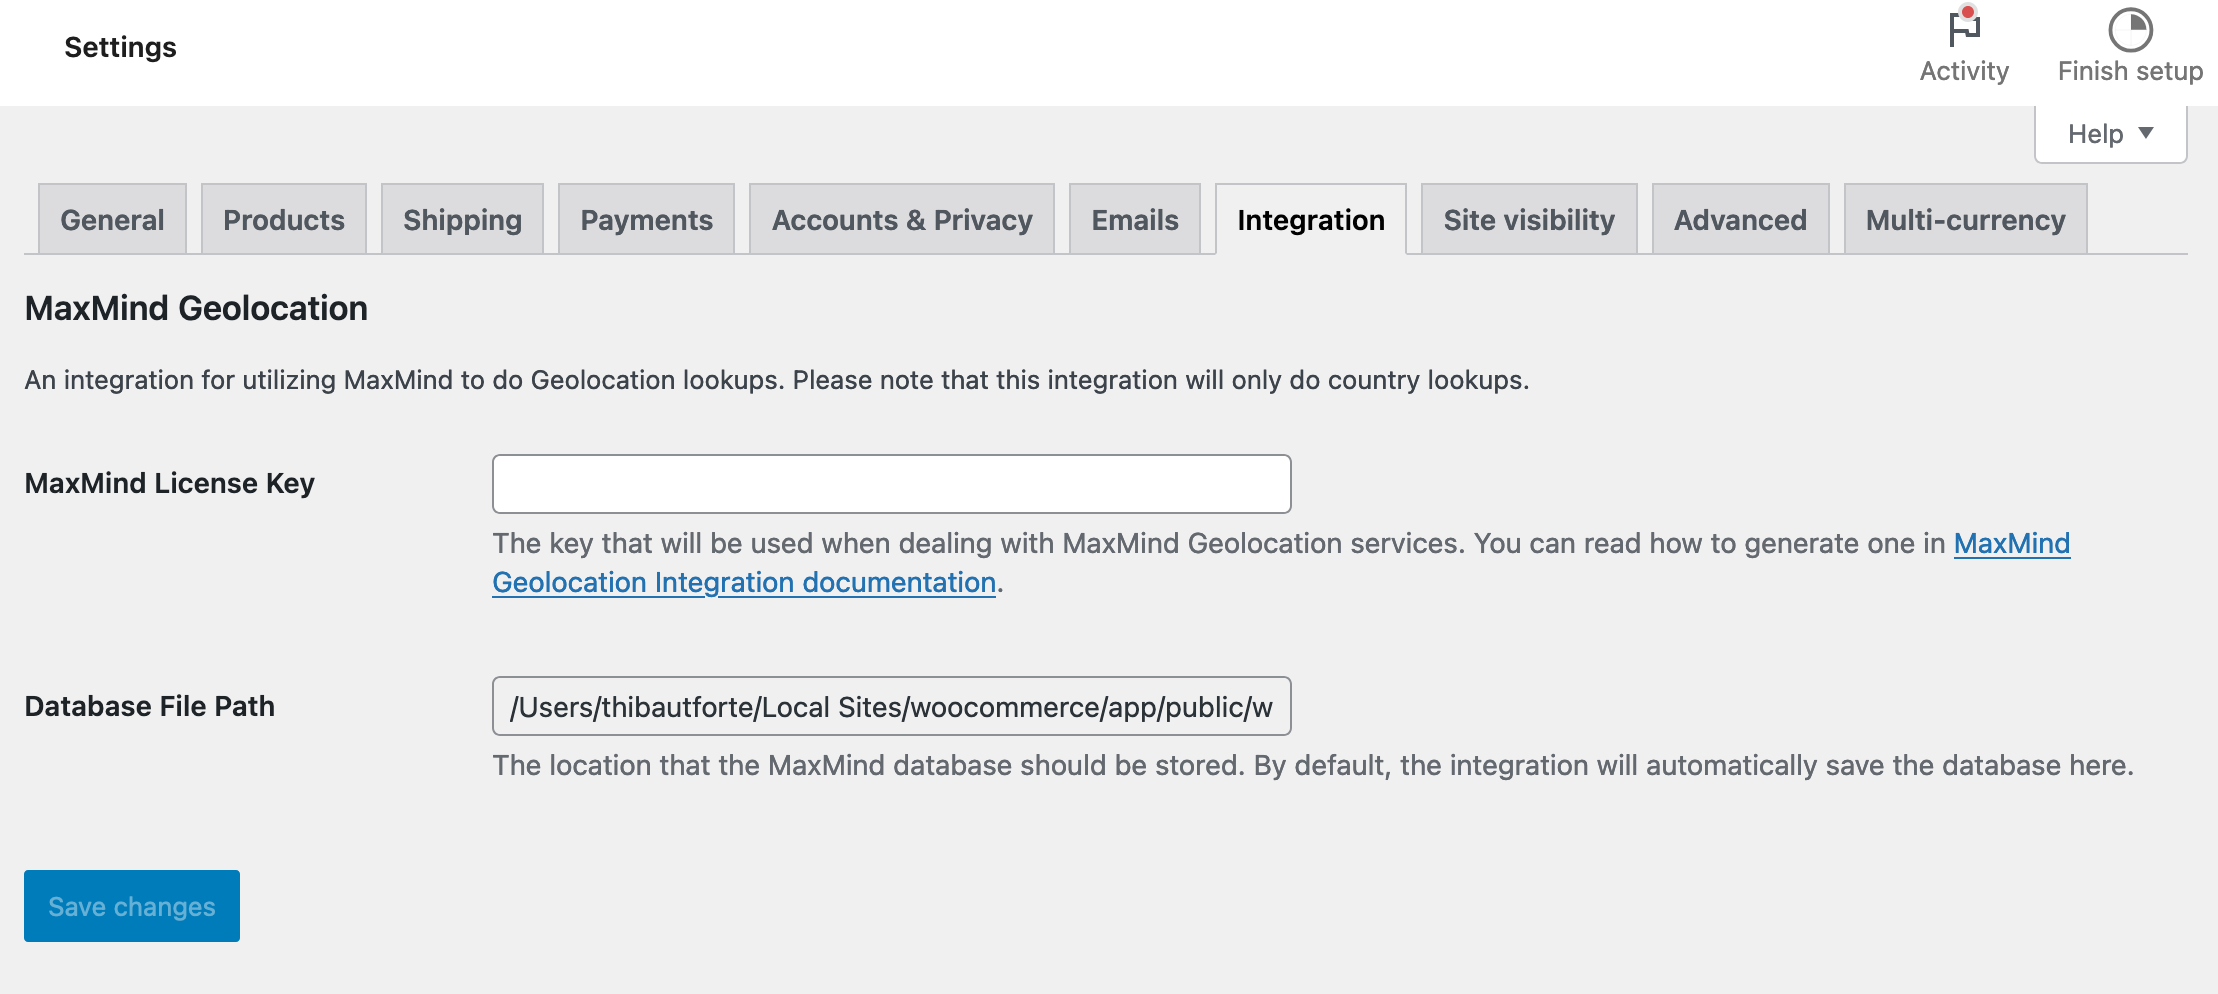
The Integration tab
The “Integration” tab allows you to use “MaxMind to do geolocation lookups”.
MaxMind is a service that automatically geolocates your customers. Thanks to this, your WooCommerce store is able to offer them VAT rates and shipping methods specific to their geographical location.
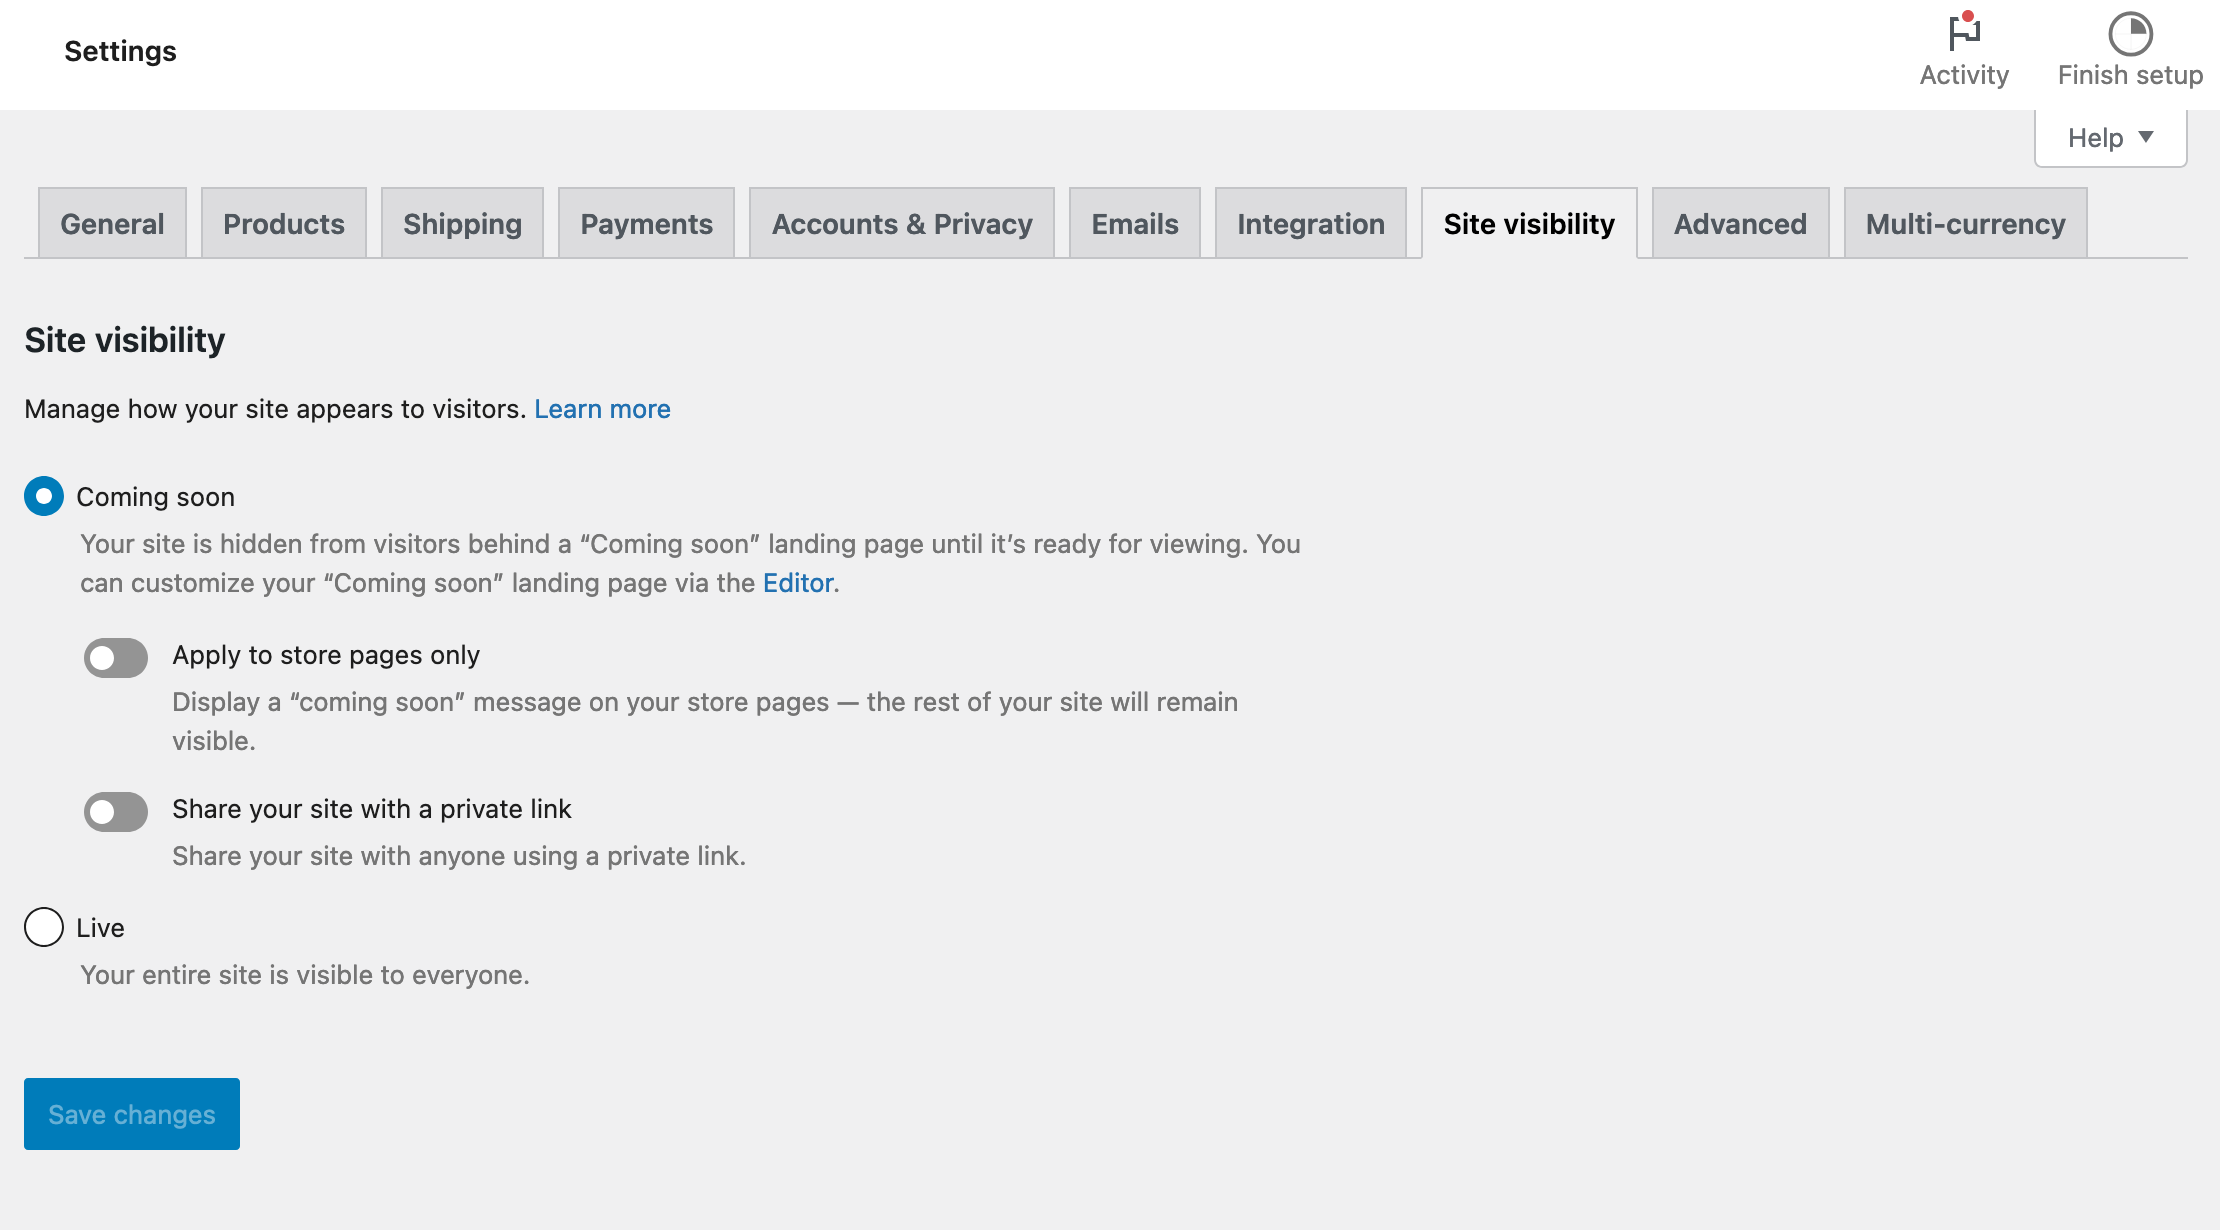
The Site visibility tab
WooCommerce’s Site Visibility tab lets you manage the way your site appears to your visitors. This new feature was introduced with the release of version 9.1 of the e-commerce plugin.
Two options are available, by toggling the button of your choice:
- Coming Soon: Activates a “Coming Soon” mode, with a page you can customize via the Site Editor. Note that you can apply this “Coming Soon” mode to your store pages only and/or share your site with a private link. This last option comes in handy if you’re used to designing sites for customers.
- Online. Your entire site can be seen by anyone. Remember to check this box when you’ve completed your settings!
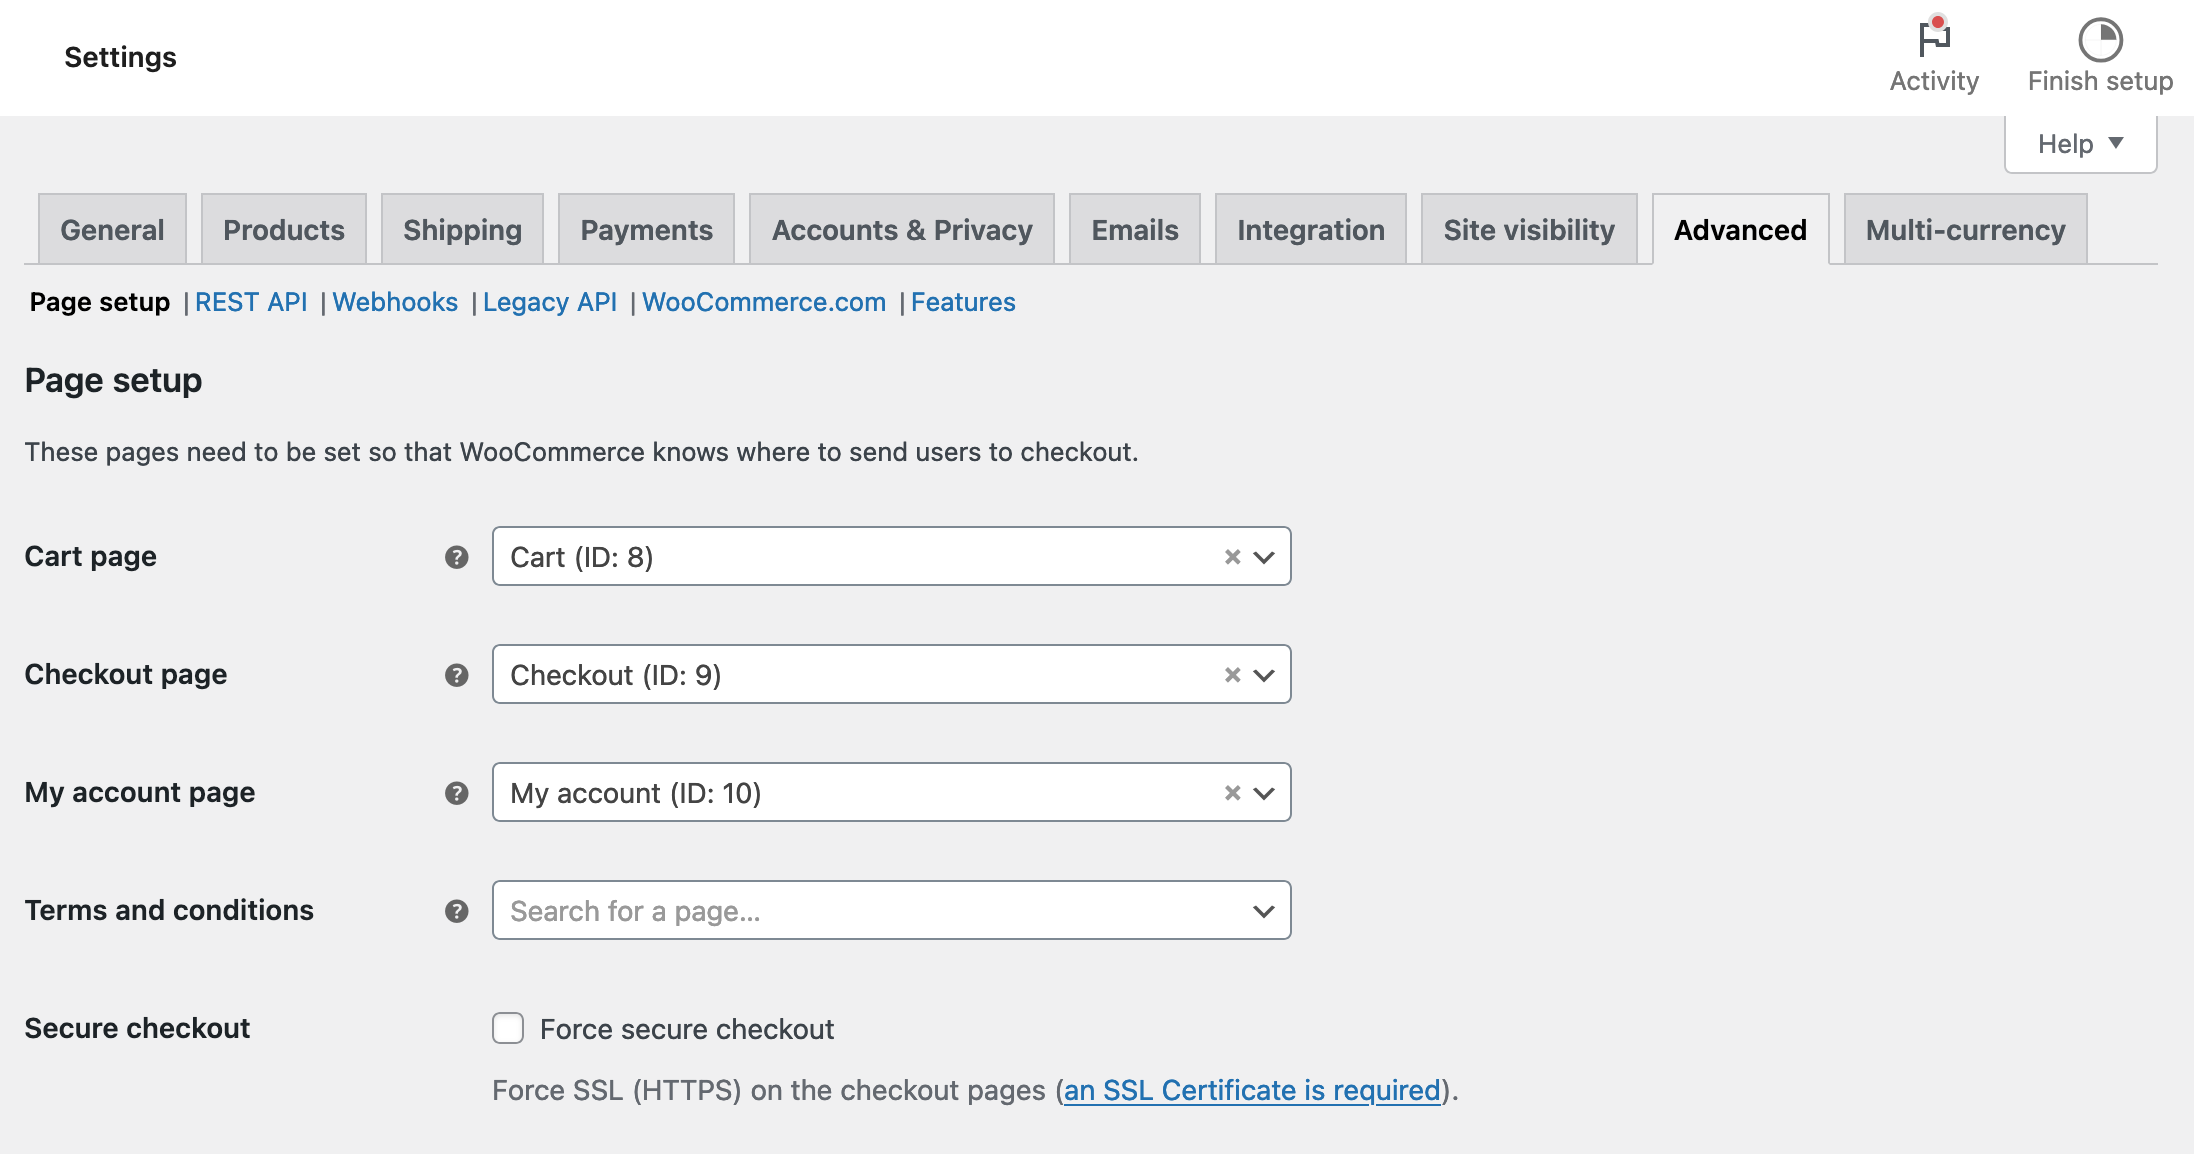
The Advanced tab
This last tab allows you to define the pages associated with the Cart, orders, user accounts, etc.
You can (and should) also secure the payment, provided you have an SSL certificate.
Finally, it is possible to activate some features useful for developers. Last thing: depending on your desired language, remember to translate the endings added to your page URLs, which are in English.
The Multi-Currency tab
Finally, this last tab is used to accept payments in multiple currencies. To take advantage of this feature, simply finish configuring WooPayments.
Now the WooCommerce menu settings have no secrets for you. For the sake of completeness, I’ll now show you what the other options of this menu have in store for you.

Other WooCommerce menu options
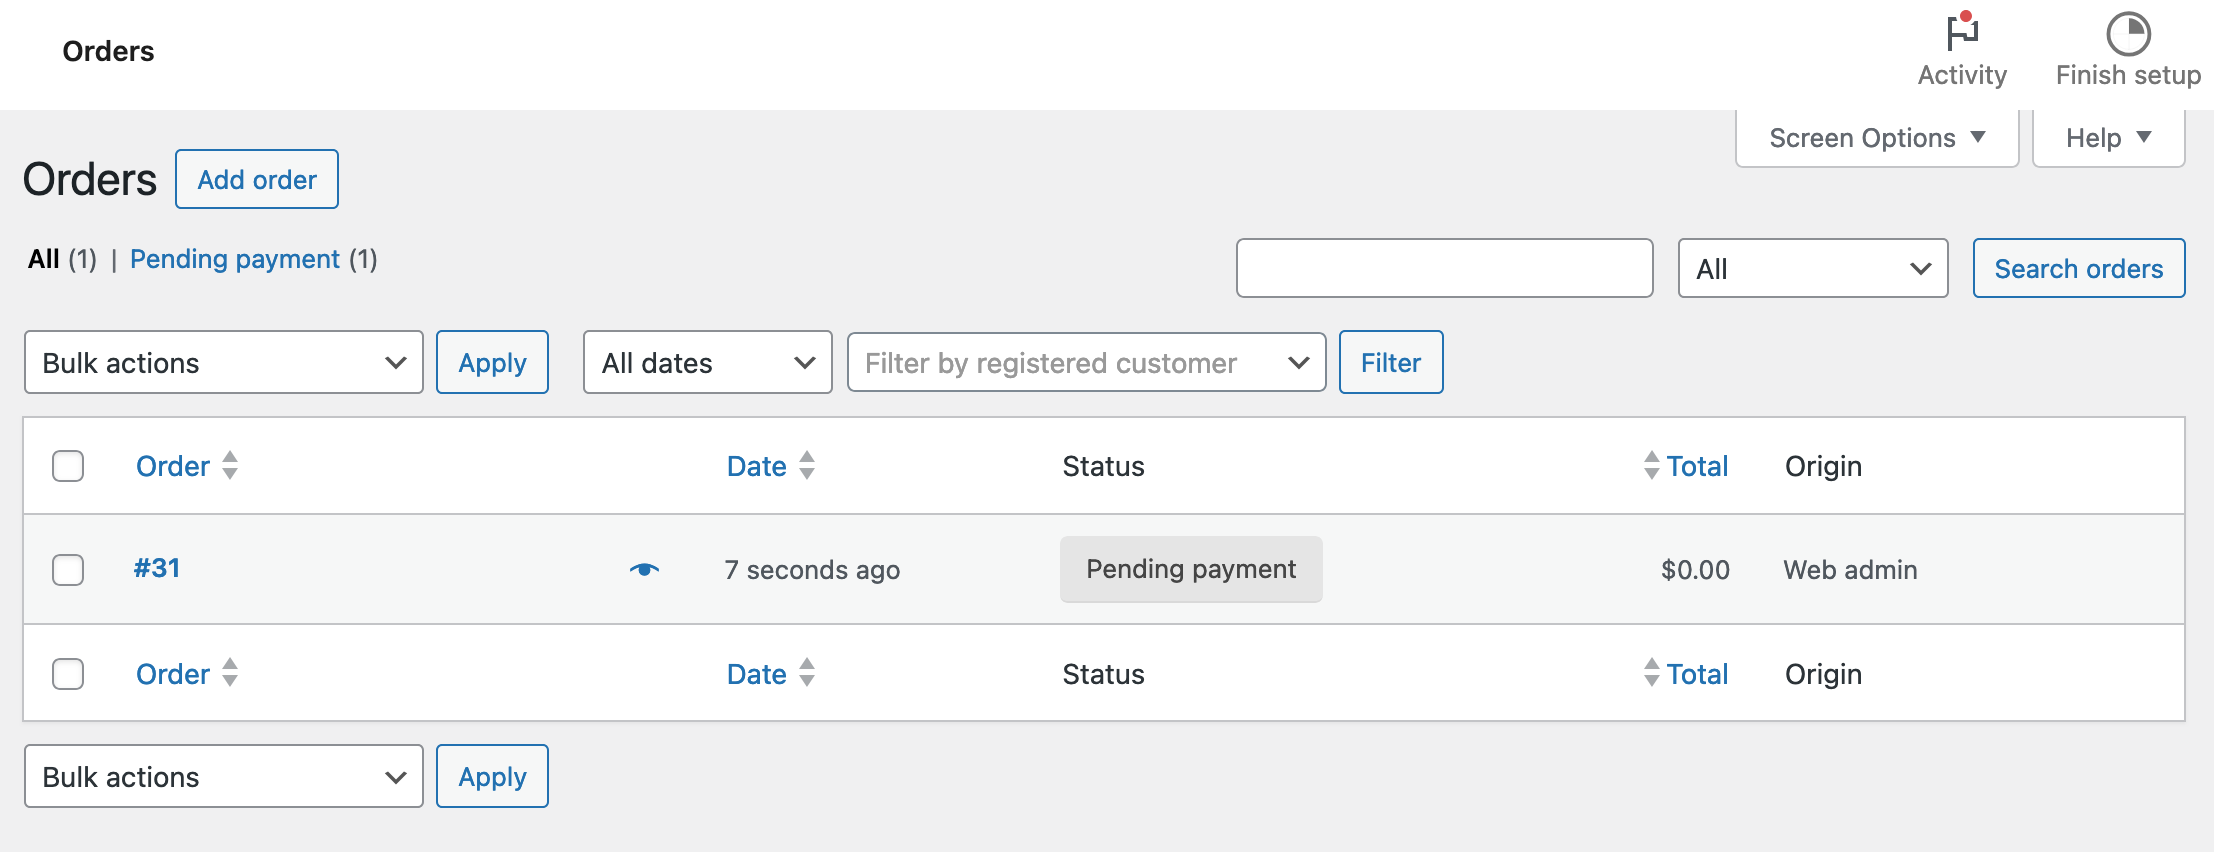
Orders
This page lists all orders placed on your store. You can also add an order manually (for example in the case of a purchase made offline).
You have for example access to its status (pending payment, in progress, canceled, refunded etc..), the date of order, or the amount of the product purchased.
Customers
The Customers submenu offers you detailed information about your customers:
- Name
- Username
- Orders placed
- Total spend on your store
- Location
You can sort this information by customer, or even filter it by certain criteria (name, email, number of orders, total spend, etc.).

Reports
With this submenu, you will be able to follow the evolution of your store, whether it is sales, customers, stocks, VAT, or the effectiveness of your coupon codes.
Though it is still accessible from the general WooCommerce menu, the plugin says that since the release of its version 4.0, these reports are replaced by the new Analytics menu, which is much more comprehensive.

Depending on when you’re going to read this, we can even assume that this Reports submenu might not exist anymore.
Status
If you’re going to be calling on WooCommerce support, you’ll want to give as much information as possible to the person who will be taking care of you.
To help them out, you’ll just have to click on “Get System Report,” then copy and paste the generated report to them, in order to give them all the information about your store.

Regarding the Status menu, you will see that it is divided into 5 tabs:
- System status: This tab gives access to information about your WordPress environment, server, your plugins, your theme, or if you use HTTPS or not.
- Tools: This tab provides you with some tools to reset or delete some data. Be careful what you do.
- Logs: Here you have access to the logs, which are used to list everything that happens in your store (orders, downloads, use of a coupon code, etc). If a problem occurs, studying the logs can help you discover the cause(s).
- WooCommerce Shipping & Tax: You can see if the tax-related options are working, while also having access to debugging features.
- Scheduled Actions: This last tab will be mostly dedicated to developers.
Extensions
Finally, the last part of this first WooCommerce menu: the extensions. The complementary extensions, also called addons, enrich the functionality of WooCommerce.
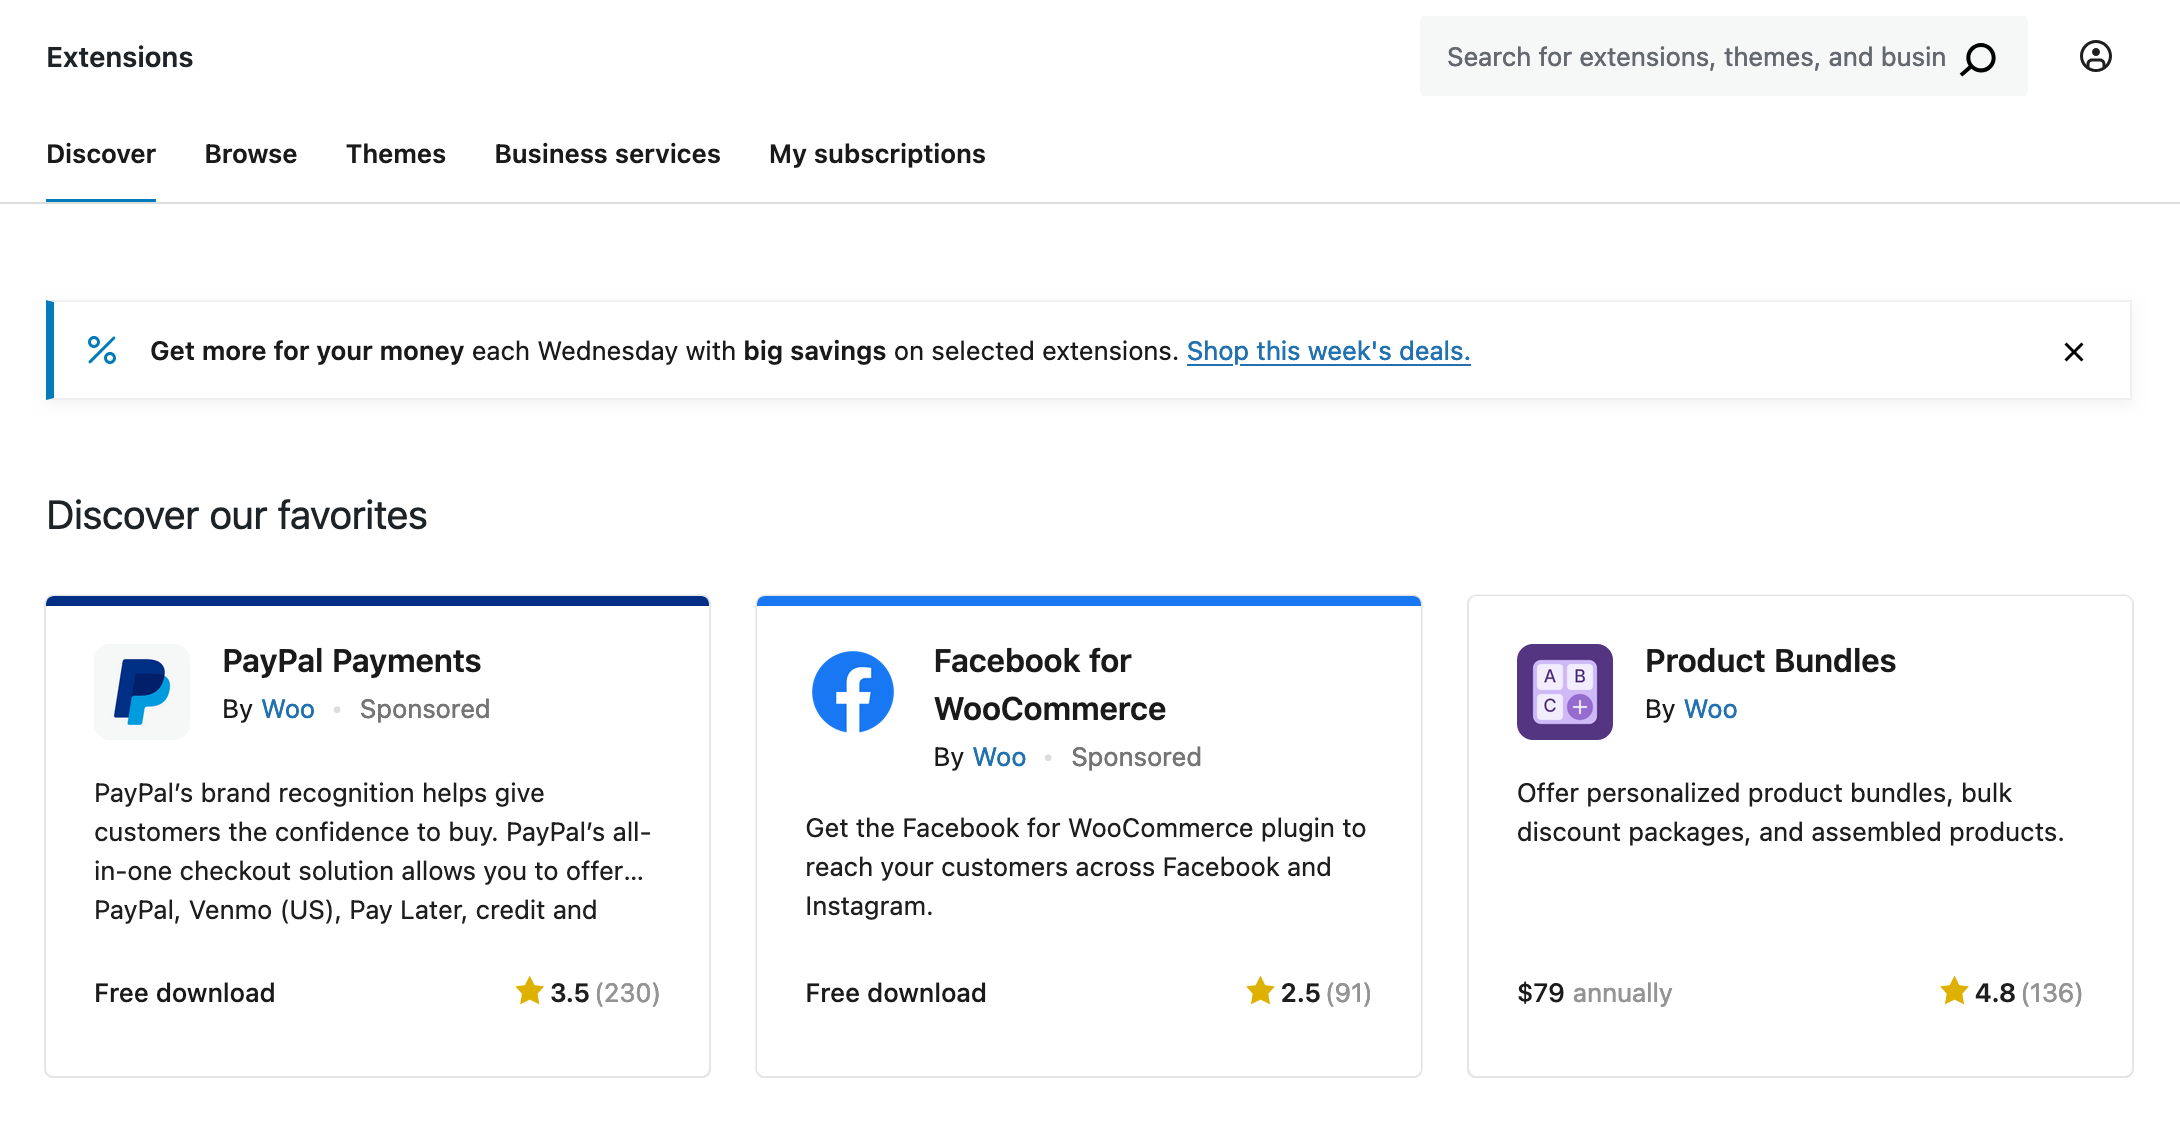
You can find them in this menu, and filter them by domain (Marketing, customer service, etc.) in the tab “Browse.”
WooCommerce also offers a selection of 60 themes, as well as commercial services.
Depending on the project you are setting up, some addons will be of great help. You will also find a selection of them later in this article.
We are now done with this first menu. As you can see, it is very well supplied.
Your store is now set up. Now you probably want to add your products or services, right? Well, that’s what the next part is about.
How to add products on WooCommerce
Products Menu presentation
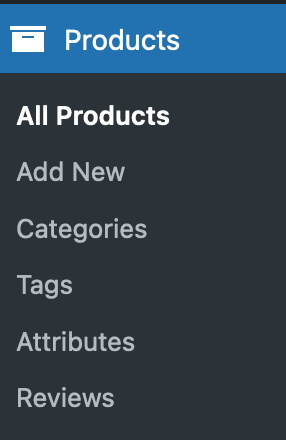
The Products menu has 6 submenus:
- All Products: You will find on this page the list of all the created products.
- Add New: Clicking on this submenu will open the product creation page. We will detail this in a few moments.
- Categories: It is possible to classify products into various categories (e.g., men, women, or kids for clothing).
- Tags: As with posts, it is possible to assign tags.
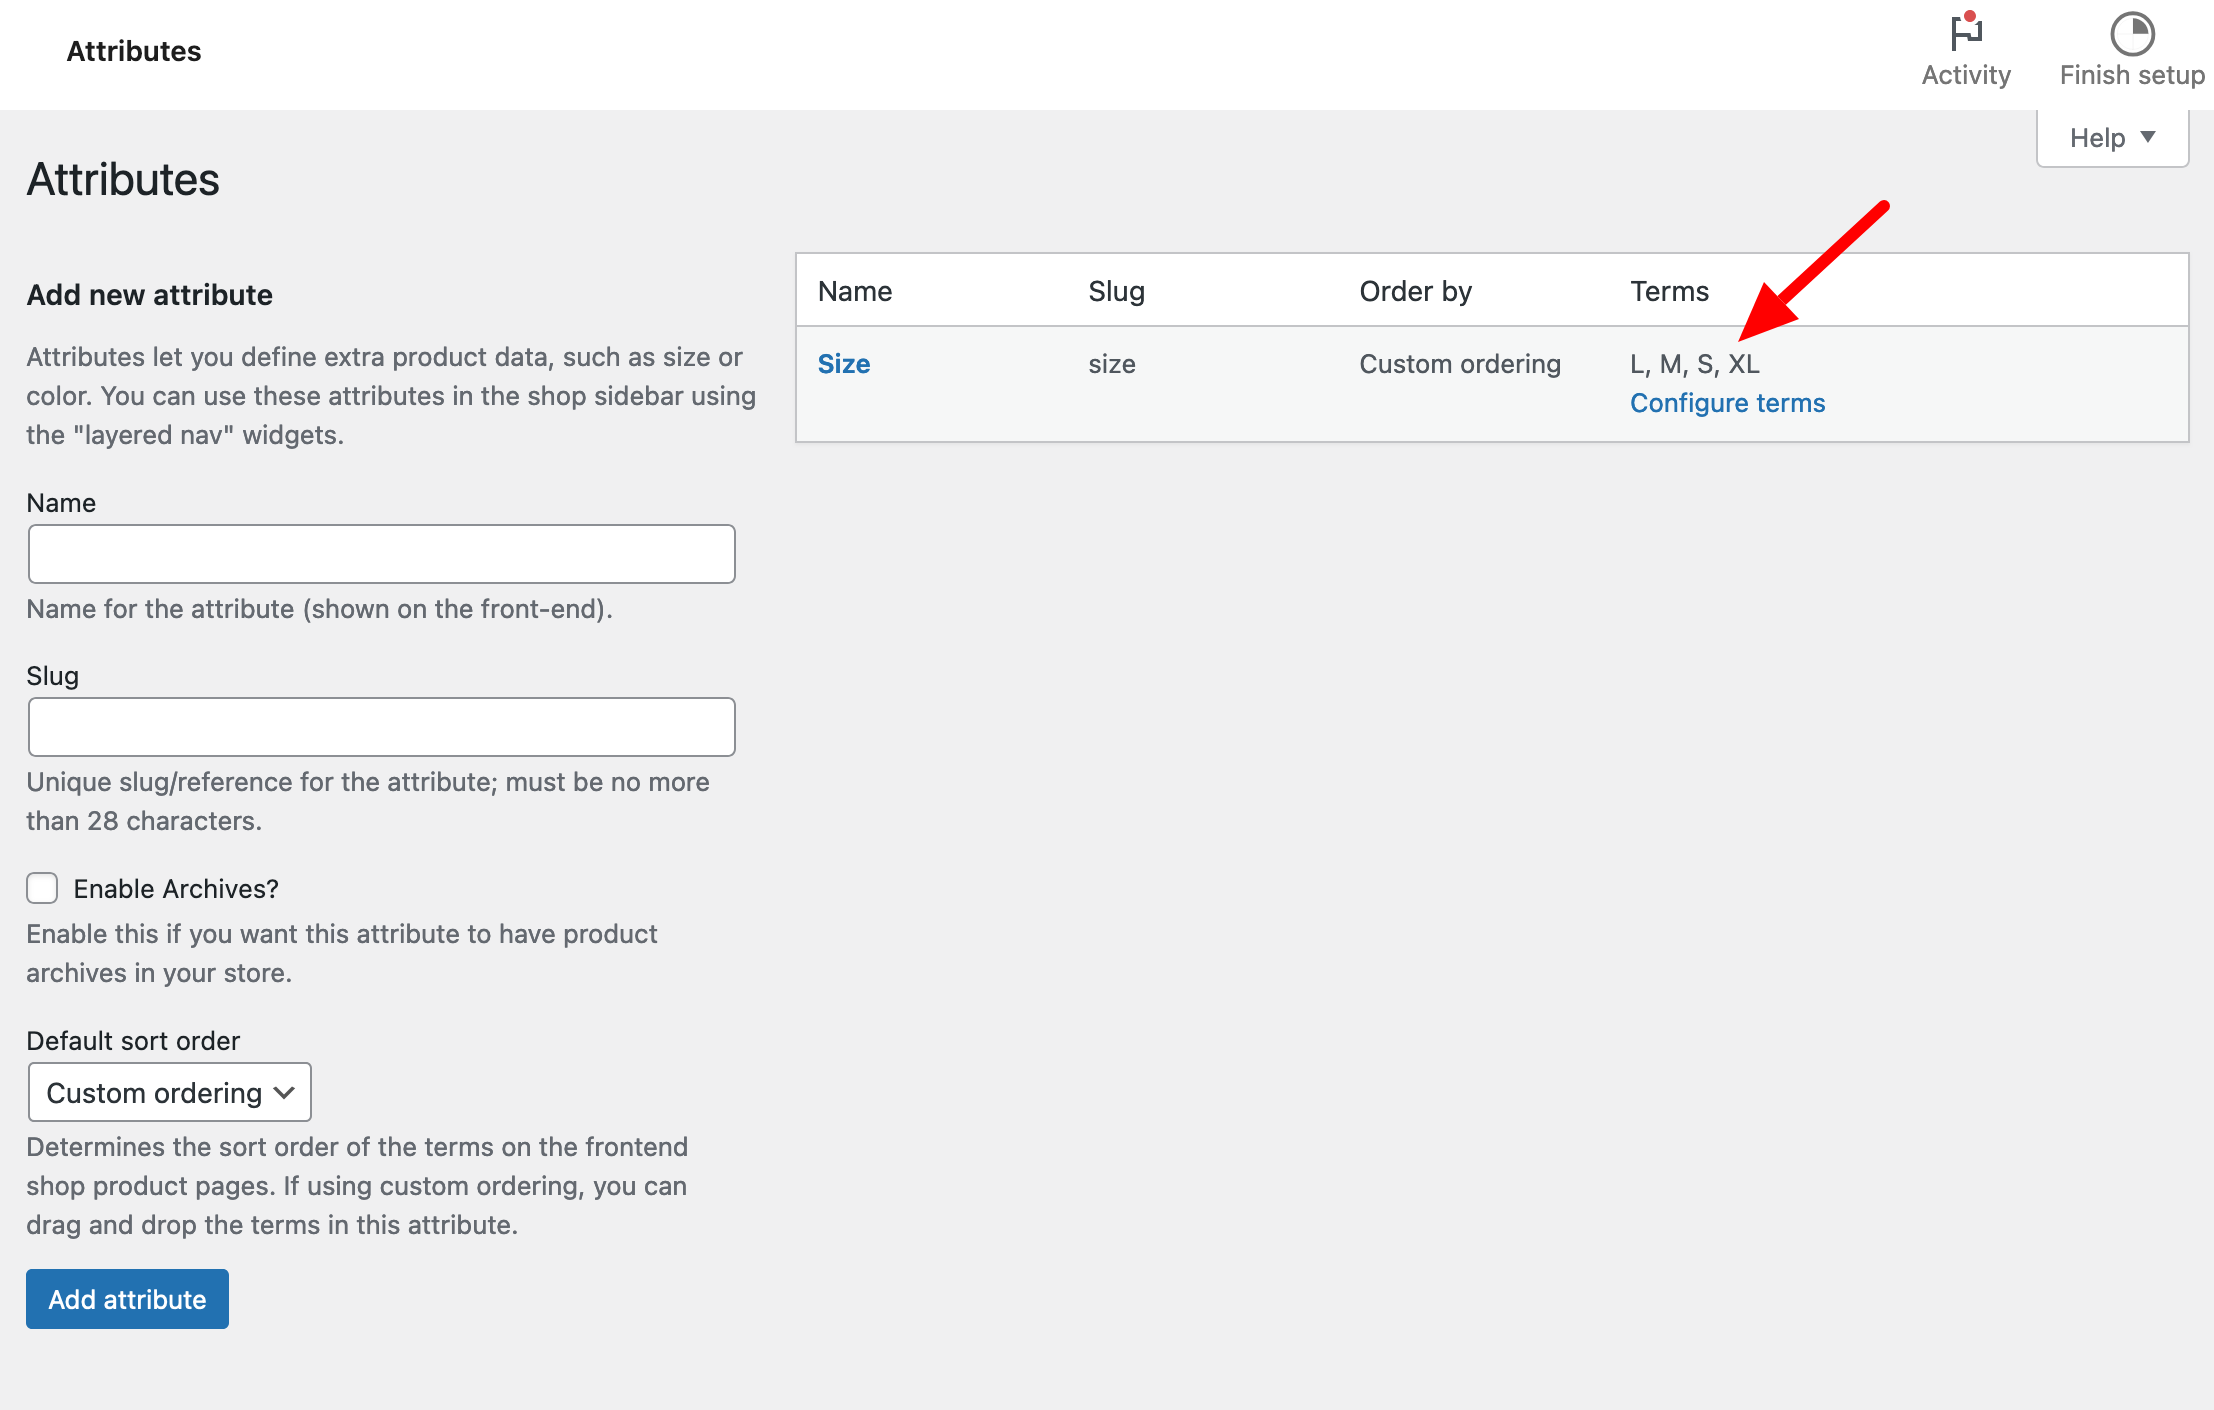
- Attributes: Attributes are product-related characteristics. For example, you can have a Size attribute if you sell clothes. Once the attribute is created, click on the “Configure Terms” link to enter all possible values (S, M, L, XL, XXL, etc.).
- Reviews: List of the reviews left for your products.
Let’s now focus on adding products.
Adding a product
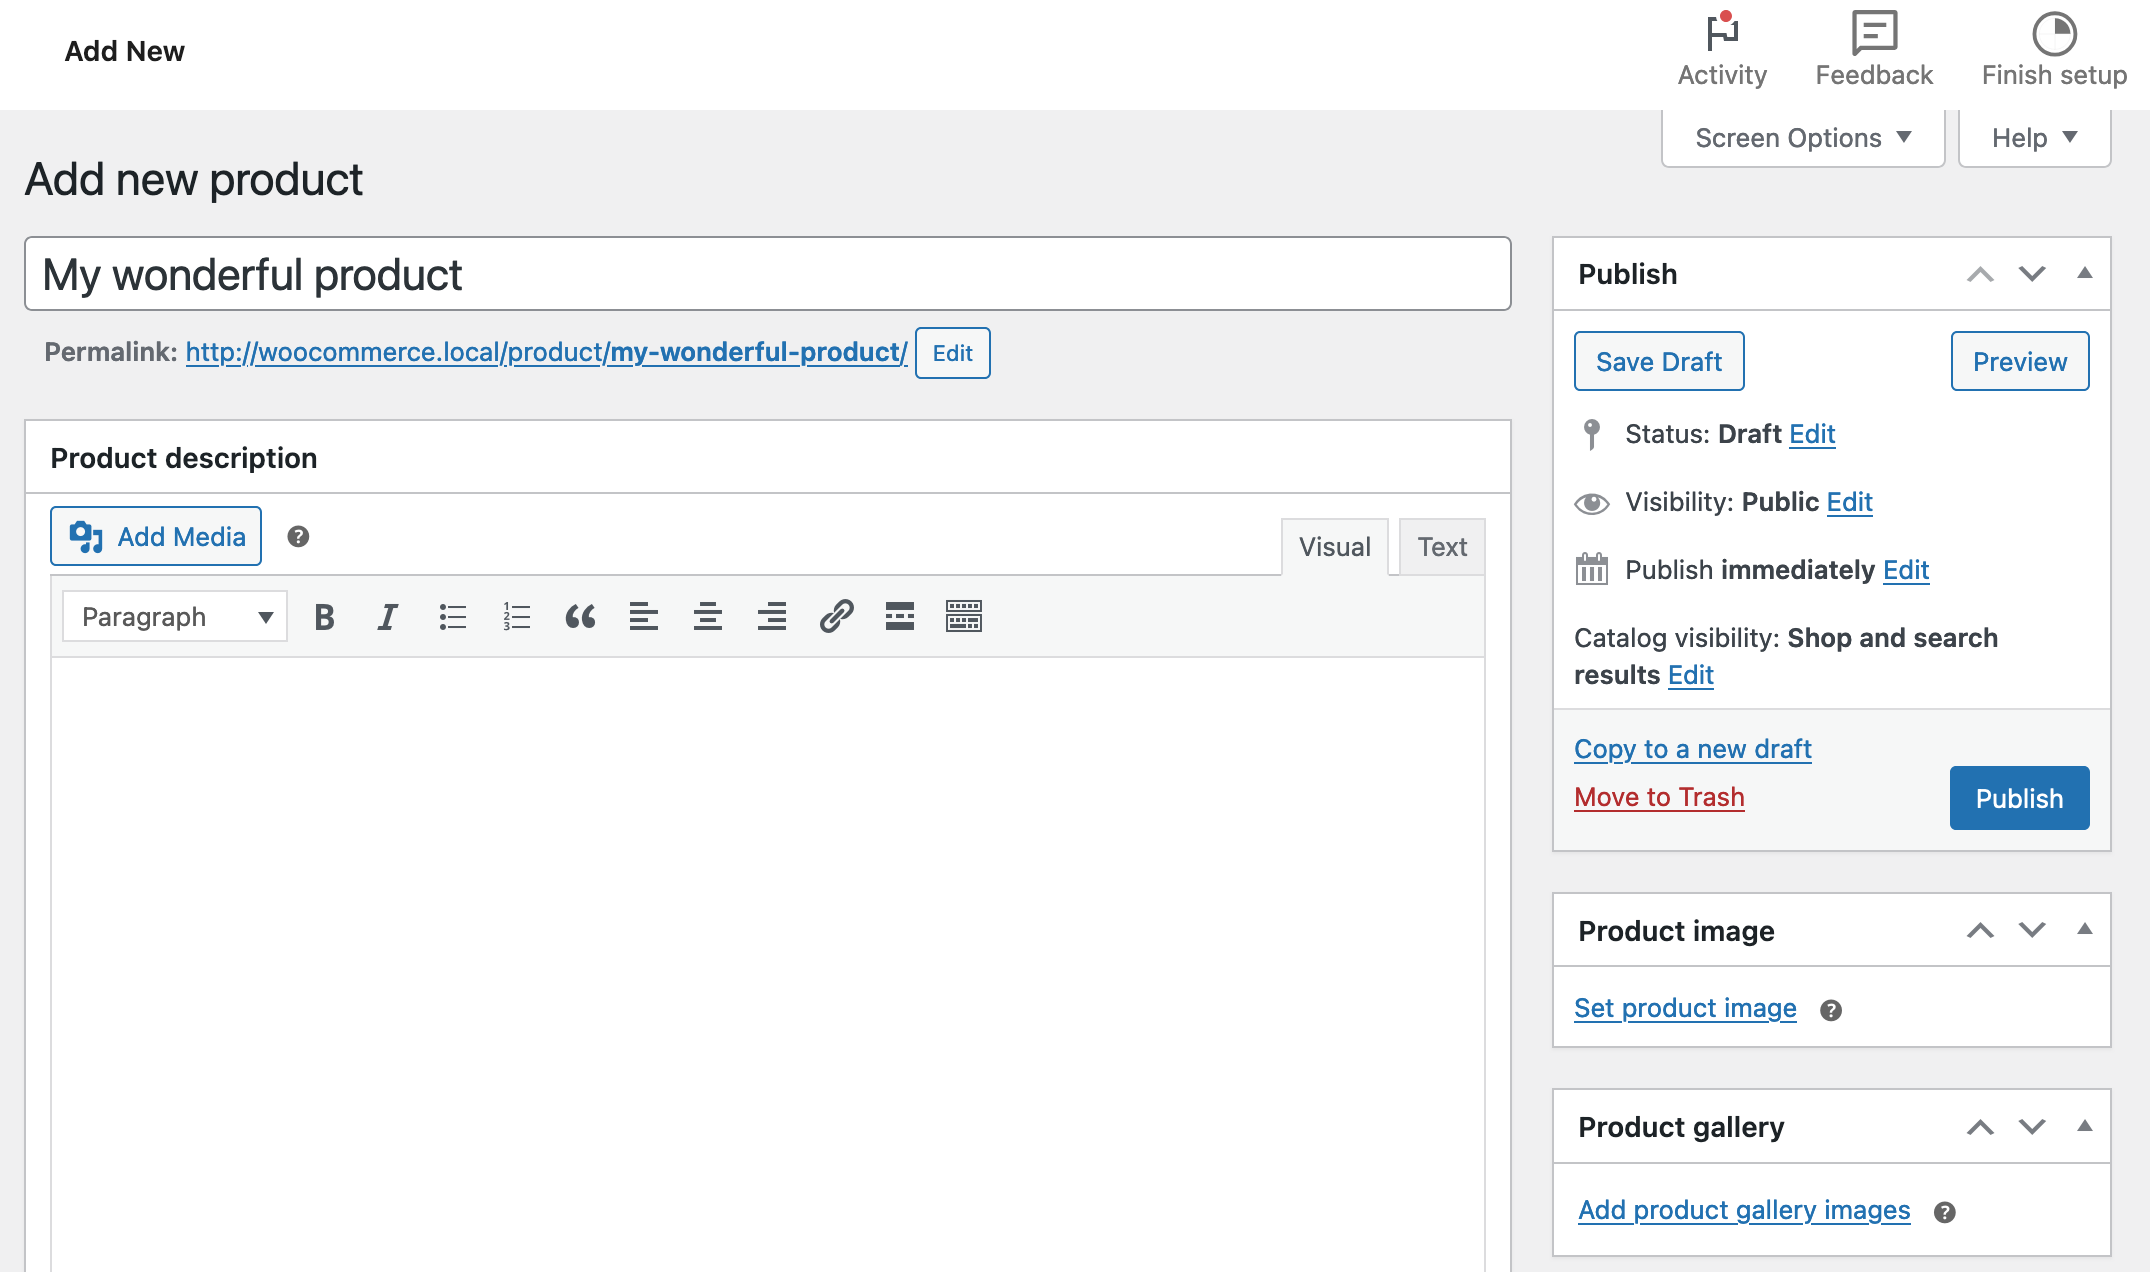
When you get to the “Add new product” page (Products > Add New), you’ll realize that it is quite similar to the one used to create a post or a page (at least, with the presence of the old TinyMCE editor).
It is possible to add:
- A product name
- A description
- A short description
- A category
- Tags
- A featured image
- An image gallery
But above all, a “Product Data” meta box is available under the visual editor to set up its features.
6 tabs are available. The first one, “General,” enables us to define the kind of product to be created:
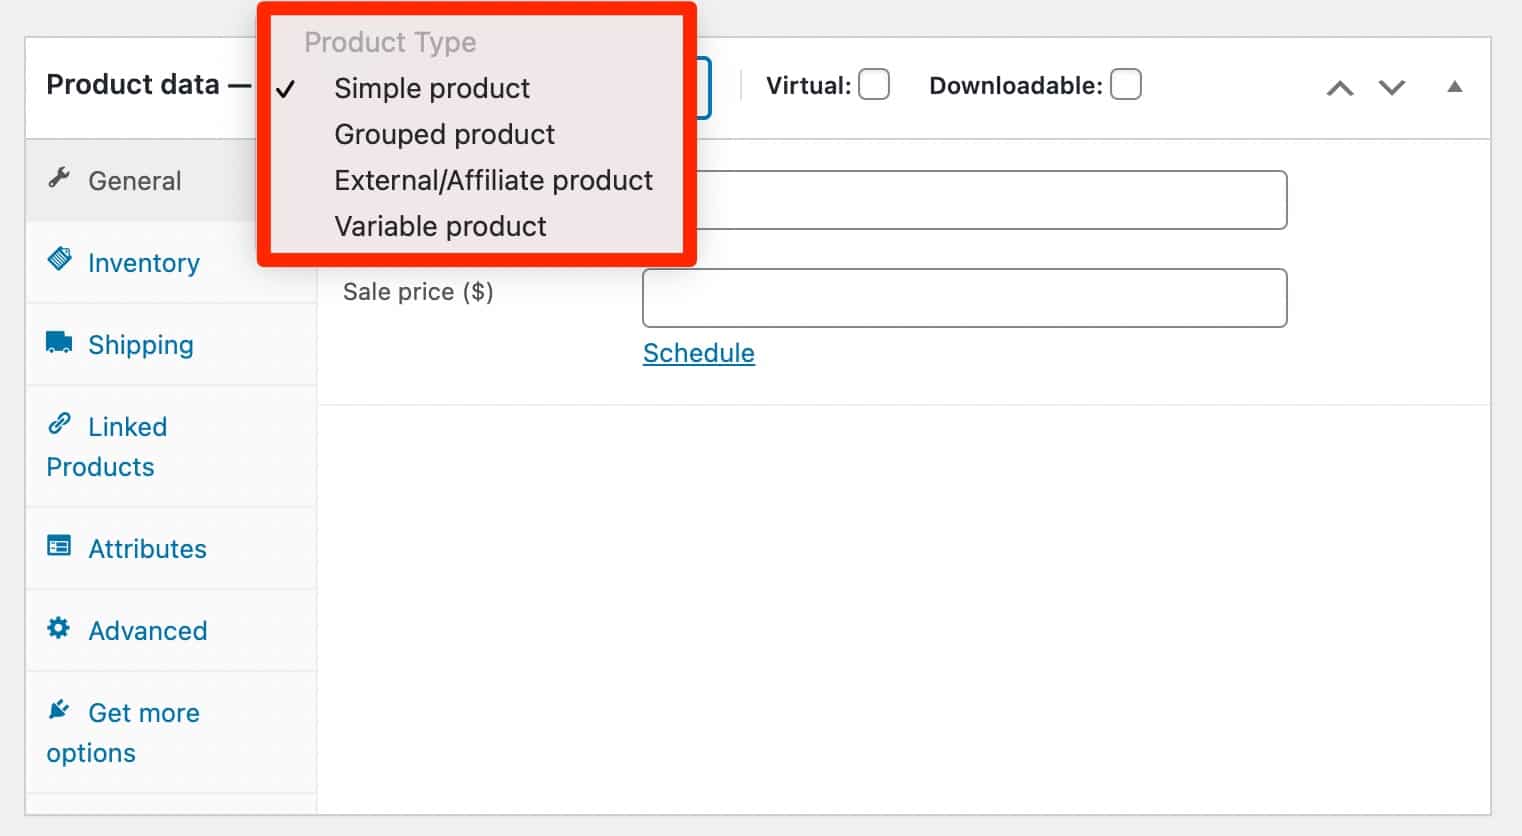
By default, there are 4 types:
- Simple product: The default product, the one you will use in most cases. Two options can be assigned depending on their nature:
- Simple Virtual Product: Ideal if you sell a service (delivery becomes unnecessary).
- Simple Downloadable Product: One or more files will be sent to the customer following the purchase.
- Grouped product: A group of products that can be purchased separately (for example, a computer could be grouped with a basic configuration, a more advanced one, and another with the best configuration).
- External/Affiliate product: It is possible to promote products from other shops (and possibly earn a commission on them).
- Variable product: A product that has certain characteristics (color, size etc.). For example, a t-shirt can be available in 3 colors and 5 sizes for men, women, and kids.
Then enter the price of your product, and a possible promotional price. In the following tabs, you will be able to specify :
- A unique identifier, the SKU (Stock Keeping Unit), as well as the available stock (Inventory tab).
- Weight, dimensions, and shipping class (Shipping tab).
- Linked products (upmarket, cross-selling) to make additional sales (Linked Products tab).
- The product attributes (Attributes tab). You have normally defined them in Products > Attributes.
- A note to send to the buyer and if you want to activate customer reviews (Advanced tab).
Depending on the type of product you choose, some fields will appear and disappear. For example, the delivery options are useless for a downloadable product.
That’s it, we’re done reviewing the WooCommerce options.
Next step: make your store functional. Let’s look at this in the next part.
Starting up your online store

You have seen it so far, creating an ecommerce website (whether with WordPress or not) requires a lot of work.
For a website to qualify as a shop, it must have a certain number of pages.
Let’s study them in detail.
The pages created by WooCommerce
Yes, WooCommerce gives you a boost by automatically adding pages when it is activated. We can name:
- The Shop page where visitors will browse your products.
- The Cart page where customers will see the products they want to buy.
- The Checkout page where they will pay for their purchases.
- The My account page where they will see their orders and manage their shipping and billing addresses.
- The Refunds and Returns Policy page, which speaks for itself.
If you are curious, you will find that these pages each contain a shortcode (E.g.: [woocommerce_cart] for the Cart page).
These shortcodes will be interpreted and transformed by WooCommerce to display the content of the page.
However, there is a page that is not automatically created, yet it is very important.
The Terms & Conditions page
The Terms & Conditions are used to define the relationship between you (the seller) and the buyers. In particular, they contain a description of the products sold, the accepted means of payment, the conditions of reimbursement, etc.
In short, everything you need to ensure so that nothing is left in the dark.
Indeed, they must correspond to your activity (and copying and pasting from another site exposes you to lawsuits if you get caught).
To do this properly, we advise you to consult a legal specialist.
The Privacy Policy page
The famous GDPR (General Data Protection Regulation) means it is now mandatory to explain what you are doing with your user data.
And that’s where the Privacy Policy page comes in.
These elements should appear in a page embedded in your footer, for example.
You can create your Privacy Policy page by going to the Settings > Privacy menu in your administration interface.
Pre-written paragraphs, optimized for the GDPR, will be proposed: it is up to you to select those that concern your site.
Moreover, on this sensitive issue, once again do not hesitate to contact a legal specialist, who will be able to advise you according to your personal situation.

To make sure you have an GDPR-compliant WooCommerce store, I invite you to check out our article on the subject. It gives you plenty of advice for your GTCs, your order page, your forms, or even your customer reviews.
The Thank you page
By default, WooCommerce does not allow you to modify this page. A default message will be displayed for all orders.

I think this is a shame because there is no better place to start building a relationship with your customers than on the thank you page.
Once the order is done, you can:
- Suggest they follow you on social networks.
- Ask them to subscribe to your newsletter.
- Put complementary products in front of them to promote additional sales, etc.
To achieve this, you can use the following free plugin NextMove Lite – Thank You Page for WooCommerce.
In premium, you can turn to an official WooCommerce extension: Custom Thank You Pages ($49).
It will allow you to set up one thank you page per product.
Let’s now turn to one key point, being…
Payment methods
If you do not install a payment method on your shop, you may wait a long time before making your first sales!
By default, several payment methods are available:
- WooPayments
- Direct bank transfer
- Check payments
- Cash on delivery
To secure payments, set up an SSL certificate to enable HTTPS on the payment page, at least. The procedure is different depending on the web host but it’s very easy with SiteGround, for example. Beyond the payment, you will not have a good reputation if your site is hacked and your customer file is stolen.
WooCommerce Payments menu
In addition to the “Payments” tab in the WooCommerce > Settings menu, you can also access the payment method configuration via the general “Payments” menu, located in your administration sidebar.
From here, you can first install and activate the WooPayments plugin. This is a payment solution integrated into WooCommerce.
It accepts credit and debit cards (Visa, Mastercard, American Express etc.), but also digital wallets such as Apple Pay and Google Pay (among others).
It supports payments in over 135 currencies, with no further plugins required.
Installation and use of this powerful tool is free of charge. However, as with most payment acceptance tools, fees apply depending on the payment method used by your customers:
From the “Payments” menu, you can also offer your buyers other payment methods:
- PayPal Payments
- Amazon Pay
Stripe
If WooPayments isn’t for you, WooCommerce is compatible with other payment solutions. For example, the official Woo extension directory offers 79 plugins for this purpose alone!
Among the most popular payment methods is the famous Stripe, which you can activate using the WooCommerce Stripe Payment Gateway plugin.
Stripe will allow your visitors to pay by credit card on your store.
This isn’t insignificant: 91% of all purchases in the United States are made by credit or debit card (whether physical or virtual). You must therefore accept this payment method.
On the technical side, Stripe will add a form on your payment page, then it will check the details. You will just need to create an account to activate this solution on WooCommerce.
Other payment gateways include PayPlug. Once you’ve signed up, you’ll need to install a plugin to integrate it with WooCommerce.
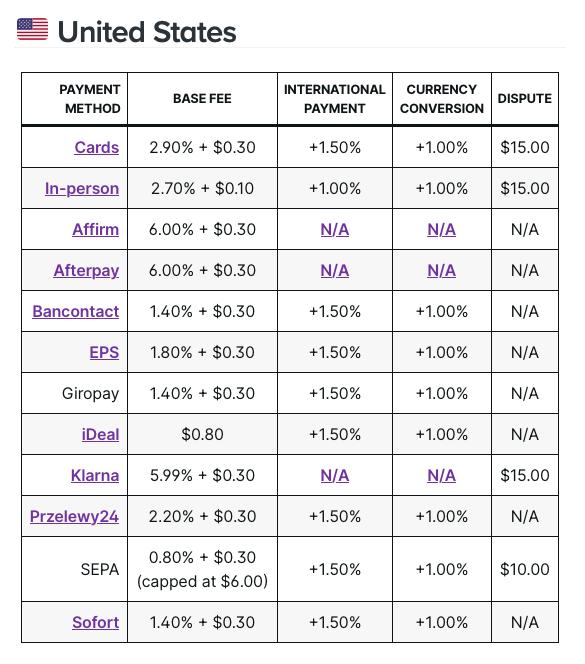
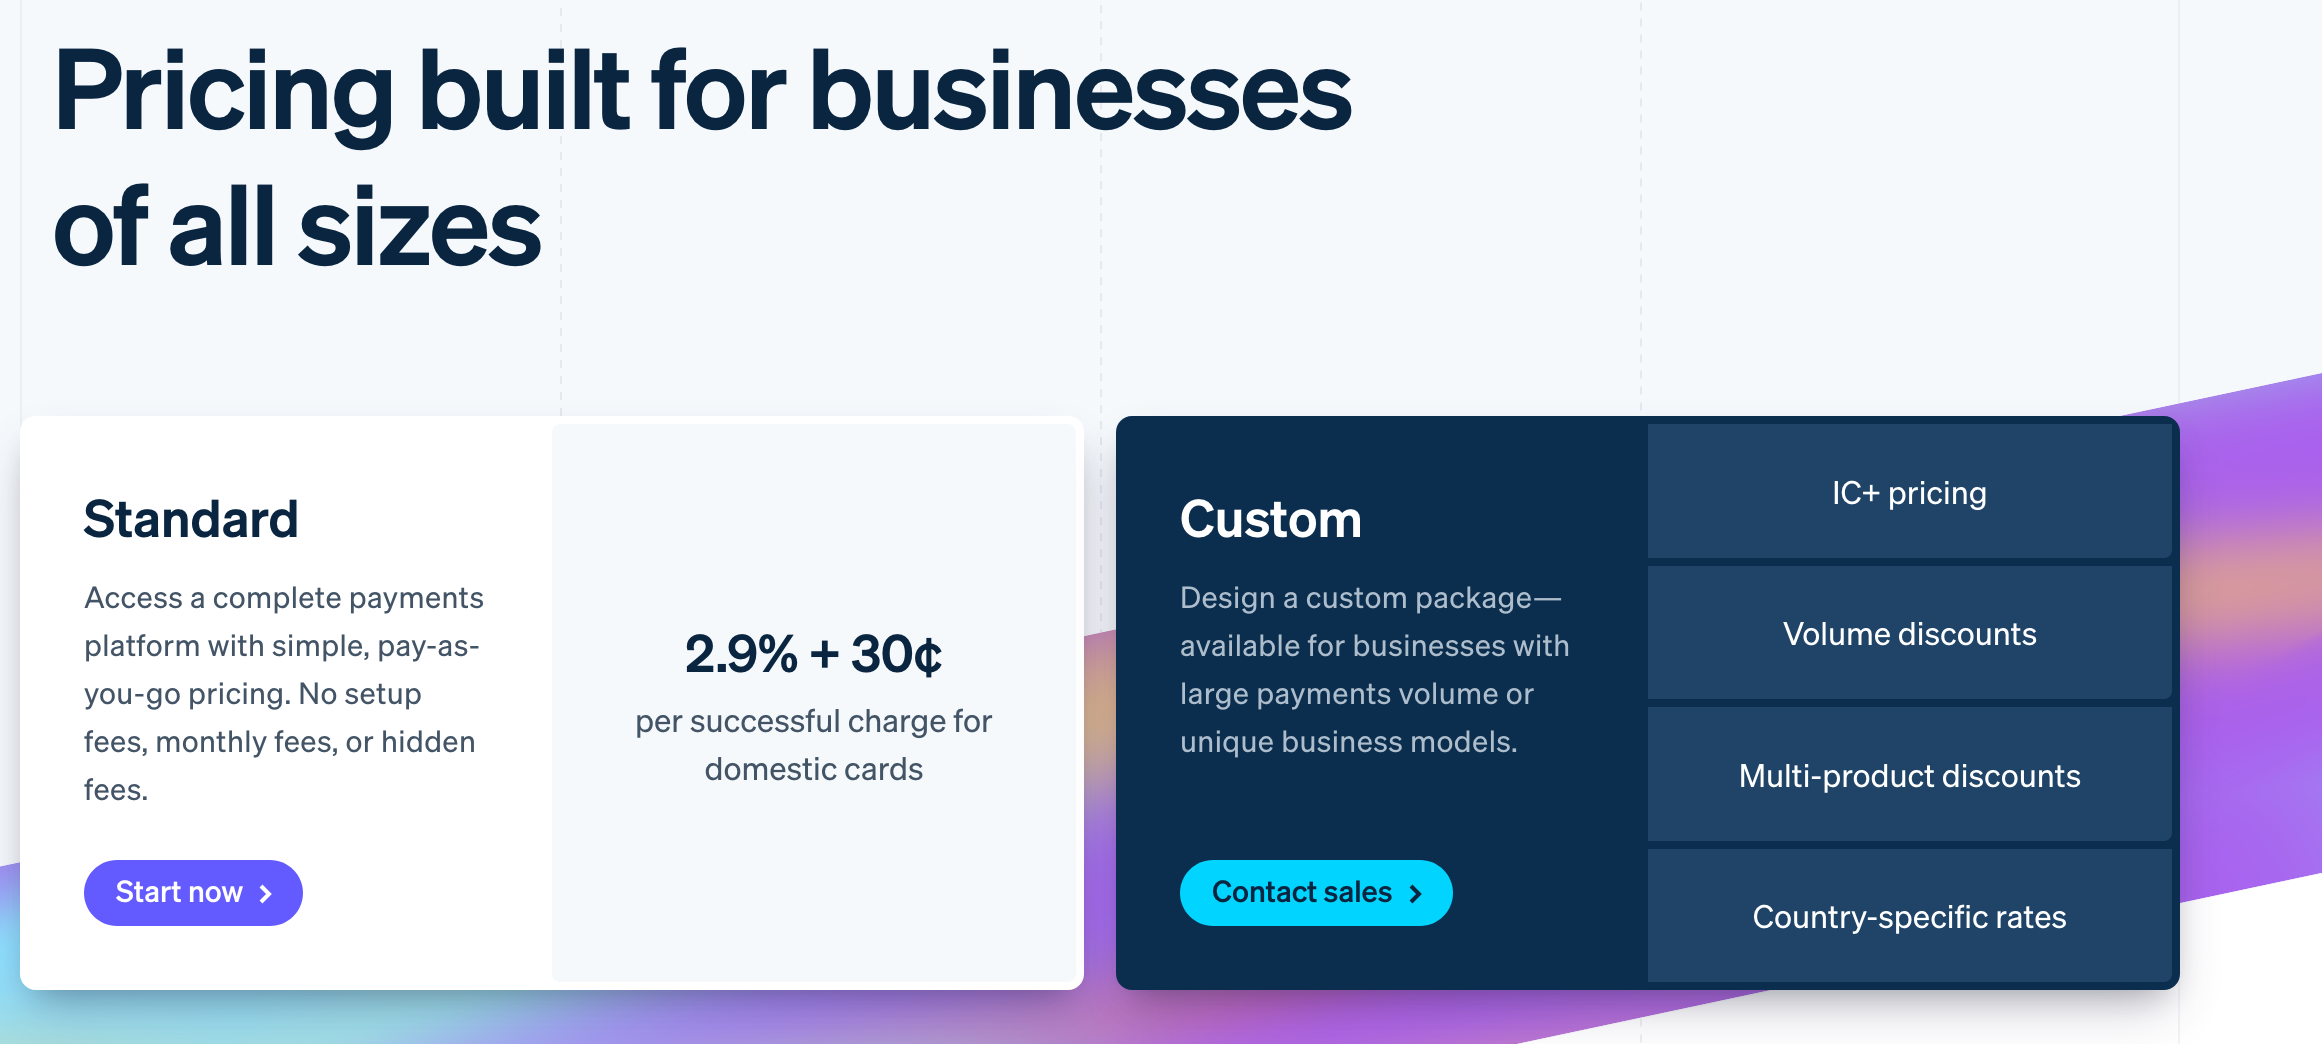
These platforms aren’t free, but they’re reasonably priced. For example, Stripe will charge you 2.9% + 30 cents per transaction for domestic cards (the same amount as WooPayments).
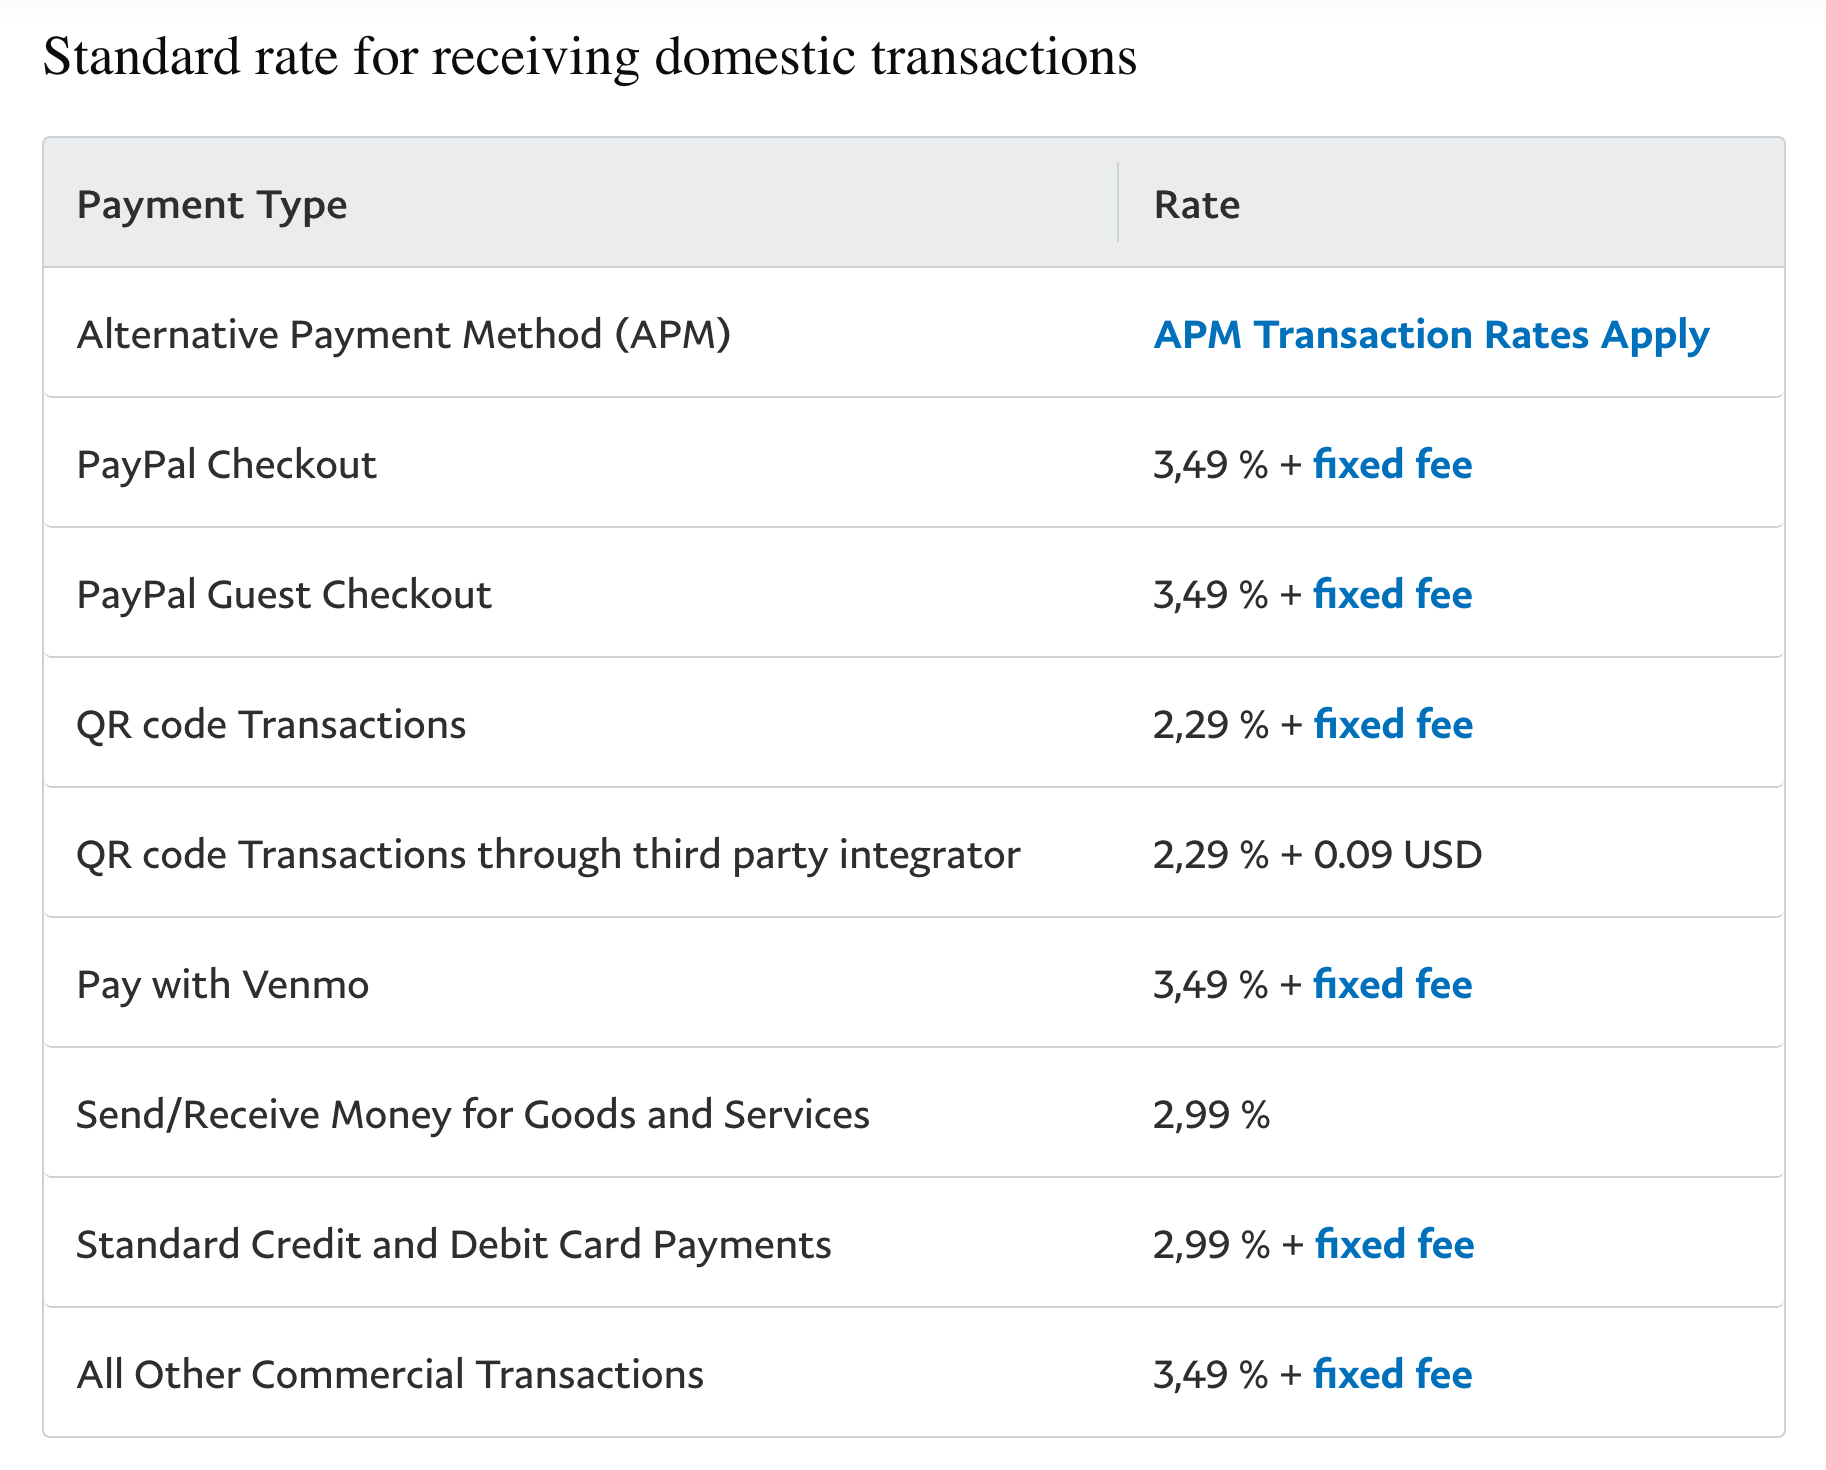
This is lower than Paypal’s fees (2.99% + 49 cents per transaction), though sliding-scale pricing is available according to monthly sales volume. Take a look:
Payment gateways
The other solution to accept credit cards is to set up a payment gateway in conjunction with your bank.
The advantage of using a gateway is that the cost per transaction is lower.
With the banking solutions you can negotiate the commissions directly with your bank advisor.
Depending on your average cart and your revenue, the savings can be substantial compared to the previous solutions. On the other hand, you have to take into account that a subscription of a few dollars has to be paid, so you need a certain volume of sales for it to be relevant.
Beyond the cost, a gateway will allow you to receive your sales directly into your company’s bank account.
Once you have all the necessary payment methods, you can organize, activate, and deactivate them in WooCommerce > Settings > Payments.
In terms of online payments, the European Payment Services Directive 2 (PSD2) applies to all online purchases over 30 euros. To combat fraud and protect e-merchants, it introduces a strong authentication system, requiring customers wishing to pay for a purchase to provide two means of identification (e.g. a password and a fingerprint), as Stripe explains. As an e-merchant, you simply need to ensure that the payment method you use complies with PSD2 (all the payment providers we’ve mentioned so far are). And get ready for a new Payment Services Directive (PSD3) to come into force, probably in the first half of 2026. In particular, PSD3 will introduce new tools to combat and limit fraud, while improving open banking services.
Shipping management
When you order from huge sites like Amazon, you know that your items will be delivered. On the other hand, with a young shop, you will have to be convincing and keep your promises.
With WooCommerce, you have the possibility to set several options for order shipping in WooCommerce > Settings > Shipping.
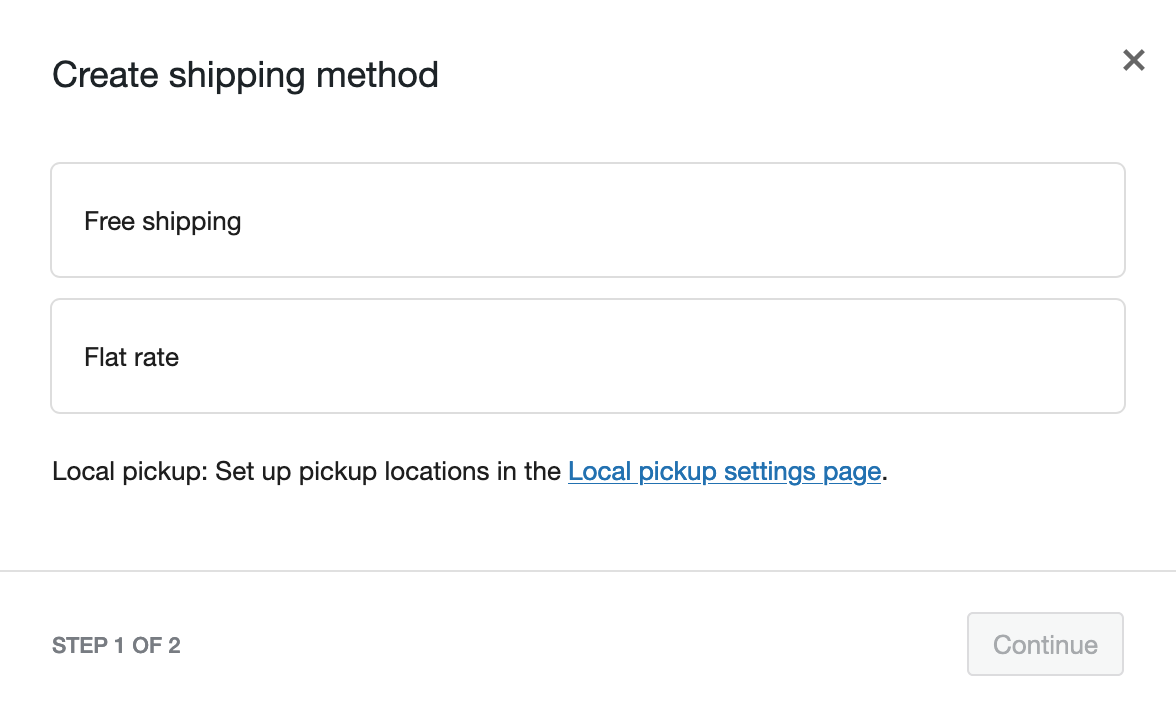
You will first need to add a shipping zone (e.g. US domestic zone). Then, by default, WooCommerce will offer you several shipping methods depending on the zone name (e.g. flat rate, free shipping, local pickup).
For the United States, this means:
- Flat rate: You charge a flat rate for delivery.
- Free delivery: If you’re generous!
- Local pick-up: If the order can be picked up in your store.
If you’d like to add other delivery methods such as UPS, Colissimo, Chronopost, DHL, etc., you can take a look at the Boxtal plugin. Once installed, you’ll be able to offer up to 14 carriers to your customers.
Marketing on WooCommerce
WooCommerce also offers a general menu dedicated to marketing. Inside, you’ll find two submenus.
The first, called “Overview,” suggests you install three of the extensions already offered when you activate the WooCommerce plugin:
- Google for WooCommerce
- Pinterest for WooCommerce
- TikTok for WooCommerce
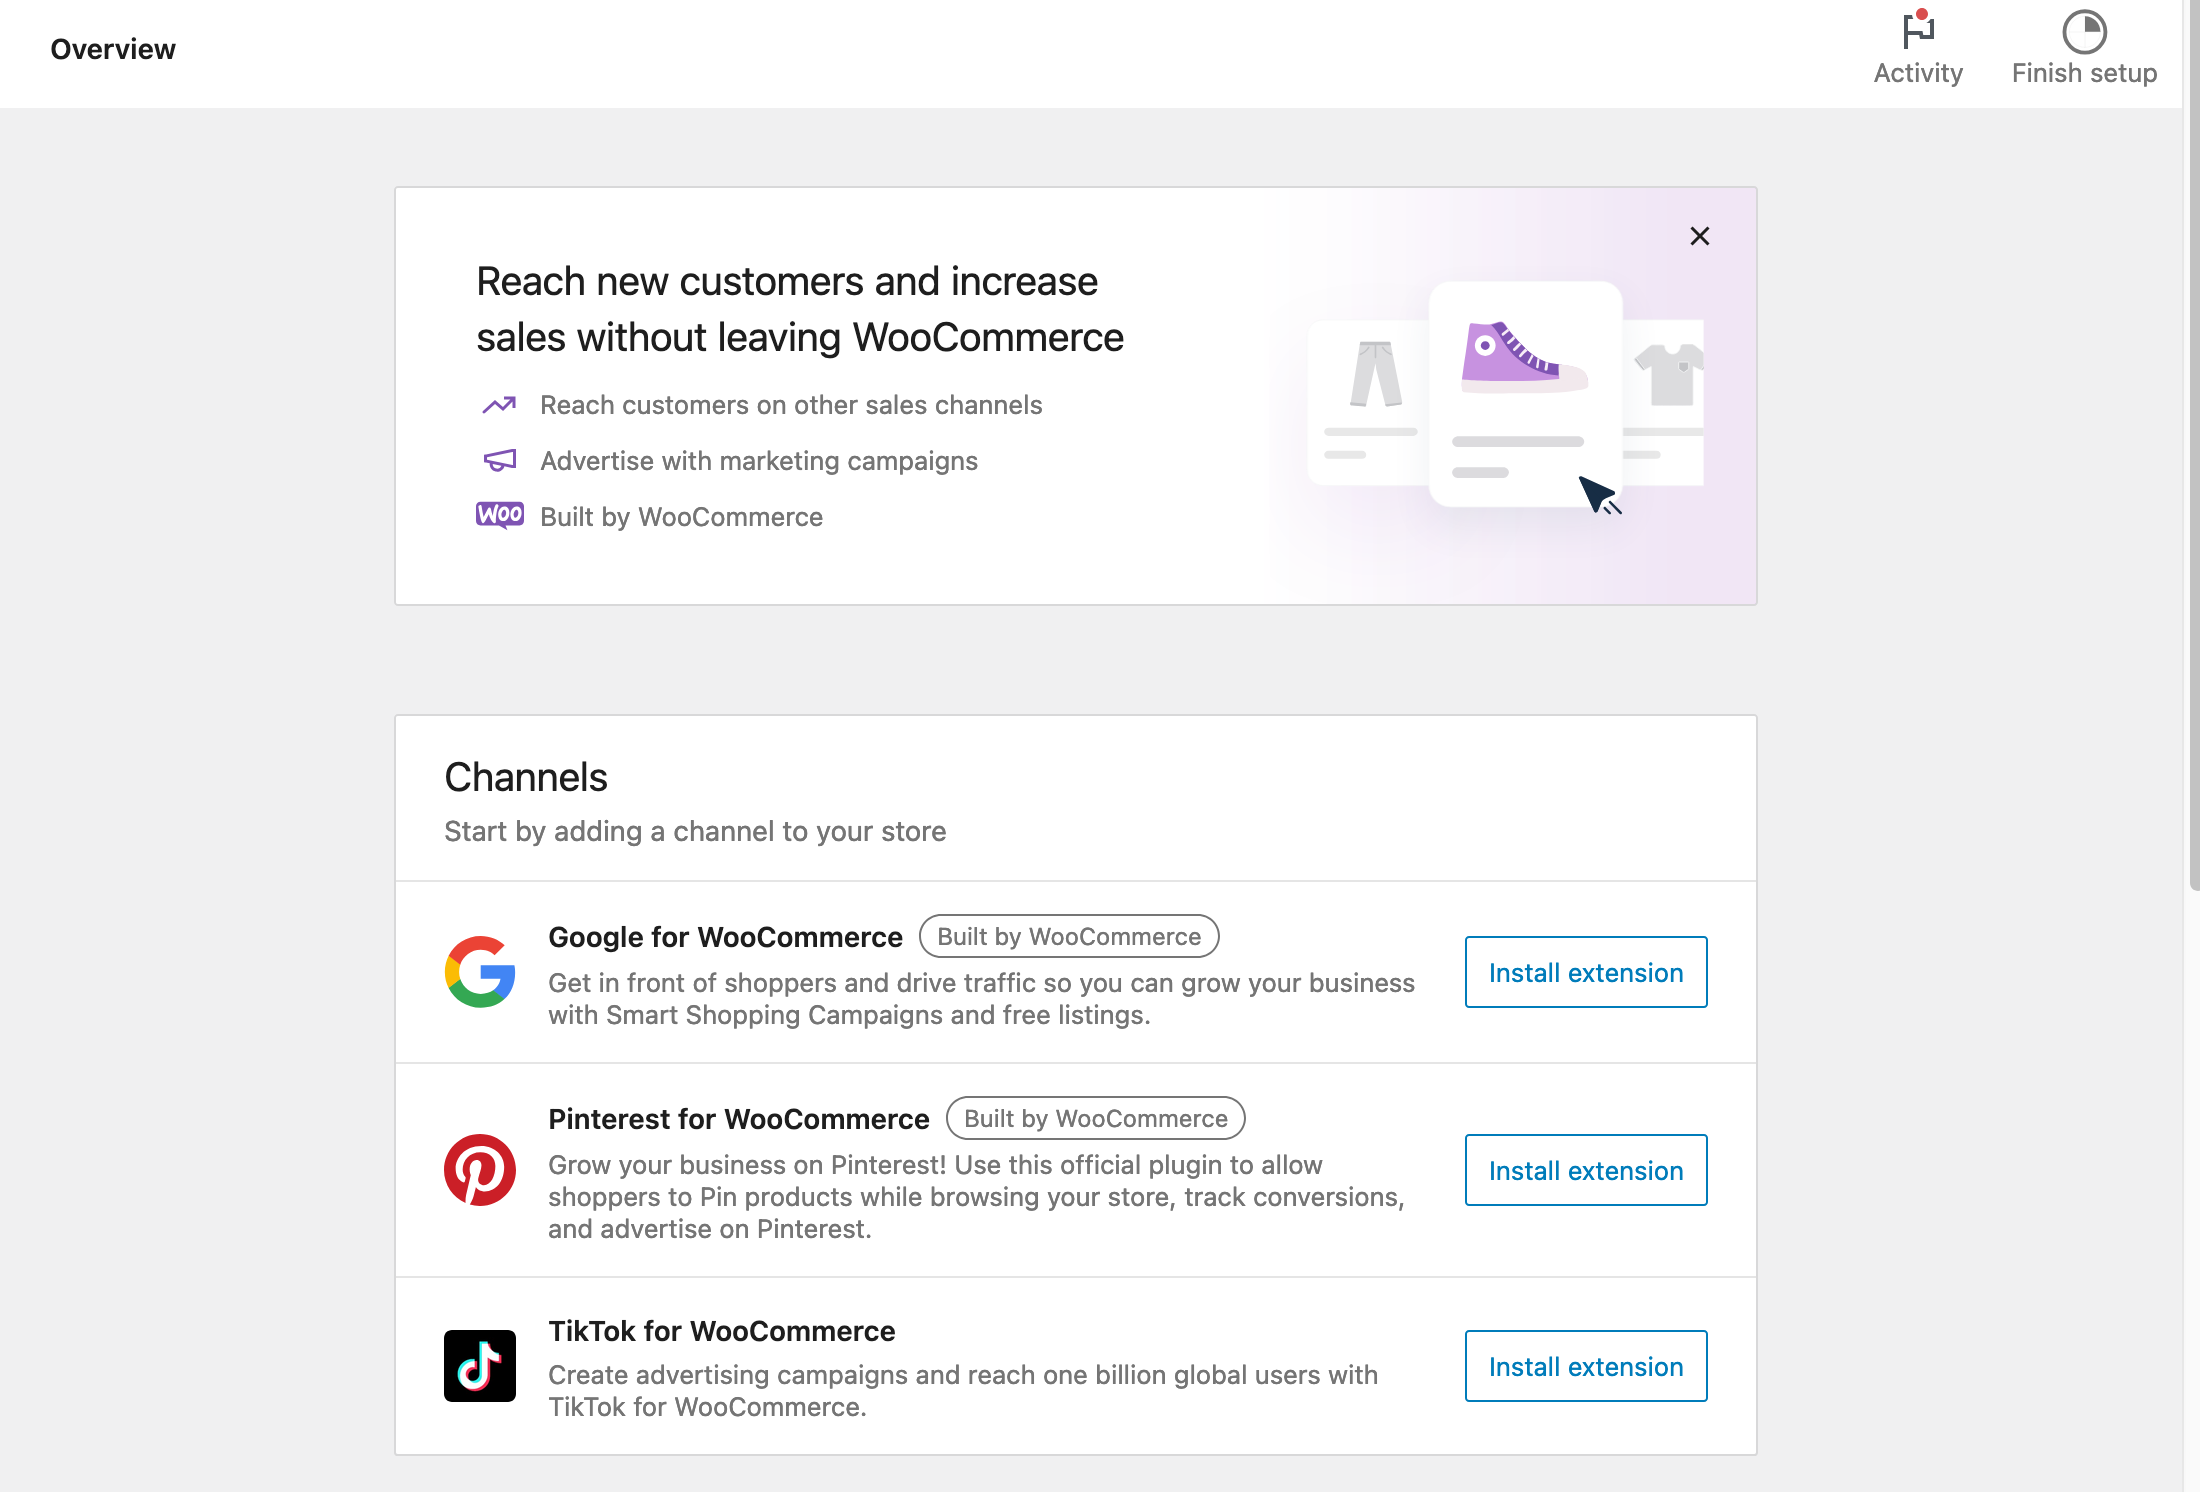
In addition, there’s an insert with links to marketing-related articles on the WooCommerce blog.
The second sub-menu, called “Promo codes,” lets you create and manage promo codes, so you can offer discounts to your customers.
Access to your statistics
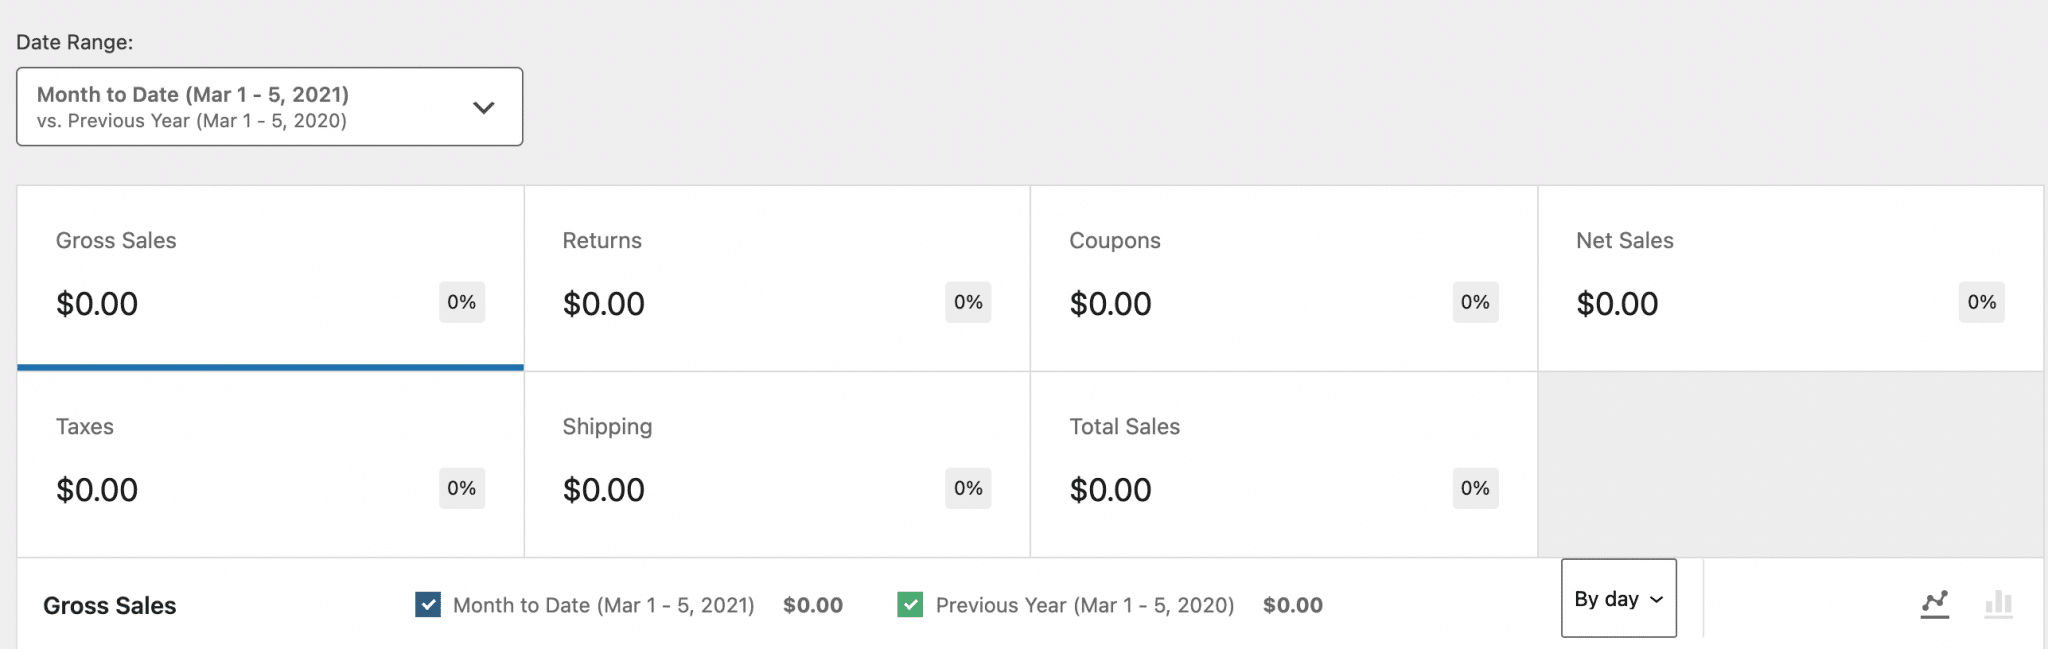
Finally, to finish our complete tour of WooCommerce options, I suggest you stop by the “Statistics menu.”
As its name suggests, it will provide you with precise and advanced statistics on your product sales, orders, downloads, coupon codes, etc.
All things considered, it is similar in form to what a tool like Google Analytics can offer.
You have access to precise stats, with the possibility to filter according to the period of your choice, to segment, and even to download these data in CSV format.
Well, I think that with all this you have good leads to build your store, right?
Are you a little bit lost when you first start using WooCommerce? You can check the resources provided by the plugin:
- WooCommerce Getting Started Guide
- WooCommerce Store Owner guide
- Official documentation of the plugin
- Official WooCommerce blog
- Official Facebook group
- Slack group
Otherwise, you know what? WooCommerce wouldn’t be WooCommerce without its complementary extensions. Let’s find out what they are in the next part.
Which supplementary WooCommerce plugins should you install to go further?
Like WordPress, WooCommerce has an ecosystem. It is possible to create plugins and themes especially for it.
You can therefore enrich your shop functionalities with supplementary extensions (also called addons) to go beyond what is offered by default.
Indeed, the WooCommerce plugin does not allow you to do everything.
Whether you are looking to increase your store traffic, increase sales, reduce your cart abandonment, or diversify your payment methods, you will have to turn to an addon.
Where can I find WooCommerce plugins?
To find the right one, there are first of all the official WooCommerce extensions. There are around 900, both free and paid.
They are classified into different categories such as payments, marketing, shipping, or subscriptions.

Then, you can also find the extension of your dreams on specialized premium platforms like Code Canyon, or on independent sites.
Finally, you can find free plugins related to WooCommerce on the official WordPress directory, by typing the keyword “WooCommerce” in the search bar.
To make your life easier, here are a few that could give you a good hand… and help you create a wide variety of e-commerce sites:
- WooCommerce Bookings (premium): To allow your customers to make online reservations easily.
- WooCommerce PDF Invoices & Packing Slips (freemium): To automatically add a PDF invoice to the order confirmation email your visitors receive after their purchase.
- EU VAT Number (premium): To directly deduct the VAT amount if you sell to professionals based in the European Union. If you sell digital products (ebooks, themes, plugins, training, etc.) to individuals based in the EU, be aware that THEIR VAT rate must be applied to their order. For this, use Simba Hosting (WPMarmite uses it).
- Flexible Shipping (freemium): To calculate shipping costs based on the weight of the order and/or the total cart.
To go even further on the subject of plugins, I have the resource you need. In this WPMarmite blog post, we’ve selected for you the 60 best WooCommerce plugins (free and paid), categorized into search, payment, customization, order, shipping, billing, and more.
Which WordPress theme should you choose for your WooCommerce website?
Should you opt for Storefront, the theme designed by the developers of the WooCommerce core?
By default, WooCommerce is compatible with almost any WordPress theme.
Only disadvantage? The appearance may not always be optimized. By this I mean that visitors may have difficulty browsing your site.
To overcome this, the solution is to use a theme optimized for WooCommerce.
The first one I think about is Storefront, the flagship theme of WooCommerce, made by Automattic.
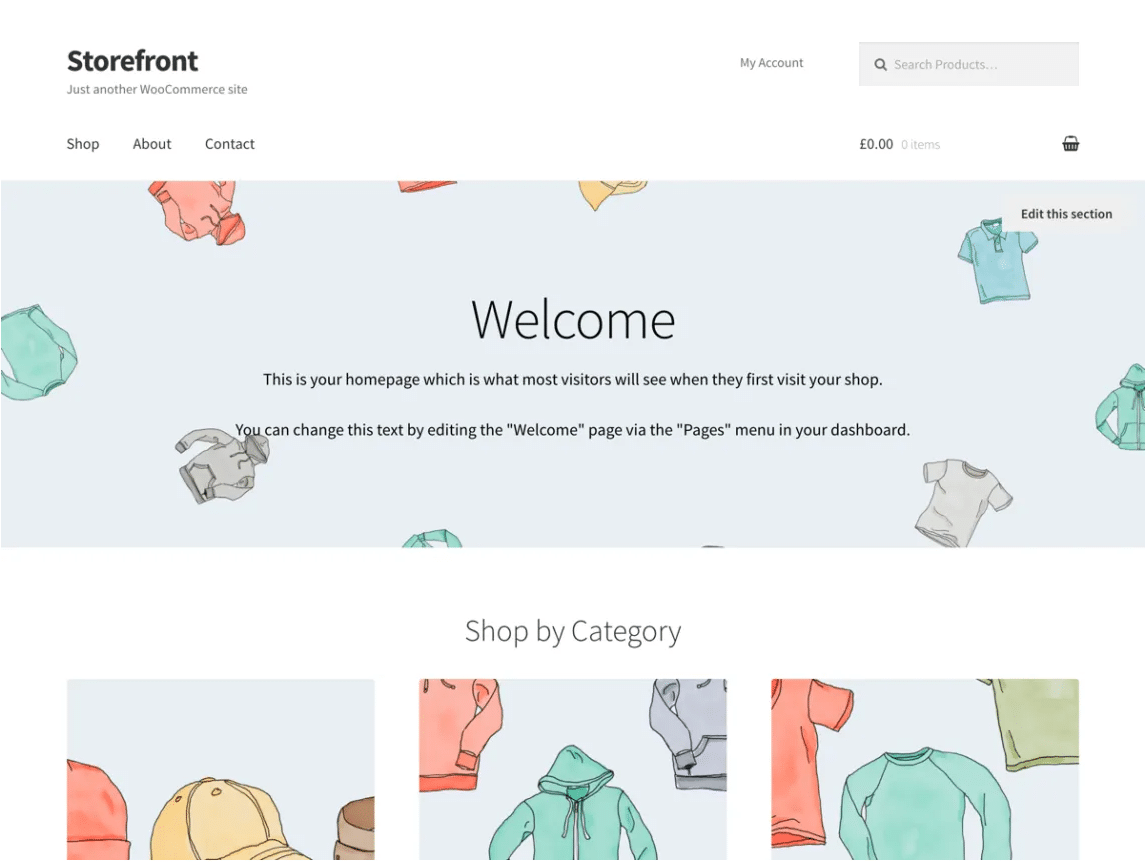
Storefront is free of charge. WooCommerce also offers dozen of child themes for Storefront, in different fields (Fashion, Sport, Beauty, etc.).
Even though it is a must-have WordPress e-commerce theme to quickly design a custom online store, Storefront also has some limitations:
- Its default design remains basic.
- A lot of features to customize it are not free, while other themes offer the same kind of options for free.
And above all, Storefront isn’t really up to speed with the latest technical developments in WordPress.
Case in point? Storefront is not a block-based theme. So it can’t be customized directly from the Site Editor.
In fact, WooCommerce no longer activates it directly by default when you install the e-commerce plugin. For some time now, it has preferred the latest native theme based on blocks, namely Twenty Twenty-Four when we wrote this article.
But don’t throw Storefront in the garbage can either! Depending on your needs, it may be just what you’re looking for, especially if you’re unfamiliar with the WordPress Site Editor (which can be a real pain for beginners).
Which alternative themes should you choose for your WooCommerce store?
Personally, I recommend you to turn to freemium themes that are more manageable and just as efficient, like Astra, GeneratePress, Neve, or Blocksy.
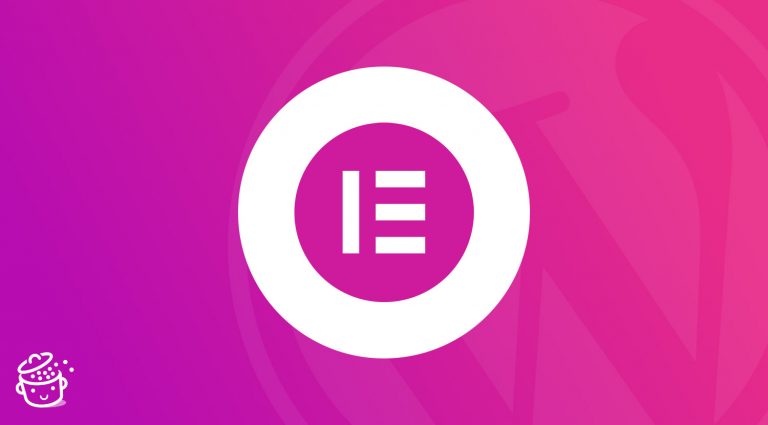
They integrate very well with WooCommerce and pair perfectly with a page builder like Elementor, Divi Builder, or Beaver Builder.
These page builders sometimes even offer their own WooCommerce Builder to customize native WooCommerce pages and add ready-to-use modules without coding. This is the case with Elementor Pro and Divi Builder, for example.
You can also look at specialized theme stores like CSSIgniter or WPZoom.
If you have a good grounding in templating and web design, opt for a WooCommerce-compatible block-based theme. While these aren’t widely available, you’ll find a few here, like the excellent Neve FSE.
Finally, of course, you can find premium themes on the specialized platform Themeforest (it lists more than 1500). But beware: these are often overly complicated and difficult for beginners to get to grips with.
How much does WooCommerce cost?
A free plugin, but…
The WooCommerce plugin is free. However, in order to have a functional store, you’ll need to invest a minimum in some areas.
First of all, using a premium theme — rather than a free one — is useful for several reasons:
- You will have more options.
- You will benefit from the developers’ assistance (support).
- Its update will normally be frequent, which is important in terms of security.
A paid theme is sold for around $60/year on average.
Then, as you develop your store, you will notice that it is difficult to do without certain indispensable paid extensions. Which ones? It all depends on your needs, in fact.
For example? If you want to sell products by subscription, WooCommerce Subscriptions will be a great help ($199/year).
Also keep in mind that you will pay fees on online payments made by your customers.
Moreover, managing a store also includes SEO, security, web marketing, maintenance, etc. Here again, you will probably have to spend some extra money to equip yourself.
Other costs you can expect
Finally, don’t forget that you’ll also have to cover:
- The cost of hosting your WordPress site. Expect to pay between $30/year and $100/year for shared or dedicated WordPress hosting. The price range varies according to the host you choose, and especially the options it offers.
- The cost of renewing your domain name (often free for the first year). Expect to pay around $10 a year for this expense.
- The cost of maintaining your website, if you delegate it to a freelancer or agency. On average, you should expect to pay between $40/month and $100/month for this kind of service.
What do customers say about WooCommerce?
What do WooCommerce users think? After all, you’re probably asking yourself this question if you’re planning to rely on this plugin to create your next WordPress online store.
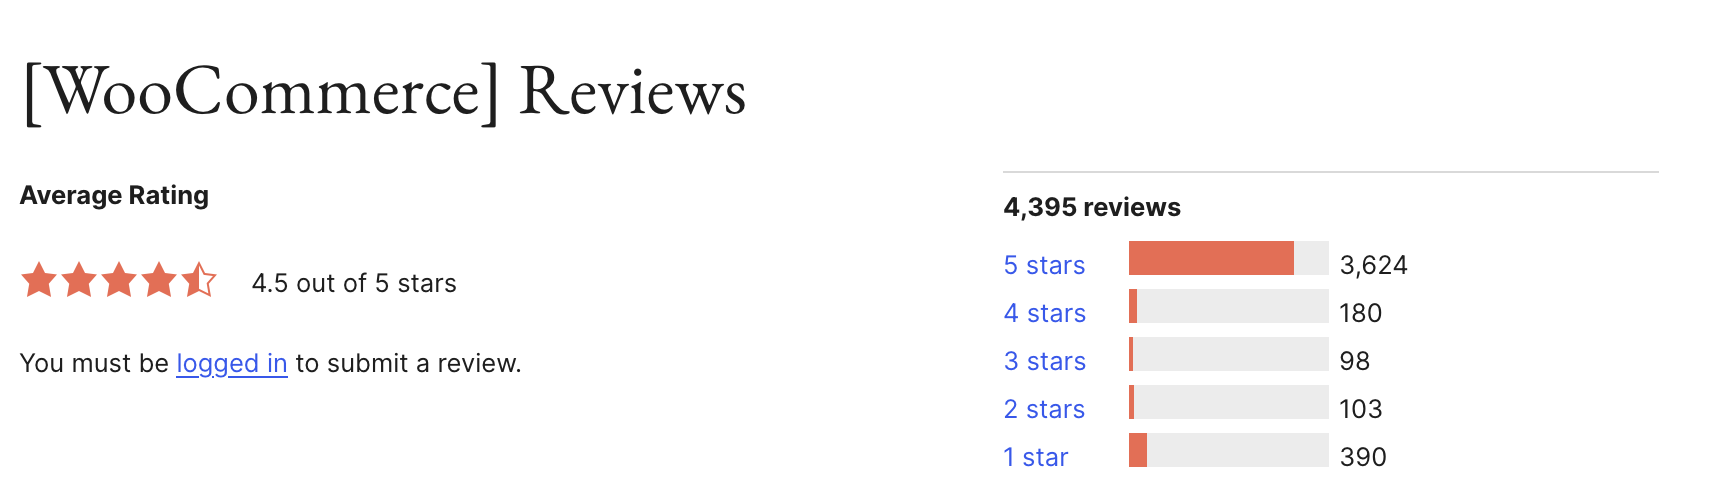
To take the pulse and temperature of what’s out there, head over to the official WordPress plugin directory, where WooCommerce has earned a very respectable rating of 4.5 stars out of 5 from a representative sample of nearly 4,500 reviews.
The same applies to Capterra, a platform that helps you find the right software for your needs. Here again, WooCommerce received a rating of 4.5/5 out of nearly 1,000 reviews submitted.
Despite these positive reviews, WooCommerce is not without its critics. Some critics, for example, accuse it of being a catch-all, with multiple technical settings all over the place, and an interface whose UX leaves much to be desired compared to other competing solutions.
So, if you want to look elsewhere, which solution can you turn to?
What are the alternatives to WooCommerce?
E-commerce plugins on WordPress
Though this article is dedicated to WooCommerce, you should know that it’s not the only plugin for e-commerce on WordPress.
Among the possible alternatives, I could mention:
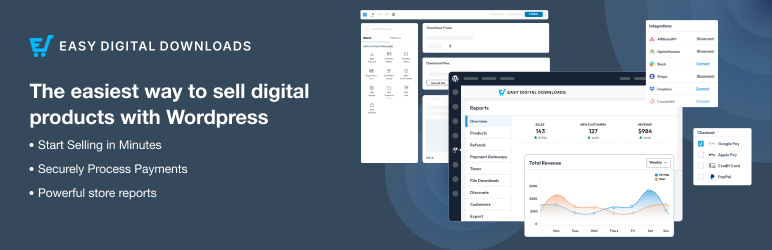
- Easy Digital Downloads(for selling digital products)
- BigCommerce for WordPress
- WP Easy Cart
- Ecwid by Lightspeed Ecommerce Shopping Cart
SaaS solutions
Finally, it’s perfectly possible to create an e-commerce site without using WordPress.
If you wish to leave this ecosystem, you can turn to non-proprietary SaaS solutions such as:
- Shopify. Check out our WooCommerce vs Shopify comparison to get a better idea of the specifics of this e-commerce platform.
- Wix Boutique (Wix Stores), an application for creating an online store with Wix.
Our final opinion on WooCommerce
Here you are at the end of this article dedicated to WooCommerce.
Throughout these lines, we have reviewed the following:
- Presentation of WooCommerce.
- How to create and set up a WooCommerce store.
- The essential pages for your online store.
- WooCommerce extensions and themes.
- WooCommerce pricing.
- The alternatives to this plugin.
What to keep in mind from all this? In my opinion, WooCommerce is an excellent plugin. Thanks to its flexibility, it will allow you to create any type of store (big or small) and will let you control all aspects of your site.
Thanks to its wide range of extensions, you will be able to customize it as you wish, without getting your hands dirty.
However, it is worth noting that it requires a learning curve to be properly mastered. Allow a few hours to familiarize yourself with all these menus and understand how they work.
FAQ about WooCommerce
What is WooCommerce on WordPress?
WooCommerce is a free plugin that transforms your WordPress site into an online store. It requires WordPress to function. It allows you to sell physical or digital products, accept payments, manage your inventory, and optimize sales with various built-in features and third-party plugins (free or paid).
What is WooCommerce’s main functionality?
WooCommerce’s main functionality is to create and manage an online store on WordPress, so you can sell physical or digital products, with flexible payment and delivery options.
What’s the difference between WordPress and WooCommerce?
WordPress is an open-source content management system (CMS) for creating websites and blogs. WooCommerce is a WordPress plugin that transforms a showcase site into an online store, allowing you to sell products and/or services.
Does WooCommerce cost anything?
The WooCommerce plugin itself is free. However, there are additional costs involved in creating and managing your online store, starting with a domain name and hosting. In addition, you may need to pay for some themes, plugins, or additional services (payment, delivery, marketing, etc.), depending on your specific needs.
How do I get WooCommerce for free?
To get WooCommerce for free, install WordPress, then go to the “Plugins” menu on your dashboard. Type “WooCommerce” in the search bar, then click on “Install” and “Activate.” The plugin is free, but some additional features may be subject to a charge.

Receive the next posts for free and access exclusive resources. More than 20,000 people have done it, why not you?
Register

The more I browse your site, the more impressed I am with your content! Once again, an article that is really going to help me grow and learn as an online businesswoman. Thanks!😊 – Jessica